
Creating a RabbitMQ Virtual Host
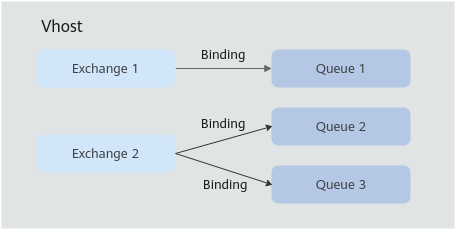
Each virtual host serves as an independent RabbitMQ server. Virtual hosts provide logical separation of exchanges, queues, and bindings. Different applications run on different virtual hosts without interfering with each other. An instance can have multiple virtual hosts, and a virtual host can have multiple exchanges and queues. To connect a producer or consumer to a RabbitMQ instance, you must specify a virtual host. For details, see Virtual Hosts on the official RabbitMQ website.
Methods of creating a virtual host:
Notes and Constraints
- After an instance is created, a virtual host named / is automatically created.
- When a virtual host name of a RabbitMQ 3.x.x instance starts with a special character, such as a period (.), the monitoring data may not be displayed. When a virtual host name contains special characters such as percent (%), vertical bar (|), or slash (/), this name is not consistently displayed on the monitoring page. The special characters are displayed as underscores (_) instead. For example, virtual host Vhost.1%1|2_3/ is displayed as Vhost.1_1_2_3_ in monitoring.
Creating a RabbitMQ Host (Console)
- Log in to the console.
- Click
 in the upper left corner to select the region where your instance is located.
 - Click
 in the upper left corner and choose Application > Distributed Message Service for RabbitMQ to open the RabbitMQ instance list.
 - Click an instance name to go to the instance details page.
- In the navigation pane, choose Instance > Virtual Hosts.
- Click Create Virtual Host.
- Enter a virtual host name and click OK.
2 to 128 characters. Use only letters, digits, and special characters .%|-_/
Once a virtual host is created, its name is fixed and it is displayed in the virtual host list.
Tracing indicates whether message tracing is enabled. If it is enabled, you can trace the message forwarding path.
Creating a RabbitMQ Virtual Host (Management UI)
- Log in to the RabbitMQ management UI.
- On the top navigation bar, choose Admin.
- In the navigation tree on the right, choose Virtual Hosts.
Figure 2 Virtual hosts

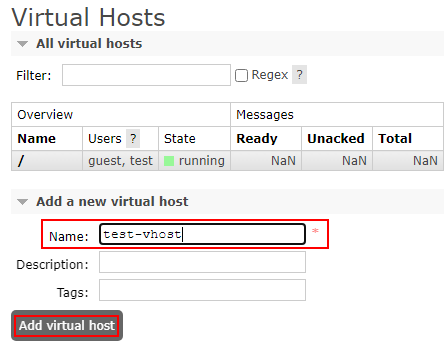
- In the Add a new virtual host area, enter the virtual host name and click Add virtual host.
Figure 3 Creating a virtual host (management UI)
After the creation is successful, the new virtual host is displayed in the All virtual hosts area.
Figure 4 Virtual host list (management UI)
Feedback
Was this page helpful?
Provide feedbackThank you very much for your feedback. We will continue working to improve the documentation.See the reply and handling status in My Cloud VOC.
For any further questions, feel free to contact us through the chatbot.
Chatbot


