Using JDBC to Connect to a Cluster
In DWS, you can use a JDBC driver to connect to a database on Linux or Windows. The driver can connect to the database through an ECS on the Huawei Cloud platform or over the Internet.
When using the JDBC driver to connect to the DWS cluster, determine whether to enable SSL authentication. SSL authentication is used to encrypt communication data between the client and the server. It safeguards sensitive data transmitted over the Internet. You can download a self-signed certificate file on the DWS console. To make the certificate take effect, you must configure the client program using the OpenSSL tool and the Java keytool.

The SSL mode delivers higher security than the common mode. You are advised to enable SSL connection when using JDBC to connect to a DWS cluster.
For details about how to use the JDBC API, see the official documentation.
Prerequisites
- You have installed JDK 1.6 or later and configured environment variables.
- You have downloaded the JDBC driver. For details, see Downloading the JDBC or ODBC Driver.
DWS also supports open source JDBC driver: PostgreSQL JDBC 9.3-1103 or later.
- You have downloaded the SSL certificate file. For details, see Downloading an SSL Certificate.
Using a JDBC Driver to Connect to a Database
The procedure for connecting to the database using a JDBC driver in a Linux environment is similar to that in a Windows environment. The following describes the connection procedure in a Windows environment.
- Determine whether you want to use the SSL mode to connect to the DWS cluster.
- If yes, enable SSL connection (enabled by default) by referring to Configuring SSL Connection and go to 2.
- If no, disable SSL connection by referring to Configuring SSL Connection and go to 4.
- (Optional) On Linux, use WinSCP to upload the downloaded SSL certificate file to the Linux environment.
- Configure the certificate to enable SSL connection.
- Download the OpenSSL tool for Windows at https://slproweb.com/products/Win32OpenSSL.html. The latest stable version is 3.4. All earlier versions (including 1.1.1, 1.1.0, 1.0.2, 1.0.0, and 0.9.8) are not supported and should not be used. Download Win64 OpenSSL v3.4.0 Light.
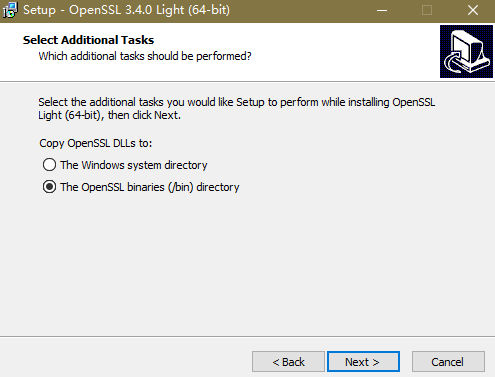
- Double-click the installation package Win64OpenSSL_Light-3.4.0.exe and install it to the default path on drive C. Copy the DLLs to the OpenSSL directory, as shown in the following figure. Retain the default settings in the remaining steps until the installation is complete.
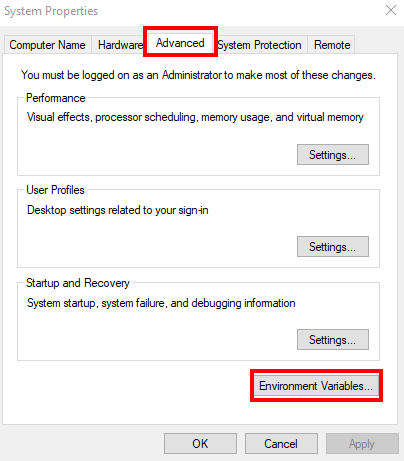
- Install an environment variable. Click Start in the lower left corner of the local PC, right-click This PC, choose More > Properties > View advanced system settings. Switch to the Advanced tab and click Environment Variables.
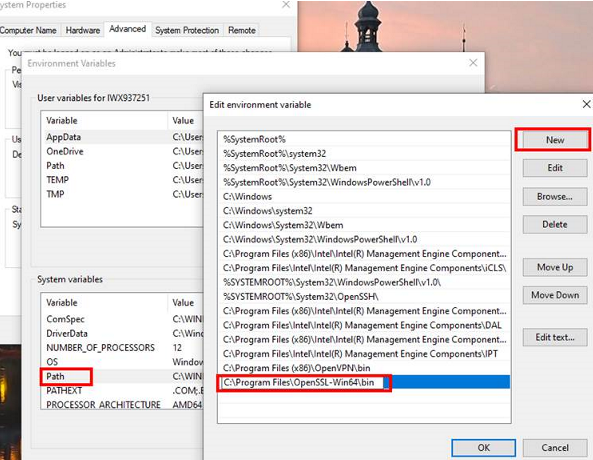
- In the System variables area, double-click Path and click New in the window displayed. Add the OpenSSL bin path to the last line, for example, C:\Program Files\OpenSSL-Win64\bin, and click OK. Click OK again and the variable is configured successfully.
- Decompress the package to obtain the certificate file. Decompression path C:\ is used as an example.
You are advised to store the certificate file in a path of the English version and can specify the actual path when configuring the certificate. If the path is incorrect, a message stating that the file does not exist will be prompted.
- Open Command Prompt and switch to the C:\dws_ssl_cert\sslcert path. Run the following commands to import the root license to the truststore:
openssl x509 -in cacert.pem -out cacert.crt.der -outform der
keytool -keystore mytruststore -alias cacert -import -file cacert.crt.der
- cacert.pem indicates the root certificate obtained after decompression.
- cacert.crt.der indicates the generated intermediate file. You can store the file to another path and change the file name to your desired one.
- mytruststore indicates the generated truststore name and cacert indicates the alias name. Both parameters can be modified.
Enter the truststore password as prompted and answer y.
- Convert the format of the client private key.
openssl pkcs12 -export -out client.pkcs12 -in client.crt -inkey client.key
Enter the client private key password Gauss@MppDB. Then enter and confirm the self-defined private key password.
- Import the private key to the keystore.
keytool -importkeystore -deststorepass Gauss@MppDB -destkeystore client.jks -srckeystore client.pkcs12 -srcstorepass Password -srcstoretype PKCS12 -alias 1

- In the preceding command, Password is an example. Replace it with the actual password.
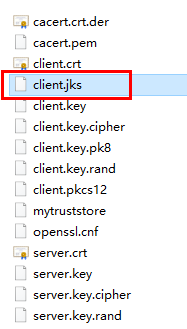
- If information similar to the following is displayed and no error is reported, the import is successful. The target key file client.jks will be generated in C:\dws_ssl_cert\sslcert.

- Download the driver package dws_8.1.x_jdbc_driver.zip and decompress it. There will be two JDBC drive JAR packages, gsjdbc4.jar and gsjdbc200.jar. Use either of them as required.
- Add the JAR file to the application project so that applications can reference the JAR file.
Take the Eclipse project as an example. Store the JAR file to the project directory, for example, the lib directory in the project directory. In the Eclipse project, right-click the JAR file in the lib directory and choose Build Path to reference the JAR file.
Figure 1 Referencing a JAR file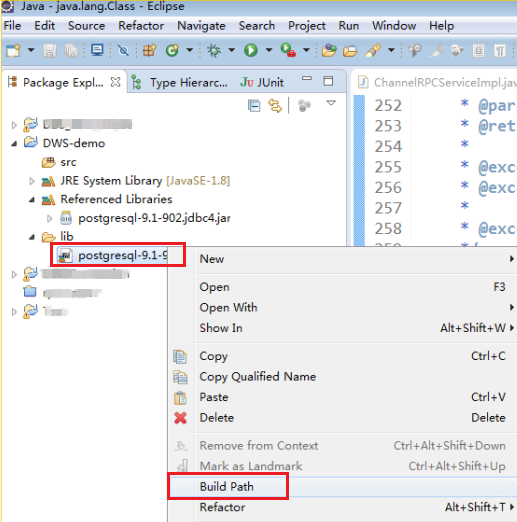
- Load the driver.
The following methods are available:
- Using a code: Class.forName("org.postgresql.Driver");
- Using a parameter during the JVM startup: java -Djdbc.drivers=org.postgresql.Driver jdbctest

The JDBC driver package downloaded on DWScontains gsjdbc.jar.
- gsjdbc4.jar: The gsjdbc4.jar driver package is compatible with PostgreSQL. Its class names and class structures are the same as those of the PostgreSQL driver. Applications that run in PostgreSQL can be directly migrated to the current system.
- Invoke the DriverManager.getConnection() method of JDBC to connect to the DWS database.
The JDBC API does not provide the connection retry capability. You need to implement the retry processing in the service code.
DriverManager.getConnection() methods:
- DriverManager.getConnection(String url);
- DriverManager.getConnection(String url, Properties info);
- DriverManager.getConnection(String url, String user, String password);
Table 1 Database connection parameters Parameter
Description
url
Specifies the database connection descriptor, which can be viewed on the management console. For details, see Obtaining the Connection Address of a DWS Cluster.
The URL format is as follows:
- jdbc:postgresql:database
- jdbc:postgresql://host/database
- jdbc:postgresql://host:port/database
- jdbc:postgresql://host:port[,host:port][...]/database
NOTE:- If gsjdbc200.jar is used, change jdbc:postgresql to jdbc:gaussdb.
- database indicates the name of the database to be connected.
- host indicates the name or IP address of the database server. If an ELB is bound to the cluster, set host to the IP address of the ELB.
- port indicates the port number of the database server. By default, the database running on port 8000 of the local host is connected.
- Multiple IP addresses and ports can be configured. JDBC balances load by random access and failover, and will automatically ignore unreachable IP addresses.
Separate multiple pairs of IP addresses and ports by commas (,). Example: jdbc:postgresql://10.10.0.13:8000,10.10.0.14:8000/database
- If JDBC is used to connect to a cluster, only JDBC connection parameters can be configured in a cluster address. Variables cannot be added.
info
Specifies database connection properties. Common properties include the following:
- user: indicates the database user who creates the connection task. The value is of the string data type.
- password: indicates the password of the database user. The value is of the string data type.
- ssl: indicates whether to use the SSL connection. The value is of the Boolean data type.
- loggerLevel: indicates the log amount recorded in DriverManager for LogStream or LogWriter. The value is of the string data type. Currently, OFF, DEBUG, and TRACE are supported. DEBUG indicates that only logs of DEBUG or a higher level are printed, generating little log information. TRACE indicates that logs of the DEBUG and TRACE levels are displayed, generating detailed log information. The default value is OFF, indicating that no logs will be displayed.
- prepareThreshold: It is used to determine the execution times of PreparedStatement before the information is converted into prepared statements on the server. The value is of the integer data type. The default value is 5.
- batchMode: indicates whether to connect the database in batch mode. The value is of the Boolean data type.
- fetchsize: integer type. It indicates the default fetch size for statements in the created connection.
- ApplicationName: indicates the application name. The value is of the string data type. The parameter is set to PostgreSQL JDBC Driver by default.
- allowReadOnly: indicates whether the read-only mode can be set for a connection. The value is of the Boolean data type. The default value is false. If this parameter is not set to true, the connection.setReadOnly statement will not take effect.
- blobMode: indicates the data types to which a value is assigned using the setBinaryStream method. The value is of the string data type. If this parameter is set to on, a value is assigned to the BLOB data type. If this parameter is set to off, a value is assigned to the bytea data type. The default value is on.
- currentSchema: string type. It specifies the schema used for connecting to the database.
- defaultQueryMetaData: Boolean. It specifies whether to query SQL metadata by default. The default value is false. After this function is enabled, raw data operations are supported. However, it is incompatible with the create table as and select into operations in PrepareStatement.
- connectionExtraInfo: indicates whether the driver reports the driver deployment path and process owner to the database. The value is of the Boolean data type.
NOTE:
The value can be true or false. The default value is true. If connectionExtraInfo is set to true, the JDBC driver reports the driver deployment path and process owner to the database and displays the information in the connection_info parameter. In this case, you can query the information from PG_STAT_ACTIVITY or PGXC_STAT_ACTIVITY.
- TCP_KEEPIDLE=30: The detection starts after the connection is idle for 30s. This parameter is valid only when tcpKeepAlive is set to true.
- TCP_KEEPCOUNT=9: A total of nine detections are performed. This parameter is valid only when tcpKeepAlive is set to true.
- TCP_KEEPINTERVAL=30: The detection interval is 30s. This parameter is valid only when tcpKeepAlive is set to true.
- cnListRefreshSwitch: indicates whether JDBC automatically detects the live CN list. The value is of the string data type. If this parameter is set to on, the function of automatically detecting the live CN list is enabled. If this parameter is set to off, the function is disabled. The default value is off.
- cnListRefreshDelay: specifies the start time for scanning the live CN list. This parameter is valid only when cnListRefreshSwitch is set to on. The value is of the integer data type. The default value is 1800000, in milliseconds.
- cnListRefreshPeriod: specifies the interval for scanning the live CN list. This parameter is valid only when cnListRefreshSwitch is set to on. The value is of the integer data type. The default value is 1800000, in milliseconds.
- autoReconnect: indicates whether to enable automatic reconnection of database connections. The value is of the Boolean data type. If this parameter is set to true, the automatic reconnection is enabled. If this parameter is set to false, the automatic reconnection is disabled. The default value is false.
- reConnectCount: specifies the number of automatic database reconnections. The value is of the integer data type. This parameter is valid only when autoReconnect is set to true. The default value is 10. If the number of reconnection attempts exceeds the configured value, the reconnection fails.
- sslCrl: a string type that sets the path for the revoked certificate used by JDBC. The default value is null.
user
Specifies the database user.
password
Specifies the password of the database user.
The following describes the sample code used to encrypt the connection using the SSL certificate:1 2 3 4 5 6 7 8 9 10 11 12 13 14 15 16 17 18 19 20 21 22 23 24 25 26 27 28 29 30 31 32 33 34 35
// The following code obtains the database SSL connection operation and encapsulates the operation as an API. public static Connection GetConnection(String username, String passwd) { // Define the driver class. String driver = "org.postgresql.Driver"; //Set keyStore. System.setProperty("javax.net.ssl.trustStore", "mytruststore"); System.setProperty("javax.net.ssl.keyStore", "client.jks"); System.setProperty("javax.net.ssl.trustStorePassword", "password"); System.setProperty("javax.net.ssl.keyStorePassword", "password"); Properties props = new Properties(); props.setProperty("user", username); props.setProperty("password", passwd); props.setProperty("ssl", "true"); String url = "jdbc:postgresql://" + "10.10.0.13" + ':' + "8000" + '/' + "gaussdb"; Connection conn = null; try { // Load the driver. Class.forName(driver); } catch (Exception e) { e.printStackTrace(); return null; } try { // Create a connection. conn = DriverManager.getConnection(url, props); System.out.println("Connection succeed!"); } catch (SQLException throwables) { throwables.printStackTrace(); return null; } return conn; }
- Run SQL statements.
- Run the following command to create a statement object:
1Statement stmt = con.createStatement();
- Run the following command to execute the statement object:
1int rc = stmt.executeUpdate("CREATE TABLE tab1(id INTEGER, name VARCHAR(32));");
- Run the following command to release the statement object:
1stmt.close();
- Run the following command to create a statement object:
- Call close() to close the connection.
Sample Code
This example illustrates how to develop applications based on the JDBC API provided by DWS.

Before completing the following example, you need to create a stored procedure. For details, see "Tutorial: Development Using JDBC or ODBC" in the Data Warehouse Service (DWS) Developer Guide.
1 2 3 4 5 6 7 8 9 10 11 |
create or replace procedure testproc ( psv_in1 in integer, psv_in2 in integer, psv_inout in out integer ) as begin psv_inout := psv_in1 + psv_in2 + psv_inout; end; / |
1 2 3 4 5 6 7 8 9 10 11 12 13 14 15 16 17 18 19 20 21 22 23 24 25 26 27 28 29 30 31 32 33 34 35 36 37 38 39 40 41 42 43 44 45 46 47 48 49 50 51 52 53 54 55 56 57 58 59 60 61 62 63 64 65 66 67 68 69 70 71 72 73 74 75 76 77 78 79 80 81 82 83 84 85 86 87 88 89 90 91 92 93 94 95 96 97 98 99 100 101 102 103 104 105 106 107 108 109 110 111 112 113 114 115 116 117 118 119 120 121 122 123 124 125 126 127 128 129 130 131 132 133 134 135 136 137 138 139 140 141 142 143 144 145 146 147 148 149 150 151 152 153 154 155 156 157 158 159 160 161 162 163 164 165 166 167 168 |
//DBtest.java //gsjdbc4.jar is used as an example. //Demonstrate the main steps for JDBC development, including creating databases, creating tables, and inserting data. import java.sql.Connection; import java.sql.DriverManager; import java.sql.PreparedStatement; import java.sql.SQLException; import java.sql.Statement; import java.sql.CallableStatement; import java.sql.Types; public class DBTest { //Create a database connection. Replace the following IP address and database with the actual database connection address and database name. public static Connection GetConnection(String username, String passwd) { String driver = "org.postgresql.Driver"; String sourceURL = "jdbc:postgresql://10.10.0.13:8000/database"; Connection conn = null; try { // Load the database driver. Class.forName(driver).newInstance(); } catch (Exception e) { e.printStackTrace(); return null; } try { //Create a database connection. conn = DriverManager.getConnection(sourceURL, username, passwd); System.out.println("Connection succeed!"); } catch (Exception e) { e.printStackTrace(); return null; } return conn; }; //Run the common SQL statements to create table customer_t1. public static void CreateTable(Connection conn) { Statement stmt = null; try { stmt = conn.createStatement(); //Run the common SQL statements. int rc = stmt .executeUpdate("CREATE TABLE customer_t1(c_customer_sk INTEGER, c_customer_name VARCHAR(32));"); stmt.close(); } catch (SQLException e) { if (stmt != null) { try { stmt.close(); } catch (SQLException e1) { e1.printStackTrace(); } } e.printStackTrace(); } } //Run the prepared statements and insert data in batches. public static void BatchInsertData(Connection conn) { PreparedStatement pst = null; try { //Generate the prepared statements. pst = conn.prepareStatement("INSERT INTO customer_t1 VALUES (?,?)"); for (int i = 0; i < 3; i++) { //Add parameters. pst.setInt(1, i); pst.setString(2, "data " + i); pst.addBatch(); } //Execute batch processing. pst.executeBatch(); pst.close(); } catch (SQLException e) { if (pst != null) { try { pst.close(); } catch (SQLException e1) { e1.printStackTrace(); } } e.printStackTrace(); } } //Run the precompiled statement to update the data. public static void ExecPreparedSQL(Connection conn) { PreparedStatement pstmt = null; try { pstmt = conn .prepareStatement("UPDATE customer_t1 SET c_customer_name = ? WHERE c_customer_sk = 1"); pstmt.setString(1, "new Data"); int rowcount = pstmt.executeUpdate(); pstmt.close(); } catch (SQLException e) { if (pstmt != null) { try { pstmt.close(); } catch (SQLException e1) { e1.printStackTrace(); } } e.printStackTrace(); } } //Execute the storage procedure. public static void ExecCallableSQL(Connection conn) { CallableStatement cstmt = null; try { cstmt=conn.prepareCall("{? = CALL TESTPROC(?,?,?)}"); cstmt.setInt(2, 50); cstmt.setInt(1, 20); cstmt.setInt(3, 90); cstmt.registerOutParameter(4, Types.INTEGER); //Register a parameter of the out type. Its value is an integer. cstmt.execute(); int out = cstmt.getInt(4); //Obtain the out parameter. System.out.println("The CallableStatment TESTPROC returns:"+out); cstmt.close(); } catch (SQLException e) { if (cstmt != null) { try { cstmt.close(); } catch (SQLException e1) { e1.printStackTrace(); } } e.printStackTrace(); } } /** * Main program, which gradually invokes each static method. * @param args */ public static void main(String[] args) { //Create a database connection. Replace User and Password with the actual database user name and password. Connection conn = GetConnection("User", "Password"); //Create a table. CreateTable(conn); //Insert data in batches. BatchInsertData(conn); //Run the precompiled statement to update the data. ExecPreparedSQL(conn); //Execute the storage procedure. ExecCallableSQL(conn); //Close the database connection. try { conn.close(); } catch (SQLException e) { e.printStackTrace(); } } } |
Feedback
Was this page helpful?
Provide feedbackThank you very much for your feedback. We will continue working to improve the documentation.See the reply and handling status in My Cloud VOC.
For any further questions, feel free to contact us through the chatbot.
Chatbot


