
Using a Python Script to Connect to an MRS Security Cluster and Execute Impala SQL Statements
Step 1: Install Packages on the Target Server
pip install krbcontext (version 0.10)
pip install kerberos (version 1.3.1)
pip install impala
Example command:
pip install krbcontext == 0.10

Before running the preceding command, run the following command to check the version (maybe pip3) installed on the server:
which pip
Step 2: Install the Impala Client (or the Entire MRS Client) on the Target Server and Upload the Impala User Authentication Credential
- The client software package downloaded from the FusionInsight Manager homepage contains the clients of all services (excluding Flume) in the cluster. To download the client of a single service, choose Cluster > Services > Service name, click More, and select Download Client.
- For MRS 3.3.0 or later, click Download Client on the FusionInsight Manager homepage to download the client.
- Log in to the MRS console.
- Choose Clusters > Active Clusters.
- Click the name of a cluster to go to the Dashboard page. Click Access Manager to log in to the management plane of the MRS service.
Kerberos Authentication is Enabled.
Figure 1 Access Manager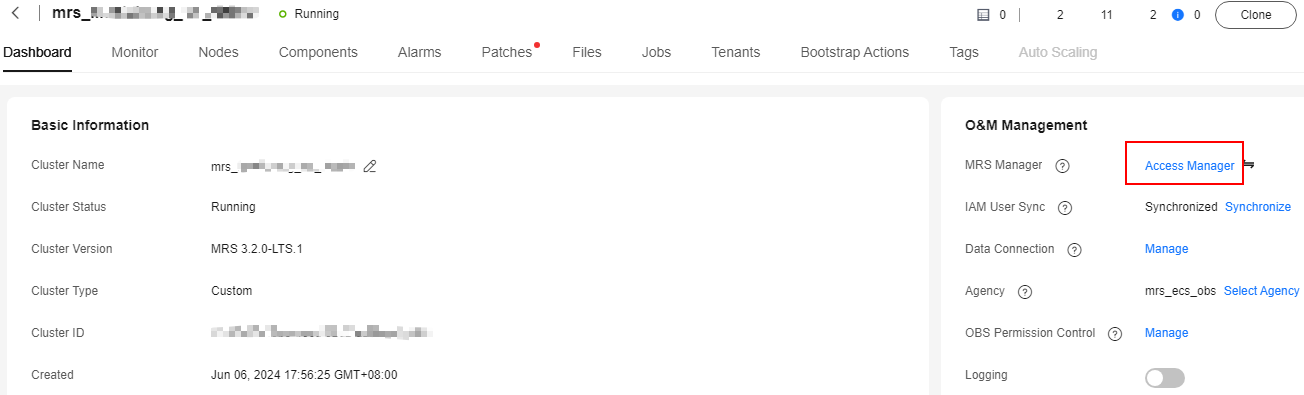
If a dialog box is displayed, select a mode for accessing the MRS Manager page. For details, see Accessing FusionInsight Manager (MRS 3.x or Later).
- Log in to FusionInsight Manager. (Obtain the username and password from the system administrator.)
- Choose Cluster. On the Dashboard page, click More in the upper right corner and select Download Client.
- In the displayed Download Cluster Client dialog box, set required parameters and click OK to download the client. Figure 2 Downloading the cluster client
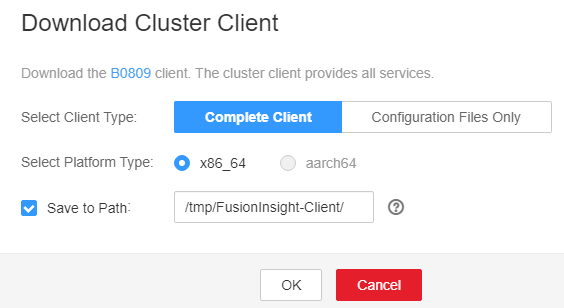
- Select the client type and platform type (consistent with the server for running tasks). If you do not change the save path, the client is automatically downloaded to the corresponding path on the active MRS node. Then, copy the client software package to the specified directory on the node where the client is to be installed. Log in to the node where the client is to be installed, decompress the client software package, and run the install command to install the client. For details, see Installing a Client (MRS 3.x or Later).
After an MRS cluster earlier than 3.x is created, the client is installed on the active Master node by default. The installation directory is /opt/client.
- On FusionInsight Manager, download the user authentication credential to a local path.
If a user develops applications in a security-mode cluster, the keytab file of the user needs to be obtained for security authentication. You can export keytab files on FusionInsight Manager. To obtain the user credential, perform the following steps:
After a user password is changed, the exported keytab file becomes invalid, and you need to export a keytab file again.
- Log in to FusionInsight Manager.
For MRS 3.x and later versions, choose System > Permission > User.
For versions earlier than MRS 3.x, choose System > Permission > Manage User.
- Locate the row that contains the user whose authentication files need to be exported, and click More and choose Download Authentication Credential. After the files are automatically generated, specify the save path and keep the files properly.
After creating a human-machine user, you need to log in to FusionInsight Manager to reset the user's password.
The authentication credential contains the krb5.conf file of the Kerberos service.
After the authentication credential files are decompressed, you can obtain the following two files:
- The krb5.conf file contains the authentication service connection information.
- The user.keytab file contains user authentication information.
For details about how to download authentication credentials, see Downloading MRS Cluster User Credentials.
- Log in to FusionInsight Manager.
- Upload the Impala user authentication credential to the Impala client installation directory on the node where you want to perform operations, for example, Client installation directory/impala/.
- Go to the Impala client path and run the following command to view the user principal:
During Kerberos authentication, you need to configure the file parameters required for configuring the Kerberos authentication, including the keytab file path, Kerberos authentication username, and the krb5.conf configuration file of the client for Kerberos authentication.
Log in to the MRS cluster client node and access the installation directory of the client.
cd {Client installation directory}
Run the following command to set environment variables:
source bigdata_env
Run the following command to authenticate the user:
kinit MRS cluster service user
Enter the password.
Run the following command to query the principal of the user:
klist -kt Client installation directory/impala/user.keytab
Figure 3 Viewing the principal
Python3 Sample Code
The version (krbcontext) of the Python2 package is different from that of the Python 3 package.
## ******************************************************************** ##
from impala.dbapi import connect
from krbcontext.context import krbcontext
#from krbcontext import krbcontext      Python2 package
#from subprocess import Popen, PIPE
#kinit = Popen(['/opt/bigdata/client/KrbClient/kerberos/bin/kinit', 'impala1@F5840AB1_7495_448E_BC63_A8D2B0E2EE69.COM'], stdin=PIPE, stdout=PIPE, stderr=PIPE)
#kinit.stdin.write('Admin@123$#\n'.encode())
#kinit.wait()
with krbcontext(using_keytab=True,principal='impala1@F5840AB1_7495_448E_BC63_A8D2B0E2EE69.COM',keytab_file='/opt/bigdata/user.keytab'):
 conn = connect(host="192.168.0.136", port=21050, auth_mechanism='GSSAPI', kerberos_service_name='impala',database='default')
 cursor = conn.cursor()
 cursor.execute("show databases;")
 data = cursor.fetchall()
 print (data)
 cursor.close()
conn.close() Feedback
Was this page helpful?
Provide feedbackThank you very much for your feedback. We will continue working to improve the documentation.See the reply and handling status in My Cloud VOC.
For any further questions, feel free to contact us through the chatbot.
Chatbot


