|
PeerConnectFailed |
BCS |
Peers fail to connect to orderers. Possible causes include:
- The network may have fluctuated.
- The orderer is abnormal.
If the network fluctuates, the alarm will be automatically cleared within a few minutes.
If the alarm persists and is not cleared after a few minutes, the peer may have been disconnected from the orderer. In this case, perform the following steps:
- Log in to the BCS console, click Instance Management in the navigation pane, and click an instance to go to the instance details page.
- On the BCS instance details page, click the Monitoring tab and then the Active tab. Record the value of name in the Resource Name column.
Figure 1 Checking name of the failed peer

- Log in to all nodes (bound with EIPs) in the CCE cluster where the instance is deployed and run the docker ps |grep name command (as shown in the following figure). The container whose name starts with k8s_peer (or k8s_orderer for an orderer) is the container for which the alarm is generated. The container ID is at the start of the section.
Figure 2 Viewing the command output

- Check whether the container is normal.
- If the container is abnormal, run the docker restart Container ID command to restart the container.
- If the fault persists, go to Log > Log Files on the AOM console. Download the log files of the peer and orderer on the cluster for which the alarm is generated, and send the log files to technical support.
|
|
PeerWriteDBFailed |
BCS |
A peer fails to access database files. Possible causes include:
- The status database file is damaged or lost.
- The storage service mounted to the status database is deleted.
To rectify this fault, perform the following steps:
- Log in to the BCS console, click Instance Management in the navigation pane, and click an instance to go to the instance details page.
- Click the value next to Cluster to go to the CCE console, and click the target cluster. On the Storage page, check whether the PVC bound to the peer exists and is normal.
- If it does not exist or is abnormal, create a PVC and bind it to the BCS instance.
- If it exists, perform the following steps.
- On the BCS instance details page, click the Monitoring tab and then the Active tab. Record the value of name in the Resource Name column.
Figure 3 Checking name of the peer that failed to access the database
- Click the alarm and record clusterID and name.
- Go to the CCE console, click Storage, and check whether the PVC bound to the peer exists.
If it does not exist, create a PVC and bind it to the peer.
- Log in to all nodes (bound with EIPs) in the CCE cluster where the instance is deployed and run the docker ps |grep name command (as shown in the following figure). The container whose name starts with k8s_peer (or k8s_orderer for an orderer) is the container for which the alarm is generated. The container ID is at the start of the section.
Figure 4 Viewing the command output

- Run the docker exec -it container id /bin/bash command to enter the container.
- Run the find / -name production command to go to the found path, as shown in the following figure.
Figure 5 Viewing the path

Check whether the CURRENT, LOG, and MANIFEST-000**** files exist in the ledgersData/stateLeveldb/ directory. If these files do not exist, run the docker restart Container ID command to restart the peer container.
- If the fault persists, go to Log > Log Files on the AOM console. Download the log files of the peer and orderer on the cluster for which the alarm is generated, and send the log files to technical support.
|
|
PeerNodeDiskAvailableNotEnough |
BCS |
The peer disk space is insufficient and needs to be expanded. Perform the following steps to expand the disk space:
- Log in to the BCS console, click Instance Management in the navigation pane, and click an instance to go to the instance details page.
- Click the Monitoring tab and then the Active tab. Record the value of uid in the Resource Name column.
Figure 6 Checking uid

- Log in to all nodes (bound with EIPs) in the CCE cluster where the BCS instance is deployed and run the docker ps command on the nodes one by one until you find the Container ID, that is, the first 12 digits of the uid obtained in the previous step. Record the value of the corresponding NAMES.
Figure 7 Viewing the command output

For example, if the value of NAMES is k8s_peer_peer-b738403d592c78f5463a8ccf24b4f7f8cc83d07a-0_default_b28328a1-8d7d-4686-8b4f-dd4333e2b400_0, the corresponding peer name is peer_peer-b738403d592c78f5463a8ccf24b4f7f8cc83d07a-0.
- On the BCS instance details page, click More on the Basic Information tab page and then click View Details next to Network Storage to obtain PVC Name.
- Log in to the CCE console, and choose Resource Management > Storage in the navigation pane.
- On the SFS Turbo tab page, select the target BCS instance's cluster, and click Expand Capacity in the row containing the recorded PVC.
|
|
OrdererNodeDiskAvailableNotEnough |
BCS |
The orderer disk space is insufficient and needs to be expanded. Perform the following steps to expand the disk space:
- Log in to the BCS console, click Instance Management in the navigation pane, and click an instance to go to the instance details page.
- Click the Monitoring tab and then the Active tab. Record the value of uid in the Resource Name column.
Figure 8 Checking uid of the orderer
- Log in to all nodes (bound with EIPs) in the CCE cluster where the BCS instance is deployed and run the docker ps command on the nodes one by one until you find the Container ID, that is, the first 12 digits of the uid obtained in the previous step. Record the value of the corresponding NAMES.
Figure 9 Checking the value of NAMES

For example, if the value of NAMES is k8s_orderer_orderer-759ca9423d9805ed7b9b4aa274e54a2481aaaaa5-0_default_2827a84a-dfbd-49b0-a96e-9a73b0c65a32_0, the corresponding orderer name is orderer_orderer-759ca9423d9805ed7b9b4aa274e54a2481aaaaa5-0.
- On the BCS instance details page, click More on the Basic Information tab page and then click View Details next to Network Storage to obtain PVC Name.
- Log in to the CCE console, and choose Resource Management > Storage in the navigation pane.
- On the SFS Turbo tab page, select the target BCS instance's cluster, and click Expand Capacity in the row containing the recorded PVC.
|
|
FailedPullImage |
CCE |
The image address is incorrect. For example, the image address configured in the add-on at some sites is incorrect, or the permission configured for the image repository is incorrect.
If a large number of images are pulled concurrently, some images may fail to be pulled. If the images can be pulled successfully after retry, the alarm is cleared. |
|
BackOffPullImage |
CCE |
The image address is incorrect. For example, the image address configured in the add-on at some sites is incorrect, or the permission configured for the image repository is incorrect. If the images can be pulled successfully after retry, the alarm is cleared. |
|
FailedCreate |
CCE |
Check the pod status of baas-agent, peer, and orderer.
Do as follows:
- Check whether the pod scheduling policy is correct.
Log in to the CCE console, choose Workloads > Deployments or StatefulSets in the navigation pane, click the workload name to go to the workload details page, and check CPU requests and memory requests on the Pods tab.
- Check whether the node resources are sufficient.
In the navigation pane, choose Resource Management > Nodes. In the Allocatable column, view the available CPUs and memory size of the node where the pod is located.
|
|
BackOffStart |
CCE |
Check the pod status of baas-agent, peer, and orderer.
Do as follows:
- Check whether the pod scheduling policy is correct.
Log in to the CCE console, choose Workloads > Deployments or StatefulSets in the navigation pane, click the workload name to go to the workload details page, and check CPU requests and memory requests on the Pods tab.
- Check whether the node resources are sufficient.
In the navigation pane, choose Resource Management > Nodes. In the Allocatable column, view the available CPUs and memory size of the node where the pod is located.
|
|
Unhealthy |
CCE |
Check the pod status of baas-agent, peer, and orderer.
Do as follows:
Log in to the CCE console, choose Workloads > Deployments or StatefulSets in the navigation pane, click the workload name to go to the workload details page, and click Upgrade > Advanced Settings > Health Check. |
|
FailedScheduling |
CCE |
Check the pod status of baas-agent, peer, and orderer.
Do as follows:
- Check whether the node resources are sufficient. In the navigation pane, choose Resource Management > Nodes. In the Allocatable column, view the available CPUs and memory size of the node where the pod is located.
- Check whether the pod scheduling policy is correct. Log in to the CCE console, choose Workloads > Deployments or StatefulSets in the navigation pane, click the workload name to go to the workload details page, and check custom scheduling policies on the Scheduling Policies tab.
NOTE:
The coredns add-on is a DNS server that provides domain name resolution services for Kubernetes clusters. coredns chains plug-ins to provide additional features. At least two nodes are required to ensure the proper running of coredns. Therefore, if the number of nodes in the cluster where the BCS instance is located is less than 2, the alarm indicating failed scheduling is frequently generated. This alarm does not affect BCS functions.
Do as follows:
- Log in to the BCS console.
- In the navigation pane, click Instance Management.
- Click an instance name to go to the instance details page.
- On the Monitoring tab page, locate the row that contains the alarm, hover the mouse pointer over the resource name, and check the value of name. If the value starts with "coredns-", the alarm does not need to be handled.
|
|
Rebooted |
CCE |
The node has been restarted. If the baas-agent, peer, and orderer services are deployed on the node, check whether the pod status is abnormal. If these instances are not deployed on the node, BCS is not affected.
Do as follows:
- Check whether the restart is caused by manual operations (such as shutdown and restart).
- Check whether the restart is caused by node resource overload. Go to the AOM console, choose Monitoring > Host Monitoring in the navigation pane, and check the CPU usage and memory usage.
|
|
NodeNotReady |
CCE |
If the baas-agent, peer, and orderer services are deployed on the node, restore the node status or migrate services to other nodes.
Do as follows:
- Check whether the node resources are sufficient. In the navigation pane, choose Resource Management > Nodes. In the Allocatable column, view the available CPUs and memory size of the node where the pod is located.
- Restart the node.
- In the navigation pane, choose Resource Management > Nodes. In the Operation column, choose More > Reset.
|
|
High Memory Usage on the Node |
BCS |
If the memory usage exceeds 80%, the possible causes are as follows:
- There are too many transaction requests in a short time.
- The memory capacity of the node where the container is located cannot meet what is required by the instance specifications.
Do as follows:
- Log in to the BCS console. In the navigation pane, click Instance Management.
- Click an instance name to go to the instance details page.
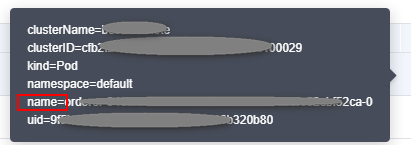
- On the BCS instance details page, click the Monitoring tab and then the Active tab. Record the value of name in the Resource Name column.
Figure 10 Checking the value of name of the peer

- Go to the CCE console and locate the cluster where the abnormal node is. On the Resource Management > Nodes page, click the node name to go to the node details page. Click the node name to go to the ECS page.
- Stop the ECS, and then choose More > Modify Specifications. Select a new flavor with desired memory.
|
|
Excessive memory usage |
BCS |
If the memory usage exceeds 90%, the possible causes are as follows:
- There are too many transaction requests in a short time.
- The memory capacity of the node where the container is located cannot meet what is required by the instance specifications.
Do as follows:
- Log in to the BCS console. In the navigation pane, click Instance Management.
- Click an instance name to go to the instance details page.
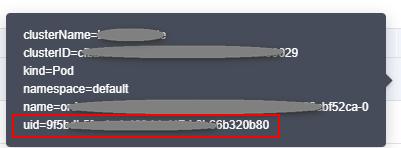
- On the BCS instance details page, click the Monitoring tab and then the Active tab. Record the value of name in the Resource Name column.
Figure 11 Checking the value of name

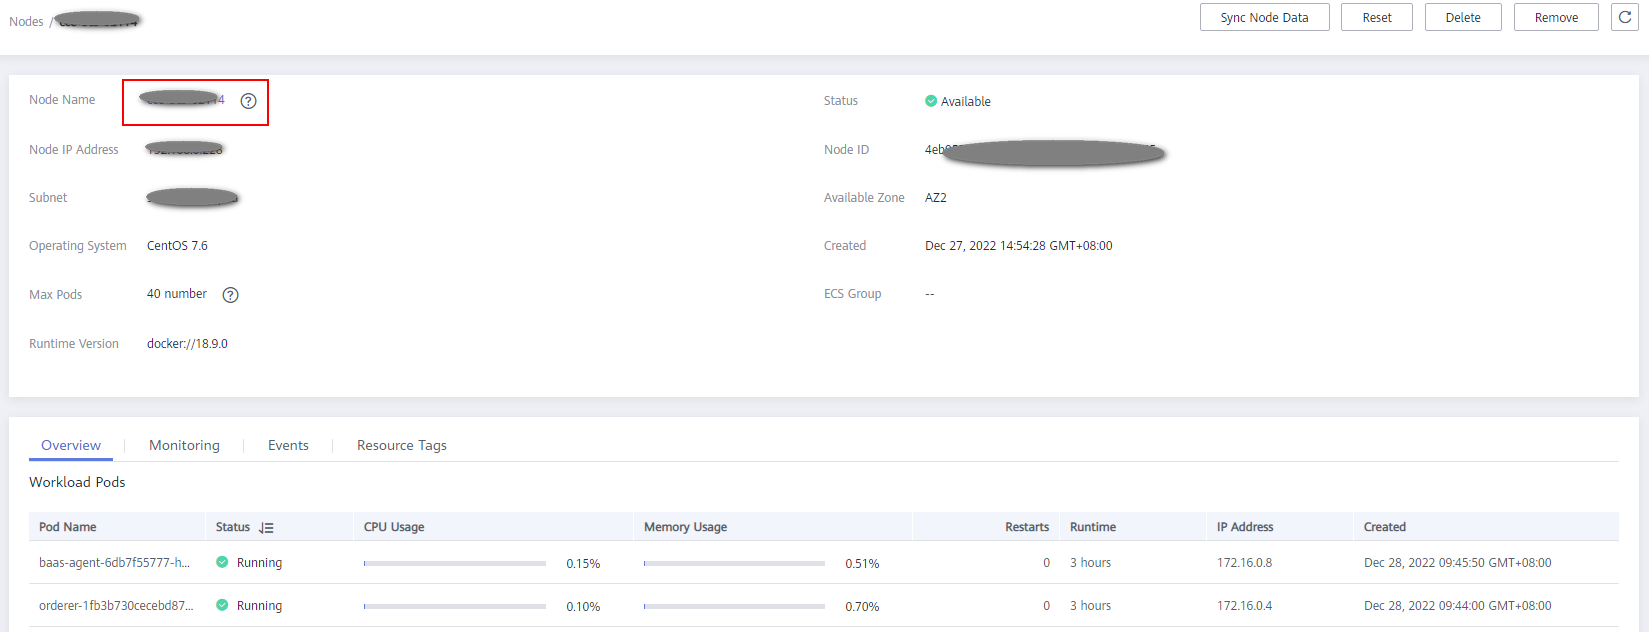
- Go to the CCE console and locate the cluster where the abnormal node is. On the Resource Management > Nodes page, click the node name to go to the node details page. Click the node name to go to the ECS page.
Figure 12 Node details page
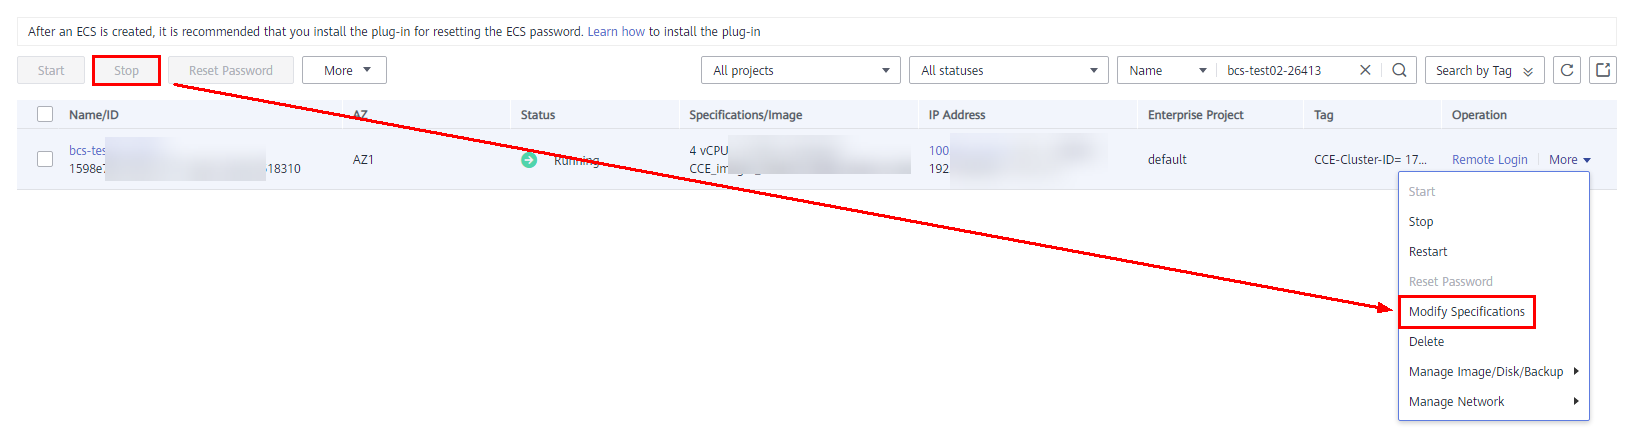
- Stop the ECS, and then choose More > Modify Specifications. Select a new flavor with desired memory.
Figure 13 Modifying specifications
|


