Enabling a Service Mesh
With the control plane being fully managed, you can better concentrate on your services, experience simplified O&M, and save resources. Service meshes of the Enterprise edition support unified cross-cluster grayscale release, service governance, security management, and topologies for multiple clusters and infrastructures.
Constraints
- ASM depends on CoreDNS of clusters for domain name resolution. Before creating a service mesh for a cluster, ensure that the cluster has the required resources and CoreDNS is running normally.
- Before configuring application metrics or access logs, ensure that the required add-on (kube-prometheus-stack for collecting application metrics and log-agent for collecting access logs) has been installed in all clusters bound to the fleet.
- Service meshes can be enabled only for fleets that contain only CCE clusters.
Procedure
Method 1: Creating a service mesh on the Service Meshes page
- Log in to the UCS console. In the navigation pane, choose Service Meshes. If a service mesh is available, click Create Mesh in the upper right corner.
- Set parameters as follows:
- Bound Container Fleet
Bind an existing fleet. If there is no available fleet, create one by referring to Fleets.
- Region
Select the region where the control plane components are deployed.
- Proxy Mode
Select Sidecar-Proxy or Node-Proxy. For details about the two proxy modes, see Service Mesh Proxies.
- VPC
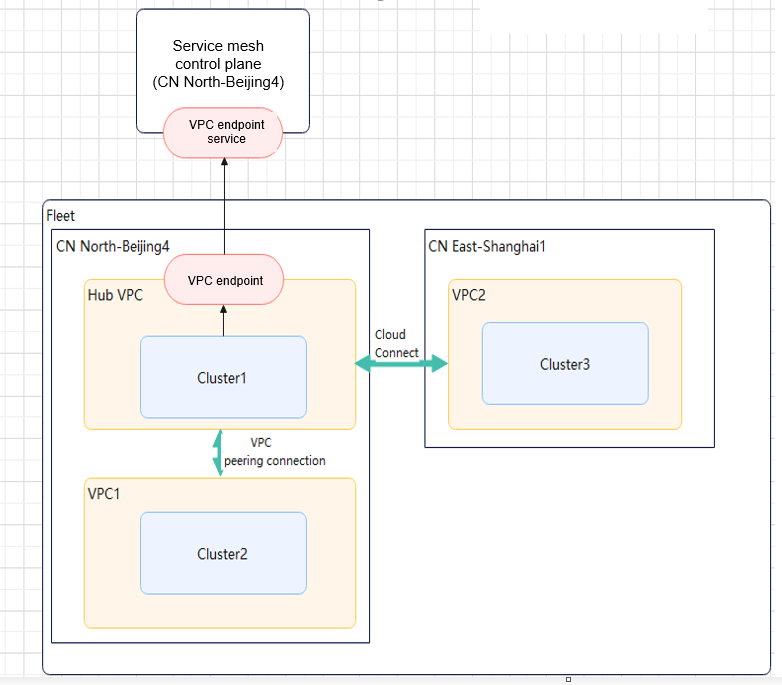
After enabling the service mesh for the fleet, you can use the asm-mesh-controller or asm-terrace add-on in the clusters of the fleet to synchronize services and configure policies for control plane components. The VPC endpoint can be used to connect the add-on to the control plane. To facilitate management, create a VPC endpoint in your VPC.

In the figure, the add-on in Cluster1 of the hub VPC can be directly connected to the control plane through the VPC endpoint. Before the add-on in Cluster2 of VPC1 that is in the same region as the hub VPC is connected to the control plane, create a VPC peering connection to enable network communication between the hub VPC and VPC1. Before the add-on in Cluster3 of VPC2 that is in a different region from the hub VPC is connected to the control plane, use Cloud Connect to enable network communication between the hub VPC and VPC2.
- Istio Version
Currently, Istio 1.18 is supported.
- Bound Container Fleet
- (Optional) Under Observability Configuration, set parameters as follows:
- Application Metrics
If this option is enabled, you can build service access metrics, application topologies, and service health and SLO definitions in the service mesh.
- Access Logs
If this option is enabled, you can query inter-service access records in the service mesh to locate exceptions.

The parameters in Observability Configuration cannot be enabled again after a service mesh is created.
- Tracing
- Sampling Rate: Number of requests generated by the tracing/Total number of requests
- Version: the tracing service There are two options: Huawei Cloud APM and Third-party Jaeger/Zipkin service. If you select Third-party Jaeger/Zipkin service, you need to set Service Address and Service Port, which indicate the address and port number used by the tracing service to receive requests.

- Only Istio 1.15 or later support the third-party tracing service.
- If you want to use the third-party Jaeger or Zipkin service, install it first. Then, obtain the service address.
- The default service ports of Jaeger and Zipkin are both 9411. If you customize the service port during Jaeger or Zipkin installation, replace Service Port with the actual value.
- Application Metrics
- Click Create in the lower right corner.

If you use the sidecar proxy after creating a service mesh, the asm-mesh-controller add-on will be automatically installed in all clusters of the fleet. If you use the node proxy, the asm-terrace add-on will be automatically installed.
- Click Viewing the progress to view details about resource creation, environment preparation, component installation, and fleet cluster access.
Method 2: Creating a service mesh on the Fleets page
- Log in to the UCS console. In the navigation pane, choose Fleets.
- Click the name of the target fleet to go to its details page.
- In the navigation pane, choose Service Meshes.
- Click Enable Mesh and configure parameters by referring to 2.

- Click Create in the lower right corner.
- Click Viewing the progress to view details about resource creation, environment preparation, component installation, and fleet cluster access.
Viewing Events

Events will be retained for 30 days and then automatically deleted.

Feedback
Was this page helpful?
Provide feedbackThank you very much for your feedback. We will continue working to improve the documentation.See the reply and handling status in My Cloud VOC.
For any further questions, feel free to contact us through the chatbot.
Chatbot


