Creating a Trust Agency (by a Delegating Party)
By creating a trust agency, you can share your resources with another account, or delegate an individual or team to manage your resources. You do not need to share your security credentials (the password and access keys) with the delegated party. Instead, the delegated party can log in with its own account credentials and then switches the role to your account and manage your resources.
Prerequisites
Before creating a trust agency, complete the following operations:
- Understand the basic concepts of permissions.
- Plan the system identity policies required for the trust agency.
Procedure
- Log in to the new IAM console.
- On the IAM console, choose Agencies in the navigation pane, and click Create Trust Agency in the upper right corner.
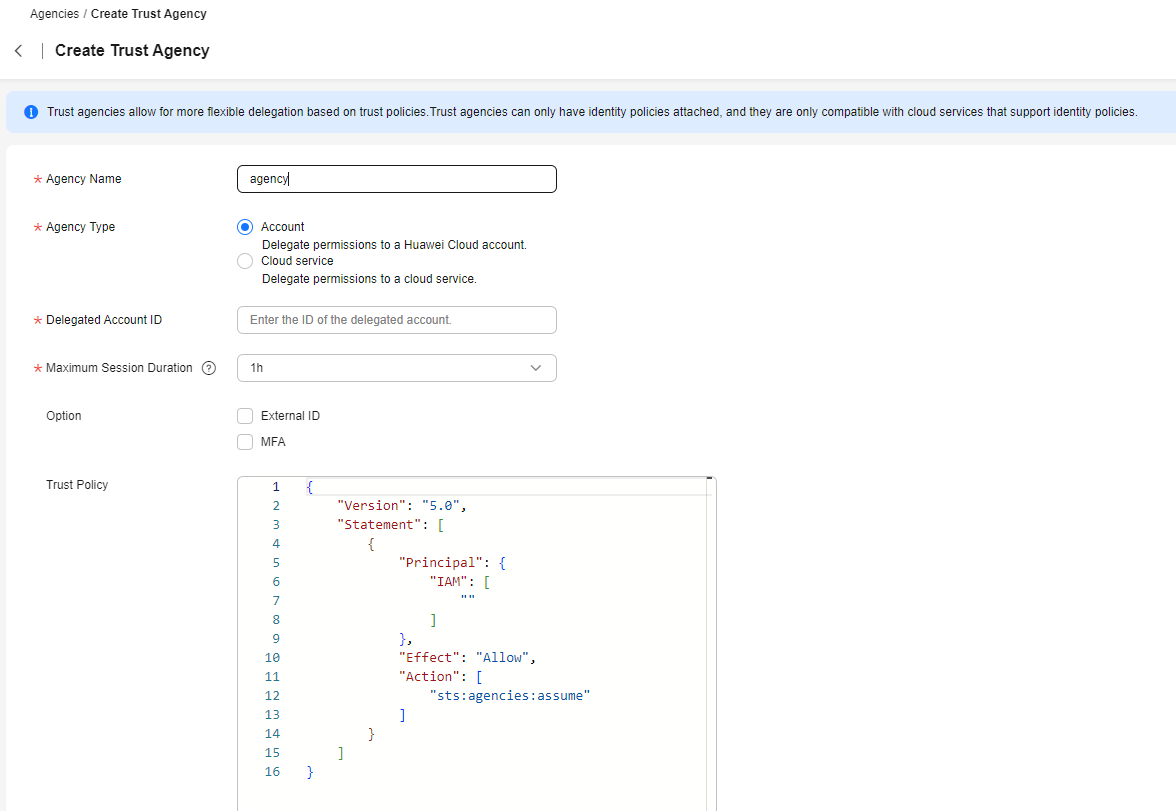
Figure 1 Creating a trust agency

- Enter a trust agency name.
Figure 2 Setting the trust agency name

- Select Account for Agency Type and enter the ID of the delegated account. After obtaining the account ID on the My Credentials page, the delegated user can provide the account ID to the delegator.

- Account: Delegate resource access to another account. By default, all principals in an account that have the permissions to assume trust agencies can switch to the trust agency. You can use the g:PrincipalUrn condition key to allow only a specific principal (such as an IAM user or trust agency) in the account to assume trust agencies. For details about the g:PrincipalUrn condition key, see Global Condition Keys.
- Cloud service: Delegate resource access to another cloud service. For details, see Cloud Service Delegation.
- Set Maximum Session Duration to configure the maximum session duration of the temporary access credentials obtained by programmatic access.
- Choose whether to select External ID. The external ID of the delegated party must be unique.
The external ID can be any identifier (for example, the invoice number) known only to you and the delegated party. Do not use easily-guessed information, such as the name or phone number of the delegated party. If you select External ID, the entered ID will be added to the trust policy for check to ensure that the delegated party performs correct operations. For details about using external IDs, see Preventing Cross-Account Confused Deputy.
- Determine whether to enable MFA.
After MFA is enabled, the delegated party needs to enter the verification code sent to the virtual MFA device on the login verification page to verify its identity.
- Edit the trust agency by referring to Deleting or Modifying an Agency (by a Delegated Party).
- Enter a brief description.
- Click OK to enter the page for assigning permissions to a trust agency.
- Assign permissions to an IAM user by referring to Assigning Permissions to an IAM User.
For security purposes, it is a best practice to grant least privilege.
- Click OK. The trust agency is created.
The delegating account notifies the delegated account of its account name, the name and URN of the trust agency, the permissions assigned to the trust agency, and the external ID (if any). The delegated account can then switch role or call AssumeAgency API to switch to the delegating account for resource management.
Example Policies
When delegating an account to manage Huawei Cloud resources, you need to configure the trust policy and identity policy of the trust agency. The trust policy specifies who can assume the trust agency, and the identity policy specifies what operations the assumed-agency session can perform after the assumption. Both trust and identity policies are in JSON format. For the JSON elements supported by the policies, see JSON Element Reference.
{
    "Version": "5.0",
    "Statement": [
        {
            "Principal": {
                "IAM": [
                    "<account-id-b>"
                ]
            },
            "Effect": "Allow",
            "Action": [
                "sts:agencies:assume"
            ],
            "Condition": {
                "Bool": {
                    "g:MFAPresent": [
                        "true"
                    ]
                }
            }
        }
    ]
}
Note that, although the trust policy allows the trusted principal to assume the trust agency, the IAM users in account B must have sts:agencies:assume in the identity policy. After the required permissions are granted, the IAM users in account B can assume the trust agency through the console or by calling the AssumeAgency API to obtain the temporary security credentials of the assumed-trust agency session. For more information about temporary security credentials, see Overview.
{
    "Version": "5.0",
    "Statement": [
        {
            "Principal": {
                "IAM": [
                    "<account-id-b>"
                ]
            },
            "Effect": "Allow",
            "Action": [
                "sts:agencies:assume",
                "sts::setSourceIdentity",
                "sts::tagSession"
            ],
            "Condition": {
                "Bool": {
                    "g:MFAPresent": [
                        "true"
                    ]
                }
            }
        }
    ]
}

If you need to add sts::setSourceIndentity and sts::tagSession to the trust policy, edit the trust policy after creating the trust agency.
{
  "Version": "5.0",
  "Statement": [
    {
      "Principal": {
        "IAM": [
          "<account-id-b>"
        ]
      },
      "Effect": "Allow",
      "Action": [
        "sts:agencies:assume",
        "sts::tagSession",
        "sts::setSourceIdentity"
      ],
      "Condition": {
        "Bool": {
          "g:MFAPresent": [
            "true"
          ]
        },
        "StringEquals": {
          "g:UserId": [
            "<user-id-1>"
          ]
        }
      }
    }
  ]
}
Replace <user-id-1> with the actual IAM user ID in account B. You can also add more condition keys to the trust policy to control the conditions for switching trust agencies. For more information, see Global Condition Key and iam_01_1289.html#iam_01_1289__li13495143171719.
{
    "Version": "5.0",
    "Statement": [
        {
            "Effect": "Allow",
            "Action": [
                "obs:bucket:ListBucket"
            ],
            "Resource": [
                "OBS:*:*:bucket:example_bucket"
            ]
        }
    ]
}
Feedback
Was this page helpful?
Provide feedbackThank you very much for your feedback. We will continue working to improve the documentation.See the reply and handling status in My Cloud VOC.
For any further questions, feel free to contact us through the chatbot.
Chatbot


