Configuring Instance Metadata Options
Scenarios
You can configure instance metadata options to control the metadata behavior of an instance.
Constraints
This function is only available in the LA-Sao Paulo1 region.
Instance Metadata Options
You can configure instance metadata options when purchasing an ECS or at its runtime.
Instance metadata can be accessed using two methods, as described in Table 1.
For security purposes, you can set the instance metadata version only to V2 (hardening). After you enforce the use of V2 (hardening), access using the V1 (traditional) method will be denied to prevent most SSRF risks.
Accessing Metadata from an ECS (Example)
You can access metadata of both Windows and Linux ECSs.
- Linux:
curl -X GET http://169.254.169.254/openstack/latest/meta_data.json
- Windows:
Invoke-RestMethod -Method GET -Uri http://169.254.169.254/openstack/latest/meta_data.json
- Linux:
# Obtain the metadata access credentials. You are advised to set X-Metadata-Token-Ttl-Seconds to 21600 (6 hours).
TOKEN=`curl -X PUT http://169.254.169.254/meta-data/latest/api/token -H "X-Metadata-Token-Ttl-Seconds:21600"`
# Access the instance metadata.
curl -X GET http://169.254.169.254/openstack/latest/meta_data.json -H "X-Metadata-Token:$TOKEN"
- Windows:
# Obtain the metadata access credentials and set a validity period. Do not include the header X-Forwarded-For.
$token = Invoke-RestMethod -Headers @{"X-Metadata-Token-Ttl-Seconds" = "21600"} -Method PUT -Uri http://169.254.169.254/meta-data/latest/api/token
# Access the instance metadata.
Invoke-RestMethod -Headers @{"X-Metadata-Token" = $token} -Method GET -Uri http://169.254.169.254/openstack/latest/meta_data.json
Configuring Metadata (When Purchasing an ECS)
- Log in to the ECS console and access the Buy ECS page.
Set the required parameters to purchase an ECS. For details, see Purchasing an ECS in Custom Config Mode.
- In Advanced Settings, set Metadata Access to Enable.
- Set Metadata Version to Only V2 (Token).
Figure 1 Selecting a metadata version

- Confirm the settings and click Submit.
Configuring Metadata (At ECS Runtime)
- Log in to the management console.
- Click
 in the upper left corner and select a region and project.
 - Click
 . Choose Compute > Elastic Cloud Server.
 - In the ECS list, click the target ECS to go to the ECS details page.
- Locate the Metadata Version row and click the edit icon.
Figure 2 Clicking the edit icon

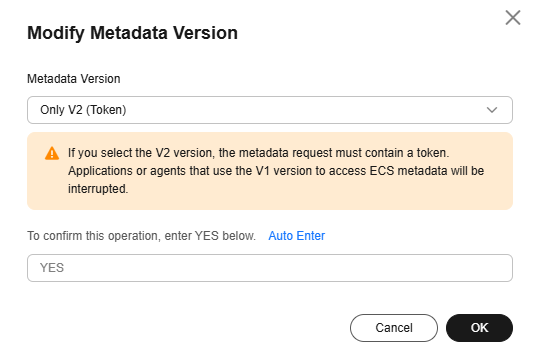
- Select a metadata version and click OK.
Figure 3 Modifying the metadata version

After the modification is complete, the new metadata version is displayed on the ECS details page.
Feedback
Was this page helpful?
Provide feedbackThank you very much for your feedback. We will continue working to improve the documentation.See the reply and handling status in My Cloud VOC.
For any further questions, feel free to contact us through the chatbot.
Chatbot


