

Uploading/Downloading Packages on the Self-Hosted Repo Page
Only repository administrators and developers can upload and download private packages. You can set repository roles on the Repository Permissions page.
Uploading a Package
- Click a project card to access the project. (If no project is available, create one.)
- Choose > from the navigation pane.
- In the left pane, click the target repository to which the private package is to be uploaded.
- Click Upload on the right of the page.
- In the Upload dialog box, specify parameters, select the file, and click Upload. Detailed configuration for each package type is described below.
- The Conan package cannot be uploaded on the page.
- The maximum file size for uploads is 100 MB for Maven, npm, PyPI, RPM, and Debian types, and 20 MB for NuGet.
- Do not upload files containing sensitive information such as plaintext accounts and passwords to self-hosted repos.
Uploading a Maven Artifact
Maven artifact
- Project Object Model (POM) is the basic working unit of a Maven project. It is an XML file that contains basic project information to describe how to build a project and declare project dependencies. When a build task is run, Maven searches for the POM in the current directory, reads its content, obtains the required configuration information, and builds the target package.
- Maven coordinates: X, Y, and Z are used to uniquely identify a point in the three-dimensional space. In Maven, GAV is used to identify a unique package. It stands for groupId, artifactId, and version. groupId indicates a company or organization. For example, Maven core components are in the org.apache.maven organization. artifactId indicates the name of the package. version indicates the version of the package.
- Maven dependencies are crucial for POM files. The building and running of most projects depend on the dependency on other components. Add the dependency list to your POM file. If the App component depends on the App-Core and App-Data components, the configuration is as follows:
<project xmlns="http://maven.apache.org/POM/4.0.0"
   xmlns:xsi="http://www.w3.org/2001/XMLSchema-instance"
   xsi:schemaLocation="http://maven.apache.org/POM/4.0.0
   http://maven.apache.org/xsd/maven-4.0.0.xsd">
      <modelVersion>4.0.0</modelVersion>
      <groupId>com.companyname.groupname</groupId>
      <artifactId>App</artifactId>
      <version>1.0</version>
      <packaging>jar</packaging>
      <dependencies>
         <dependency>
            <groupId>com.companyname.groupname</groupId>
            <artifactId>App-Core</artifactId>
            <version>1.0</version>
         </dependency>
      </dependencies>
      <dependencies>
         <dependency>
            <groupId>com.companyname.groupname</groupId>
            <artifactId>App-Data</artifactId>
            <version>1.0</version>
         </dependency>
      </dependencies>
</project>
Procedure
POM and GAV upload modes are supported.
- Access self-hosted repos using your Huawei Cloud account.
- In the left pane, click the target Maven repository to which the private package is to be uploaded.
- Click Upload on the right of the page.
- In the displayed dialog box, select an upload mode and set the parameters, as shown in the following table.
Table 1 Parameters for uploading a Maven artifact Upload Mode
Description
POM
GAV parameters are obtained from the POM file. The system retains transitive dependencies of components.
In POM mode, you can either upload just the POM file or both the POM file and its related components. The uploaded file must match the artifactId and version values specified in the POM. As shown in the following figure, if the artifactId value is demo and the version value is 1.0 in the POM, then the uploaded file must be named demo-1.0.jar.
Figure 1 Uploading a package in POM mode

The POM file structure is as follows:
<project>
  <modelVersion>4.0.0</modelVersion>
  <groupId>demo</groupId>
  <artifactId>demo</artifactId>
  <version>1.0</version>
</project>
NOTE:The modelVersion tag must exist and the value must be 4.0.0, indicating that Maven2 is used.
If you upload files in both the POM and File area, the artifactId and version values in POM must match the file name in File. For example, if the artifactId value is demo and the version value is 1.0 in POM, then the uploaded file must be named demo-1.0 in File.
GAV
GAV, short for Group ID, Artifact ID, and Version, is the unique identifier of a JAR package. In this mode, GAV parameters are manually specified. The system automatically generates a POM file without any transitive dependency.
In the GAV mode, the Group ID, Artifact ID, and Version parameters must be manually specified and they determine the name of the file to upload. Extension indicates the packaging type and determines the file type to be uploaded.
Classifier is used to differentiate artifacts that are built from the same POM but contain different contents. This field is optional. It can contain letters, digits, underscores (_), hyphens (-), and dots (.). If you specify this field, it will be appended to the file name.
Common usage scenarios
- Differentiate versions by name, such as demo-1.0-jdk13.jar and demo-1.0-jdk15.jar.
- Differentiate usage by name, such as demo-1.0-javadoc.jar and demo-1.0-sources.jar.
Figure 2 Uploading a package in GAV mode

- Extension: packaging type. The default value is the same as the file name extension.
- Group ID: project name, which uniquely identifies a project, for example, org.apache.commons. It can contain up to 128 characters. Only letters, digits, underscores (_), hyphens (-), and periods (.) are supported.
- Artifact ID: component name, for example, commons-math. It can contain up to 128 characters. Only letters, digits, underscores (_), hyphens (-), and periods (.) are supported.
- Version: component version, for example, 1.0. It can contain up to 32 characters. Only letters, digits, underscores (_), hyphens (-), and periods (.) are supported.
- Classifier is used to differentiate artifacts that are built from the same POM but contain different contents. Common values include sources, javadoc, tests, and jdk. If specified, the value is appended to the file name. Setting Classifier disables automatic POM file generation.
- Click Upload after the configuration is complete.
View the uploaded package in the repository list.
Uploading an npm Package
npm package
Node Package Manager (npm) is a JavaScript package management tool. An npm package is the item managed by npm, and the npm registry is used to store and manage these packages.
The npm package consists of a structure and file description.
- Package structure organizes various files in a package, such as source code files and resource files.
- Description file describes package information. Example: package.json, bin, and lib files
The package.json file in the package is a description file of a project or module package. It contains information such as the name, description, version, and author. The npm install command downloads all dependent modules based on this file.
An example of the package.json file is as follows:
{
  "name": "third_use",			//Package name
  "version": "0.0.1",           //Version number
"description": "this is a test project", // Description
  "main": "index.js",			//Entry file
  "scripts": {					//Script command
    "test": "echo \"Error: no test specified\" && exit 1"
  },
  "keywords": [					//Keyword
    "show"
  ],
  "author": "f",				//Developer name
  "license": "ISC",				//License agreement
  "dependencies": {				//Project production dependencies
    "jquery": "^3.6.0",
    "mysql": "^2.18.1"
  },
  "devDependencies": {			//Project development dependencies
    "less": "^4.1.2",
    "sass": "^1.45.0"
  }
}
The name and version are the most important fields and must exist. Otherwise, the current package cannot be installed. The two attributes together form the unique identifier of an npm package.
name indicates the name of the package. The first part of the name, such as @scope, is used as the namespace. The other part is name. Generally, you can search with the name field to install and use the required package.
{
  "name": "@scope/name"
}
version indicates the version of the package, which is in the x.y.z format.
{
  "version": "1.0.0"
}
Procedure
- Access self-hosted repos using your Huawei Cloud account.
- In the left pane, click the target npm repository to which the private package is to be uploaded.
- npm packages in .tgz format can be uploaded to self-hosted repos. When uploading packages, you need to set the following parameters.
Item
Description
Package Name
The value must be the same as that of name in the package.json file.
When uploading a package, ensure that the package name starts with a path in the path list added during repository creation. For details, see Table 1 in the help guide.
Example:
The path @test is added when you create an npm registry.
When uploading the package to the registry, make sure that the PackageName starts with @test. If a path outside the path list is used, for example, @npm, the upload will fail.
After the upload is successful, you can find the package in .tgz format in the repository list and the corresponding metadata is generated in the .npm directory.
Version
The value must be the same as that of version in the package.json file.
File
File name must end with .tgz.
- Click Upload after the configuration is complete.
After the upload is successful, you can find the package in .tgz format in the repository list and the corresponding metadata is generated in the .npm directory.
Uploading an RPM Package
RPM package
- Red Hat Package Manager (RPM), developed by Red Hat, is used by many Linux distributions. It is a software management system that installs software on Linux in database recording mode.
- You are advised to package and name the RPM binary file according to the following rules:
Software name-Main version number of the software.Minor version number of the software.Software revision number-Number of software compilation times.Hardware platform suitable for the software.rpm
For example, hello-0.17.2-54.x86_64.rpm. hello is the software name, 0 is the major version number of the software, 17 is the minor version number, 2 is the revision number, 54 is the number of times that the software is compiled, and x86_64 is the hardware platform suitable for the software.
| Software Name | Major Version | Minor Version | Revision No. | Compilation Times | Applicable Hardware Platform |
|---|---|---|---|---|---|
| hello | 0 | 17 | 2 | 54 | x86_64 |
Procedure
- Access self-hosted repos using your Huawei Cloud account.
- In the left pane, click the target RPM repository to which the private package is to be uploaded.
- Click Upload on the right of the page.
- In the displayed dialog box, set the parameters as described in the following table.
Item
Description
Component
Component name
Version
Version of the RPM binary package
File
The RPM file to be uploaded
Figure 3 Uploading an RPM package

- Click Upload after the configuration is complete.
After the upload is successful, you can find the RPM binary package in the repository list and the corresponding metadata repodata directory is generated in the package name directory. You can use Yum to install the package.
Uploading a PyPI Package
PyPI package
You are advised to go to the project directory (which must contain the setup.py configuration file) and run the following command to compress the package to be uploaded into a wheel (.whl) installation package. By default, this package is generated in the dist directory of your project directory. Note that the Python package management tool pip supports only wheel installation packages.
python setup.py sdist bdist_wheel
Procedure
- Access self-hosted repos using your Huawei Cloud account.
- In the left pane, click the target PyPI repository to which the private package is to be uploaded.
- Click Upload on the right of the page and set the parameters described in the following table.
Item
Description
Package Name
The value must be the same as that of name in the setup.py file.
Version
The value must be the same as that of version in the setup.py file.
File
The PyPI file to be uploaded.
- Click Upload after the configuration is complete.
After the upload is successful, you can find the installation package in .whl format in the repository package list. In addition, the corresponding metadata is generated in the .pypi directory, which can be used for pip installation.
Uploading a Go Package
Go package
Go, also known as Golang, is a programming language developed by Google. Golang 1.11 or later supports modular package management. A module is a unit for source code exchange and versioning in Go. A MOD file identifies and manages a module. A ZIP file is a source code package. Go modules are divided into two types: v2.0 and later, and earlier than v2.0, each with different management rules.
Procedure
- Access self-hosted repos using your Huawei Cloud account.
- In the left pane, click the target Go repository to which the package is to be uploaded.
- Click Upload on the right of the page.
- To upload a Go package, you need to upload both a ZIP file and a MOD file and set the following parameters.
Step
Item
Description
Step 1:
Upload a ZIP file
Zip Path
Complete path of the ZIP file. Valid path formats are:
- Versions earlier than v2.0: {moduleName}/@v/{version}.zip
- Versions later than v2.0:
- If the ZIP file contains go.mod and the path ends with /vN, the file path format is: {moduleName}/vX/@v/vX.X.X.zip
- If the ZIP file does not contain go.mod or the first line in go.mod does not end with /vN, the file path format is: {moduleName}/@v/vX.X.X+incompatible.zip
Zip File
Directory structure of the ZIP file. Valid directory structure formats are:
- Versions earlier than v2.0: {moduleName}@{version}
- Versions later than v2.0:
- If the ZIP file contains go.mod and the path ends with /vN, the directory structure format is: {moduleName}/vX@{version}
- If the ZIP file does not contain go.mod or the first line in go.mod does not end with /vN, the directory structure format is: {moduleName}@{version}+incompatible.
Step 2:
Upload a MOD file
Mod Path
Complete path of the MOD file. Valid path formats are:
- Versions earlier than v2.0: {moduleName}/@v/{version}.mod
- Versions later than v2.0:
- If the ZIP file contains go.mod and the path ends with /vN, the file path format is: {moduleName}/vX/@v/vX.X.X.mod
- If the ZIP file does not contain go.mod or the first line in go.mod does not end with /vN, the file path format is: {moduleName}/@v/vX.X.X+incompatible.mod.
Mod File
MOD file content. Valid content formats are:
- Versions earlier than v2.0: module {moduleName}
- Versions later than v2.0:
- If the ZIP file contains go.mod and the path ends with /vN, the content format is: module {moduleName}/vX
- If the ZIP file does not contain go.mod or the first line in go.mod does not end with /vN, the content format is: module {moduleName}
- Click Upload after the configuration is complete.
View the uploaded package in the repository list.
Uploading a Debian Package
Debian package
Debian packages are packages released through the package management system, such as Advanced Package Tool (APT), for the Debian GNU/Linux distribution. These packages contain all files required to install, configure, and use the software.
Procedure
- Access self-hosted repos using your Huawei Cloud account.
- In the left pane, click the target Debian repository to which the private package is to be uploaded.
- Click Upload on the right of the page.
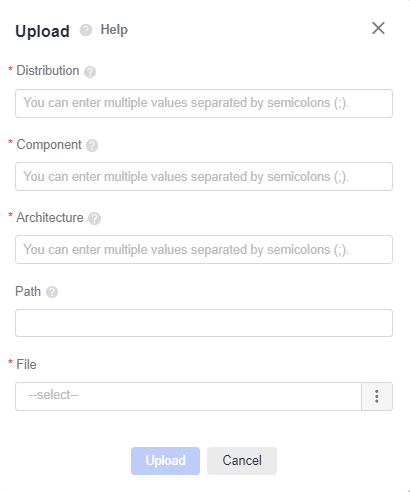
- When uploading a Debian package, you need to set the following parameters:
Item
Description
Distribution
Release version of the package
Component
Name of the package
Architecture
Package architecture
Path
Path for storing the package. By default, the package is uploaded to the root path.
File
Local storage path of the package to be uploaded
- Click Upload after the configuration is complete.
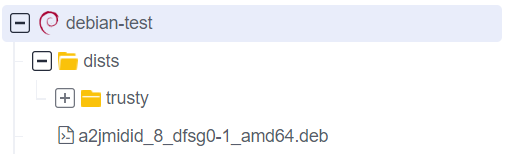
After the upload is successful, you can find the installation package in .deb format in the repository list. In addition, the corresponding metadata is generated in the dists directory, which can be used for Debian installation.
Uploading a NuGet Package
NuGet package
A NuGet package is a single ZIP file with a .nupkg extension. As a shareable unit of code, developers can publish it to a dedicated server to share it with other team members.
CodeArts Artifact creates a NuGet repository to host and manage NuGet packages.
You are advised to package and name the NuGet file according to the following rules:
Software name-Major version number of the software.nupkg
Example: automapper.12.0.0.nupkg
Procedure
- Access self-hosted repos using your Huawei Cloud account.
- In the left pane, click the target NuGet repository to which the private package is to be uploaded.
- Click Upload on the right of the page, select the NuGet file to be uploaded from the local PC, and click Upload.

View the uploaded package in the repository list, as shown in the following figure:
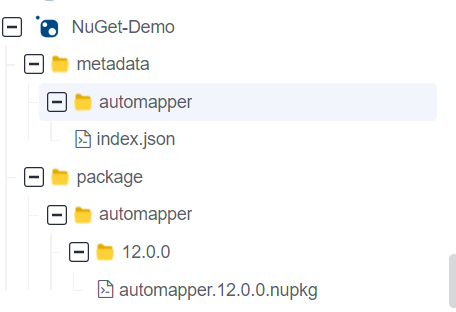
- metadata stores metadata and is named after the package name. metadata cannot be deleted manually. It will be deleted or added automatically when the corresponding package is deleted or restored.
- package stores components.
Uploading a CocoaPods Package
CocoaPods pod
CocoaPods is a dependency manager for iOS and macOS projects. It helps developers easily integrate and manage required libraries efficiently. CocoaPods artifacts (Pods) are third-party libraries published via CocoaPods.
Procedure
- Access self-hosted repos using your Huawei Cloud account.
- In the left pane, click the target CocoaPods repository to which the private package is to be uploaded.
- Click Upload and set the parameters described in the following table.
Item
Description
Package Name
Enter the package name.
File
Select the CocoaPods file to be uploaded from the local PC.
- Click Upload.
When the progress bar in the lower-right corner of the page shows 100%, it indicates the upload is complete.
Uploading an OHPM Package
OHPM package
OpenHarmony Package Manager (OHPM) is an ArkTS package management tool. OHPM manages packages, which are stored and organized in the OHPM repository.
The OHPM package contains the Harmony Archive (HAR) package and Harmony Shared Package (HSP) package.
- HAR: Static shared package, which is reused in the build phase. It is mainly used as a second-party or third-party library for other applications to depend on. It includes resource files, *.so files, and metadata files.
- HSP: Dynamic shared package, which is reused in the running phase. It provides shared code and resources to improve code reusability and maintainability.
The metadata file, oh-package.json5, in the HAR package describes the component, including its name, version, and dependency information. The ohpm install command automatically reads the dependencies in oh-package.json5 and downloads them.
Example: oh-package.json5
{
	"name": "@scope/demo",  				// Component name
	"version": "0.0.1",  				// Version
	"author": "artifact",  					// Author
	"license": "Apache-2.0",  				// License agreement
	"main": "index.ts",  					// Entry file
	"description": "basic information.",  	// Description
	"dependencies": {  						// Dependency
		"@scope/demo1": "1.0.0",
		"@scope/demo2": "file:./demo2.har"
	},
	"devDependencies": {   					// Development dependency
		"@scope/demo3": "1.0.0",
		"@scope/demo4": "1.0.0"
	},
	"metadata": {  							// Metadata information
		"sourceRoots": ["./src/main"]
	}
}
The name and version are the most important fields and must exist. Otherwise, the current package cannot be installed. The two attributes together form the unique identifier of an OHPM package.
name indicates the name of the package. The first part of the name, such as @scope, is used as the namespace. The other part is name. Generally, you can search with the name field to install and use the required package.
{
  "name": "@scope/name"
}
version indicates the version of the package, which is in the x.y.z format.
{
  "version": "1.0.0"
}
Procedure
You can upload OHPM packages in .har or .hsp format to the self-hosted repo. The procedure is as follows:
- Access self-hosted repos using your Huawei Cloud account.
- In the left pane, click the target OHPM repository to which the private package is to be uploaded.
- Click Upload on the right of the page and set the parameters described in the following table.
Item
Description
Package Name
Enter the package name. The value must be the same as that of name in the oh-package.json5 file.
Ensure that the package name starts with a path in the path list added during repository creation. For details, see Table 1 in the help guide.
Example:
The path @test is added when you create an OHPM repository.
When uploading the package to the repository, make sure that the PackageName starts with @test. If a path outside the path list is used, for example, @ohos, the upload will fail.
Version
Enter the version number. The value must be the same as that of version in the oh-package.json5 file.
File
Select the OHPM file to be uploaded from the local PC.
- Click Upload.
When the progress bar in the lower-right corner of the page shows 100%, it indicates the upload is complete.
You can find the package in the repository list and the corresponding metadata is generated in the .ohpm directory.
Uploading a Docker Image
Docker image
Docker artifacts refer to container images built and published using Docker. Docker images contain all dependencies and configurations required for running applications, ensuring portability and consistent behavior across environments.
Procedure
- Access self-hosted repos using your Huawei Cloud account.
- In the left pane, click the target Docker repository to which the private package is to be uploaded.
- Click Upload on the right of the page and set the parameters described in the following table.
Item
Description
Package Name
Enter the package name.
File
Select the Docker file to be uploaded from the local PC.
- Click Upload.
When the progress bar in the lower-right corner of the page shows 100%, it indicates the upload is complete.
Uploading a Generic Artifact
Generic artifact
Generic artifacts (also called common artifacts) are files of any type generated during the build and release process.
Procedure
- Access self-hosted repos using your Huawei Cloud account.
- In the left pane, click the target Generic repository to which the private package is to be uploaded.
- Click Upload on the right of the page and set the parameters described in the following table.
Item
Description
Upload Mode
Select Single file or Multiple files. Single file is selected by default here.
When Multiple files is selected, a maximum of 20 files can be uploaded at a time.
Path
After you set the path name, a folder with that name is created in the Repo View, where the uploaded packages will be stored.
File
Select the Generic artifact to be uploaded from the local PC.
- Click Upload.
When the progress bar in the lower-right corner of the page shows 100%, it indicates the upload is complete.
Uploading a Composer Package
Composer package
- name: The value consists of the vendor name and project name, separated by a slash (/). Example: monolog/monolog.
The name must contain lowercase letters, digits, underscores (_), periods (.), and hyphens (-). The regular expression is used: ^[a-z0-9]([_.-]?[a-z0-9]+)*/[a-z0-9](([_.]?|-{0,2})[a-z0-9]+)*$.
- version: The component version number, which follows the format X.Y.Z or vX.Y.Z, and can end with -dev, -patch (-p), -alpha (-a), -beta (-b), and -RC. Examples: 1.0.0, v2.0.0, and 3.0.0-dev.
Procedure
- Access self-hosted repos using your Huawei Cloud account.
- In the left pane, click the target Composer repository to which the private package is to be uploaded.
- Click Upload on the right of the page and set the parameters described in the following table.
Item
Description
Package Name
Enter the package name, for example, monolog/monolog.
Version
Enter the version number, for example, v2.0.0.
File
Select the Composer file to be uploaded from the localhost.
- Click Upload.
When the progress bar in the lower-right corner of the page shows 100%, it indicates the upload is complete.
Uploading a Helm Chart
Helm chart
Helm is an open-source Kubernetes package manager that allows you to find, share, and use pre-configured deployments of applications on Kubernetes. Helm provides the following functions:
- Simplifies the deployment and management of Kubernetes applications.
- Installs, updates, and uninstalls applications on Kubernetes.
- Provides an easy way to manage application dependencies.
- Shares and reuses application configurations.
You are advised to package and name the Helm file according to the following rules:
Software name-Software version.tgz
Example: helloworld-3.0.1.tgz
Procedure
- Access self-hosted repos using your Huawei Cloud account.
- In the left pane, click the target Helm repository to which the private package is to be uploaded.
- Click Upload, select the Helm file to be uploaded from the localhost, and click Upload.
- The uploaded chart is displayed in the repository list. The index.yaml file contains metadata, and the *.tgz file is the Helm software package, as shown in the figure below.

Uploading a Conda Package
Conda package
Conda is an open-source package and environment management system that runs on Windows, macOS, and Linux. Conda can install, run, and update packages and their dependencies. With Conda, you can create, save, load, and switch environments on the localhost. While it is designed for Python programs, it can also package and distribute software for any language.
Procedure
The Conda repository supports .conda and .tar.bz2 packages. You can create multi-level directories and generate metadata files at the package level. The procedure is as follows:
- Access self-hosted repos using your Huawei Cloud account.
- In the left pane, click the target Conda repository to which the private package is to be uploaded.
- Click Upload on the right of the page and set the parameters described in the following table.
Item
Description
Path
Mandatory. Specify the storage path of the Conda package. Explicitly specify the platform in the last path segment (for example: linux-64, linux-32, win-64, win-32, osx-64, osx-arm64, linux-aarch64, or noarch).
File
Select the Conda file to be uploaded from the localhost.
- Click Upload.
When the progress bar in the lower-right corner of the page shows 100%, it indicates the upload is complete.
Downloading a Package
- Access self-hosted repos using your Huawei Cloud account.
- In the left pane, locate the package to be downloaded and click its name.
If there are too many repositories or packages, you can search for the desired one by referring to Searching for a Package.
- Click Download on the right of the page.
What is your overall rating for this page?
Thank you very much for your feedback. We will continue working to improve the documentation.See the reply and handling status in My Cloud VOC.
For any further questions, feel free to contact us through the chatbot.
Chatbot


