Invoice Management
Huawei Cloud will automatically create corresponding invoices after generating the bills for the partner. The system normally creates the invoice of the previous month on the fifth day of the current month.
You can view and download the invoices automatically issued by Huawei Cloud, and configure whether to receive the invoice notification email when there is no expenditure record in the current month.
In addition, you can add or modify your invoice information. Then, the system will create the invoices based on your configured information.
Partners who meet the conditions can also manage WHT certificates. For details, see WHT Certificate Management.
Viewing Invoices
- Use your partner account to log in to Huawei Cloud.
- In the drop-down list of your account name, click Partner Center to go to the Partner Center.
- On the top navigation, choose Sales > Financial Information > Invoices and view the invoices automatically issued by the Huawei Cloud system.


- If you find that not all invoices are created, click submit a ticket in the note to request invoicing, and enter the required information and upload the expenditure bill on the displayed page to create an invoice creation service ticket.
- If you need to return an invoice, click submit a ticket in the note to return an invoice, and enter the required information and upload a picture or scanning copy of the original invoice on the displayed page to create an invoice returning service ticket.
- Click Download in the Operation column to download the invoices.

Alternatively, you can choose Sales > Financial Information > Partner Bills, click Invoice No. in the Monthly Bills area, and then download the invoices.
Managing Invoice Information
You can add or modify the invoice information.
- To add information, go to the Invoices page and click Manage Invoice Info. In the Manage Invoice Info dialog box, configure Address and Email and click Save. You can add invoice information only when you perform the operation for the first time.
- To modify information, go to the Invoices page and click Invoice Info Management. In the Manage Invoice Info dialogue box, modify Address and Email and click Modify.

The system automatically obtains the tax ID that you have entered during your registration. You cannot modify the tax ID here.
Receiving Invoices by Emails
You can also set whether to receive invoice notifications when there is no expenditure record in the current month on the Invoices page.
To enable or disable email receiving, go to the Invoices page and click setting up email receipts for electronic invoices. In the setting up email receipts for electronic invoices dialogue box, turn the toggle switch on or off to enable or disable the setting of receiving or not receiving the invoice notification when there are no expenditure records in the current month.
WHT Certificate Management
You can manage your WHT certificates or receipts in Partner Center. After you have withheld taxes as required and obtained a WHT certificate issued by the tax authority, you can submit the certificate on the Huawei Cloud official website and follow up the certificate processing flow.
Precautions
- The WHT certificate management function is available only to partners below.
Registered Country
Signing Entity
Malaysia
Sparkoo Technologies Singapore Pte. Ltd.
Thailand
Sparkoo Technologies (Thailand) Co., Ltd.
Philippines
Huawei Technologies Phils. Inc.
- Sign in to Huawei Cloud as a partner.
- In the drop-down list of your account name, click Partner Center to go to the Partner Center.
- On the top navigation bar, select Sales > Financial Information > Invoices, and click Withholding Tax Certificates.
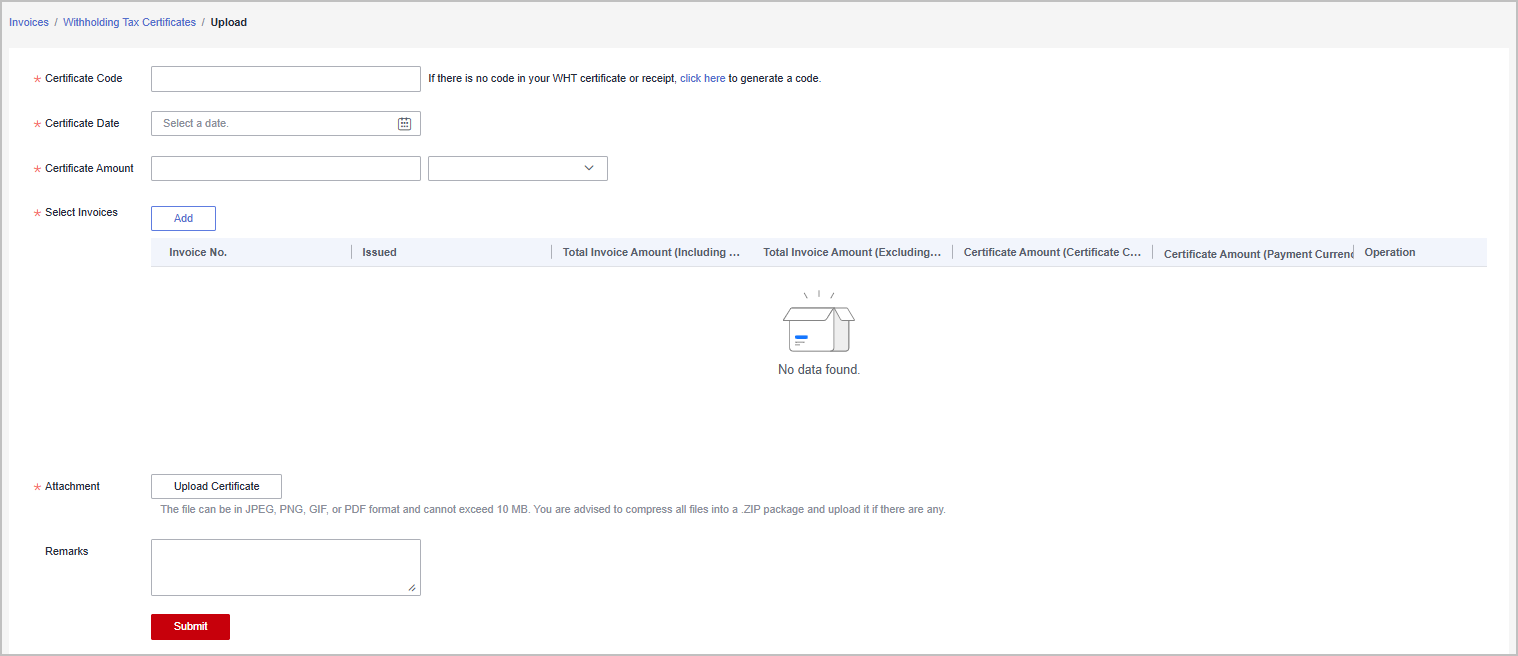
- On the displayed page, click Upload.
- On the displayed Upload page, configure the following parameters and click Submit.

Precautions
After uploading the WHT certificate, you can view the uploading record on the Withholding Tax Certificates page, such as the uploading time, review time, and review status (to be reviewed, approved, or rejected). Click Download in the Operation column to download the certificate. Click Details in the Operation column to view the WHT certificate details.
Feedback
Was this page helpful?
Provide feedbackThank you very much for your feedback. We will continue working to improve the documentation.See the reply and handling status in My Cloud VOC.
For any further questions, feel free to contact us through the chatbot.
Chatbot


