Setting Properties of the Router Navigator and Router View Widgets
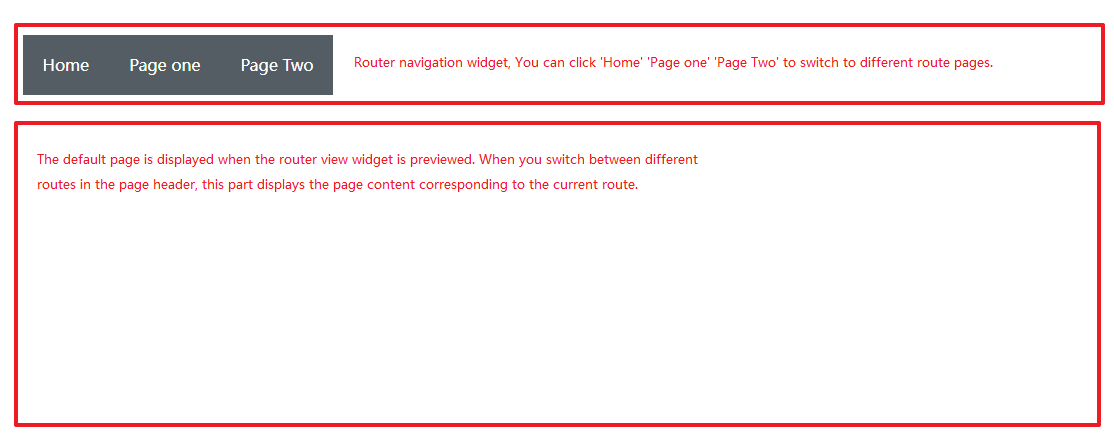
Router navigator works with the router view widget for navigation and display of the page corresponding to the valid route. See Figure 1. Only one router navigator and one router view can be added to a page. The properties of the router navigator and router view widgets are similar to those of other widgets. You can configure the properties by referring to those of other widgets.
System Router Navigator and Router View Widgets
When the router navigator and router view widgets are used, the layout type of the page that uses the widgets and the page associated with the router navigator must be Liquid Layout (responsive layout), that is, the widget is automatically adjusted based on the widget size and page size. The steps for using the router navigator and router view widgets are as follows:
- Develop advance pages with the Liquid Layout type.
Create the home, page1, page2, and empty advanced pages in advance by referring to the operations in Creating Advanced Pages.
- Access the application designer. In the navigation pane, choose Page.
- Click
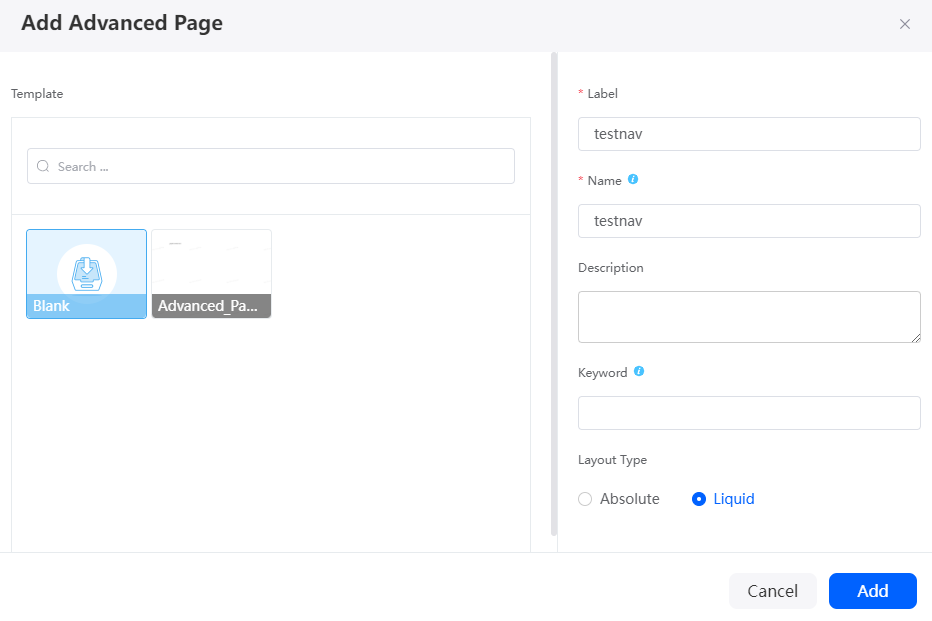
 next to Advanced Page, set Label and Name to testnav, set Layout Type to Liquid Layout, and click Add.
Figure 2 Create a page
- Click
 in the upper left corner of the design page, and drag the router navigator (demo) and router view widgets from Menu to the blank area in the right pane.
Figure 3 Dragging the desired widgets to the canvas
- Click this widget and configure pages associated with different routes on the route tab page.
Select the advance pages created in 1 from the homepage, page1, page2, and Default drop-down lists. The Default page is the page displayed when you preview the testnav page.Figure 4 Configuring the page

The router navigator widget is used for route page redirection. You can implement it on the Routers tab without having to set the click actions on the Events tab.
- Click
 in the upper part of the page to save the page.
 - Click
 to publish the page.
 - After the release is successful, click
 to view the page display effect.
Customizing System Widgets
If you want to modify the display effect of the router navigator, for example, to add a route tag, you can customize the display effect based on the system router navigator widget.
- Log in to the application designer by referring to Logging In to the Application Designer.
- Click
 in the upper left corner of the page and choose Environments > Environment Configuration.
 - Choose Maintenance from the main menu.
- In the navigation pane, choose Global Elements > Page Assets > Widgets.
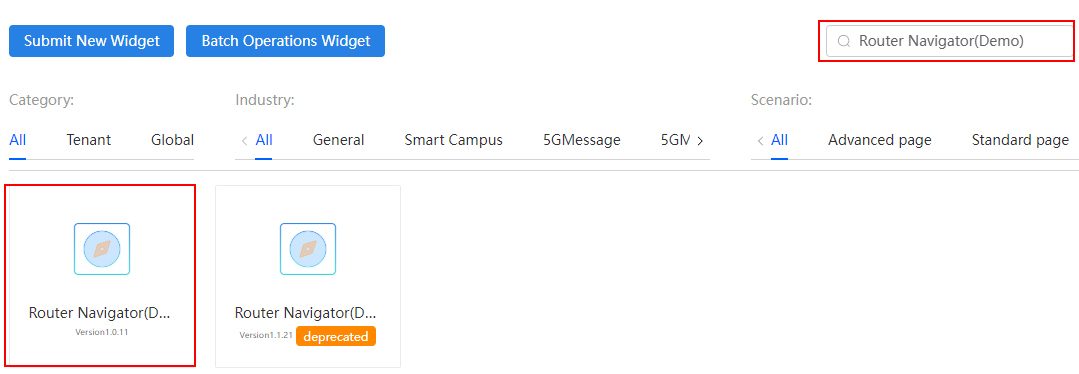
- In the Global tab page, click Router Navigator(Demo). The widget details page is displayed.
Figure 5 Selecting a widget
- Click Download to download the widget package to the local PC.
Figure 6 Downloading the widget
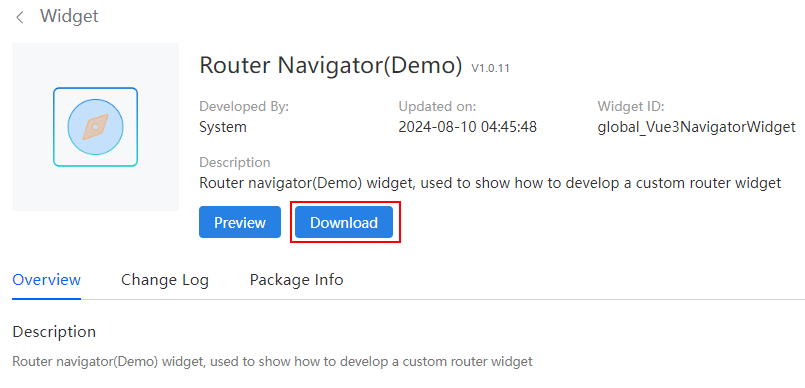
- The downloaded package is named global_Vue3NavigatorWidget_Version number. Decompress the package.
- Modify the Vue3Navigator_Widget.js file after decompression.
The Vue3Navigator_Widget.js file is the widget logic file, which is the core JS file for widget rendering. The router navigator (demo) widget is developed based on Vue Router (official router for Vue.js). You can modify the files in the widget package by referring to the code development specifications of Vue Router.
In this example, add the following code in bold:
var Vue3Navigator_Widget = StudioWidgetWrapper.extend( { init: function() { var thisObj = this; thisObj._super.apply(thisObj, arguments); if ((typeof(Studio) != "undefined") && Studio) { /* * The platform generates a default route for each level of route. When no other routes can be matched, the default route can be matched. * name must be unique; * displayName is displayed during route configuration on the development page. * params defines route parameters. Parameters can be configured only for the top-level route. * Nested routes are configured for children. A maximum of three levels of routes are supported. */ // Define a route through Studio.registerRouter. } if($.isFunction(thisObj.getWidgetI18n)) { thisObj.getWidgetI18n().then(function(){thisObj.render()}); } else { thisObj.render() } }, /* * Triggered from init method and is used to render the widget */ render: function() { var thisObj = this; var widgetProperties = thisObj.getProperties(); var elem = thisObj.getContainer(); if (elem) { var containerDiv = $(".scfClientRenderedContainer", elem); if (containerDiv.length) { $(containerDiv).empty(); } else { containerDiv = document.createElement('div'); containerDiv.className = "scfClientRenderedContainer"; $(elem).append(containerDiv); } thisObj.i18nVM = Vue.createApp(); const i18n = HttpUtils.getI18n({ locale: HttpUtils.getLocale(), messages: thisObj.getMessages() }, thisObj.i18nVM); thisObj.i18nVM.use(i18n); thisObj.i18nVM.$t = i18n.global.t; // Set the saved routing information routers. const defaultRouters = { homepage: {pageName: ''}, page1: {pageName: ''}, page2: {pageName: ''}, page3: {pageName: ''}, }; const routers = widgetProperties.routers ? JSON.parse(widgetProperties.routers): defaultRouters; let routersArr = [ { // Default font Font0:{ FontSize: 16, Color: 'rgba(255, 255, 255, 1)', FontFamily: 'sans-serif', FontWeight: 'normal' }, // Hover text Font1:{ FontSize: 16, Color: 'rgba(138, 191, 240, 1)', FontFamily: 'sans-serif', FontWeight: 'normal' }, // Click the text. Font2:{ FontSize: 16, Color: 'rgb(255, 208, 75)', FontFamily: 'sans-serif', FontWeight: 'normal' }, // Text content textContent: thisObj.i18nVM.$t("router.homepage"), // Tab page route tabRouter:'', // Default style defaultStyle:'color', defaultStyleBgColor:'rgba(84, 92, 100, 1)', defaultStyleImage:'', // Hover style hoverStyle:'color', hoverStyleBgColor:'rgba(84, 92, 100, 1)', hoverStyleImage:'', // Click style clickStyle:'color', clickStyleBgColor:'rgba(84, 92, 100, 1)', clickStyleImage:'', name:'homepage', deleteRoute:'' },{ // Default font Font0:{ FontSize: 16, Color: 'rgba(255, 255, 255, 1)', FontFamily: 'sans-serif', FontWeight: 'normal' }, // Hover text Font1:{ FontSize: 16, Color: 'rgba(138, 191, 240, 1)', FontFamily: 'sans-serif', FontWeight: 'normal' }, // Click text Font2:{ FontSize: 16, Color: 'rgb(255, 208, 75)', FontFamily: 'sans-serif', FontWeight: 'normal' }, // Text content textContent: thisObj.i18nVM.$t("router.page1"), // Tab page route tabRouter:'', // Default style defaultStyle:'color', defaultStyleBgColor:'rgba(84, 92, 100, 1)', defaultStyleImage:'', // Hover style hoverStyle:'color', hoverStyleBgColor:'rgba(84, 92, 100, 1)', hoverStyleImage:'', // Click style clickStyle:'color', clickStyleBgColor:'rgba(84, 92, 100, 1)', clickStyleImage:'', name:'page1', deleteRoute:'' },{ // Default font Font0:{ FontSize: 16, Color: 'rgba(255, 255, 255, 1)', FontFamily: 'sans-serif', FontWeight: 'normal' }, // Hover text Font1:{ FontSize: 16, Color: 'rgba(138, 191, 240, 1)', FontFamily: 'sans-serif', FontWeight: 'normal' }, // Click text Font2:{ FontSize: 16, Color: 'rgb(255, 208, 75)', FontFamily: 'sans-serif', FontWeight: 'normal' }, // Text content textContent: thisObj.i18nVM.$t("router.page2"), // Tab page route tabRouter:'', // Default style defaultStyle:'color', defaultStyleBgColor:'rgba(84, 92, 100, 1)', defaultStyleImage:'', // Hover style hoverStyle:'color', hoverStyleBgColor:'rgba(84, 92, 100, 1)', hoverStyleImage:'', // Click style clickStyle:'color', clickStyleBgColor:'rgba(84, 92, 100, 1)', clickStyleImage:'', name:'page2', deleteRoute:'' },{ // Default font Font0:{ FontSize: 16, Color: 'rgba(255, 255, 255, 1)', FontFamily: 'sans-serif', FontWeight: 'normal' }, // Hover text Font1:{ FontSize: 16, Color: 'rgba(138, 191, 240, 1)', FontFamily: 'sans-serif', FontWeight: 'normal' }, // Click text Font2:{ FontSize: 16, Color: 'rgb(255, 208, 75)', FontFamily: 'sans-serif', FontWeight: 'normal' }, // Text content textContent: thisObj.i18nVM.$t("router.page3"), // Tab page route tabRouter:'', // Default style defaultStyle:'color', defaultStyleBgColor:'rgba(84, 92, 100, 1)', defaultStyleImage:'', // Hover style hoverStyle:'color', hoverStyleBgColor:'rgba(84, 92, 100, 1)', hoverStyleImage:'', // Click style clickStyle:'color', clickStyleBgColor:'rgba(84, 92, 100, 1)', clickStyleImage:'', name:'page3', deleteRoute:'' }]; - Modify the Vue3Navigator_Widget.ftl file as required after decompression. (In this example, no modification is required.)
This is a widget DOM file, which is equivalent to an HTML file and is used for style display.
<div class="navigator-widget-container"> <div id="navigator_widget" :style="getContainerStyle" v-cloak> <router-link v-for="(item, index) in routersArr" :to="`/${item.name}/${index}`" class='routerLink' @click.native=clickRoute(index) >{{handleMoreText(item.textContent)}}</router-link> </div> </div> <div id="edit-wrap" style="display: none"></div> - Modify the Vue3Navigator_Widget.css file as required after decompression. (In this example, no modification is required.)
This is the style file of the widget. You can compile the CSS style in this file.
.navigator-widget-container { text-align: left; } #navigator_widget { font-size: 20px; background-color: transparent; height: auto; } #navigator_widget a { display: inline-block; height: 60px; line-height: 60px; padding: 0 20px; text-decoration: none; text-align: center; } /* #navigator_widget .router-link-exact-active { color: rgb(255, 208, 75); } */ #edit-navigator .navigator-wrap .flex-row { display: flex; align-items: center; margin-bottom: 20px; } #edit-navigator .navigator-wrap .flex-row-bottom { margin-bottom: 20px; } #edit-navigator .navigator-wrap .flex-row .label { width: 70px } - Modify the messages-zh.json and messages-en.json files.
This file is the internationalization resource file of the widget. In this example, add the following code in bold:
- messages-zh.json file:
{ "zh-CN": { "router.homepage": "Homepage", "router.page1": "Page1", "router.page2": "Page2", "router.page3": "Page3", "router.default": "Default", "router": "Route", "router.tip": "Only released pages can be selected" } } - messages-en.json file:
{
	"en-US": {
		"router.homepage": "Home",
		"router.page1": "Page one",
		"router.page2": "Page Two",
		"router.page3": "Page Three",
		"router.default": "Default",
		"router": "Router",
		"router.tip": "Only published pages can be selected"
	}
}
- messages-zh.json file:
- Compress all files (including the modified files) into the global_NavigatorWidget.zip package.
- Upload the widget.
- Choose Maintain > Global Elements > Page Assets Management > Widgets.
- Click Submit New Widget.
- On the displayed page, click Select Source File(.zip), select the widget ZIP package, configure the basic information and click Submit.
Figure 7 Uploading a widget
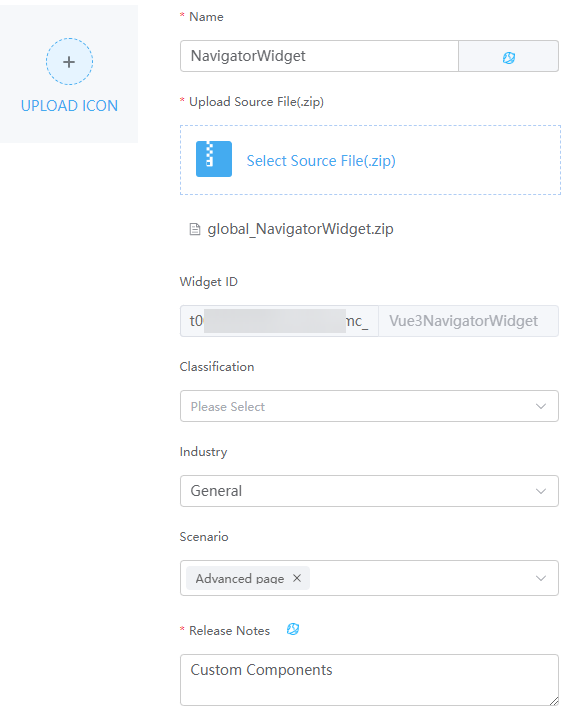
- Name: widget name. In this example, set this parameter to NavigatorWidget.
- Upload icon: display icon of the widget.
- Source file: Select the global_NavigatorWidget.zip package in 12.
- Classification: Category to which a widget belongs. After a widget is uploaded, the widget is displayed in the category on the advanced page. In this example, select navigation.
- Industry: Industry in which the widget package is used. Retain the default value General. Widgets can be displayed by industry in the widget list.
- Scenario: application scenario of the widget package. Widgets can be displayed by scenario in the widget list.
- Release Notes: Widget description. You need to configure the description in different languages. After the setting, the content is displayed on the Overview tab page of the widget details page.
- Create an advanced page of the Liquid Layout type.
- Access the application designer. In the navigation pane, choose Page.
- Click
 next to Advanced Page, set the label and name, set the layout type to Liquid Layout, and click Add.
- In the upper left corner of the design page, click
 and drag the widget uploaded in 13 from the Custom to the design area.
 - Click this widget and configure pages associated with different routes on the route tab page.
Page three is displayed on the Router tab of the custom widget, which meets the scenario requirements.Figure 8 Dragging custom widgets and configuring routes

- Click
 in the upper left corner of the design page, and drag the router view widget from Menu to the lower part of the custom widget in the blank area.
 - Click
 in the upper part of the page to save the page.
 - Click
 to publish the page.
 - After the page is successfully released, click
 to go to the preview page and view the page effect.
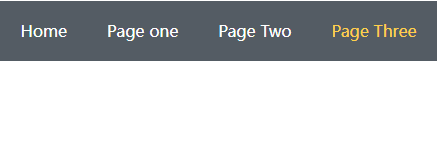
Page Three is added, and the result meets the expectation.Figure 9 Preview effect
Development Example of Nested Router Navigator
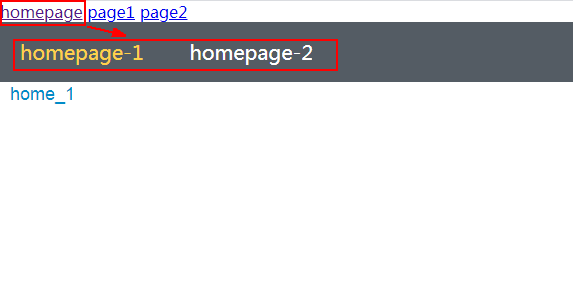
To achieve the page effect shown in Figure 10, you need to nest a level-2 route within the homepage of the level-1 router navigator. This nested level-2 router should allow navigation to both the homepage-1 and homepage-2 pages. To implement the nested routing function, use children to the route configuration in the level-1 route navigation JS file.
- Download the preset widget navigator (demo) by referring to Customizing System Widgets and decompress global_Vue3NavigatorWidget_Version number.zip.
- Modify the Vue3Navigator_Widget.js file after decompression and use children to configure the route parameters.
Add the following code in bold:
// Set the saved routing information routers. const defaultRouters = { homepage: {pageName: '', children: [{}]}, page1: {pageName: ''}, page2: {pageName: ''}, }; const routers = widgetProperties.routers ? JSON.parse(widgetProperties.routers): defaultRouters; let routersArr = [ { // Default font Font0:{ FontSize: 16, Color: 'rgba(255, 255, 255, 1)', FontFamily: 'sans-serif', FontWeight: 'normal' }, // Hover text Font1:{ FontSize: 16, Color: 'rgba(138, 191, 240, 1)', FontFamily: 'sans-serif', FontWeight: 'normal' }, // Click text Font2:{ FontSize: 16, Color: 'rgb(255, 208, 75)', FontFamily: 'sans-serif', FontWeight: 'normal' }, // Text content textContent: thisObj.i18nVM.$t("router.homepage"), // Tab page route tabRouter:'', // Default style defaultStyle:'color', defaultStyleBgColor:'rgba(84, 92, 100, 1)', defaultStyleImage:'', // Hover style hoverStyle:'color', hoverStyleBgColor:'rgba(84, 92, 100, 1)', hoverStyleImage:'', // Click style clickStyle:'color', clickStyleBgColor:'rgba(84, 92, 100, 1)', clickStyleImage:'', name:'homepage', deleteRoute:'', children: [ { name: "homepage-1", displayName: "homepage 1" }, { name: "homepage-2", displayName: "homepage 2" } ] },{ // Default font Font0:{ FontSize: 16, Color: 'rgba(255, 255, 255, 1)', FontFamily: 'sans-serif', FontWeight: 'normal' }, // Hover text Font1:{ FontSize: 16, Color: 'rgba(138, 191, 240, 1)', FontFamily: 'sans-serif', FontWeight: 'normal' }, // Click text Font2:{ FontSize: 16, Color: 'rgb(255, 208, 75)', FontFamily: 'sans-serif', FontWeight: 'normal' }, // Text content textContent: thisObj.i18nVM.$t("router.page1"), // Tab page route tabRouter:'', // Default style defaultStyle:'color', defaultStyleBgColor:'rgba(84, 92, 100, 1)', defaultStyleImage:'', // Hover style hoverStyle:'color', hoverStyleBgColor:'rgba(84, 92, 100, 1)', hoverStyleImage:'', // Click style clickStyle:'color', clickStyleBgColor:'rgba(84, 92, 100, 1)', clickStyleImage:'', name:'page1', deleteRoute:'' },{ // Default font Font0:{ FontSize: 16, Color: 'rgba(255, 255, 255, 1)', FontFamily: 'sans-serif', FontWeight: 'normal' }, // Hover text Font1:{ FontSize: 16, Color: 'rgba(138, 191, 240, 1)', FontFamily: 'sans-serif', FontWeight: 'normal' }, // Click text Font2:{ FontSize: 16, Color: 'rgb(255, 208, 75)', FontFamily: 'sans-serif', FontWeight: 'normal' }, // Text content textContent: thisObj.i18nVM.$t("router.page2"), // Tab page route tabRouter:'', // Default style defaultStyle:'color', defaultStyleBgColor:'rgba(84, 92, 100, 1)', defaultStyleImage:'', // Hover style hoverStyle:'color', hoverStyleBgColor:'rgba(84, 92, 100, 1)', hoverStyleImage:'', // Click style clickStyle:'color', clickStyleBgColor:'rgba(84, 92, 100, 1)', clickStyleImage:'', name:'page2', deleteRoute:'' }]; routersArr = widgetProperties.routersArr ? JSON.parse(widgetProperties.routersArr) : routersArr; var defaultPropObj = { direction: 'row', position:'defaultType', quickSet:'center', topDis:0, leftDis:0, defaultRoute:'', routeStyle:'' } defaultPropObj = widgetProperties.defaultPropObj ? $.extend({}, defaultPropObj, JSON.parse(widgetProperties.defaultPropObj)) : defaultPropObj; // Register a route. let arr = []; Object.keys(routers).forEach(item=>{ let obj = { name: item, displayName: item, params: [ { name: "id", displayName: "ID" } ] } if(item === 'homepage') { obj.children = [ { name: "homepage-1", displayName: "homepage 1" }, { name: "homepage-2", displayName: "homepage 2" } ]; } arr.push(obj) }) console.log('arr', arr); Studio.registerRouter(thisObj, arr); const height = $(elem).height(); const RouterPlugin = Studio.inReader ? Studio.router : VueRouter.createRouter({ history: VueRouter.createWebHashHistory(), routes: [] }); - Compress all files (including the modified files) into a .zip package named global_NavigatorWidgetAdd1.zip and upload the component by referring to section Customizing System Widgets.
- Create an advance page "Navigator" with liquid layout, click
 in the upper left corner of the design page, and drag the created widget from Custom in Menu to the blank area in the right pane. Click to select the widget. The property setting panel of the widget is displayed in the right pane. Click the Routers tab and configure the pages associated with the L1 and L2 routes, as shown in Figure 11.
- Click
 in the upper left corner of the design page "Navigator" and drag the router view widget from Menu to the lower part of the custom widget in the blank area.
 - Download the preset widget navigator (demo) by referring to Customizing System Widgets and decompress global_Vue3NavigatorWidget_Version number .zip.
- Modify the Vue3Navigator_Widget.js file after decompression. Because the L2 route has been defined in the L1 router navigator widget, you need to delete the code specified in the L2 router navigator JS file.
Delete the following code:
if ((typeof(Studio) != "undefined") && Studio) { /* The platform generates a default route for each level of route. When no other routes can be matched, the default route can be matched. name must be unique; displayName is displayed during route configuration on the development page. params defines route parameters. Parameters can be configured only for the top-level route. Nested routes are configured for children. A maximum of three levels of routes are supported. */ var router = [ { name: 'homepage', displayName: 'homepage', params: [ { name: "id", displayName: "ID" } ] }, { name: 'page1', displayName: 'page1', params: [ { name: "id", displayName: "ID" } ] }, { name: 'page2', displayName: 'page2', params: [ { name: "id", displayName: "ID" } ] } ]; // Define a route through Studio.registerRouter. Studio.registerRouter(thisObj, router); } - In the decompressed Vue3Navigator_Widget.ftl file, modify the route page parameters to the children configuration added in 2.
This is a widget DOM file, which is equivalent to an HTML file and is used for style display. In this example, add the following code in bold:
<div id="Navigator_Widget"> <router-link :to="{name: 'homepage-1', params: {id: 1}}">homepage-1</router-link> <router-link :to="{name: 'homepage-2', params: {id: 2}}">homepage-2</router-link> </div> - Compress all files (including the modified files) into a .zip package named global_NavigatorWidgetAdd2.zip and upload the widget by referring to Customizing System Widgets.
- Open the "home" page that uses the L2 router navigator, click
 in the upper left corner of the design page, and drag the created widget from Custom in Menu to the blank area on the right of the design page.
Do not configure anything on the router tab.Figure 12 Router tab
- Click
 in the upper left corner of the design page "home" and drag the router view widget from Menu to the lower part of the custom widget in the blank area.
 - Click the save icon in the upper part of the "home" and "Navigator" pages.
- In the upper part of the "Navigator" page, click
 to publish the page.
 - Click
 to view the page effect, as shown in Figure 10. Nested routes are displayed.
Customizing the Layout Style
If you want to have a page on which the navigation widget area and the global router view widget area can scroll with the scroll bar, do as follows.
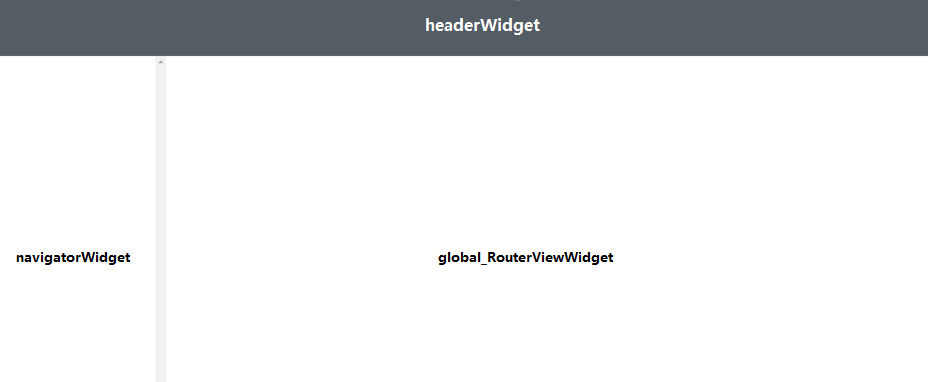
- Specify the height of the head widget in the .css style file.
The sample code is as follows:
#headerWidget { height: 90px; } - Download the preset widget navigator (demo) by referring to Customizing System Widgets and decompress global_Vue3NavigatorWidget_Version number .zip.
- Modify the decompressed Vue3Navigator_Widget.css file. This is the style file of the widget. You can compile the CSS style in this file.
The sample code is as follows:
html[app=desktop] body { overflow: hidden; } #navigatorWidget, #global_RouterViewWidget { height: calc(100% - 90px); overflow: scroll; } - Compress the modified head widget and widget router navigator files into a ZIP package.
- Upload the repacked widget by referring to Customizing System Widgets.
- Click
 in the upper left corner of the design page and drag the uploaded head widget, router navigator widget, and system router view widget to the design page.
 - Click
 in the upper part of the page to save the page.
 - Click
 to publish the page.
 - After the publish is successful, click
 to view the page display effect.
Feedback
Was this page helpful?
Provide feedbackThank you very much for your feedback. We will continue working to improve the documentation.See the reply and handling status in My Cloud VOC.
For any further questions, feel free to contact us through the chatbot.
Chatbot

