Websites
Checking Websites
- Log in to the APM console.
- Click
 on the left and choose Management & Governance > Application Performance Management.
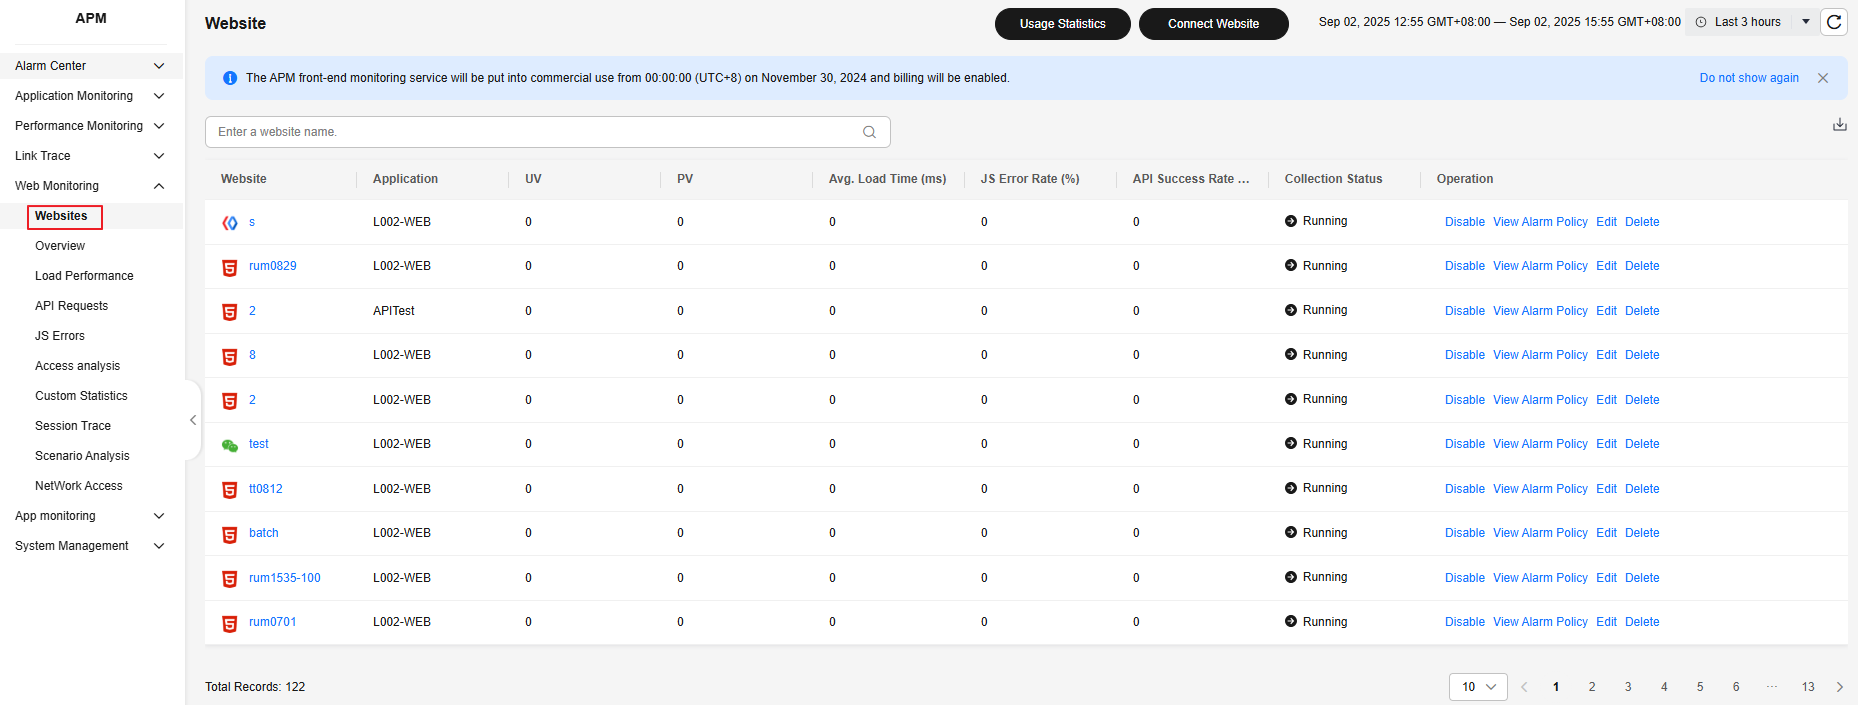
 - In the navigation pane, choose Web Monitoring > Websites. The connected website list is displayed.
Figure 1 Checking websites

Table 1 Website parameters Parameter
Description
Website
Name of a website.
Application
Application to which the website belongs.
UV
Number of visitors who access the website. If a user accesses the site multiple times in a day, only one UV will be counted.
PV
Page view (PV), which is the number of times a page is opened or refreshed.
Avg. Load Time
Average page load time.
Avg. Load Time is displayed only for web/HTML5 pages. For other applets, Avg. Load Time is displayed as 0.
JS Error Rate
JS error rate = Number of errors triggered during JS running/Total number of Java scripts
API Success Rate
API success rate = Number of APIs that are successfully called/Total number of APIs
Collection Status
Collection status of the website. Options: Running and Disabled.
Operation
Operations that can be performed on the website. For details, see Table 7.
- In the upper right corner of the Websites page, select a time range. Default: Last 20 minutes.
Options: Last 20 minutes, Last hour, Last 3 hours, Last 6 hours, Last day, Today, Yesterday, Last week, Last month, or Custom.
Enter a website name in the search box in the upper left corner of the list and click
 . Only the information about this website is displayed.
Click
 in the upper right corner of the list to export information. A maximum of 200 records can be exported.
Viewing Usage Statistics
APM provides usage statistics for web monitoring.
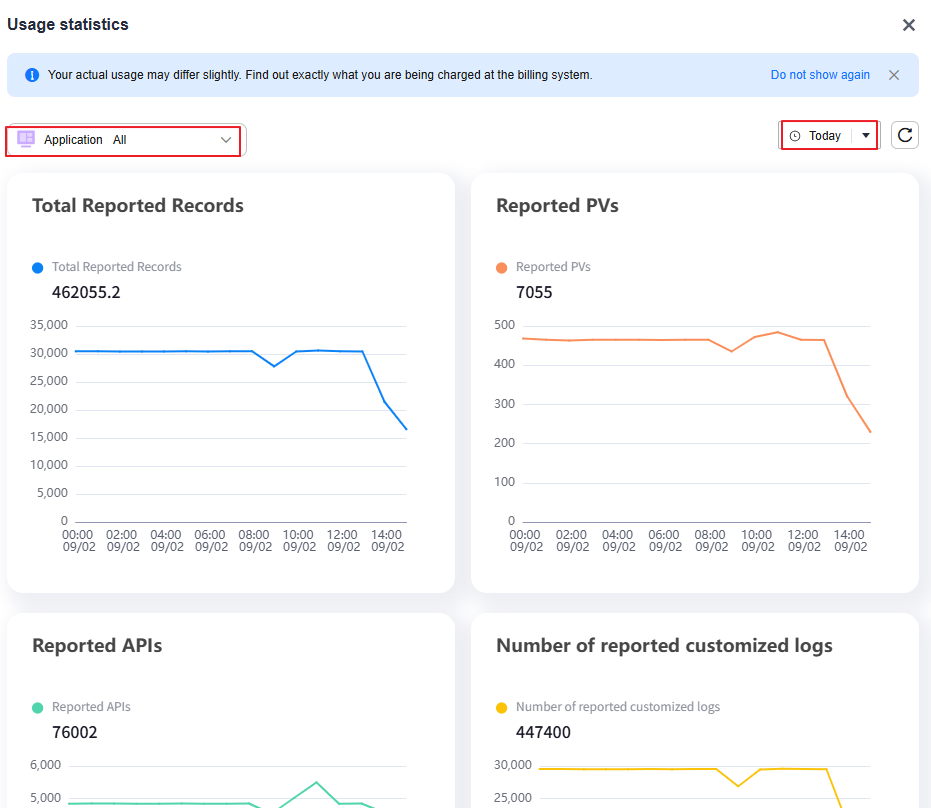
- In the navigation pane, choose Web Monitoring > Websites. On the displayed page, click Usage Statistics to view the usage information of a website.
Figure 2 Viewing usage statistics

By default, the trend graphs of Total Reported Records, Reported PVs, Reported APIs, and Reported Custom Logs, and the usage overview of all sites are displayed.
Figure 3 Usage statistics - metric trends
Table 2 Usage statistics parameters Parameter
Description
Total Reported Records
Total number of reported records = Number of reported PVs + Number of reported APIs/10 + Number of reported custom logs
Reported PVs
Number of reported PVs.
Reported APIs
Number of reported APIs.
Reported Custom Logs
Number of reported custom logs.
- In the upper right corner of the Usage Statistics page, select a time range. Default: Today. Options: Today, Yesterday, and Custom.
- Click
 on the right of PV, API, Custom, and Total to sort sites.
- Click the site drop-down list and select a site name to view the usage statistics of the site.
Connecting Websites
- In the navigation pane, choose Web Monitoring > Websites, and click Connect Website. On the displayed page, set related parameters.
- After a website is created, appId will be automatically generated.
- Before you enter a website name, the Create Website button is grayed.
- After a website is created, you can click Edit in the Operation column to check the SDK extended configuration items.
- Web monitoring data is reported through the automatically generated appId. Due to the lack of authentication, dirty data may be generated.
- For details about how to connect applet SDKs, see SDK Reference.
- Web & HTML5 access
- Select Web & HTML5.
- Select an application from the drop-down list box and enter a website name.
- Click Create Website.
- WeChat mini program access
- Select WeChat.
- Select an application from the drop-down list box and enter a website name.
- Click Create Website.
- Baidu mini program access
- Select Baidu.
- Select an application from the drop-down list box and enter a website name.
- Click Create Website.
- Alipay mini program access
- Select Alipay.
- Select an application from the drop-down list box and enter a website name.
- Click Create Website.
- DingTalk mini program access
- Select DingTalk.
- Select an application from the drop-down list box and enter a website name.
- Click Create Website.
- Track the service.
- Web&H5
Copy the following code to the first line of the <body> of Index.html.
- Fixed version access
<script> !function(x, n) { window[n] = window[n] || {}; window[n].config = { domain: "https://rum.rnd.*****.com",appId: "",apiRepo: true,thirdApi: true,hashMode: true,JsErrClean: true,smartJsErr: true,webResource: true,traceType: "apm"}; var o = document.createElement('script'); o.src = x, o.async = !0; var d = document.body.firstChild; document.body.insertBefore(o, d); }('https://test-static-resource.obs.*****.ulanqab.****.com/js-agent/jsagent.min.js', '__fr'); </script> - Latest version access
<script>
    !function(x, n) {
      window[n] = window[n] || {};
      window[n].config = { domain: "https://rum.rnd.****.com",appId: "",apiRepo: true,thirdApi: true,hashMode: true,JsErrClean: true,smartJsErr: true,webResource: true,traceType: "apm"};
    var o = document.createElement('script');
    o.src = x, o.async = !0;
    var d = document.body.firstChild;
    document.body.insertBefore(o, d);
  }('https://test-static-resource.obs.****.ulanqab.****.com/js-agent/jsagent.min.js', '__fr');
</script>
- Fixed version access
- WeChat

- Add the report address https://apm-web.region.myhuaweicloud.com and register it as a valid domain name.
Currently, this function is supported in the AP-Singapore region only. The report address is https://apm-web.ap-southeast-3.myhuaweicloud.com.
To add an Agent to the WeChat mini program, perform the following steps:
- Run the following command on the terminal to install the SDK:
npm i apm-mini-sdk
Use the developer tool to build the npm library file of the current project. If the apm-mini-sdk file exists in the miniprogram_npm folder, the import is successful.
- Add the following code to the header of app.js:
import apmAgent from 'apm-mini-sdk';
apmAgent.startSDK({
  domain: "https://rum.rnd.****.com",appId: "",apiRepo: true,thirdApi: true,hashMode: true,JsErrClean: true,smartJsErr: true,webResource: true,traceType: "apm"
  platform: 'wx'
});
- Add the report address https://apm-web.region.myhuaweicloud.com and register it as a valid domain name.
- Baidu

- Add the report address https://apm-web.region.myhuaweicloud.com and register it as a valid domain name.
Currently, this function is supported in the AP-Singapore region only. The report address is https://apm-web.ap-southeast-3.myhuaweicloud.com.
To add an Agent to the Baidu mini program, perform the following steps:
- Run the following command on the terminal to install the SDK:
npm i apm-mini-sdk
- Add the following code to the header of app.js:
import apmAgent from 'apm-mini-sdk';
apmAgent.startSDK({
  domain: "https://rum.rnd.****.com",appId: "cb868c9076de4324a22c6496ab55aadf",apiRepo: true,thirdApi: true,hashMode: true,JsErrClean: true,smartJsErr: true,webResource: true,traceType: "apm",
  platform: 'baidu'
});
- Add the report address https://apm-web.region.myhuaweicloud.com and register it as a valid domain name.
- Alipay

- Add the report address https://apm-web.region.myhuaweicloud.com and register it as a valid domain name.
Currently, this function is supported in the AP-Singapore region only. The report address is https://apm-web.ap-southeast-3.myhuaweicloud.com.
To add an Agent to the Alipay mini program, perform the following steps:
- Run the following command on the terminal to install the SDK:
npm i apm-mini-sdk
- Add the following code to the header of app.js:
import apmAgent from 'apm-mini-sdk';
apmAgent.startSDK({
  domain: "https://rum.rnd.***.com",appId: "cb868c9076de4324a22c6496ab55aadf",apiRepo: true,thirdApi: true,hashMode: true,JsErrClean: true,smartJsErr: true,webResource: true,traceType: "apm",
  platform: 'alipay'
});
- Add the report address https://apm-web.region.myhuaweicloud.com and register it as a valid domain name.
- DingTalk

- Add the report address https://apm-web.region.myhuaweicloud.com and register it as a valid domain name.
Currently, this function is supported in the AP-Singapore region only. The report address is https://apm-web.ap-southeast-3.myhuaweicloud.com.
To add an Agent to the DingTalk mini program, perform the following steps:
- Run the following command on the terminal to install the SDK:
npm i apm-mini-sdk
- Add the following code to the header of app.js:
import apmAgent from 'apm-mini-sdk';
apmAgent.startSDK({
  domain: "https://rum.rnd.****.com",appId: "cb868c9076de4324a22c6496ab55aadf",apiRepo: true,thirdApi: true,hashMode: true,JsErrClean: true,smartJsErr: true,webResource: true,traceType: "apm",
  platform: 'ding_talk'
});
- Add the report address https://apm-web.region.myhuaweicloud.com and register it as a valid domain name.
- Web&H5
Setting an Alarm Policy
- In the navigation pane, choose Web Monitoring > Websites. Locate a target website and click View Alarm Policy in the Operation column to view the alarm policy list.
Table 3 Parameters in the alarm policy list Parameter
Description
Policy Name
Policy name of the current site.
Monitoring Type
Select a monitoring type.
- Options: API collection, JS error collection, Page performance collection, and Traffic (PV/UV) collection. The information about the selected type is displayed on the right.
Alarm Severity
Severity of an alarm. Options: COMMON and CRITICAL.
Monitored Object
Website to be monitored.
Alarm Rule
Rule based on which an alarm is triggered.
Updated
Time when the alarm policy was last changed.
Status
Status of the alarm policy. Options: Running and Disabled.
Operation
- Edit: Click Edit to edit the alarm policy.
- Disable/Enable: Disable or enable the alarm policy.
- Delete: Delete the alarm policy.
You can search for alarm policies by policy name.
- Enter a policy name in the search box.
- Click
 . The information about the policy is displayed.
- Click Add Alarm Policy.
- Basic information
Table 4 Basic information parameters Parameter
Description
Policy Name
Custom name, which cannot be left blank.
Only letters, digits, underscores (_), and hyphens (-) are allowed. Enter up to 512 characters.
Alarm Severity
Severity of an alarm. Options: COMMON and CRITICAL.
Monitored Object
Website to be monitored.
Monitoring Type
Select a monitoring type.
- Options: API collection, JS error collection, Page performance collection, and Traffic (PV/UV) collection. The information about the selected type is displayed on the right.
Metric Set
Select a target metric set. The information about the selected metric set is displayed on the right.
- Alarm rule
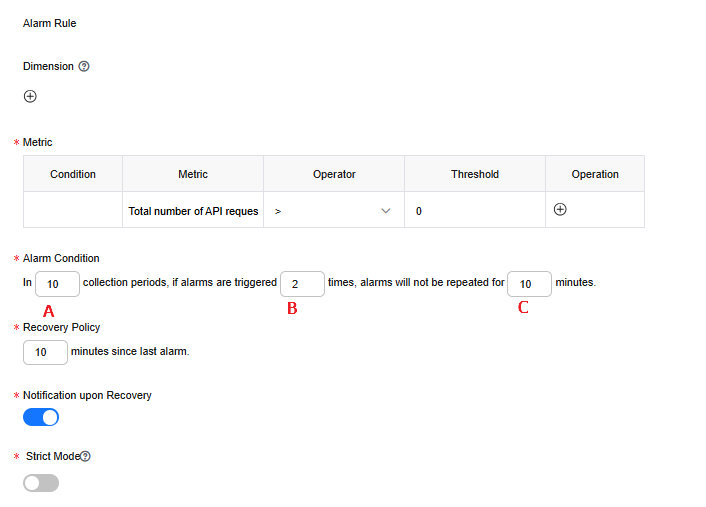
Figure 4 Alarm rule

Table 5 Alarm rule parameters Parameter
Description
Dimension
(Optional) A fine-grained category of metrics.
Metric
Metric for which you want to define one or more alarm rules.
Alarm Condition
Condition for triggering an alarm.
A: 1–10
B: 1–10; not greater than A
C: ≥ 10
Recovery Policy
Condition for clearing an alarm.
Notification upon Recovery
Whether to notify recipients of alarm clearance.
Strict Mode
Checks all returned values against alarm rules to detect exceptions.
- Alarm notification
Table 6 Alarm notification parameters Parameter
Description
Notification Content
Alarm details, which contain up to 500 characters.
- If Strict Mode is enabled, the alarm notification content supports both Variable and Loop. If Strict Mode is disabled, only Variable is supported.
- Alarm notification content. You can customize the content or select required metrics.
- Select the metrics to be collected. On the right of the page, click
 next to a metric. The metric will then be referenced to the notification content box.
Notification Object
Select a notification object from the drop-down list. Alarms will then be sent to the selected notification object.
- Basic information
- Click OK.
More Operations
|
Operation |
Description |
|---|---|
|
Enabling or disabling a website |
Click Disable or Enable in the Operation column to disable or enable a website, respectively. |
|
Checking the alarm policy |
Click View Alarm Policy in the Operation column. For details, see Setting an Alarm Policy. |
|
Editing a website |
Click Edit in the Operation column. |
|
Deleting a website |
Click Delete in the Operation column. |
Feedback
Was this page helpful?
Provide feedbackThank you very much for your feedback. We will continue working to improve the documentation.See the reply and handling status in My Cloud VOC.
For any further questions, feel free to contact us through the chatbot.
Chatbot


