

Quickly Applying for and Using an OV SSL Certificate
With an SSL certificate deployed on your web server, the server uses HTTPS to establish encrypted links to the client, ensuring data transmission security.
Scenarios
- Cloud Certificate & Manager provides domain SSL certificates. You can purchase them as required. There are three types of domain name certificates: DV, OV, and EV. OV wildcard-domain SSL certificates are widely used to provide encryption protection for all subdomain names and are widely used by the Ministry of Foreign Affairs, State Grid, and Huawei Cloud.
- This topic walks you through on how to quickly apply for and use an SSL certificate in CCM. Let's apply for a wildcard-domain OV SSL certificate from GlobalSign.
- A wildcard-domain certificate can protect only subdomains of the same level. For example, a level-2 wildcard domain name *.example.com can protect test.example.com, but cannot protect a level-3 subdomain name such as test.test.example.com.
Procedure
| Step | Description |
|---|---|
| After signing up for a Huawei Cloud account, complete real-name authentication, top up your account, and grant permissions to IAM users. | |
| Configure the parameters for purchasing an OV SSL certificate. | |
| After you purchase a certificate, associate a domain name, provide additional details, and then submit the application for approval. | |
| After you submit a certificate application, configure domain name verification information to verify your ownership of the domain name. | |
| After the domain name ownership is verified, the CA will initiate organization verification. | |
| After the organization verification is complete, the CA manually reviews the certificate information. After the information is approved, the CA issues the certificate. | |
| After applying for a certificate, you can deploy the certificate to other Huawei Cloud services in one-click mode or download the certificate and deploy it on a server. |
Preparations
- Sign up with Huawei Cloud and complete real-name authentication.
Before purchasing a certificate, sign up for a Huawei Cloud account and complete real-name authentication.
- Ensure that your account has sufficient balance or has a valid payment method configured.
- The account for purchasing a certificate has the SCM Administrator/SCM FullAccess, BSS Administrator, and DNS Administrator permissions.
- BSS Administrator: has all permissions on the account center, billing center, and resource center. It is a project-level role, which must be assigned in the same project.
- DNS Administrator: has full permissions for DNS.
For details, see Permissions Management.
-
If the website where the SSL certificate is to be applied is planned to be deployed in the Chinese mainland, you need to complete ICP filing as required by the Ministry of Industry and Information Technology (MIIT). Otherwise, website access may be affected.
Step 1: Purchase an SSL Certificate
- Log in to the CCM console.
- Click
 in the upper left corner of the page and choose . The SSL certificate manager page is displayed.
 - In the upper right corner of the page, click Buy Certificate to go to the certificate purchase page.
- On the Buy CCM page, set the following parameters, as shown in Figure 1.
Table 1 Parameters for purchasing an OV SSL certificate Parameter
Example
Description
Billing Mode
One-time
SSL certificates are a single-time product.
Type
SSL certificate - domain name
-
Domain Type
Wildcard
You can associate Single domain, Multiple domain, or Wildcard with a certificate as required. For more information, see Domain Name Types Supported in SCM.
Domain Quantity
1
- If the Domain Type value is Single domain or Wildcard, you can only associate one domain name with a certificate.
- If the Domain Type value is Multiple domains, the quantity of domain names ranges from 2 to 250. Set the number of domain names as required.
Certificate Type
OV
CCM provides three types of SSL certificates: OV, DV, and EV. Different types of certificates apply to different application scenarios, trust levels, and security levels. For details, see Certificate Types.
Certificate Authority
GlobalSign
CCM supports the following certificate authorities: GeoTrust, DigiCert, GlobalSign.
CCM supports the following certificate authorities: DigiCert, GeoTrust, and GlobalSign.
For details about the types of certificates that can be issued by each CA, see Certificate Authority.
Region
All
-
Subscription Period
1 year
Select the subscription period as required. The longer the subscription period, the higher the discount.
Enterprise Project
default
This parameter is displayed only when you use an enterprise account to purchase an SSL certificate.
It enables unified management of cloud resources by project.
Quantity
1
Set the value as required.
Tags
Not added
Tags are used to identify SSL certificates, facilitating cloud resource classification and management.
- Click Next.
- Confirm the order information and agree to the CCM statement by selecting I have read and agree to the Cloud Certificate & Manager Statement. Click Pay.
- On the displayed page, select a payment method.
After the payment is successful, you can go to the page to view certificates you purchased.

Step 2: Apply for an SSL Certificate
After you purchase a certificate, you still need to associate a domain name with it, provide certain details, and then submit it for approval. The CA will not issue the certificate until all of the submitted details have been reviewed.
- Log in to the CCM console.
- Click
 in the upper left corner of the page and choose . The SSL certificate manager page is displayed.
 - In the Operation column that contains the certificate to be applied for, click Apply for Certificate. Figure 2 Applying for a Certificate

- On the displayed page, set parameters such as domain name, enterprise, and applicant. For details, see Submitting an SSL Certificate Application. Figure 3 Certificate application details page
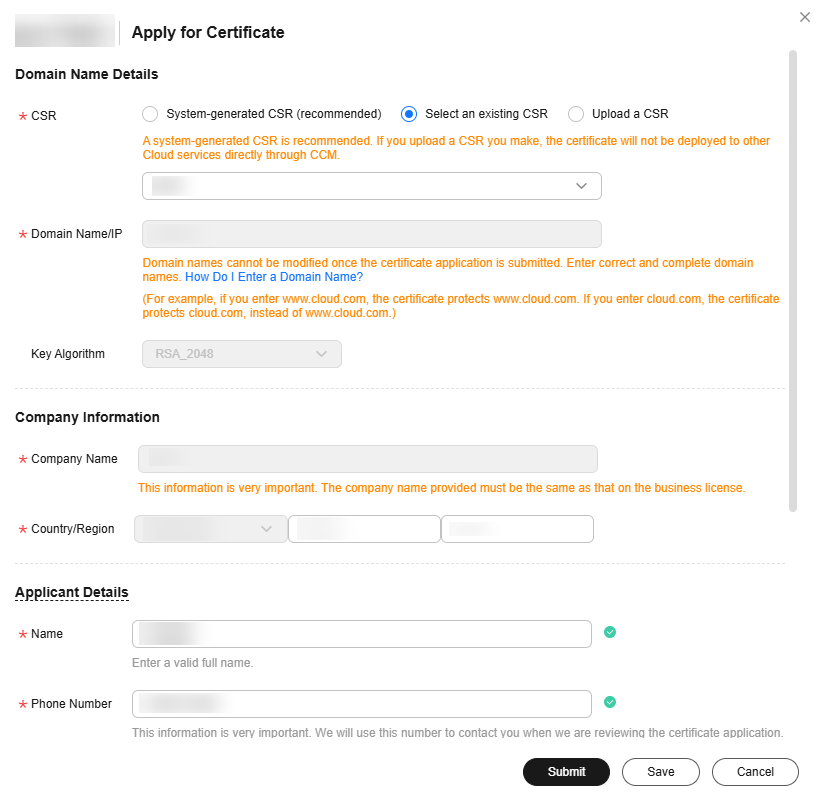
- After confirming that the entered information is correct, read through the Cloud Certificate & Manager Statement, Privacy Statement, and the authorization statement, and check the box to agree to the disclaimer and statements.
- Click Submit.
The system will submit your application to the CA. During the approval process, make sure that you can be reached by phone and that you regularly check for emails from the CA.
Step 3: Verify the Domain Ownership
The CA will handle your application within 2 to 3 working days and send a verification email to you. You need to verify the domain name as required to prove the domain name ownership. This section uses DNS verification as an example.
- Log in to the CCM console.
- Click
 in the upper left corner of the page and choose . The SSL certificate manager page is displayed.
 - In the SSL certificate list, locate the row that contains the certificate to be applied for, and click Verify Domain Name in the Operation column. Figure 4 Domain ownership verification

- On the Verify Domain Name page, view the content for Host Record, Record Type, and Record Value. Figure 5 shows an example.
- Go to the DNS service provider of your domain name and add a record. For details, see Manual DNS Verification.
- Check whether the domain name verification takes effect. For details, see Manual DNS Verification. If the DNS verification configuration does not take effect, rectify the fault by referring to Manual DNS Verification until the verification takes effect.
- Review the DNS verification result.
If you have verified the domain name ownership, the CA will take 2 to 3 working days to verify your information. You can proceed to the organization verification step only after the application is approved.

Step 4: Verify the Organization
If you apply for an OV SSL certificate, the CA sends an organization verification email after domain name ownership is verified. The CA validates your organization identity by contacting you through the method you select.
- If you purchase a certificate again from the same CA within 13 months and the certificate information is not changed, organization verification is not required.
- After the organization verification completes, it takes some time for CA to complete the verification.
- Log in to the mailbox you left when applying for a certificate.
- Open the organization verification email from the CA.
- Reply to the email from the CA to select an organization verification method.
- Cooperate with the CA and complete the verification by the method you select.
Step 5: Issue an SSL Certificate
Your SSL certificates will be issued after the CA approves your application. The certificate approval time depends on how quickly you respond with requested information from the CA. The CA contacts you through the reserved email address and phone number. Ensure you can be contacted through the information you leave when applying for the certificate.
Generally, the CA manually reviews the information about an OV SSL certificate after the organization verification is complete. If the information is correct, the review takes three to five working days. After the CA approves the certificate, it issues the certificate. The certificate takes effect upon issuance. The OV SSL certificate application is complete.
Step 6: Using an OV SSL Certificate
After applying for a certificate, you can deploy the certificate to other Huawei Cloud services in one-click mode or download the certificate and deploy it on a server. Downloading a Certificate. The following uses Scenario 1: Deploying an SSL Certificate to WAF or Scenario 2: Installing an SSL Certificate on an Nginx Server as an example. For details about how to install and deploy certificates on other cloud products or servers, see Installing/Deploying an SSL Certificate on the Server.
If traffic passes through WAF and needs to be encrypted using HTTPS, you need to deploy the SSL certificate on WAF, especially when the multi-node architecture such as CDN → WAF → Origin Server is used. This prevents attackers from tampering with data on intermediate nodes, while decrypting, inspecting, and allowing legitimate incoming traffic to improve overall data security.
- Prerequisites
- You have enabled WAF, routed your website domain name to WAF, and configured an SSL certificate for the domain name in WAF.
- You have an SSL certificate that is in Issued or Hosted status.
- Constraints
- If you have not purchased WAF or the domain name you want to use the certificate for has not been added to WAF, deploying the certificate to WAF may fail.
- If you select Upload a CSR for CSR when applying for a certificate, the issued certificate cannot be directly deployed to other cloud products through SCM because no private key of the certificate is available on the Huawei cloud. To use a certificate in a cloud product, download the certificate to your local PC first. Then, upload the certificate and private key to the cloud product and complete deployment.
- Step
- Log in to the CCM console.
- In the navigation pane on the left, choose SSL Certificate Manager > SSL Certificates.
- Locate the row containing the certificate you want to deploy on other cloud product, and click More > Deploy in the Operation to go to the certificate deployment details page.
- On the displayed page, select WAF in the Deployment Details area.
- Select the domain name you want to deploy the certificate for and click Deploy in the Operation column.
To deploy the certificates for multiple domain names, select all the target domain names and click Batch Update above the domain name list.
- In the displayed confirmation dialog box, click Confirm.
After the deployment is successful, a message is displayed, indicating that the deployment is successful. Go to the deployment record page to view the result.
The following uses an Nginx 1.24.0 server running CentOS 7 as an example to describe how to install an international standard certificate. After the installation is complete, your web server will have the SSL communication capability to ensure secure data transmission.
- Prerequisites
- The SSL certificate has been issued, and it is in the Issued status.
- You have downloaded the SSL certificate. For more details, see Downloading an SSL Certificate.
- Constraints
- Before installing the certificate, enable port 443 on the server where the SSL certificate is installed and add port 443 to the security group. Otherwise, HTTPS cannot be enabled after the installation.
- If a domain name maps to multiple servers, deploy the certificate on each server.
- The domain name to be run on the target server must be the same as the one associated with the certificate. Otherwise, the web browser will display a message indicating that the connection to the domain name is insecure.
- The certificate you will install is an international certificate.
- Step
- Obtain required files. Before installing the certificate, obtain the certificate files and password file. For details, see Step 1: Obtaining Files.
- Create a directory. Create the cert directory in the Nginx installation directory conf for storing the certificate files. For details, see Step 2: Creating a Directory.
- Upload the certificate file. Upload the local server.key and server.crt certificate files obtained in 1 to cert directory created in 2 on the Nginx server. For details, see Step 3: Uploading the Certificate File.
- Modify the configuration file. Configure the nginx.conf file in the conf directory of the Nginx server. For details, see Step 4: Modifying Configuration File.
- Verify the configuration. For details, see Step 5: Verifying the Configuration.
- Restart the Nginx server. Restart the Nginx server to make the configuration take effect. For details, see Step 6: Restarting Nginx.
- Verify the effect. After the deployment succeeds, in the address bar of the browser, enter https://Domain name and press Enter. For details, see Step 7: Verifying the Effect.
What is your overall rating for this page?
Thank you very much for your feedback. We will continue working to improve the documentation.See the reply and handling status in My Cloud VOC.
For any further questions, feel free to contact us through the chatbot.
Chatbot


