Changing the DataNode Storage Directory
Scenario
If the storage directory defined by the HDFS DataNode is incorrect or the HDFS storage plan changes, the MRS cluster administrator needs to modify the DataNode storage directory on FusionInsight Manager to ensure smooth HDFS running. Changing the ZooKeeper storage directory includes the following scenarios:
- Change the storage directory of the DataNode role. In this way, the storage directories of all DataNode instances are changed.
- Change the storage directory of a single DataNode instance. In this way, only the storage directory of this instance is changed, and the storage directories of other instances remain the same.
Notes and Constraints
This section applies to MRS 3.x or later.
Impact on the System
- The HDFS service needs to be stopped and restarted during the process of changing the storage directory of the DataNode role, and the cluster cannot provide services before it is completely started.
- The DataNode instance needs to stopped and restarted during the process of changing the storage directory of the instance, and the instance at this node cannot provide services before it is started.
- The directory for storing service parameter configurations must also be updated.
Prerequisites
- New disks have been prepared and installed on each data node, and the disks are formatted.
- New directories have been planned for storing data in the original directories.
- The HDFS client has been installed.
- The service user hdfs has been created.
- When changing the storage directory of a single DataNode instance, ensure that the number of active DataNode instances is greater than the value of dfs.replication.
Procedure
Check the environment.
- Log in to the server where the HDFS client is installed as user root, and run the following command to configure environment variables:
source HDFS client installation directory/bigdata_env
- If the cluster is in security mode, run the following command to authenticate the user:
kinit hdfs
- Run the following command on the HDFS client to check whether all directories and files in the HDFS root directory are normal:
hdfs fsck /
Check the fsck command output.
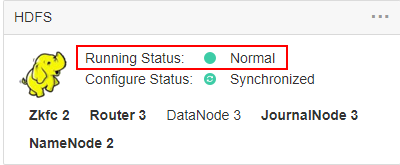
- Log in to FusionInsight Manager, choose Cluster > Services, and check whether Running Status of HDFS is Normal.

- Rectify the HDFS fault. The task is complete.
- Determine whether to change the storage directory of the DataNode role or that of a single DataNode instance:
Changing the storage directory of the DataNode role
- Choose Cluster > Services > HDFS and click Stop Service to stop the HDFS service.
- Log in as user root to each node on which the HDFS service is installed, and perform the following operations:
- Create a target directory (data1 and data2 are original directories in the cluster).
For example, if the target directory is ${BIGDATA_DATA_HOME}/hadoop/data3/dn, run the following command:
mkdir -p ${BIGDATA_DATA_HOME}/hadoop/data3/dn - Mount the target directory to the new disk. For example, mount ${BIGDATA_DATA_HOME}/hadoop/data3 to the new disk.
- Modify permissions on the new directory.
For example, if the new directory is ${BIGDATA_DATA_HOME}/hadoop/data3/dn, run the following command:
chmod 700 ${BIGDATA_DATA_HOME}/hadoop/data3/dn -Rchown omm:wheel ${BIGDATA_DATA_HOME}/hadoop/data3/dn -R - Copy the data to the target directory.
For example, if the original directory is ${BIGDATA_DATA_HOME}/hadoop/data1/dn and the target directory is ${BIGDATA_DATA_HOME}/hadoop/data3/dn, run the following command:
cp -af ${BIGDATA_DATA_HOME}/hadoop/data1/dn/* ${BIGDATA_DATA_HOME}/hadoop/data3/dn
- Create a target directory (data1 and data2 are original directories in the cluster).
- On FusionInsight Manager, choose Cluster > Services > HDFS and click Configurations then All Configurations to access the HDFS service configuration page.
Search for the parameter dfs.datanode.data.dir and change its value to the new target directory, for example, ${BIGDATA_DATA_HOME}/hadoop/data3/dn.
Table 1 Parameters Parameter
Description
Example Value
dfs.datanode.data.dir
Location of the DataNode storage block in the local file system. The default value is %{@auto.detect.datapart.dn}.
- If this parameter is set to a comma-separated list of directories, for example, /srv/BigData/hadoop/data1/dn or /srv/BigData/hadoop/data1/dn,/srv/BigData/hadoop/data2/dn, data is stored in all directories in the list, which are usually on different devices. Non-existent directories will be ignored. To ensure disk I/O load balancing, you are advised to provide several paths and each path corresponds to an independent disk.
- For example, the original data storage directories are /srv/BigData/hadoop/data1, /srv/BigData/hadoop/data2. To migrate data from the /srv/BigData/hadoop/data1 directory to the newly created /srv/BigData/hadoop/data3 directory, replace the whole parameter with /srv/BigData/hadoop/data2,/srv/BigData/hadoop/data3. Separate multiple storage directories with commas (,).
- Exercise caution when you modify the configuration. If the configuration is incorrect, the services are unavailable. If the configuration item of a role is modified, the configuration item of all instances will be modified. If the configuration item of an instance is modified, the value of the configuration item of other instances remains unchanged.
${BIGDATA_DATA_HOME}/hadoop/data3/dn
- Click Save. On the Cluster > Services page, start each stopped service in the cluster.
- After the HDFS is started, run the following command on the HDFS client to check whether all directories and files in the HDFS root directory are correctly copied:
hdfs fsck /
Check the fsck command output.
- If the following information is displayed, no file is lost or damaged, and data replication is successful. No further action is required.
The filesystem under path '/' is HEALTHY
- If other information is displayed, some files are lost or damaged. Check whether 8.d is correct and run the following command:
hdfs fsck Name of the damaged file -delete
- If the following information is displayed, no file is lost or damaged, and data replication is successful. No further action is required.
Changing the storage directory of a single DataNode instance
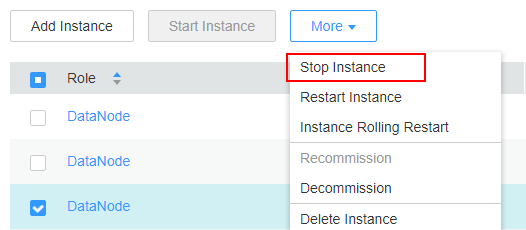
- Choose Cluster > Services > HDFS and click Instances. Select the DataNode whose storage directory needs to be modified, click More, and select Stop Instance.

- Log in to the DataNode node as user root and perform the following operations:
- Create a target directory.
For example, if the target directory is ${BIGDATA_DATA_HOME}/hadoop/data3/dn, run the following command:
mkdir -p ${BIGDATA_DATA_HOME}/hadoop/data3/dn - Mount the target directory to the new disk.
For example, mount ${BIGDATA_DATA_HOME}/hadoop/data3 to the new disk.
- Modify permissions on the new directory.
For example, if the new directory is ${BIGDATA_DATA_HOME}/hadoop/data3/dn, run the following command:
chmod 700 ${BIGDATA_DATA_HOME}/hadoop/data3/dn -Rchown omm:wheel ${BIGDATA_DATA_HOME}/hadoop/data3/dn -R - Copy the data to the target directory.
For example, if the original directory is ${BIGDATA_DATA_HOME}/hadoop/data1/dn and the target directory is ${BIGDATA_DATA_HOME}/hadoop/data3/dn, run the following command:
cp -af ${BIGDATA_DATA_HOME}/hadoop/data1/dn/* ${BIGDATA_DATA_HOME}/hadoop/data3/dn
- Create a target directory.
- On FusionInsight Manager, choose Cluster > Services > HDFS and click Instance. Click the specified DataNode instance and go to the Configurations tab page.
Change the value of dfs.datanode.data.dir to the new target directory, for example, ${BIGDATA_DATA_HOME}/hadoop/data3/dn. For details about the parameters, see Table 1.
For example, the original data storage directories are /srv/BigData/hadoop/data1,/srv/BigData/hadoop/data2. To migrate data from the /srv/BigData/hadoop/data1 directory to the newly created /srv/BigData/hadoop/data3 directory, replace the whole parameter with /srv/BigData/hadoop/data2,/srv/BigData/hadoop/data3.

- Click Save, and then click OK.
Operation succeeded is displayed. click Finish.
- Choose More > Restart Instance to restart the DataNode instance.
Feedback
Was this page helpful?
Provide feedbackThank you very much for your feedback. We will continue working to improve the documentation.See the reply and handling status in My Cloud VOC.
For any further questions, feel free to contact us through the chatbot.
Chatbot


