

Configuring Header Field Forwarding to Disable Response Packet Compression
Application Scenarios
The client usually declares that response compression is supported in the Accept-Encoding header, for example, Accept-Encoding: gzip. After the response passes through WAF, WAF considers that the response meets the compression standard and compresses the response. However, after receiving the response, the client cannot automatically decompress the response packet. The website then responds abnormally.
To address this issue, you can configure Forward Field to rewrite the Accept-Encoding header for the domain name on the WAF console so that WAF does not compress the response.
Resource and Cost Planning
| Resource | Description | Monthly Fee |
|---|---|---|
| Web Application Firewall | Cloud mode - professional edition:
| For details about pricing rules, see Billing Description. |
Limitations and Constraints
Header field forwarding can be configured only in cloud CNAME access mode and dedicated mode.
Step 1: Buy the Professional Edition Cloud WAF
The following describes how to buy the standard edition cloud WAF.
- Log in to the WAF console.
- In the upper right corner of the page, click Buy WAF. On the purchase page displayed, select Cloud Mode for WAF Mode.
- Region: Select the region nearest to your services that WAF will protect.
- Edition: Select Professional.
- Expansion Package and Required Duration: Set them based on site requirements.
- Confirm the product details and click Buy Now in the lower right corner of the page.
- Check the order details and read the WAF Disclaimer. Then, select the box and click Pay Now.
- On the payment page, select a payment method and pay for your order.
After the order is paid, click Access Console to go to the Dashboard page. Hover over the Edition Management area to view the purchased instance edition and its specifications.
Step 2: Add Website Information to WAF
The following example shows how to add a website to WAF in cloud CNAME access mode.
- For details about the cloud load balancer access mode, see Connecting a Website to WAF (Cloud Mode - ELB Access).
- For details about the dedicated mode, see Connecting a Website to WAF (Dedicated Mode).
- In the navigation pane on the left, choose Access Management.
Before adding a website to WAF, you can click Usage Guide in the upper right corner of the page to learn about the access process.
- On the Access Management page, click the Cloud CNAME tab and click Add Website.
If only one access mode is enabled, click Add Website.
- Configure website information as prompted. Figure 1 Configuring basic information

Table 2 Key parameters Parameter
Description
Example Value
Domain Name
Domain name you want to add to WAF for protection.
- The domain name has an ICP license.
- You can enter a single domain name (for example, top-level domain name example.com or level-2 domain name www.example.com) or a wildcard domain name (*.example.com).
www.example.com
Protected Port
The port over which the website traffic goes
Standard ports
Server Configuration
Web server address settings. You need to configure the client protocol, server protocol, server weights, server address, and server port.
- Client Protocol: protocol used by a client to access a server. The options are HTTP and HTTPS.
- Server Protocol: protocol used by WAF to forward client requests. The options are HTTP and HTTPS.
- Server Address: public IP address (generally corresponding to the A record of the domain name configured on the DNS) or domain name (generally corresponding to the CNAME record of the domain name configured on the DNS) of the web server that a client accesses.
- Server Port: service port over which the WAF instance forwards client requests to the origin server.
- Weight: Requests are distributed across backend origin servers based on the load balancing algorithm you select and the weight you assign to each server.
Client Protocol: HTTP
Server Protocol: HTTP
Server Address: IPv4 XXX.XXX.1.1
Server Port: 80
IP Tag
After a website is connected to WAF, Use Layer-7 Proxy is set to Yes by default. In this scenario, WAF is unable to directly obtain the real IP address of the client. This makes IP address-based protection rules invalid. You can select an IP tag to specify how WAF identifies client IP addresses. This enables WAF to obtain real client IP addresses.- $remote_sockaddr: If there is no other proxy in front of WAF, the packet contains the TCP Option Address (TOA), and you do not want WAF to use the TOA as the client IP address, select this option. With this tag configured, WAF uses the Layer 3 source IP address of the packet as the real client IP address.
- $remote_addr: If there is a layer-4 proxy in front of WAF, WAF uses the TCP connection IP address as the real client IP address.
- x-forwarded-for: If there is a layer-7 proxy in front of WAF, WAF uses the first IP address in the X-Forwarded-For (XFF) header as the real client IP address.
- Custom: If there is a layer-7 proxy in front of WAF, WAF preferentially obtains the real client IP address from the configured field. If multiple fields are configured, WAF reads the real client IP address from left to right.
If WAF does not obtain the real client IP address from the custom field, it reads the CDN-Src-Ip, X-Real-Ip, X-Forwarded-For, and $remote_addr fields in sequence to obtain the real client IP address.
x-forwarded-for
- Click Next and complete the basic information about the website to be protected. Perform the following operations as prompted on the Add Website page: Figure 2 Domain name added to WAF

After the preceding steps are complete, you can check the Access Status of the added domain name in the domain name list. The Access Status of the domain name is Inaccessible at first. You need to modify the DNS record.
Step 3: Configure Header Field Forwarding
- Log in to the WAF console.
- In the navigation pane on the left, choose .
- In the Domain Name column, click the website domain name to go to the basic information page.
- In the Forward Field column, click Modify. In the displayed Forward Field dialog box, enter a key/value pair, and click Add.
Set Key to Accept-Encoding and Value to identity.
Figure 3 Forward Field
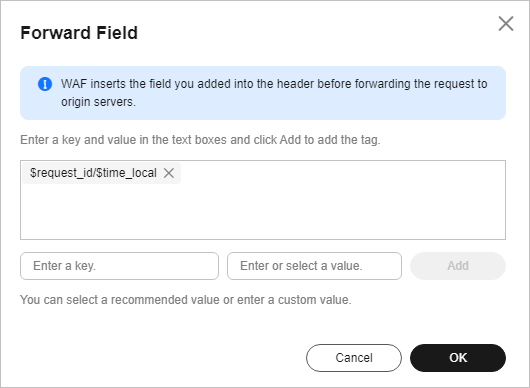
- Click OK.
What is your overall rating for this page?
Thank you very much for your feedback. We will continue working to improve the documentation.See the reply and handling status in My Cloud VOC.
For any further questions, feel free to contact us through the chatbot.
Chatbot


