

Migrating the Source Server
You need to install the SMS-Agent that matches the source server's OS type and version.
- Linux Agent
- CLI-based Windows Agent (Python 2): Windows Server 2008 and Windows 7
- GUI-based Windows Agent (Python 3): Windows Server 2019, Windows Server 2016, Windows Server 2012, Windows 8.1, and Windows 10
Migrating a Linux Server
- Install the SMS-Agent for Linux.
- Start the Agent. After the Agent lists the enterprise projects your target account is authorized to access, select your desired enterprise project. In this example, select enterprise project Test_EPS_Project created in Creating an Enterprise Project.

- Log in to the SMS console. In the navigation pane on the left, click Servers. In the server list, click the server name. The enterprise project Test_EPS_Project is displayed in the task details.

- Perform the procedures described in Configuring the Target Server, Starting a Full Replication, and Launching the Target Server.

To avoid permission errors, you are advised to create an ECS (that will be used as the target server), VPC, subnet, security group, and EIP in the enterprise project Test_EPS_Project before performing the migration.
CLI-based Windows Agent (Python 2)
- Install the SMS-Agent for Windows.
- Start the Agent. After the Agent lists the enterprise projects your target account is authorized to access, select your desired enterprise project. In this example, select enterprise project Test_EPS_Project created in Creating an Enterprise Project.

- Log in to the SMS console. In the navigation pane on the left, click Servers. In the server list, click the server name. The enterprise project Test_EPS_Project is displayed in the task details.
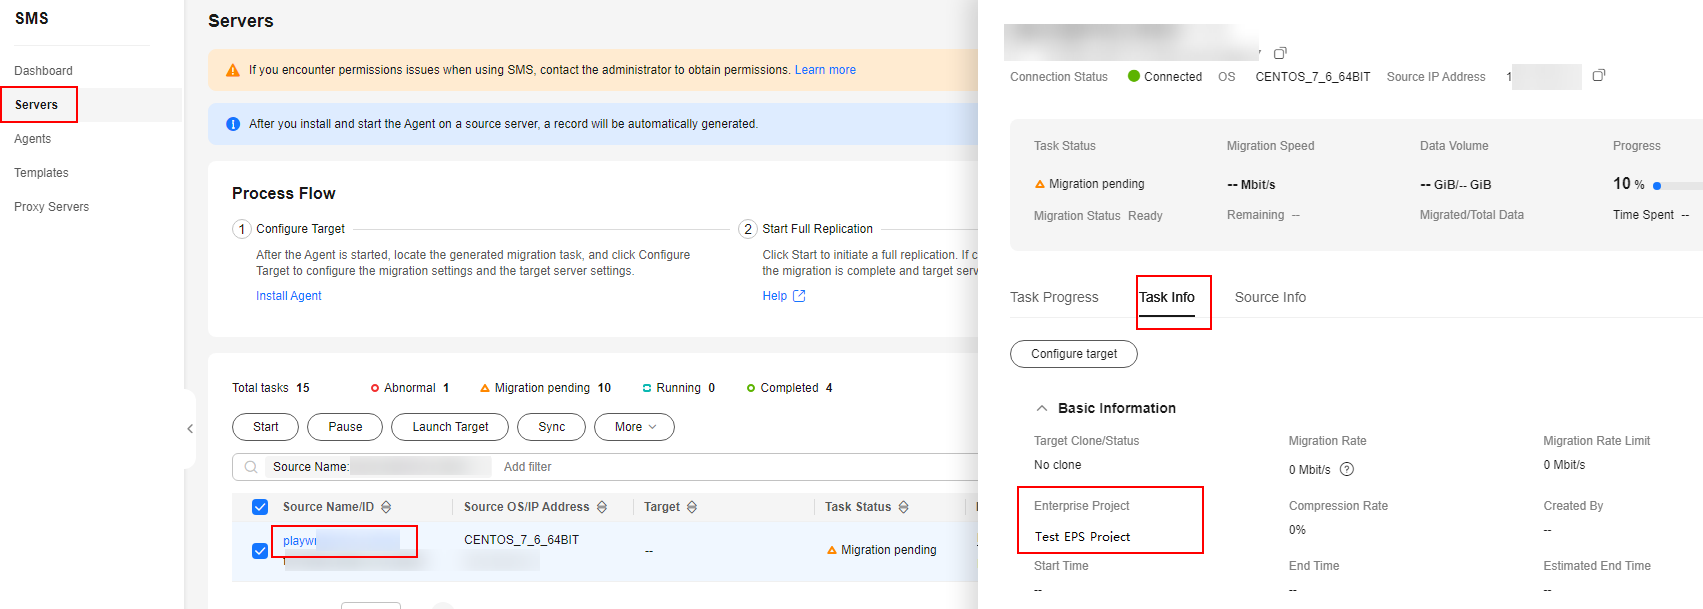
- Perform the procedures described in Configuring the Target Server, Starting a Full Replication, and Launching the Target Server.
To avoid permission errors, you are advised to create an ECS (that will be used as the target server), VPC, subnet, security group, and EIP in the enterprise project Test_EPS_Project before performing the migration.
GUI-based Windows Agent (Python 3)
- Install the SMS-Agent for Windows.
- Start the Agent. After the Agent lists the enterprise projects your target account is authorized to access, select your desired enterprise project. In this example, select enterprise project Test_EPS_Project created in Creating an Enterprise Project.

- Log in to the SMS console. In the navigation pane on the left, click Servers. In the server list, click the server name. The enterprise project Test_EPS_Project is displayed in the task details.

- Perform the procedures described in Configuring the Target Server, Starting a Full Replication, and Launching the Target Server.
To avoid permission errors, you are advised to create an ECS (that will be used as the target server), VPC, subnet, security group, and EIP in the enterprise project Test_EPS_Project before performing the migration.
What is your overall rating for this page?
Thank you very much for your feedback. We will continue working to improve the documentation.See the reply and handling status in My Cloud VOC.
For any further questions, feel free to contact us through the chatbot.
Chatbot


