

Step 9: Configure a Connector
This topic describes how to configure the source and destination for log collection. Perform the following operations based on the scenario:
- Transferring Third-Party Security Logs to SecMaster
- Transferring Security Logs from SecMaster to a Third-Party System or Product
Transferring Third-Party Security Logs to SecMaster
- Log in to the SecMaster console.
- In the navigation pane on the left, choose Workspaces > Management. In the workspace list, click the name of the target workspace. Figure 1 Workspace management page

- In the navigation pane on the left, choose . Figure 2 Operation Connections tab

- Add a source for the data connection.
- On the Connections tab, click Add.
- Configure the data connection source details. Figure 3 Source
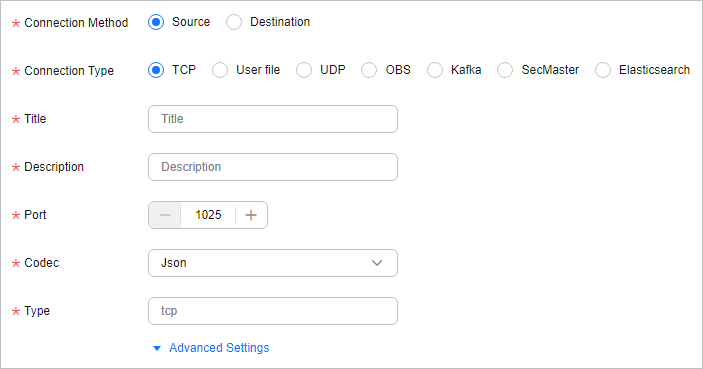
The following uses UDP and TCP as examples. For more connection types, see Rules for Configuring Connectors.
- Connection type: UDP
Table 1 Log source Parameter
Description
Connection Method
Select Source.
Connection Type
Select UDP.
Name
Enter a custom name for the data connection source.
Description
Enter a brief description of the data source.
Port
Retain the default value.
Codec
Retain the default value.
Advanced Settings
No configuration is required.
- Connection type: TCP
Table 2 Log source Parameter
Description
Connection Method
Select Source.
Connection Type
Select TCP.
Name
Enter a custom name for the data connection source.
Description
Enter a brief description of the data source.
Port
Retain the default value. Ensure that the port number is different from those used by other sources.
Codec
If the original log format is not JSON, select Plain.
Packet label
No configuration is required.
- Connection type: UDP
- After the setting is complete, click Confirm in the lower right corner of the page.
- Add a destination for the data connection.
- On the Connections tab, click Add.
- Configure the data connection destination details. Figure 4 Destination
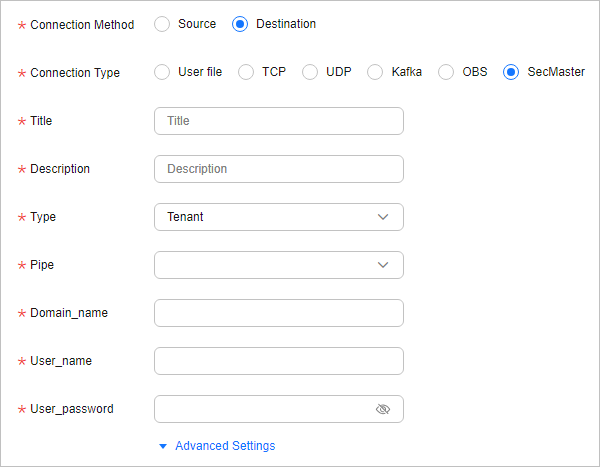
Table 3 Log transfer destination Parameter
Description
Connection Method
Select Destination.
Connection Type
Select SecMaster.
Title
Enter a custom name for the data connection destination.
Description
Enter a custom description of the log data destination.
Type
Select a log type for the destination.
Pipe
Select the pipeline created in (Optional) Step 8: Creating a Log Storage Pipeline.
Domain_name
Enter the domain account information of the IAM user used to log in to the console.
User_name
Enter the user information of the IAM user used to log in to the console.
User_password
Enter the password of the current login IAM user.
Advanced Settings
No configuration is required.
- After the setting is complete, click Confirm in the lower right corner of the page.
Transferring Security Logs from SecMaster to a Third-Party System or Product
- Log in to the SecMaster console.
- In the navigation pane on the left, choose Workspaces > Management. In the workspace list, click the name of the target workspace. Figure 5 Workspace management page
- In the navigation pane on the left, choose . Figure 6 Operation Connections tab
- Add a source for the data connection.
- On the Connections tab, click Add.
- Configure the data connection source details.
Table 4 Log source Parameter
Description
Connection Method
Select Source.
Connection Type
Select SecMaster.
Name
Customize the destination name of the data connection.
Naming rules:
- The name can contain 5 to 128 characters.
- The name must be unique in the workspace and cannot be the same as the name of any other connector in the workspace.
Description
Enter a custom description of the log data destination.
Naming rules:
- The name can contain up to 256 characters.
Type
Select a log destination type. The recommended value is ECS Agency.
Select this option if you want to obtain tokens through ECS agencies. In doing this, the data collection function is not affected even if the account or password changes.
Before using an ECS agency, create an isap-agent agency and grant permissions to it in IAM, and configure the agency in ECS. For details, see Creating the isap-agent Agency and Granting Permissions to it in IAM and Configuring an Agency in ECS. If you have created the agency and configured the ECS agency in IAM in Step 6: Install the Component Controller (isap-agent), skip this step.
Pipe
Select the name of the pipeline created in (Optional) Step 8: Creating a Log Storage Pipeline.
Subscription_type
Subscription type. Retain the default value.
- Shared: shared mode
- Exclusive: exclusive mode
- Failover: disaster recovery mode
Subscription_initial_position
Initial subscription position. Retain the default value.
- Latest: The data is consumed from the latest position of the topic corresponding to the stream table.
- Earliest: The data is consumed from the earliest position of the topic corresponding to the stream table.
- After the setting is complete, click Confirm in the lower right corner of the page.
- Add a destination for the data connection.
On the Connections page, click Add and configure data connection destination parameters.
Set this parameter based on the site requirements. For more connection types, see Connector Rules.
Creating the isap-agent Agency and Granting Permissions to it in IAM
- Log in to the IAM console as an administrator and choose Agencies in the navigation pane on the left.
- On the Agencies page, click Create Agency in the upper right corner. On the displayed page, configure the following parameters:
- Agency Name: Enter isap-agent.
- Agency Type: Select Cloud service.
- Cloud Service: Select Elastic Cloud Server (ECS) and Bare Metal Server (BMS) from the drop-down list.
- Validity Period: Select Unlimited.
- Description: Provide a description if needed.
- Configure authorization based on IAM 3.0 or IAM 5.0.
IAM 3.0 (IAM3): Click OK. In the displayed dialog box, click Authorize.
IAM 5.0 (IAM5): On the Agencies page, configure parameters and click OK in the lower right corner. In the confirmation dialog box, click Cancel. Then, click Go to New Console in the upper right corner of the agency page to go to the identity policy page (IAM5).
- Create custom identity policies based on IAM 3.0 or IAM 5.0. IAM 3.0 (IAM3): On the displayed page, click Create Policy in the upper right corner. On the displayed page, configure the following parameters:
- Policy Name: isap-agent-strategy is recommended.
- Policy View: Select JSON.
- Policy Content. Copy and paste the following content into the box to replace the existing content:
{ "Version": "1.1", "Statement": [ { "Effect": "Allow", "Action": [ "secmaster:workspace:get", "secmaster:node:create", "secmaster:node:monitor", "secmaster:node:taskQueueDetail" , "secmaster:node:updateTaskNodeStatus" ] } ] } - Description: You are advised to enter a brief description for action authorization for the isap-agent agency.
IAM 5.0 (IAM5): On the Identity Policies page, click Create Identity Policy in the upper right corner. On the Create Identity Policy page, configure the following parameters:
- Policy Name: isap-agent-strategy is recommended.
- Policy View: Select JSON.
- Policy Content. Copy and paste the following content into the box to replace the existing content:
{ "Version": "5.0", "Statement": [ { "Effect": "Allow", "Action": [ "secmaster:workspace:get", "secmaster:node:create", "secmaster:node:monitor", "secmaster:node:taskQueueDetail", "secmaster:node:updateTaskNodeStatus" ] } ] } - Description: You are advised to enter a brief description for action authorization for the isap-agent agency.
- Click Next in the lower right corner of the page. In the displayed dialog box, click OK.
- On the policy list page, select the created policy isap-agent-strategy, click Next, set the minimum authorization scope (All resources), and click OK in the lower right corner of the page.
- The Authorization successful message is displayed. Click Finish. The isap-agent agency has been created and authorized.
Configuring an Agency in ECS
- Log in to the ECS console, choose Elastic Cloud Server in the navigation pane on the left, find the ECS used to install the component controller (isap-agent), and click the ECS name to go to the details page.
- On the Summary tab of the ECS details page, click
 next to Agency, select the isap-agent agency created in Creating the isap-agent Agency and Granting Permissions to it in IAM, and click
  . Complete the ECS agency.
What is your overall rating for this page?
Thank you very much for your feedback. We will continue working to improve the documentation.See the reply and handling status in My Cloud VOC.
For any further questions, feel free to contact us through the chatbot.
Chatbot


