Using Kettle to Migrate Small Tables from AWS Redshift to a DWS Cluster
This practice demonstrates how to use the open-source tool Kettle to migrate Redshift data to DWS.
Kettle Overview
Kettle is an open-source Extract, Transform, Load (ETL) tool, also known as KDE Extraction, Transportation, Transformation, and Loading Environment. It provides a GUI that enables you to design and configure ETL processes by dragging and dropping components. Kettle supports multiple data sources and destinations, including relational databases, files, APIs, and Hadoop. It offers extensive conversion and cleansing capabilities such as data format transformation, filtering, merging, and computing.
Key features include:
- Building data pipelines with drag-and-drop operations, no coding required
- Connecting to multiple data sources
- Visualizing data pipelines ·
- Developing pipelines using templates
- Visualizing scheduled tasks
- Comprehensive Hadoop support

- DWS must bind an EIP before it can connect to Kettle.
- Both Kettle and CDM are suitable for batch processing. For smaller data volumes or table quantities, Kettle is recommended; otherwise, use CDM.
- Kettle can export data from and import data into databases.
- Kettle can synchronize data in real-time using triggers, timestamp fields, and Kafka.
This practice takes about 90 minutes. For example, migrating Redshift involves the following operations:
- Prerequisites
- Migrating Metadata: Use the DSC tool to migrate metadata.
- Creating a Transformation Task and Configuring Source and Destination Databases: Create a transformation task and configure the source and destination databases.
- Migrating Service Data: Perform full migration and incremental migration.
- Executing Migration Jobs Concurrently: Create a job to concurrently execute transformation tasks for simultaneous table migration.
- Optimizing the Migration Job: Adjust the Kettle memory size and the number of jobs to improve the migration efficiency.
- Checking Table Data: Verify data consistency after migration.
Prerequisites
- You have purchased a DWS cluster, bound an EIP to the cluster, and created the destination database dws_vd.
- You have obtained the DSC tool package and downloaded and installed DSC.
- You have obtained the DataCheck tool package and downloaded and installed DataCheck.
- You have obtained the Kettle tool package and the dws-client plugin and configured Kettle. For details, see "Preparing the Kettle Environment" and "Installing the dws-kettle-plugin Custom Plug-in" in Using Kettle to Import Data.
- JDK 11 or later has been installed, and related environment variables have been configured.
Migrating Metadata
Use the DSC migration tool developed by Huawei Cloud to convert the DDL statements of the sample table exported from the source end in Redshift to executable SQL statements in DWS.
- Decompress the obtained DSC tool package and save the files to be converted to the input directory of the DSC.

The Redshift table structure design does not include indexes. Performance is mainly influenced by the data distribution key (DISTSTYLE) and sort key (SORTKEY) specified in the DDL.
Figure 1 DDL statement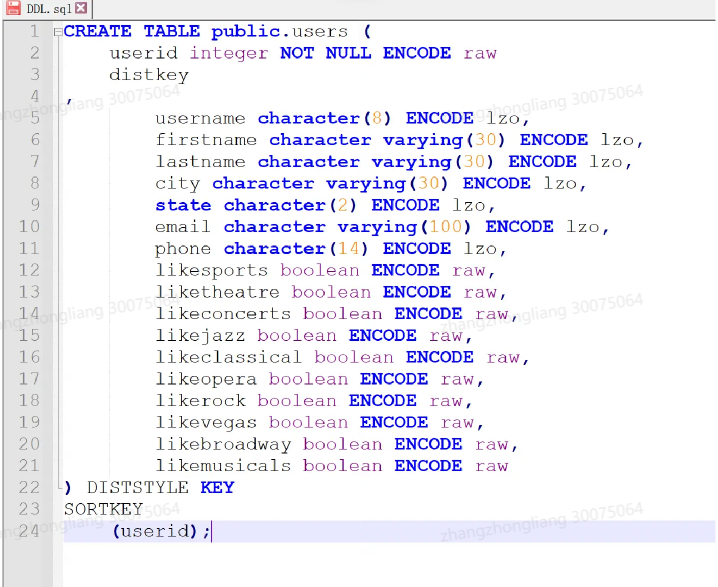
- Customize the features-pg.properties file.
- Go to the DSC directory and run the runDSC script. In Windows, double-click runDSC.bat. Run runDSC.sh in Linux.
- Convert the syntax.
1runDSC.bat -S postgres
- View the result and conversion information.
- Connect to DWS, execute the DDL statement converted in the previous step to create a table.
Creating a Transformation Task and Configuring Source and Destination Databases
- After deploying Kettle, double-click the Spoon script in the data-integration directory of Kettle to start Kettle.
Figure 2 Starting Kettle
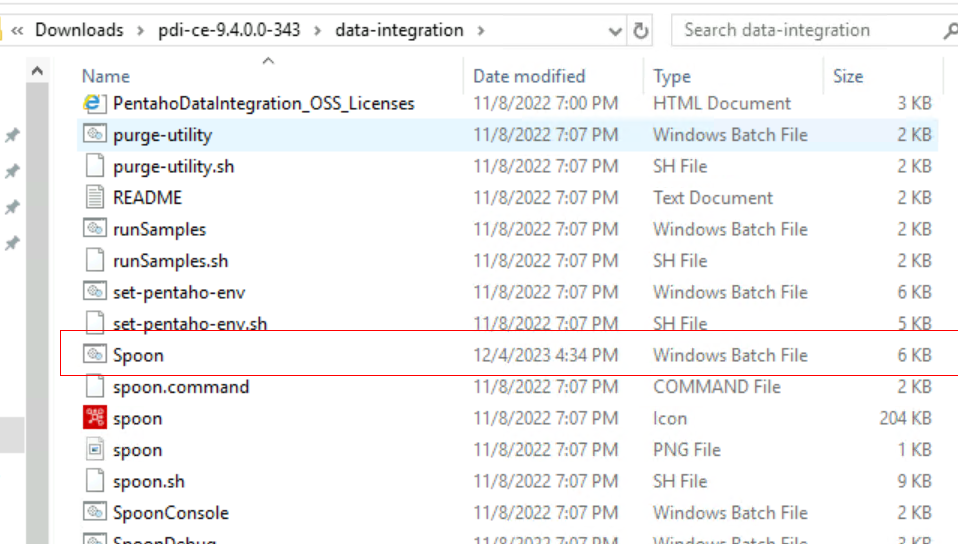
The following page is displayed.
Figure 3 Kettle GUI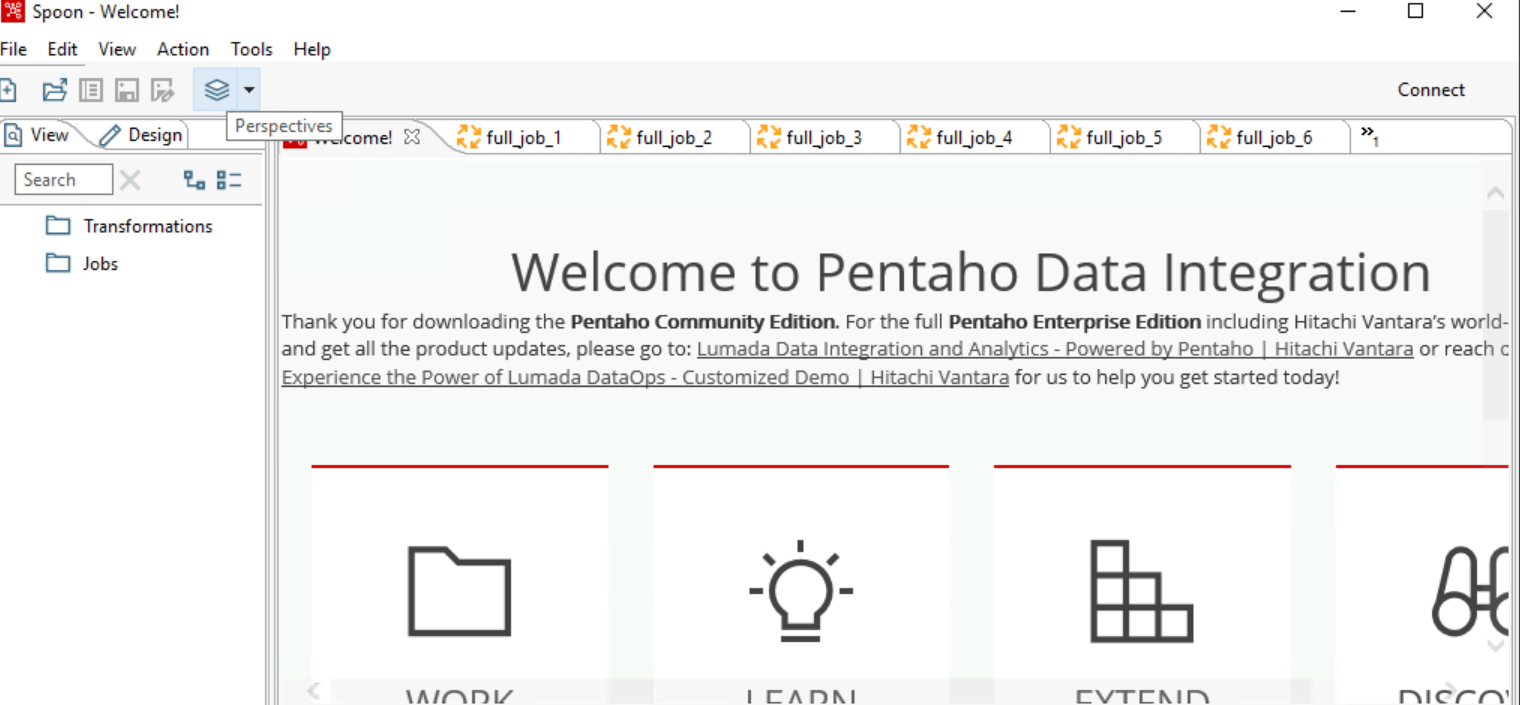
- Choose File > New > Transformation to create a new transformation.
Figure 4 Creating a transformation task
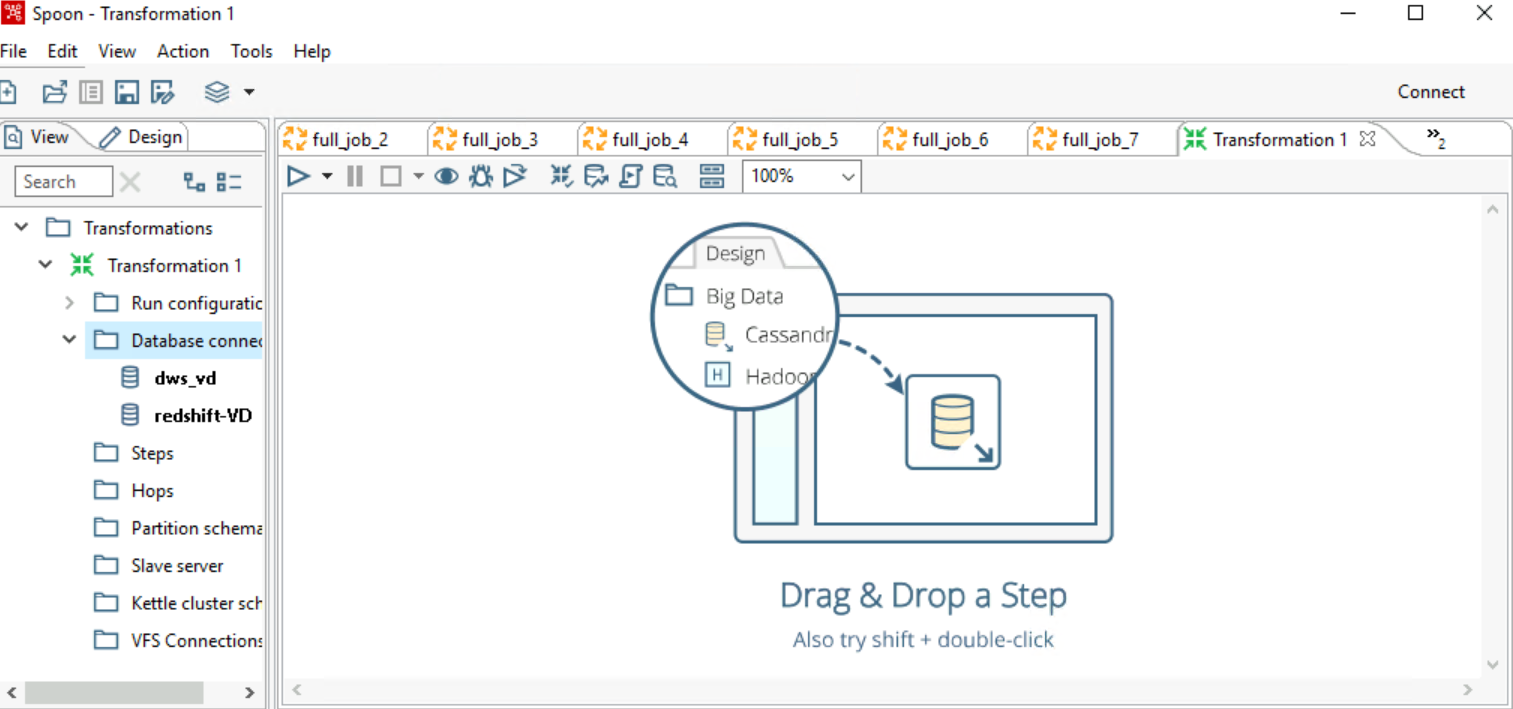
- Click Database connection under View, right-click New, and configure the source and destination database connections.
- The connection configuration of the redshift-VD database (source) is as follows:
- Custom connection URL: jdbc: redshift://dwdsi-simulacao.cslagxelrdnm.us-east-1.redshift.amazonaws.com:xxxx/dsidw
- Username: xxxxxxx
- Password: xxxxxxx
Figure 5 Configuring the source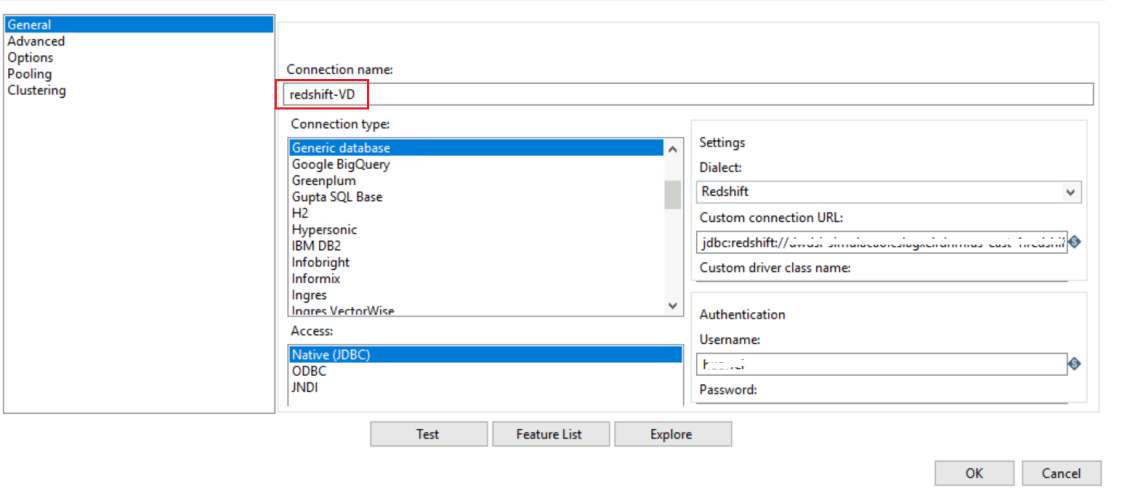
- The connection configuration of the DWS-VD database (destination) is as follows:
- Host Name: EIP of the DWS cluster.
- Database Name: dws_vd
- Username: dbadmin
- Password: password of user dbadmin.
Figure 6 Configuring the destination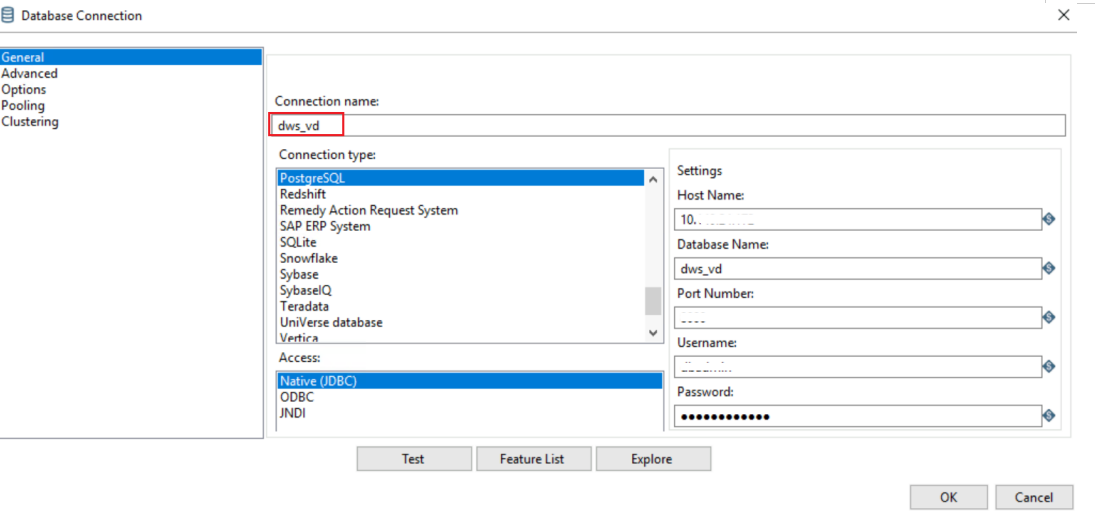 Figure 7 options
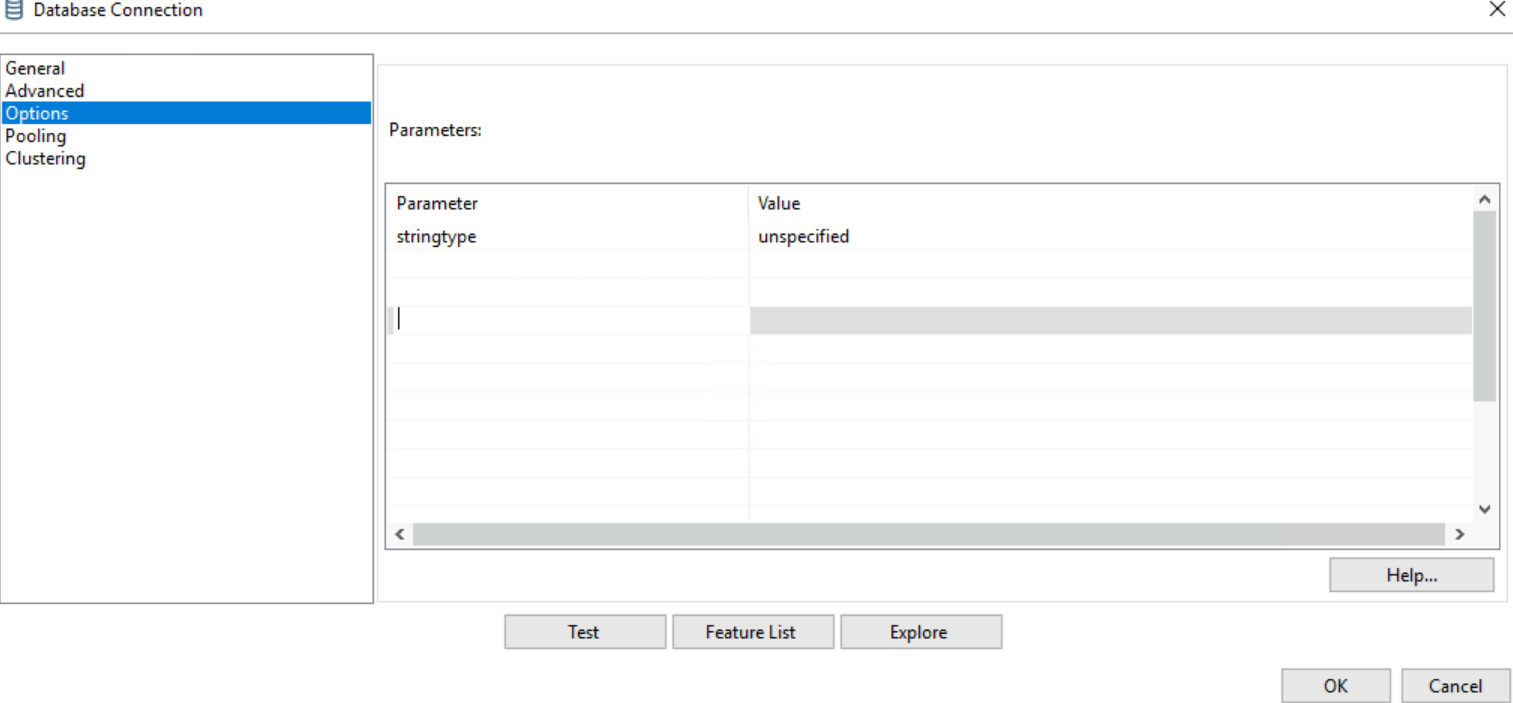

After connecting the databases, right-click the source and destination links and click Share. This prevents the need to reconfigure database links in future tasks.
- The connection configuration of the redshift-VD database (source) is as follows:
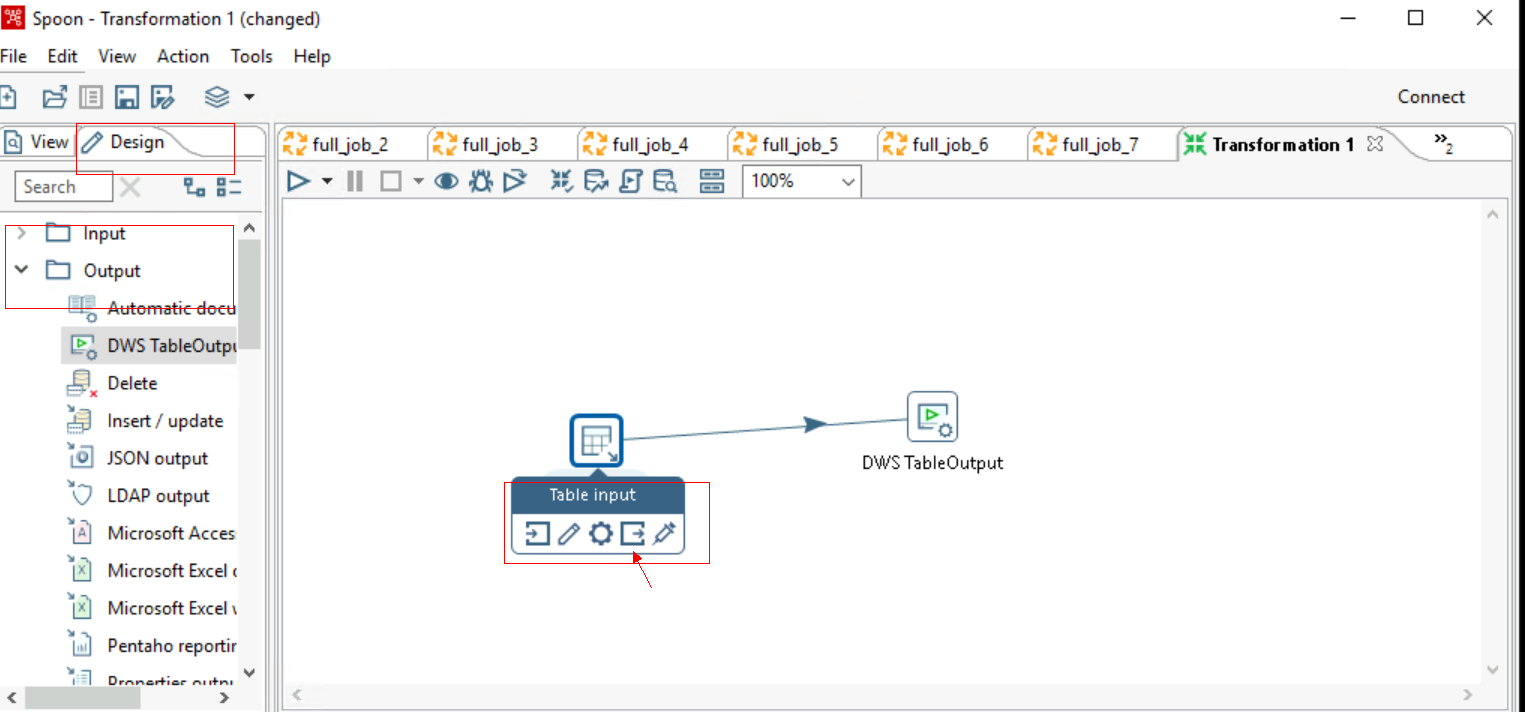
- Drag the Table input and DWS TableOutput components from the Input and Output directories under Design to the right panel separately.
- Right-click the connection line of the Table input component to connect the two components.
Figure 8 Connecting components
Migrating Service Data
Full data migration
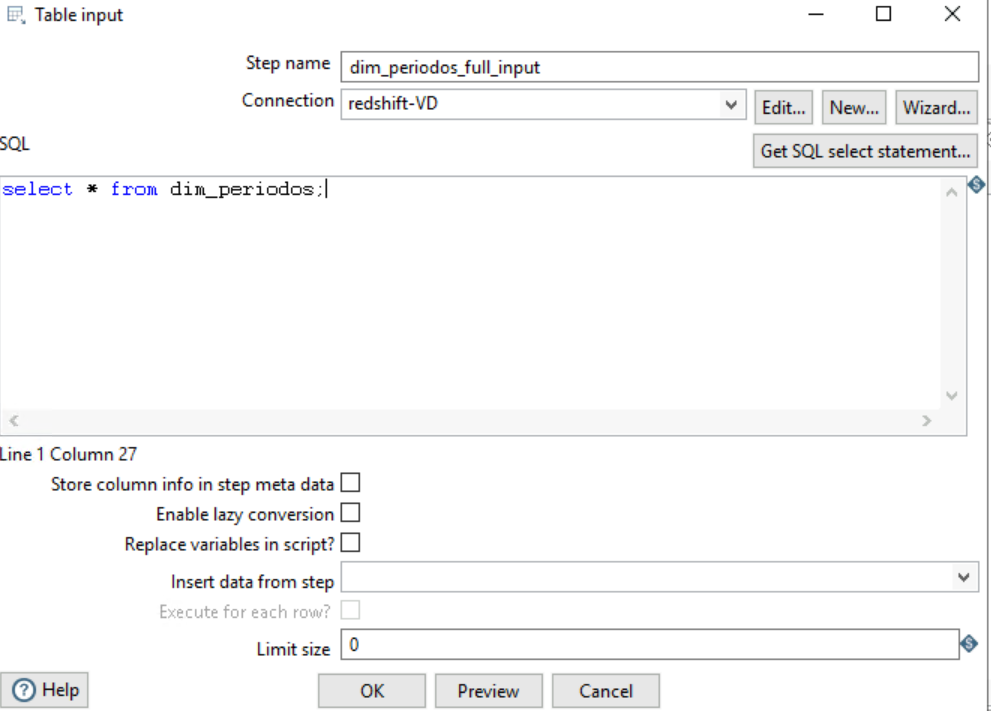
- Right-click Table Input and choose Edit from the shortcut menu. Select the source database link.
Figure 9 Editing Table Input
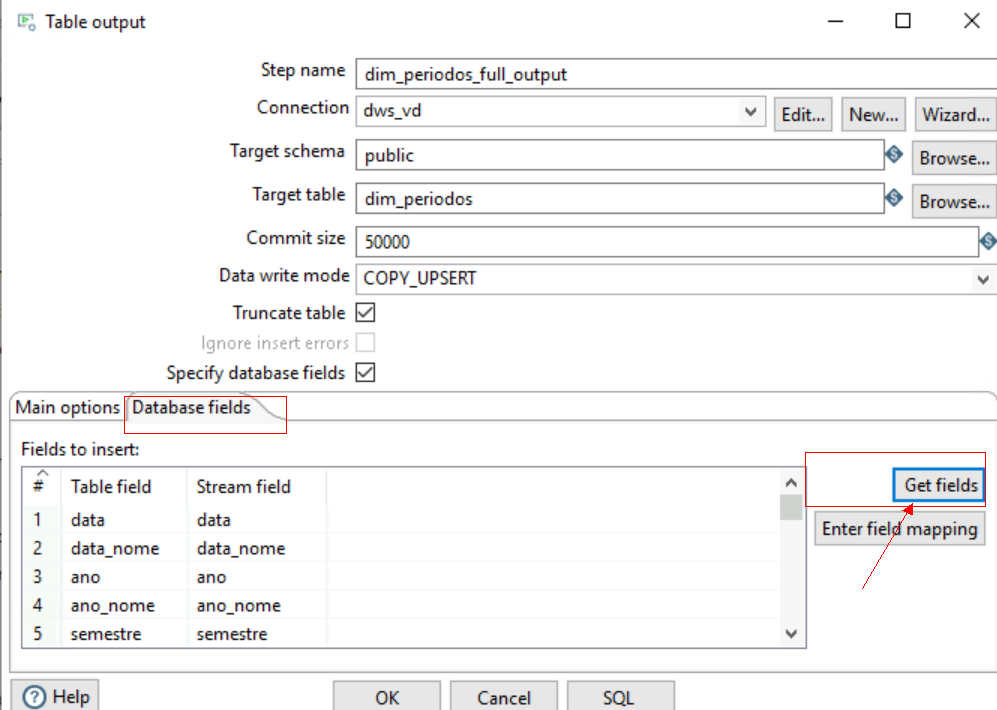
- Right-click DWS TableOutput and choose Edit from the shortcut menu. Select the destination database link. Select Truncate table and Specify database fields, click Get fields under Database fields to acquire the source and destination field mapping, and then click OK.
Figure 10 Editing Table output
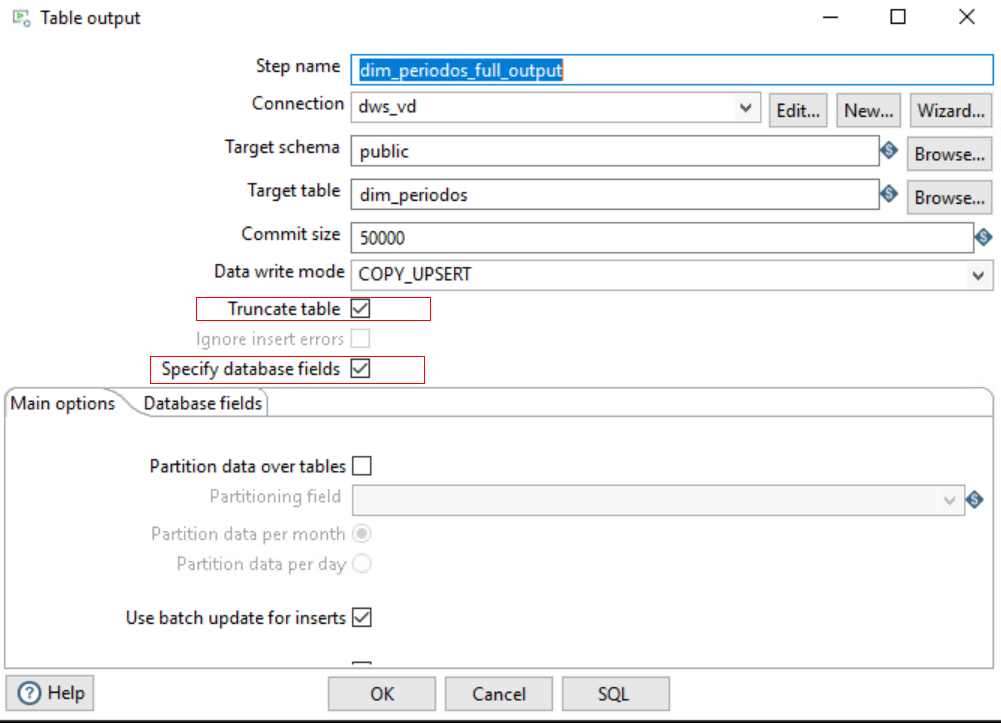 Figure 11 Editing database fields
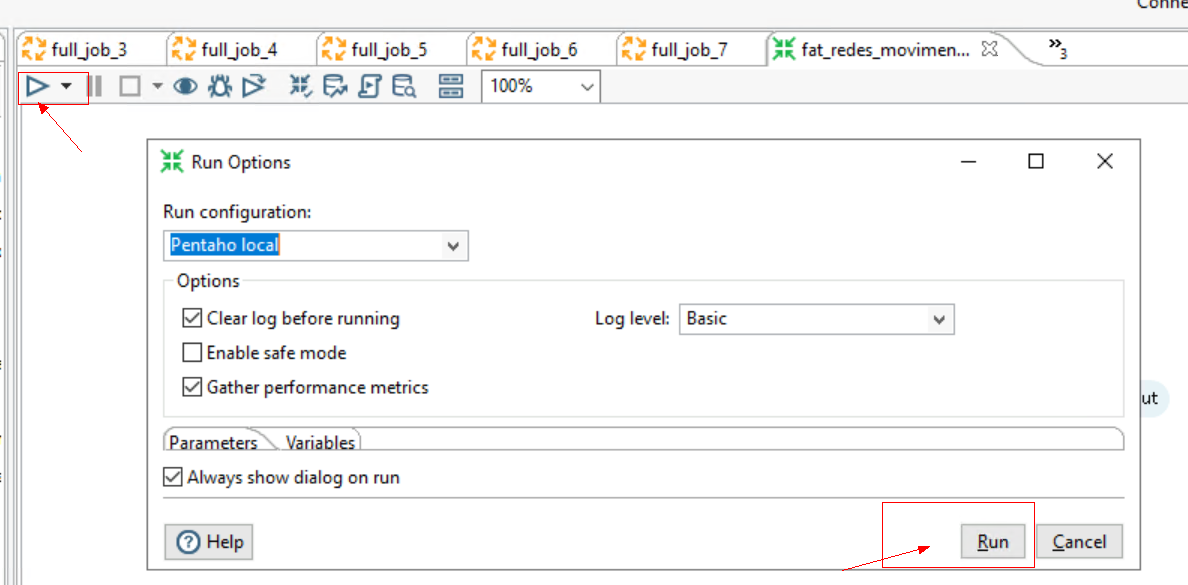
- After the configuration, click Run to start the migration task.
Figure 12 Running the task
Incremental data migration

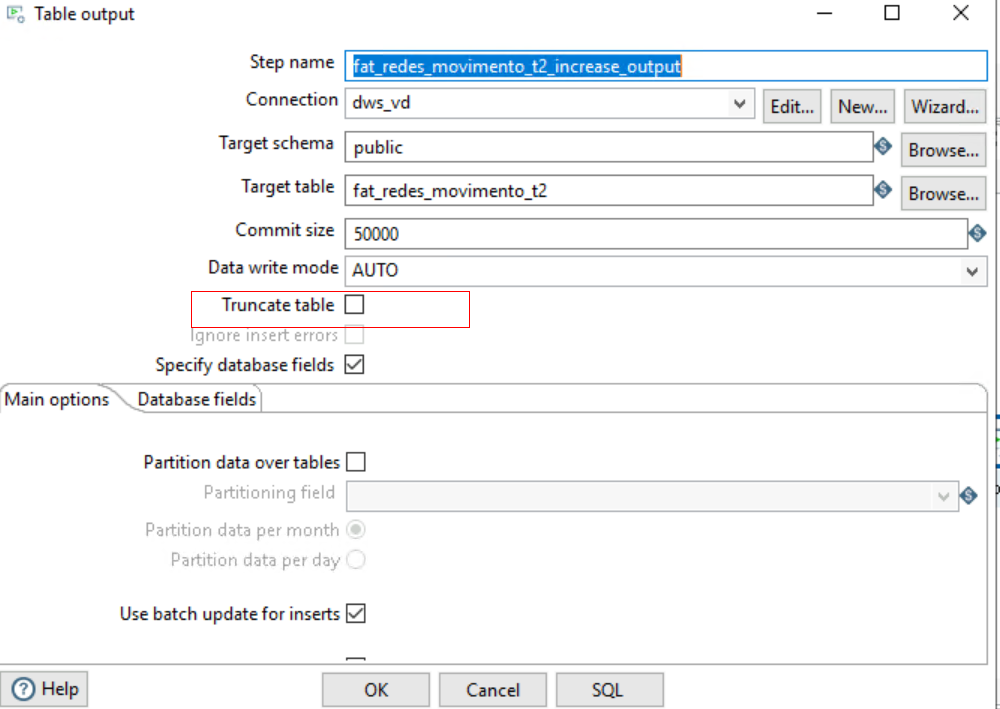
The steps for incremental and full migration are essentially the same. The difference is that a WHERE condition is added to the source SQL statement, and Truncate Table is deselected in the destination configuration.
- Right-click Table Input and choose Edit from the shortcut menu. Select the source database link.
Figure 13 Editing Table Input
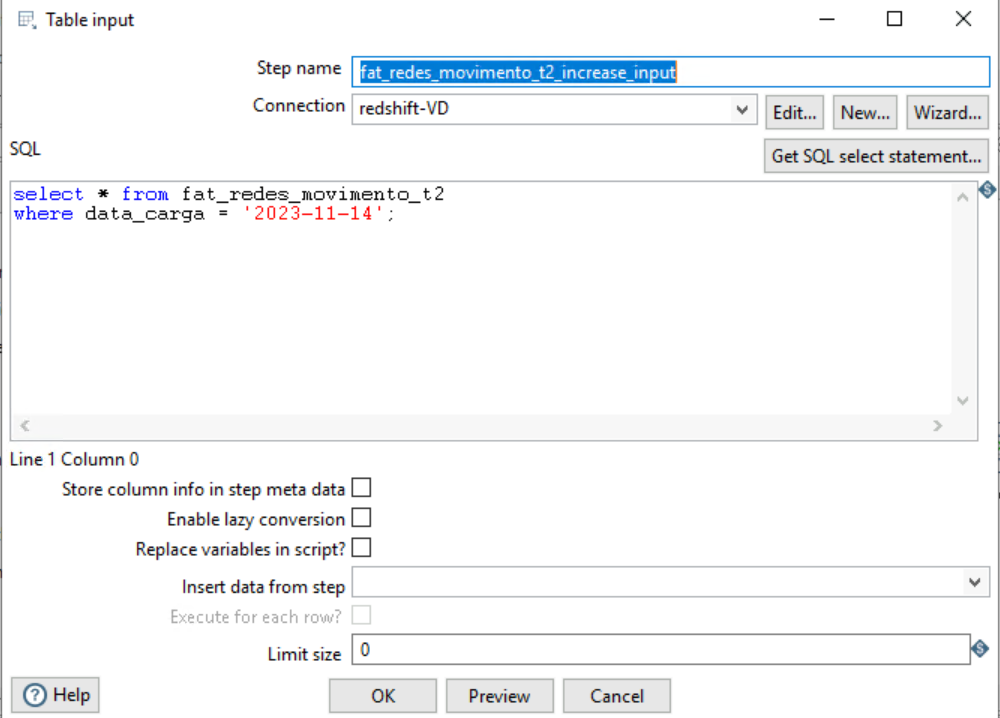
- Right-click DWS TableOutput and choose Edit from the shortcut menu. Select the destination database link. Deselect Truncate table, click Get fields under Database fields to acquire the source and destination field mapping, and then click OK.
Figure 14 Editing Table output
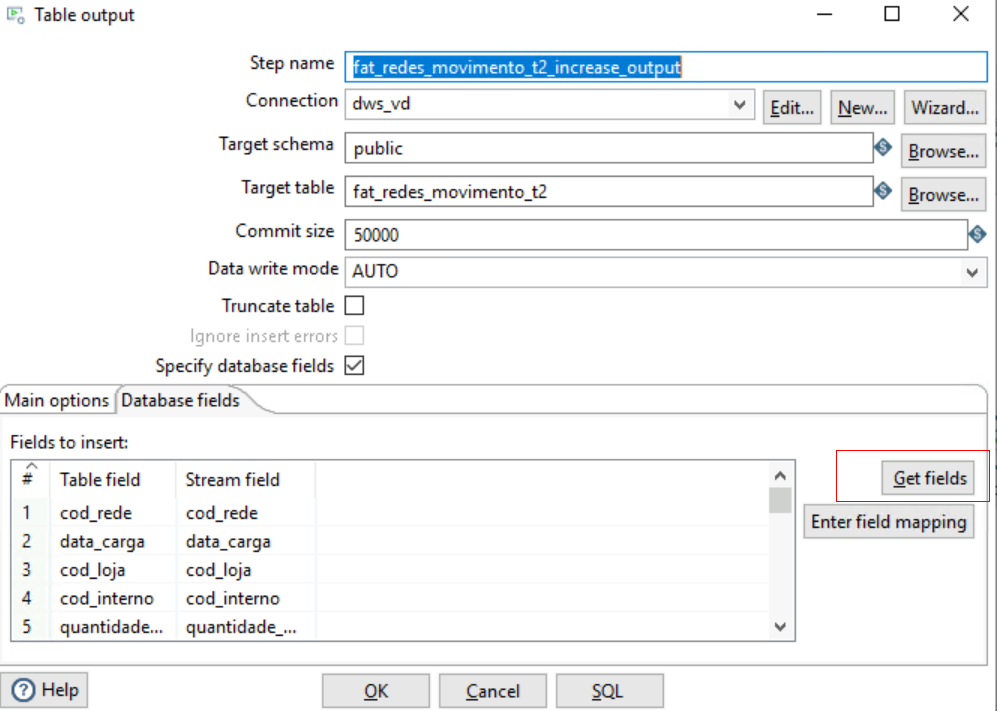
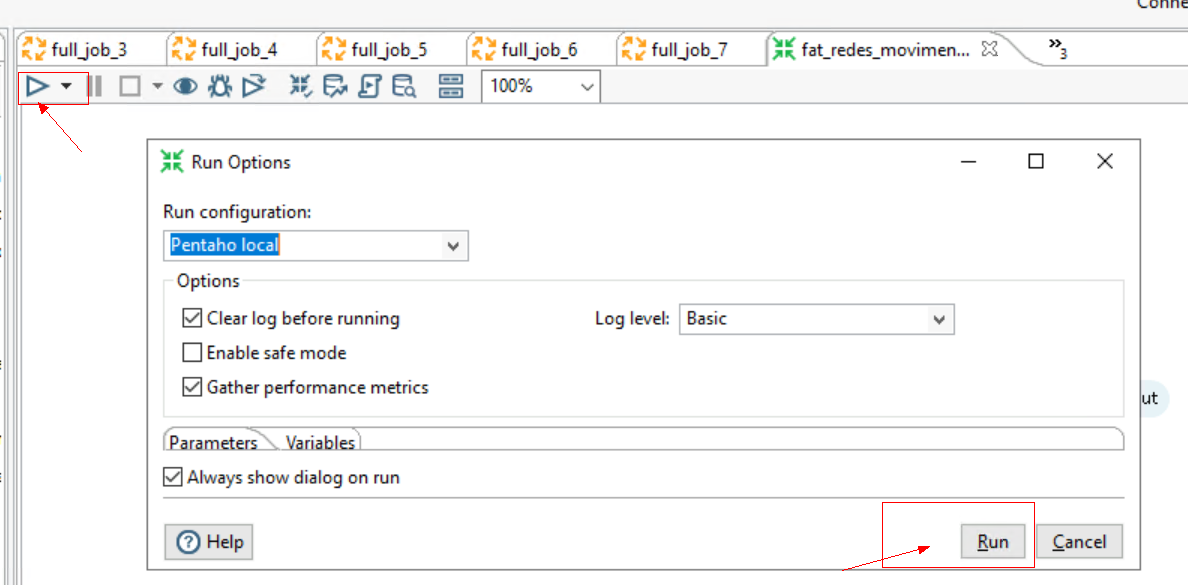
- After the configuration, click Run to start the migration task.
Figure 15 Running the task
Executing Migration Jobs Concurrently
Job task configuration combines the transformation of multiple tables into one task for faster execution.
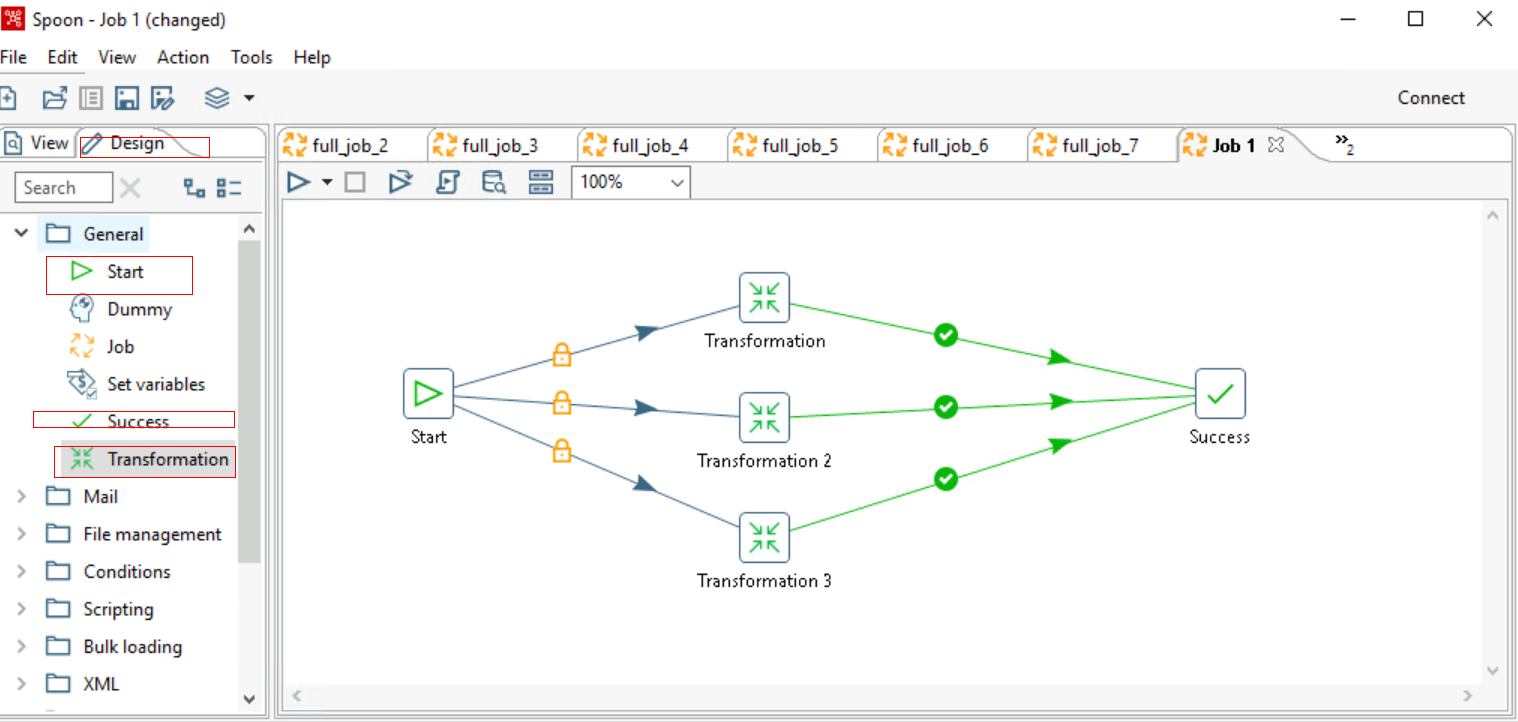
- Choose File > New > Job. Drag the target components to the panel and connect them using lines.
Figure 16 Creating a job
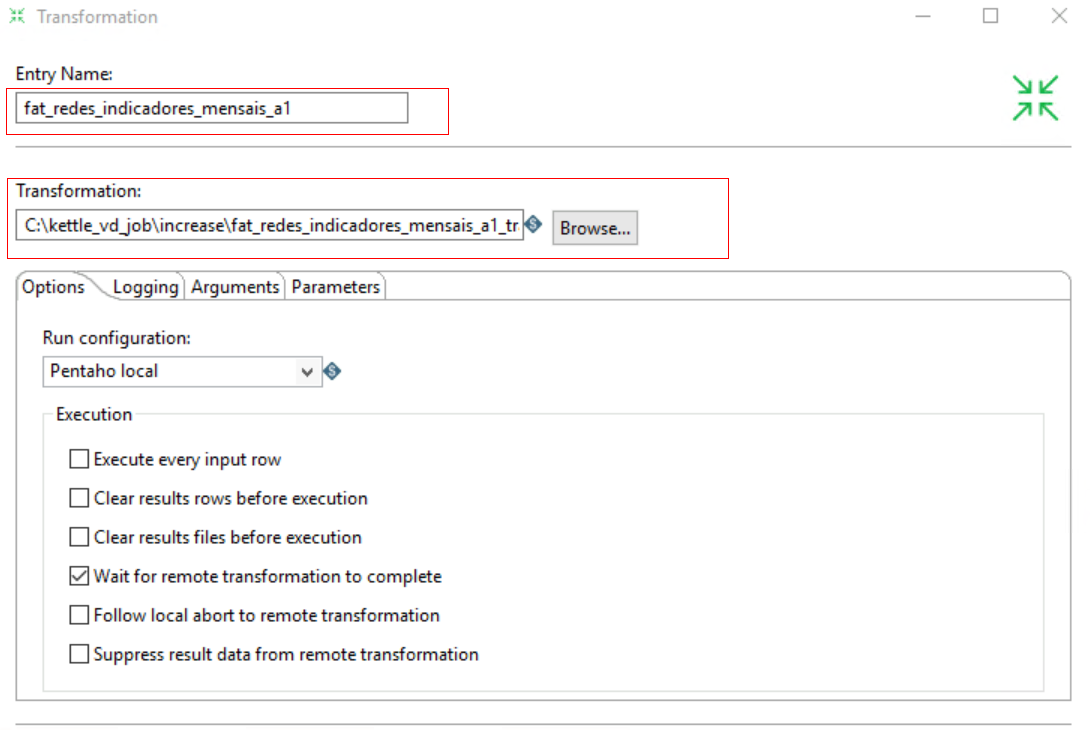
- Double-click Transformation and select the transformation task that has been configured and saved.
Figure 17 Configuring a transformation
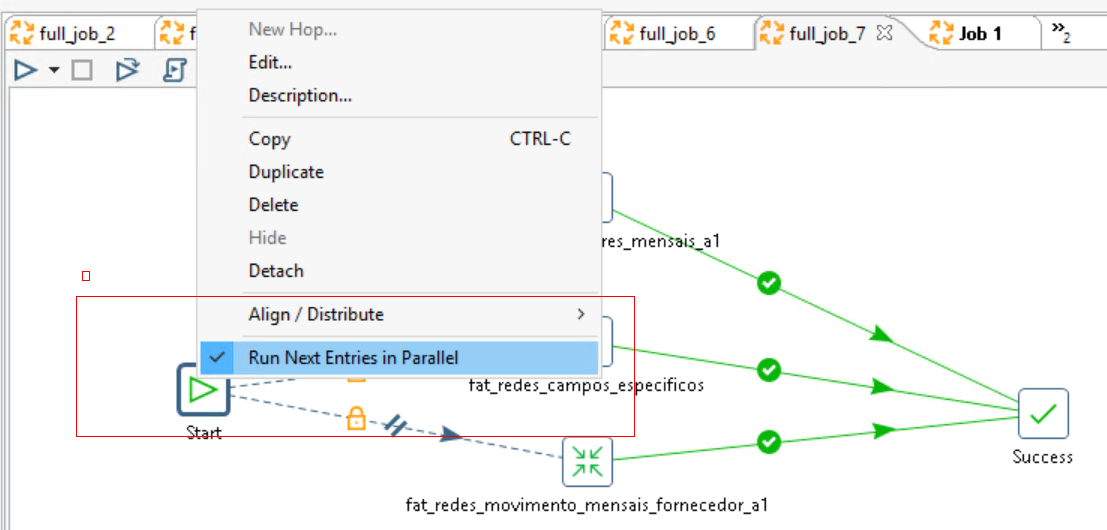
- Right-click the Start component, select the Run Next Entries in Parallel component, and set concurrent task execution.
Figure 18 Setting concurrency
After the setting, a double slash will appear between the Start and Transformation components.
Figure 19 Setting concurrency succeeded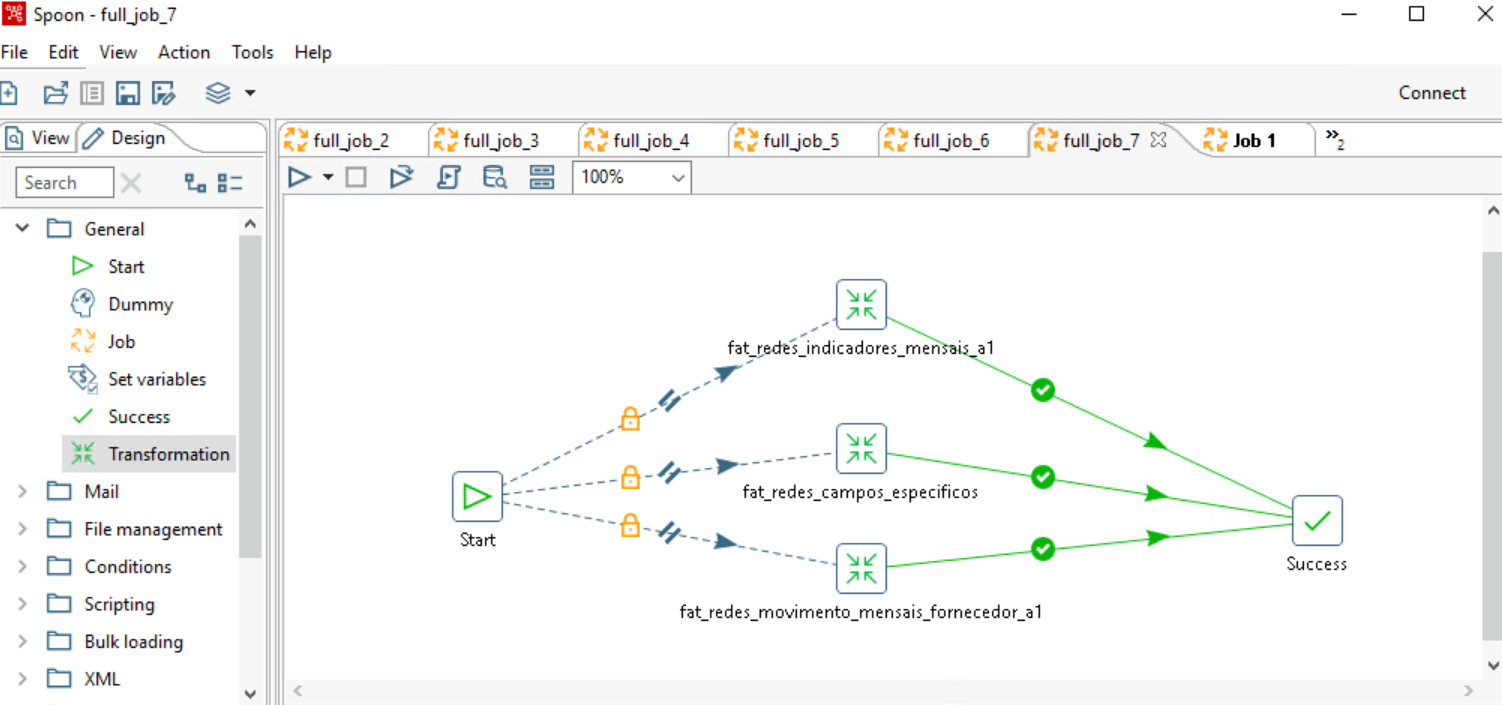
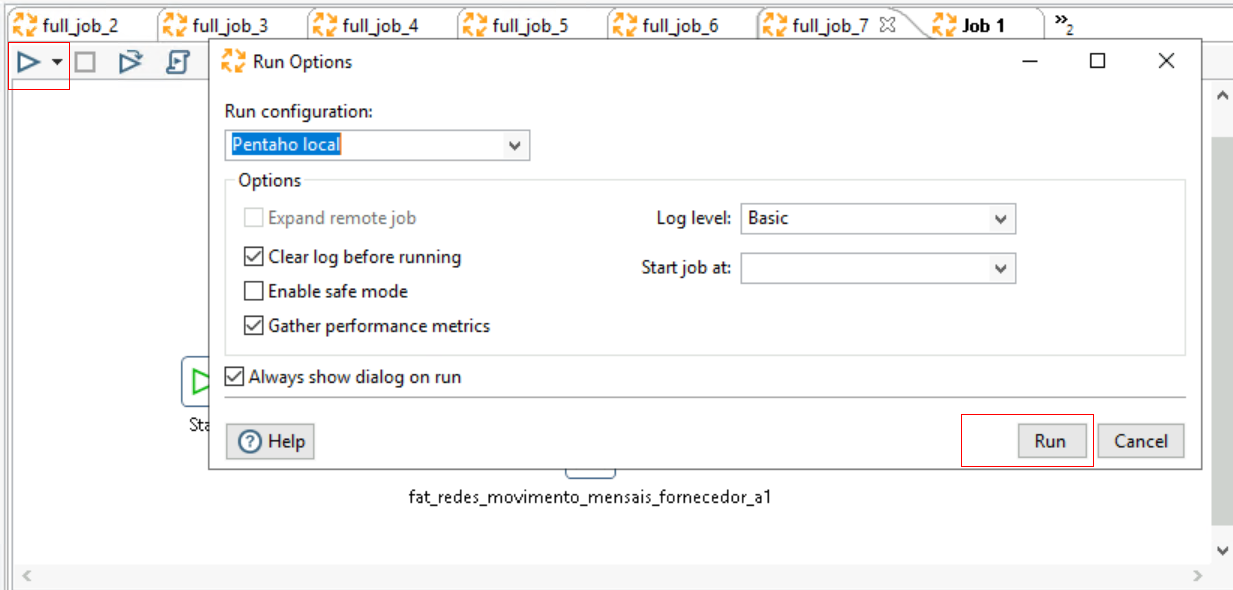
- Click Run to execute the conversion tasks concurrently.
Figure 20 Executing the conversion tasks concurrently
Optimizing the Migration Job
- Configure the Kettle memory.
To increase the number of concurrent Kettle requests and the size of cached data, you can adjust the Kettle memory size.
Use Notepad++ to open the Spoon.bat script and edit the memory content. It is recommended to set it to 60-80% of the host memory.
Figure 21 Configuring the memory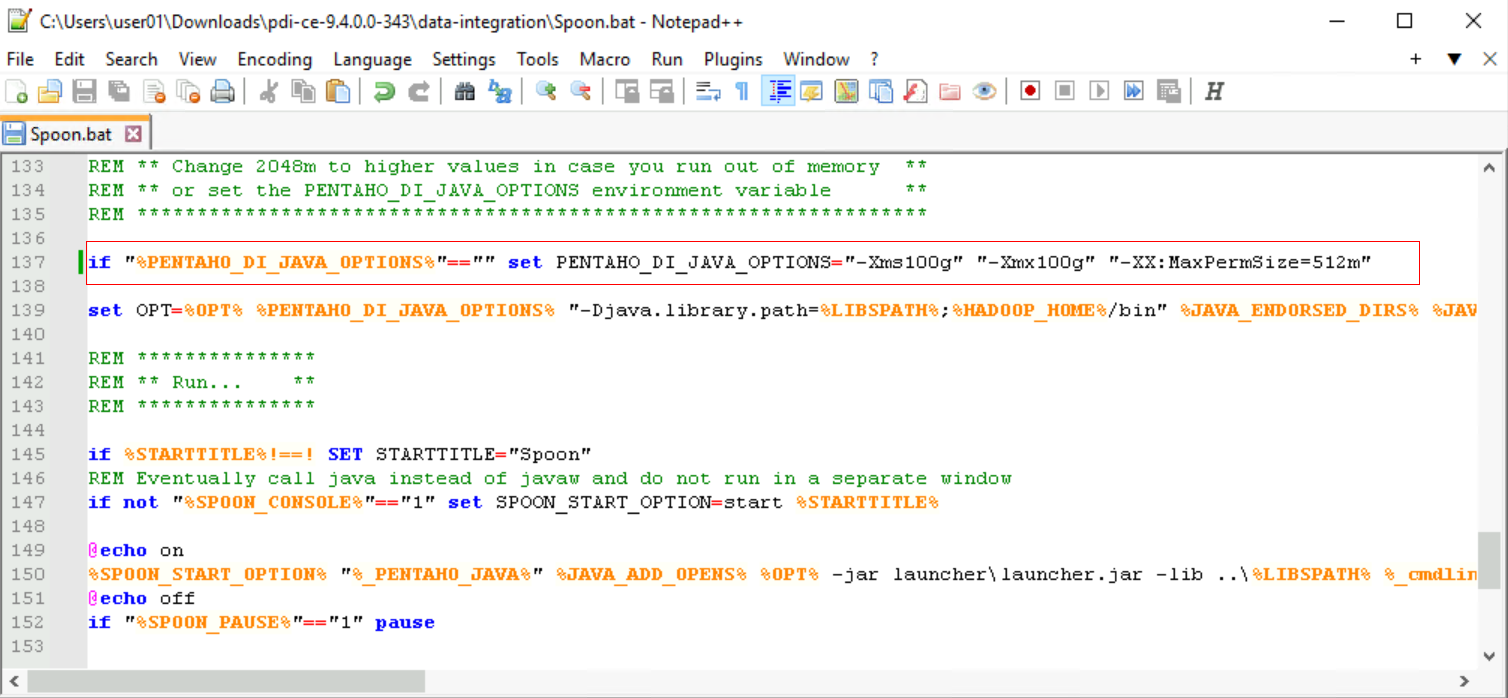
- Configure a job.
- For tables with less than 10 million records, configure around 10 tables per job.
- For larger tables with about 100 million records, configure 2 to 3 tables per job. This allows for individual task scheduling if any issues arise, enhancing efficiency.
- For tables with over 100 million records, especially those with many fields, Kettle's extraction efficiency may be slow. Choose a migration method based on your specific service needs.
Figure 22 Configuring a job
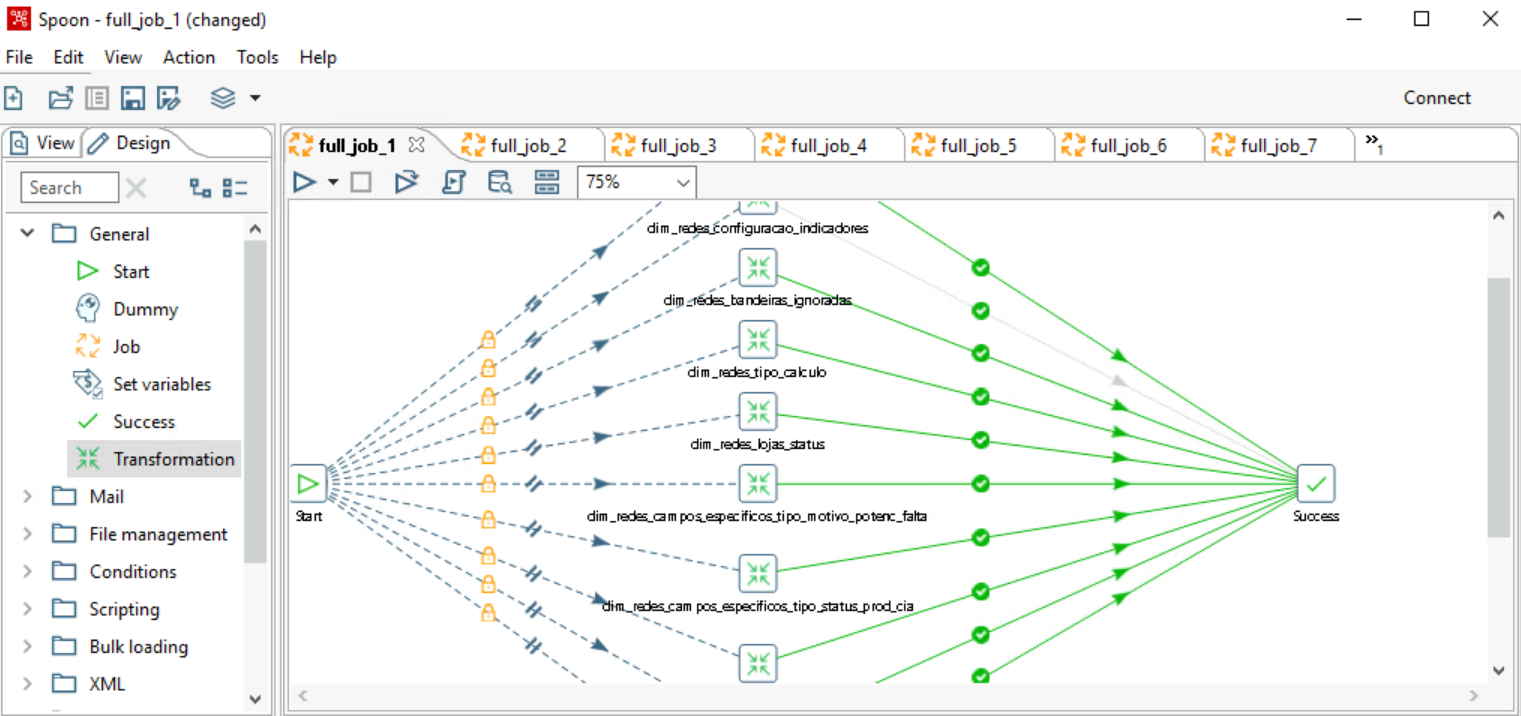
- Group tasks with similar table data volumes into the same job. This ensures all tasks finish around the same time, preventing tail tasks from delaying subsequent jobs.
- If a task error occurs, check the error logs. Issues are often due to source link restrictions causing disconnections. In such cases, restart Kettle and try again.
Checking Table Data
After the migration, check whether the data on the source and destination databases is consistent using DataCheck.
- Create an ECS (running Linux or Windows) and bind an EIP to the ECS to access BigQuery.
- Upload the software package to the specified directory (user-defined) on the ECS, decompress the DataCheck-*.zip package, and go to the DataCheck-* directory. For how to use the files in the directory, see Table 1.
- Configure the tool package.
- In Windows:
Open the dbinfo.properties file in the DataCheck/conf folder and configure it as needed.

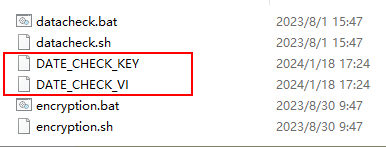
You can use the command below in the tool to generate the ciphertext of src.passwd and dws.passwd.
encryption.bat password

After the command is executed, an encrypted file is generated in the local bin directory.
- In Linux:
The method of generating the ciphertext is similar to that for Windows. The command is sh encryption.sh Password. Other steps are the same.

- In Windows:
- Check data.
In Windows:
- Open the check_input.xlsx file, enter the schemas, databases, source table, and destination table to be checked, and fill in Row Range with a data query statement to specify the query scope.

- After configuring the source database name in the configuration file, the source database name in the check_input.xlsx file defaults to this. However, if a different source database name is specified in the check_input.xlsx file, it will take precedence.
- The Check Strategy offers three levels: high, middle, and low. If unspecified, the default is low.
- The Check Mode supports statistics (statistical value checks).
The following figure shows the check_input.xlsx file for metadata comparison.
Figure 23 check_input.xlsx
- Run the datacheck.bat command in the bin directory to execute the check tool.

- View the generated check result file check_input_result.xlsx.
The following figure shows the statistical value check.

In Linux:
- Edit and upload the check_input.xlsx file. Refer to the step 1 for Windows.
- Run the sh datacheck.sh command to execute the check tool.

- View the check result in the check_input_result.xlsx file. (The check result analysis is the same as that for Windows.)
- Open the check_input.xlsx file, enter the schemas, databases, source table, and destination table to be checked, and fill in Row Range with a data query statement to specify the query scope.
Related Information
For more information, see DataCheck.
|
File or Folder |
Description |
|
|---|---|---|
|
DataCheck |
bin |
Saves the entry script of the check tool.
|
|
conf |
Configuration file, which is used to configure the connection between the source database and the destination database and set log printing. |
|
|
lib |
Directory for storing the JAR packages required for running the check tool. |
|
|
check_input.xlsx |
|
|
|
logs |
The package does not include this file. Once the check tool runs, it automatically generates this file to log the tool's execution process. |
|
|
check_input_result.xlsx |
The package does not include this file. Once the check tool runs, a check result file will be created in the same location as check_input.xlsx. |
|
|
DataCheck |
|---|
|
|
Check Level |
Description |
Syntax |
|---|---|---|
|
Low |
|
|
|
Middle |
|
|
|
High |
|
|
Feedback
Was this page helpful?
Provide feedbackThank you very much for your feedback. We will continue working to improve the documentation.See the reply and handling status in My Cloud VOC.
For any further questions, feel free to contact us through the chatbot.
Chatbot


