
Frontend Login
Before logging in to the frontend as a portal user, you need to develop a login widget and upload it to the advanced page, and configure the widget bridge data on the advanced page. After you enter the login account and password on the login page, the system then calls the user login flow.
The following uses application A as an example to describe how to develop the login page. For details about the process, see Figure 1.

In addition to customizing the login widget, you can use the preset login widget on the advanced page for quick configuration. For details, see Setting Properties of the Login Widget.
Step 1: Develop a Custom Widget
You can refer to the following to develop a custom login widget. Alternatively, you can skip this step and download userLogin.zip directly.
- On the Huawei Cloud Astro Zero console, click Access Homepage to go to the application development page.
- Click
 and choose Environments > Environment Configuration.
 - Choose Maintenance from the main menu.
- In the navigation pane, choose Global Elements > Page Assets > Widget Templates.
- In the widget template list, click widgetVue3Template. The template details page is displayed.
- Click Download, set the widget name to userLogin, and click Save. Figure 2 Saving a template

- Check the decompressed widget directories. Figure 3 Directories after decompression

- userLogin.js: stores the code of the vue service logic.
- userLogin.ftl: stores HTML code.
- userLogin.css: stores style code.
- userLogin.editor.js and packageinfo.json: configuration files.
- In the decompressed folder, create an imgs folder and place a background image of the login page in the folder.
The name of the background image in this example is imagebg.jpg.
- Open the folder in the local editor and change the propertiesConfig code in the userLogin.editor.js file to the following code to configure the bridge:
propertiesConfig: [ { headerTitle: 'Parameters', accordion: true, accordionState: 'open', config: [ { type: 'text', name: 'loginAPI', label: 'login API', value: '', }, ], }, { config: [ { type: 'connectorV2', name: 'FlowConnector', label: 'Flow Connector', model: 'ViewModel', }, { type: 'connectorV2', name: 'common.GetConnector', label: 'View API Get Connector', model: 'ViewModel', }, { type: 'connectorV2', name: 'common.PostConnector', label: 'View API Post Connector', model: 'ViewModel', }, { type: 'connectorV2', name: 'common.PutConnector', label: 'View API Put Connector', model: 'ViewModel', }, { type: 'connectorV2', name: 'common.DeleteConnector', label: 'View API Delete Connector', model: 'ViewModel', }, ], }, ], - Add the following information in bold to the packageinfo.json file:
{ "widgetApi": [ { "name": "userLogin" } ], "widgetDescription": "", "authorName": "", "localFileBasePath": "", "requires": [ { "name": "global_Vue3", "version": "3.3.4" }, { "name": "global_ElementPlus", "version": "2.6.0" }, { "name": "global_Vue3I18n", "version": "9.10.1" }, { "name": "global_Vue3Router", "version": "4.3.0" } ] } - Replace the content in the userLogin.ftl file with the following code:
<style> [v-cloak] { display: none } </style> <div v-cloak id="userLogin" class="page-login" v-cloak> <div :class="backgroundClass" class="bg-box"> <!-- <div class="title"> <span>Equipment management system</span> </div> --> <div class="login-box"> <div class="login-title">User Login</div> <input name="username" type="text" style="display: none" /> <input name="password" type="password" style="display: none" /> <div class="login-form"> <div v-show="errorDesc" class="error-line"> <!-- <img :src="BasePath + 'imgs/btn_errorInfo.png'" /> --> <span class="error-text" v-html="errorDesc"></span> </div> <div class="login-item mg-top10"> <!-- :placeholder="isUserName ? getTransLang('ds.commerce.storefront.web.loginname') : getTransLang('ds.commerce.storefront.web.loginEmailOrPhone')" --> <input ref="accountInput" v-model="account" placeholder="Enter a username." @keyup.enter="validateBeforeSubmit" autocomplete="off" maxlength="32" type="text" /> </div> <div class="login-item mg-top10"> <!-- :placeholder="getTransLang('ds.commerce.storefront.web.password')" --> <input v-model="password" @keyup.enter="validateBeforeSubmit" placeholder="Enter a password." autocomplete="off" maxlength="32" type="password" /> </div> <div v-if="needVerify" class="login-item"> <!-- :placeholder="getTransLang('ds.commerce.storefront.web.verificationcode')" --> <input v-model="inputImgCode" @keyup.enter="validateBeforeSubmit" placeholder="Enter the verification code." autocomplete="off" maxlength="10" type="text" /> <div class="verify-code"> <img :src="imgCode" @click="getVerifyCode()" /> </div> </div> <div class="login-button" @click="validateBeforeSubmit"> Login </div> </div> </div> </div> </div> - Replace the content in the userLogin.js file with the following code:
userLogin = StudioWidgetWrapper.extend({ init: function () { var thisObj = this thisObj._super.apply(thisObj, arguments) thisObj.render() thisObj.initBusi() if (typeof Studio != 'undefined' && Studio) { Studio.registerEvents(thisObj, 'goHomepage', 'go Homepage', []) } }, render: function () { var thisObj = this let tenantId; if (Studio.inReader) { tenantId = STUDIO_DATA.catalogProperties["tenant-id"].value } else { tenantId = magno.pageService.getCatalogProperties()["tenant-id"].value } HttpUtils.setCookie("tenant-id", tenantId) HttpUtils.setCookie("locale","zh_CN"); var elem = thisObj.getContainer() if (elem) { var containerDiv = $('.scfClientRenderedContainer', elem) if (containerDiv.length) { $(containerDiv).empty() } else { containerDiv = document.createElement('div') containerDiv.className = 'scfClientRenderedContainer' $(elem).append(containerDiv) } } thisObj.sksBindItemEvent() $(window).resize(function () { thisObj.sksRefreshEvents() }) }, initBusi: function () { var thisObj = this var widgetProperties = thisObj.getProperties() var BasePath = thisObj.getWidgetBasePath() // Local path var elem = thisObj.getContainer() const app = Vue.createApp({ data(){ return { BasePath: BasePath, imgCode: '', account: '', password: '', inputImgCode: '', errorDesc: '', needRead: false, backgroundClass: 'backgroundClass', needVerify: false, accountName: '', isMobile: false, } }, created() { this.getVerifyCode() this.checkIsLogin() this.isMobile = /Android|webOS|iPhone|iPad|BlackBerry/i.test( navigator.userAgent ) }, watch: { account(newVal, oldVal) { if (newVal !== oldVal) { this.password = '' } }, }, methods: { checkIsLogin() { const userInfo = JSON.parse( window.sessionStorage.getItem('userInfo') ) if (userInfo !== null && userInfo.username) { setTimeout(() => { thisObj.triggerEvent('goHomepage', {}) }, 1000) } }, shouldShowImgCode() { connService( thisObj, `${ds_baseUrl}/identities/isNeedCaptcha`, { username: this.account, }, 'common.PostConnector' ) .then((res) => { const { data = [], resp = {} } = res if (resp.code !== '0') { this.$message.error(resp.message) } if (data && data.length) { this.needVerify = data[0].needVerify if (!this.needVerify) { this.confirmLogin() } } }) .catch((e) => { this.$message.error(e.response.resMsg) }) }, // Login button validateBeforeSubmit() { if (!this.password) { this.errorDesc = 'Enter a password.' this.needVerify = true return false } if (!this.account) { this.errorDesc = 'Enter a username.' this.needVerify = true return false } if (!this.inputImgCode && this.needVerify) { this.errorDesc = 'Incorrect verification code.' return false } if (this.needVerify && this.inputImgCode) { this.confirmLogin() return } this.confirmLogin() }, // Debug the login API. confirmLogin() { var request = { username: this.account, password: this.password, captcha: this.inputImgCode, } // this.callFlowConn1( widgetProperties.loginAPI, request, this.callLogin, this.loginFail, 'post' ) }, // Function of login API success callLogin(response) { if (response) { this.errorDesc = '' let userInfo = { username: response.data[0].username, userId: response.data[0].userId, profile: response.data[0].profile, } HttpUtils.setCookie('isLogged', true) window.sessionStorage.setItem( 'userInfo', JSON.stringify(userInfo) ) thisObj.triggerEvent('goHomepage', {}) } }, // Login failed resMsg loginFail(data){ this.errorDesc = data.response.resMsg this.getVerifyCode() this.needVerify = true }, // Obtain the verification code. getVerifyCode() { this.imgCode = '/u-route/baas/sys/v1.0/verificationcode?type=login&t=' + Date.parse(new Date()) }, // Encapsulate the flow to call the background callFlowConn1: function (service, param, callbackFunc,callbackfail, method) { var thisView = this let mMethod switch (method) { case 'get': mMethod = 'common.GetConnector' break case 'post': mMethod = 'common.PostConnector' break case 'put': mMethod = 'common.PutConnector' break default: mMethod = 'common.FlowConnector' break } var connector = thisObj.getConnectorInstanceByName(mMethod) if (connector) { connector.setInputParams({ service: service, needSchema: 'data', async: false, }) connector .query(param) // Call the API with param as the input parameter .done(function (response) { if (response.resp && response.resp.code) { callbackFunc.call(thisView, response) } }) .fail(function (response) { // The API fails to be executed. callbackfail.call(thisView, response) }) } }, }, }) app.use(ElementPlus); thisObj.vm = app.mount($("#userLogin", elem)[0]); }, }) - Replace the content in the userLogin.css file with the following code. Note that the value of background must be the names of the folder and image created in 8.
.page-login { /* Browsers that use the WebKit kernel */ /* Firefox version 4-18 */ /* Firefox version 19+ */ } .page-login * { box-sizing: border-box; } .page-login .flex { display: flex; } .page-login .login_tip { font-size: 12px; color: #167aeb; } .page-login .bg-box { position: relative; display: flex; justify-content: center; width: 100%; height: 100%; background: url('imgs/imagebg.jpg') no-repeat 50%; background-size: cover; } .page-login .bg-box > img { width: 100%; } @media (min-width: 767px) { .page-login .bg-box .login-box { position: absolute; right: 18%; top: 26%; padding: 30px 30px 20px 30px; width: 380px; background: #fff; border-radius: 10px; box-shadow: 0 8px 16px 0 rgba(0, 0, 0, 0.1); } .page-login .bg-box .login-box .login-title { font-size: 24px; color: #333; text-align: center; } .page-login .bg-box .login-box .login-form { padding-top: 20px; } .page-login .bg-box .login-box .login-form .error-line { display: flex; align-items: center; background: #ffebeb; color: #e4393c; border: 1px solid #faccc6; padding: 3px 10px 3px 10px; height: auto; text-align: left; font-size: 12px; } .page-login .bg-box .login-box .login-form .error-line .error-text { padding-left: 5px; } .page-login .bg-box .login-box .login-form .error-line .error-text .change_tab { color: #167aeb; cursor: pointer; } .page-login .bg-box .login-box .login-form .login-item { display: flex; align-items: center; margin-top: 20px; } .page-login .bg-box .login-box .login-form .login-item .el-input__inner { height: 36px; } .page-login .bg-box .login-box .login-form .login-item > input { flex: 1; padding: 5px 10px; height: 36px; border-radius: 3px; border: 1px solid #ddd; } .page-login .bg-box .login-box .login-form .login-item .verify-code { height: 36px; margin-left: 5px; } .page-login .bg-box .login-box .login-form .login-item .verify-code img { height: 100%; } .page-login .bg-box .login-box .login-form .login-item .el-checkbox { margin-right: 10px; } .page-login .bg-box .login-box .login-form .login-item .read-text { font-size: 12px; color: #333; } .page-login .bg-box .login-box .login-form .login-item .read-text .clickable { color: #167aeb; cursor: pointer; } .page-login .bg-box .login-box .login-form .login-item .read-text .clickable:hover { text-decoration: underline; } .page-login .bg-box .login-box .login-form .mg-top10 { margin-top: 10px; } .page-login .bg-box .login-box .login-button { margin-top: 20px; height: 40px; line-height: 40px; border-radius: 3px; background: #3d88ff; text-align: center; color: #fff; font-size: 14px; cursor: pointer; } .page-login .bg-box .login-box .login-button:hover { opacity: 0.8; } .page-login .bg-box .login-box .divide-line { margin-top: 20px; height: 1px; background: #eee; opacity: 0.8; } .page-login .bg-box .login-box .login-bottom { margin-top: 20px; justify-content: center; align-items: center; } .page-login .bg-box .login-box .login-bottom .bottom-text { font-size: 12px; color: #999; } .page-login .bg-box .login-box .login-bottom .type-item { margin-left: 10px; width: 30px; height: 23px; cursor: pointer; } .page-login .bg-box .login-box .login-bottom .type-item img { width: 100%; } } @media (max-width: 767px) { .page-login .bg-box .login-box { position: absolute; right: auto; top: 26%; padding: 30px 30px 20px 30px; width: 380px; background: #fff; border-radius: 10px; box-shadow: 0 8px 16px 0 rgba(0, 0, 0, 0.1); } .page-login .bg-box .login-box .login-title { font-size: 24px; color: #333; text-align: center; } .page-login .bg-box .login-box .login-form { padding-top: 20px; } .page-login .bg-box .login-box .login-form .error-line { display: flex; align-items: center; background: #ffebeb; color: #e4393c; border: 1px solid #faccc6; padding: 3px 10px 3px 10px; height: auto; text-align: left; font-size: 12px; } .page-login .bg-box .login-box .login-form .error-line .error-text { padding-left: 5px; } .page-login .bg-box .login-box .login-form .error-line .error-text .change_tab { color: #167aeb; cursor: pointer; } .page-login .bg-box .login-box .login-form .login-item { display: flex; align-items: center; margin-top: 20px; } .page-login .bg-box .login-box .login-form .login-item .el-input__inner { height: 36px; } .page-login .bg-box .login-box .login-form .login-item > input { flex: 1; padding: 5px 10px; height: 36px; border-radius: 3px; border: 1px solid #ddd; } .page-login .bg-box .login-box .login-form .login-item .verify-code { height: 36px; margin-left: 5px; } .page-login .bg-box .login-box .login-form .login-item .verify-code img { height: 100%; } .page-login .bg-box .login-box .login-form .login-item .el-checkbox { margin-right: 10px; } .page-login .bg-box .login-box .login-form .login-item .read-text { font-size: 12px; color: #333; } .page-login .bg-box .login-box .login-form .login-item .read-text .clickable { color: #167aeb; cursor: pointer; } .page-login .bg-box .login-box .login-form .login-item .read-text .clickable:hover { text-decoration: underline; } .page-login .bg-box .login-box .login-form .mg-top10 { margin-top: 10px; } .page-login .bg-box .login-box .login-button { margin-top: 20px; height: 40px; line-height: 40px; border-radius: 3px; background: #3d88ff; text-align: center; color: #fff; font-size: 14px; cursor: pointer; } .page-login .bg-box .login-box .login-button:hover { opacity: 0.8; } .page-login .bg-box .login-box .divide-line { margin-top: 20px; height: 1px; background: #eee; opacity: 0.8; } .page-login .bg-box .login-box .login-bottom { margin-top: 20px; justify-content: center; align-items: center; } .page-login .bg-box .login-box .login-bottom .bottom-text { font-size: 12px; color: #999; } .page-login .bg-box .login-box .login-bottom .type-item { margin-left: 10px; width: 30px; height: 23px; cursor: pointer; } .page-login .bg-box .login-box .login-bottom .type-item img { width: 100%; } } .page-login ::-webkit-input-placeholder { font-size: 12px; color: #aaa; } .page-login :-moz-placeholder { font-size: 12px; color: #aaa; } .page-login ::-moz-placeholder { font-size: 12px; color: #aaa; } .page-login :-ms-input-placeholder { font-size: 12px; color: #aaa; } .page-login .logining-text { margin-top: 120px; text-align: center; font-size: 30px; color: #333; } - Compress the modified configuration file and customized file into a .zip package, and name the package as userLogin.zip.
Step 2: Upload the Custom Login Widget
After a custom widget is developed, you can upload it to the Huawei Cloud Astro Zero widget library for advanced pages.
- On the Huawei Cloud Astro Zero environment configuration page, choose Maintenance from the main menu.
- In the navigation pane, choose Global Elements > Page Assets > Widgets.
- Click Submit New Widget.
- Click the upload button to upload the customized widget package userLogin.zip. Figure 4 Uploading a custom widget

Table 1 Parameters for uploading a widget Parameter
Description
Example
Name
Widget name. Same as the widget package name by default.
userLogin
Upload Source File(.zip)
Source file package of a widget.
Select the customized widget package developed in Step 1: Develop a Custom Widget.
Scenario
In what kind of page development scenarios can the widget be used.
Advanced pages
Release Notes
Widget description in different languages.
The information configured here will be displayed on the overview tab page of the widget details page.
Custom widgets
- After setting the parameters, click Submit.
Step 3: Create an Advanced Page
The portal user login page is an advanced page. You can reference the uploaded login widget and set related parameters to implement the login function.

- On the Huawei Cloud Astro Zero console, click Access Homepage to go to the application development page.
- On the Home > All Apps page, click Edit next to A application to access the application designer.
- In the navigation pane on the left, choose Page.
- Click the plus sign (+) next to Advanced Page, set the label and name to Login, set the layout type to Absolute, and click Add. Figure 6 Adding an advanced page

Step 4: Drag Widgets to Develop the Login Page
- On the advanced page created in Step 3: Create an Advanced Page, click
 in the upper left corner and select All. On the Custom tab page, drag the userLogin widget to the editing area. Figure 7 Dragging a widget to the editing area
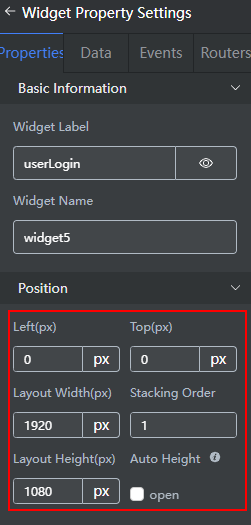
- Set the location properties of the userLogin widget.
- Check the property configuration panel of the widget displayed on the right.
- In the Position area, set Left(px) and Top(px) to 0, Layout Width(px) to 1920, and Layout Height(px) to 1080. Figure 8 Setting the widget position
- Click
 in the upper part of the page to save the configuration.
 - Choose , move the cursor to Login, click
 , and select Settings. Figure 9 Opening the Settings page
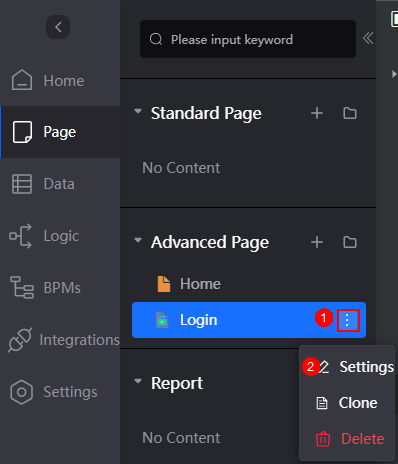
- On the displayed page, select Stretch and click Save. Figure 10 Setting the page stretching

- Set the bridge of the widget.
- Select the userLogin widget, choose Properties > Parameters, and set login API to / Namespace__A/1.0.0/Flow_login. Figure 11 Adding the login URL
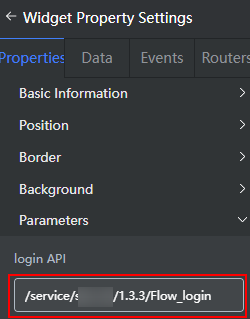
login API indicates the latter part of the URL of the login API. Set Namespace as needed. A indicates the application name. The login API is created in Background Login.
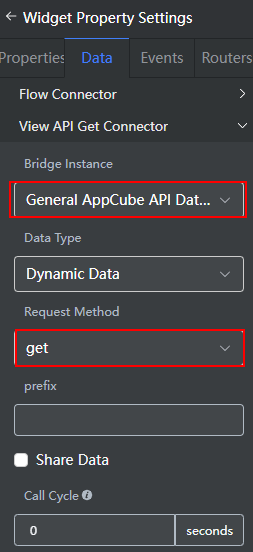
- On the Data tab page, click View API Get Connector. Set Bridge Instance to Bridge Instance AstroZero API Data Bridge, Data Type to Dynamic Data, and Request Method to get, as shown in the following figure. Figure 12 Setting a bridge
- Set the bridge instances selected in the following figure by referring to the previous step. Figure 13 Setting other bridges
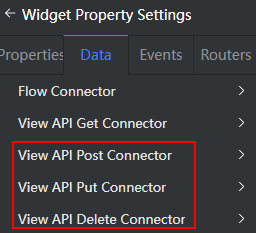
Table 2 Bridge instance configuration Data Name
Bridge Instance
Data Type
Request Method
View API Post Connector
Bridge Instance AstroZero API Data Bridge
Dynamic Data
Post
View API Put Connector
Bridge Instance AstroZero API Data Bridge
Dynamic Data ata
Put
View API Delete Connector
Bridge Instance AstroZero API Data Bridge
Dynamic Data
Delete
- Select the userLogin widget, choose Properties > Parameters, and set login API to / Namespace__A/1.0.0/Flow_login.
- Set events for the userLogin widget to associate the widget with other pages. Figure 14 Setting events
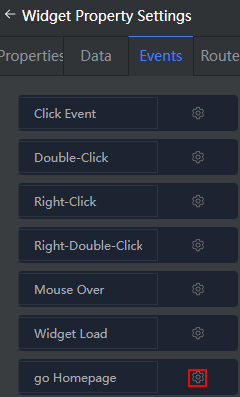
- Click the gear icon next to go Homepage. The event editing page is displayed.
- Click Create Action and choose Default > Page Navigation.
- Select the page to be redirected to and click OK. Here we select the advanced page Home created during previous steps. In real development scenario, you can customize your own destination page and its logic.Figure 15 Editing page redirection

- Click
 on the top of the Login page to save the page, then click
  to release the page.
 - After the page is successfully released, click
 to preview the login page. On the login page, after you enter the account and password of the portal use, and click Log In, the system then calls the user login flow.Figure 16 Login preview page
- On the preview page, enter the account and password of the portal user who has required permissions and click Log In. If the Home page is displayed, the portal user has logged in successfully.
Feedback
Was this page helpful?
Provide feedbackThank you very much for your feedback. We will continue working to improve the documentation.See the reply and handling status in My Cloud VOC.
For any further questions, feel free to contact us through the chatbot.
Chatbot


