
Background Login
When a portal user logs in to the background, the system uses the custom flow to call the account and password verification script, query the login account and password, and check whether the current login account and password are correct. The process of developing the portal user flow is as follows: Drag one script diagram element, three decision diagram elements, and three value assignment diagram elements. Configure the properties of each diagram element, configure the link type between diagram elements, and save and enable the configuration.
The following uses application A as an example to describe how to implement the background login logic.
Step 1: Create a Login Script for Password Verification
You need to create a script for verifying the account and password in advance.
- On the Huawei Cloud Astro Zero console, click Access Homepage. The application development page is displayed.
- On the Homepage > All Apps page, click Edit next to A application to access the application designer.
- In the navigation pane, choose Logic and click + next to Script.
- Select Create a New Script. Enter login in the Name text box and click Add. Figure 1 Adding a script

- Insert the following script code into the code editor:
import * as buffer from"buffer"; import * as crypto from"crypto"; import * as db from"db"; //Define the input parameter structure. The username and password of the account are mandatory. If other fields (such as the verification code) need to be verified, add them based on the format of the account and password fields. @action.object({type:"param"}) export class ActionInput{ @action.param({type:'String', required:true, label:'string'}) username:string; //Username @action.param({type:'String', required:true, label:'string'}) password:string; //Password @action.param({type:'String', required:true, label:'string'}) captcha:string; //Verification code. This script is used only to verify the account and password. Therefore, the verification code is not used and is not mandatory. In the flow for implementing portal user background login, the flow calls this script to check the verification code. Therefore, the verification code field is added to the script. } //Define the output parameter structure. You can add or delete fields in the structure based on the following example structure. @action.object({type:"param"}) export class ActionOutput{ @action.param({type:'String'}) msg:string;//Login information @action.param({type:'String'}) username:string;//Username @action.param({type:'String'}) userId:string;//User ID @action.param({type:'String'}) captcha:string;//Verification code } //Use the data object PortalUser. @useObject(['PortalUser']) @action.object({type:"method"}) export class Login{ //Define the API class. The input parameter of the API is ActionInput, and the output parameter is ActionOutput . @action.method({ input:'ActionInput', output:'ActionOutput'}) public login(input:ActionInput):ActionOutput{ let out =new ActionOutput(); //Create an instance of the ActionOutput type as the return value let error =new Error(); //Create an instance of the error type to save the error information when an error occurs try{ out.captcha = input.captcha; let s = db.object('PortalUser'); let condition ={ "conjunction":"AND", "conditions":[{ "field":"usrName", "operator":"eq", "value": input.username }] }; let user = s.queryByCondition(condition); if(user && user.length ==1){ if(validate(user[0].passwordSalt, user[0].userPassword, input.password)){ out.msg ="Login succeeded!"; out.username = user[0].usrName; out.userId = user[0].id; }else{ out.msg ="Incorrect account or password!"; } }else{ out.msg ="Incorrect account or password!"; } }catch(error){ console.error(error.name, error.message); out.msg = error.message; } return out; } } function _salt(password:string, saltBuf: buffer.Buffer, encoding: buffer.Encoding= buffer.Encoding.Base64):string{ const passwordBuf = buffer.from(password) const crypt = crypto.pbkdf2(passwordBuf, saltBuf,1000,32, crypto.Hashs.SHA1) return crypt.toString(encoding) } function validate(salt:string, userSaltedPassword:string, password:string, encoding: buffer.Encoding= buffer.Encoding.Base64):boolean{ const saltBuf = buffer.from(salt, encoding); const saltedPassword = _salt(password, saltBuf, encoding); return saltedPassword === userSaltedPassword } - Click
 in the upper part of the editor to save the script.
 - Test whether the script can be executed properly.
- Click
 in the upper part of the editor to run the script.
 - Enter the following test data in the input parameters at the bottom of the page and click
 .
. In the preceding command, test_cs and {XXXXXXXX} indicate the registered account and password, and captcha is optional.
The portal user created in the service configuration center cannot be the same as the portal user created using a script. Therefore, the portal user (for example, test_cs) set here cannot be the portal user created in the service configuration center. Portal users created in the service configuration center can be used only on the default login page.
{
    "username": "test_cs",
    "password": "{XXXXXXXX}",
    "captcha": ""
}
After the execution is successful, you can check the result in the output parameter area.
{{
    "captcha": "",
    "msg": "Login succeeded.",
    "userId": "10*******A",
    "username": "test_cs"
}
- Click
- After the test is successful, click
 in the upper part of the editor to activate the script.
Step 2: Develop the Background Login Logic with a Flow
- In the designer of application A, click Logic in the navigation pane, click
 next to Flow, and create a folder. Figure 2 Creating a folder
- Move the mouse cursor to Flow, click the plus sign (+) on the page to access the flow page.
- Select Create a flow. Set label and name to login, type to Autolaunched Flow, and click Add. Figure 3 Creating a flow

- Define variables for the flow.
- Click
 to expand Context, click
  next to Variable, and set the parameter name to username. Figure 4 Adding a variable
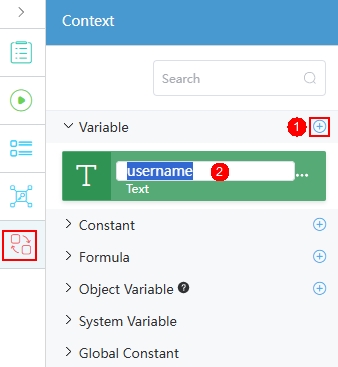
- Repeat the previous step to define other variables in Table 1.
- Click
 next to Formula. In the displayed dialog box, set the name to portalUserLogin and the expression to PORTALUSERLOGIN ({!username}), and click Save. Figure 5 Adding the formula variable portalUserLogin
- Create the formula variable verifyCode in Table 2 by referring to the previous step.
- Click
- Drag diagram elements to the flow canvas and configure basic properties.
- Drag one script, three decision, and three assignment diagram elements to the canvas. The diagram elements are arranged as shown in the following figure. Figure 6 Diagram elements arrangement

- Select the Script0 diagram element and set label to query user in the basic information area.
- Set the label properties of other diagram elements by referring to the previous step. The following table lists label properties for each diagram element.
Table 3 Label properties for each diagram element Name (Unique Identifier)
Label
Decision0
Verify the account and password
Decision1
Check whether a verification code is available
Decision2
Verify the verification code
Assignment0
Incorrect account or password
Assignment1
Perform login
Assignment2
Verification failed
Figure 7 Diagram elements after modification
- Drag one script, three decision, and three assignment diagram elements to the canvas. The diagram elements are arranged as shown in the following figure.
- Configure the Query user script diagram element.
- Click
 , specify the script name (Namespace__login) corresponding to the diagram element, and set the input and output parameters of the script. Figure 8 Specifying a script
- Click Context. The variable list is displayed. Drag username, password, and captcha from the variables area to the Source text box under Input Parameters. In the Output Parameters area, click Add Row four times, add the output parameter fields from the drop-down list box in sequence, and drag the corresponding fields from variable area to the Target text box. The following figure shows the mapping between fields and variables.
- In the script diagram element, the number of input parameters and output parameters are the same as the input parameter fields required in the specified script. If the input parameters of the custom script contain extra fields, perform the same operations for the extra fields.
- Drag a variable from Context to the corresponding input and output parameter area. If you manually enter a value, ensure that the value is the same as that of the variable in Context area.
Figure 9 Dragging the input and output parameters for the script
- Click
- Configure the decision diagram element of checking account and password.
- Select the diagram element of checking account and password, click
 on the right, and change the default name to CheckFail. Figure 10 Modifying the default result name
- Click Add to add an editable result. Change the result to CheckSuccess. Click Add Row under Visual, drag msg from the variable area to Resource, and set the comparison operator to == and the value to "Login succeeded!". Figure 11 Modifying the editable result

- Drag the msg variable from Context to the resource area. If you manually enter a value, ensure that the value is the same as that of the variable in the context.
- "Login succeeded!" must be the same as the output parameter in the login script.
- Select the diagram element of checking account and password, click
- Configure the diagram element of checking whether the verification code is available.
- Select the diagram element of checking whether the verification code is available, click
 on the right, and change the default name to hasVerifyCode. Figure 12 Modifying the default result name
- Click Add to add an editable result and change the result to noVerifyCode. Click Add Row under Visual, drag captcha from the variable area to the resource area, and set the comparison operator to ==, value to "". Figure 13 Modifying the editable result

- Select the diagram element of checking whether the verification code is available, click
- Configure the decision diagram element of verifying the verification code.
- Select the diagram element of verifying the verification code, click
 on the right, and change the default name to verifyCodeFail. Figure 14 Modifying the default name
- Click Add to add an editable result, change the result to verifyCodeSuccess, select Formula on the right, and drag verifyCode from the global context area to Formula. Figure 15 Modifying the editable result

- Select the diagram element of verifying the verification code, click
- Configure the diagram element of incorrect account and password. Figure 16 Configuring the diagram element of incorrect account and password

- Select the diagram element of incorrect account and password, click
 on the right, and click Add Row.
 - Drag $Flow.ResMsg from System Variables to Assignment, set the operator to =, and drag msg to Value.
- Click Add Row, drag $Flow.ResCode from System Variables to Variable under Assignment, set the operator to =, and set Value to 1.
- Select the diagram element of incorrect account and password, click
- Configure the diagram element of performing login. Figure 17 Configuring the variables and values

- Select the diagram element of performing login, click
 on the right, and click Add Row four times.
 - Drag fields such as msg from the context area to Variable under the Assignment area, set the operator to =, and drag values to Value. The following figure shows the field mapping.
Table 4 Mapping between variables and values Variable
Operator
Value
loginMsg
=
{!portalUserLogin}
msg
=
{!msg}
username
=
{!username}
userId
=
{!userId}
- Select the diagram element of performing login, click
- Configure the diagram element of verification failed. Figure 18 Configuring the diagram element of verification failed

- Select the diagram element of verification failed, click
 on the right, and click Add Row four times.
 - Drag $Flow.ResMsg and $Flow.ResCode from System Variables to Assignment, set the operator to =, and set values to "Incorrect account or password!" and "1".
Table 5 Assignment Variable
Operator
Value
$Flow.ResMsg
=
"Incorrect account or password!" "
$Flow.ResCode
=
"1"
- Select the diagram element of verification failed, click
- Link diagram elements and configure connection properties.
- On the canvas, move the pointer to the start diagram element and drag the pointer from + to add a link line between the start diagram element and the query user diagram element. That is, set the current script as the start node of the flow.
- Link the Query user, Check the account and password, Check Whether the verification code is available, and Perform login diagram elements in sequence. Figure 19 Linking diagram elements

- Click the link between the Check account and password diagram element and the Check whether the verification code is available diagram element, click
 on the right, and change the link type to CheckSuccess. Figure 20 Selecting a link
- Click the link between the Check whether the verification code is available diagram element and the Perform login diagram element, click
 on the right, and change the link type to noVerifyCode.
 - Drag a line to connect the Check the account and password diagram element with the Incorrect account and password diagram element.
- Drag a line to connect the Check whether a verification code is available diagram element with the Verify the verification code diagram element.
- Drag a line to connect the Verify the verification code diagram element with the Verification failed diagram element.
- Drag a line to connect the Verify the verification code diagram element with the Perform login diagram element and set the link type to verifyCodeSuccess.
The connections between diagram elements are as shown in the following figure.
Figure 21 Connecting diagram elements
- Define the input and output parameters of the flow and save the flow.
- Click the blank area on the canvas, click the
 on the right, and set the input and output parameters of the flow, as shown in the following figure. Figure 22 Setting input and output parameters for the flow
- The input parameters of the flow are the parameters that are used for executing the flow and the script of account and password verification. Therefore, if the account and password verification script contains extra input parameters, the same input parameters should be added for the flow.
- The output parameters of the flow are the parameters returned by executing the script of account and password verification. Therefore, if the account and password verification script contains extra output parameters, the same output parameters should be added for the flow.
- Click
 on the top of the flow page to save the flow.
- Click the blank area on the canvas, click the
- Test whether the flow can be executed properly.
- Click
 on the top of the flow page to access the flow test page. Figure 23 Flow test page
- On the flow run page, enter the test data and click the run button. In the following parameters, test_cs and *** indicate the username and password of the portal user.
{
 "username": "test_cs",
 "password": "***",
 "captcha": ""
 }
If the operation is successful, all device information is displayed.
Figure 24 Returned values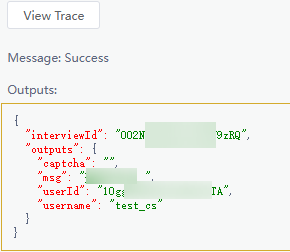
The returned value indicates that the login is successful. After the login is successful, return to Huawei Cloud Astro Zero. Refresh the page. In the upper right corner of the page, you can see that the current login user is the portal user configured in the flow.
- Click
- After the test is successful, click
 in the upper part of the editor to activate the flow.
 - After the test is successful, log in again as the platform developer and click
 in the upper part of the flow editor to enable and publish the flow.
After the test is successful, the login user on the page is changed to the portal user entered in the flow. If you click
 in the upper part of the flow editor, a message is displayed, indicating that you do not have the permission to execute the flow. In this case, you need to switch to the platform developer and log in again to enable the flow.
Step 3: Create an Open API
Open APIs are used to package scripts and flows developed by users in applications into customized RESTful APIs for third-party systems to call. In this example, the developed flow is packaged and released as a REST API for Frontend Login to call.
- Go to the designer of application A, choose Integration from the navigation pane.
- Click + next to Open API. The page for creating an open API is displayed.
- Complete the configuration and click Save. Figure 25 Creating an open API

Table 6 Open API parameters Parameter
Description
Example
Label
The label for the created API; Max. 64 characters.
login
Operation Name
The operation name of the created API. The value must start with a letter and can contain only letters, digits, and underscores (_). It cannot end with an underscore (_) and can contain a maximum of 40 characters.
login
Version
API version, which is in the x.y.z format.
1.3.3
URL
API path, which starts with /service/{namespace}__{application name}/{version}. The content set here is the URL provided by the new API for external access.
/service/namespace__A/version/Flow_login
Type
Resource type. Only Flow APIs can be called in flows. Other APIs can only be called through API request.
Flow
Resource
Select the resources to be bound based on the type.
Select the flow created in Step 2: Develop the Background Login Logic with a Flow. Ensure that the flow has been enabled. Otherwise, the flow cannot be selected.
Method
HTTP method of the API.
In this example, POST is selected to request the server to add resources or perform special operations.
POST
Feedback
Was this page helpful?
Provide feedbackThank you very much for your feedback. We will continue working to improve the documentation.See the reply and handling status in My Cloud VOC.
For any further questions, feel free to contact us through the chatbot.
Chatbot


