Configuring Chinese and English Language Properties for Widgets
Expected Results
You can configure the multi-language property for a widget to ensure it displays correctly in different languages. To do this, you need to modify the internationalization resource file (i18n). The following explains how to set up Chinese and English for the widget_demo_i18n, as shown in Figure 1 and Figure 2.
Implementation Methods
- Download a widget template.
- On the Huawei Cloud Astro Zero console, click Access Homepage to go to the application development page.
- Click
 and choose Environments > Environment Configuration.
 - Choose Maintenance from the main menu.
- In the navigation pane, choose Global Elements > Page Assets > Widget Templates.
- In the widget template list, click widgetVueTemplate. The template details page is displayed.
- Click Download, set the widget name to widget_demo_i18n, and click Save.
If you select Download original template, the widget name in the downloaded widget package will not be changed.Figure 3 Saving a template

- Configure the multi-language property for the widget.
- Add the internationalization resource files messages-en.json and messages-zh.json. The messages-zh.json file must be encoded using Unicode.
- The content of the messages-zh.json file is as follows:
{
	"zh-CN": {
		"name" : "\u540d\u79f0"
	}
}
- The content of the messages-en.json file is as follows:
{
	"en-US": {
		"name" : "name"
	}
}
- The content of the messages-zh.json file is as follows:
- Add the i18n node to the packageinfo.json file to specify the name of the internationalization resource file. Add the requires node and specify the Vue and VueI18n libraries on which the library depends.
You can obtain the library file names and versions from the library details page.
{
  "widgetApi": [
    {
      "name": "widget_demo_i18n"
    }
  ],
  "widgetDescription": "widget i18n demo",
  "authorName": "test",
  "width": "",
  "height": "",
  "i18n": [
    {
      "name": "messages-en"
    },
    {
      "name": "messages-zh"
    }
  ],
  "requires": [{
      "name": "global_Vue",
      "version": "100.7"
    },
	{
      "name": "global_VueI18n",
      "version": "100.7"
    },
    {
      "name": "global_Element",
      "version": "100.8"
    }
  ]
}
When you specify library files in requires, specify them in sequence based on the dependency between the library files. For example, global_VueI18n depends on global_Vue and needs to be written after global_Vue.
- In the render method of widget_demo_i18n.js, use the HttpUtils.getI18n method provided by the platform to return the i18n variable and create a Vue instance and import the i18n variable.
var i18n = HttpUtils.getI18n({ locale: HttpUtils.getLocale(), messages: thisObj.getMessages() }); var vm = new Vue({ el: $("#widget_demo_i18n", elem)[0], i18n: i18n, data: { form: { name: "miao" } } }) - In widget_demo_i18n.ftl, use the $t method provided by VueI18n to use internationalization resources.
<div id="widget_demo_i18n"> <el-form :model="form" :inline="true"> <el-form-item :label="$t('name')"> <el-input v-model="form.name"></el-input> </el-form-item> </el-form> </div> - Compress the developed widget code to a file with the file name extension .zip. You can also click here to obtain the sample package widget_demo_i18n.zip.
- Add the internationalization resource files messages-en.json and messages-zh.json. The messages-zh.json file must be encoded using Unicode.
- Upload the widget package to the widget library.
- Return to the environment configuration page, choose Maintenance > Global Elements > Page Assets > Widgets, and click Submit New Widget.
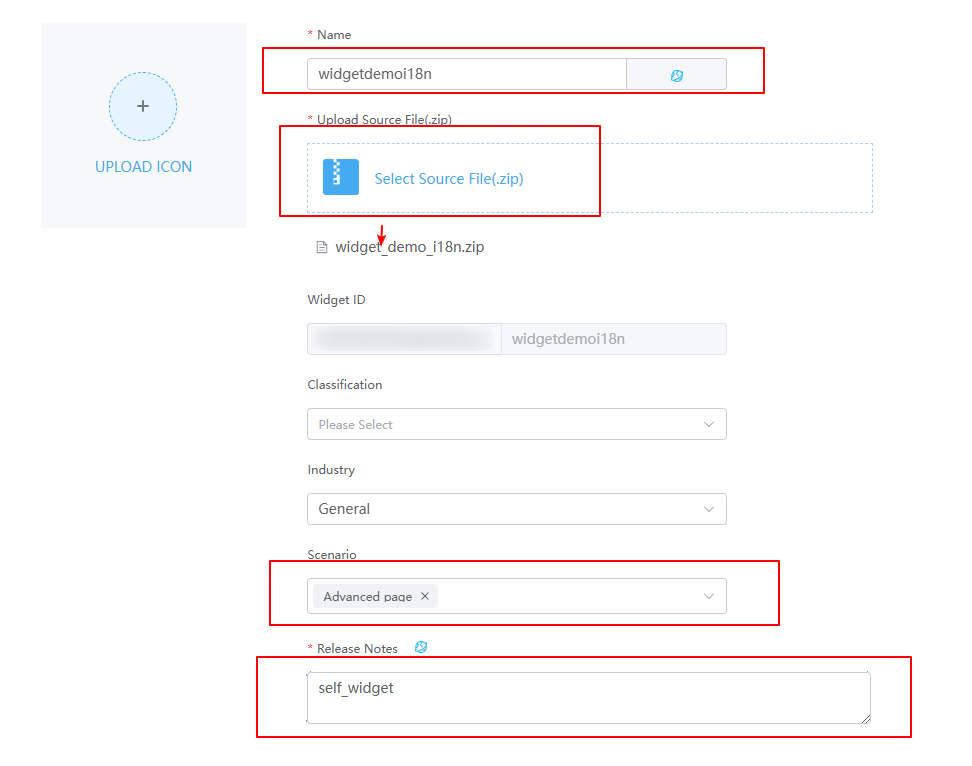
- On the page for submitting a new widget, complete the configuration, upload the compressed file, and click Submit.
Figure 4 Uploading a custom widget

Table 1 Parameters for uploading a widget Parameter
Description
Example
Name
Widget name. The system automatically sets this parameter based on the widget package name.
widgetdemoi18n
Upload Source File(.zip)
Source file package of the widget.
Select widget_demo_i18n.zip in 2.e.
Scenario
Application scenario of a widget package. You can select multiple application scenarios at a time.
Advanced page
Release Notes
Description of the widget. Set it as required. The information configured here will be displayed on the overview tab page of the widget details page.
Custom widget
- Disable the Vue3 render framework of page widgets.
The custom widgets in this practice are developed based on the Vue2 framework. However, the Vue3 render framework of page widgets is enabled by default. You need to manually disable the Vue3 page widgets to avoid the error message displayed when dragging the widget to the page.Figure 5 Displayed error

- Go to the application designer. In the navigation pane, choose Settings.
- In the Advanced Settings area, deselect The render framework of page widgets is upgraded from Vue2 to Vue3.
Figure 6 Deselecting

- In the navigation pane, choose Page, and click + next to Advanced Page.
- Click
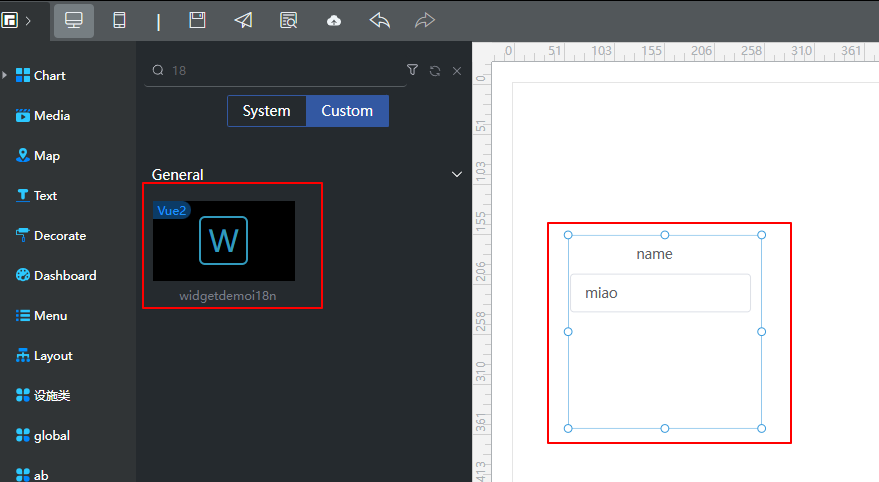
 and drag the widgetdemoi18n widget from All > Custom to the canvas on the right.
Figure 7 Dragging the widget to the canvas
- Click
 to save the advanced page settings. After the page settings are saved, click
  to release the page.
 - After the release is successful, click
 to preview.
Switch the environment language. In each language, click a widget on the canvas. The Widget Property Settings of the widget is displayed on the right. Check whether their properties meet the requirements.
Feedback
Was this page helpful?
Provide feedbackThank you very much for your feedback. We will continue working to improve the documentation.See the reply and handling status in My Cloud VOC.
For any further questions, feel free to contact us through the chatbot.
Chatbot


