Sending an Email
Prerequisites
- Your Huawei account or IAM user has passed the enterprise real-name authentication.
- You have enabled KooMessage.
- You have contacted operations personnel to configure email information. The email function can be used only after the email information is configured.
Preparing a Domain Name
You have registered a domain name kmemailtest.cn and added a domain name record with the domain name service provider.
Process
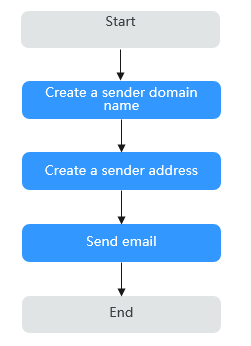
This section describes how to send an email. Figure 1 shows the operation process.
Creating a Sender Domain Name
- Log in to the console and choose KooMessage.
- Choose . The Sender Domain Name page is displayed.
- Click Create Sender Domain Name. The Create Sender Domain Name dialog box is displayed.
- Enter domain name information, as shown in Figure 2, and click Submit.
Sender Domain Name: Enter a registered domain name.
After submission, view the domain name on the Sender Domain Name page. The Status of the domain name is Verification failed.
- Click View. The Verification Details page is displayed, as shown in Figure 3.

Domain name of CNAME or TXT type must be verified.
- Confirm the information and click Verify.
After the verification is successful, the domain name Status changes to Verification passed.
Creating a Sender Address
- Choose . The Sender Addresses page is displayed.
- Click Create Sender Address. The Create Sender Address dialog box is displayed.
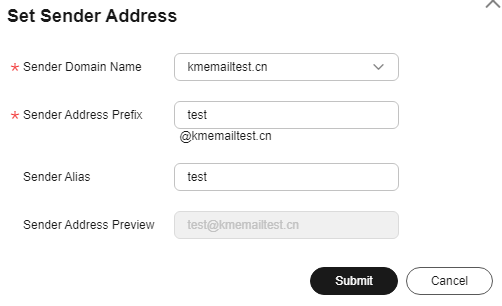
- Enter the sender address, as shown in Figure 4.
- Sender Domain Name: Select the domain name in Creating a Sender Domain Name.
- Sender Address Prefix: Enter test.
- Click Submit.
On the Sender Addresses page, you can view the submitted sender address.
Sending an Email
Select a public template to send an email.
- Choose . The Sending Tasks page is displayed.
- Click Create Sending Tasks.
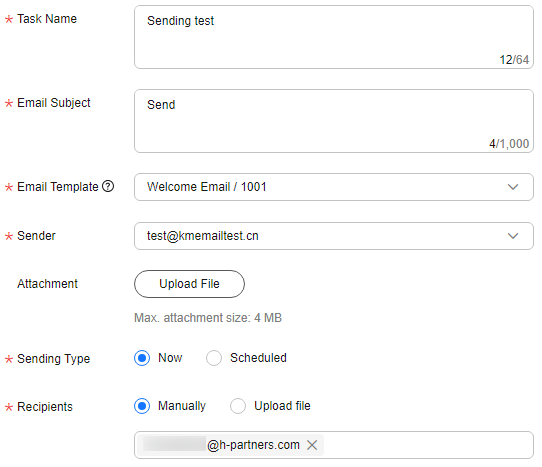
- Enter the sending task information, as shown in Figure 5.
- Task Name: Enter a name as required.
- Email Subject: Set the parameter as required.
- Email Template: Select a public template.
- Sender: Select the address in Creating a Sender Address.
- Sending Type: Select Now.
- Recipients: Select Manually and enter the recipient email address.
- Click Submit.
After the template is sent, the recipient will receive an email containing the public template.
Feedback
Was this page helpful?
Provide feedbackThank you very much for your feedback. We will continue working to improve the documentation.See the reply and handling status in My Cloud VOC.
For any further questions, feel free to contact us through the chatbot.
Chatbot


