Overview
You can use SecMaster to collect security logs on and off the cloud, as well as transfer security logs from SecMaster to a third-party system and product.
|
Scenario |
Operation Guide |
|---|---|
|
Integrating logs of cloud services on Huawei Cloud into SecMaster |
For details, see Enabling Log Access. You can enable log integration for many cloud services all at once. |
|
Integrating security logs from third parties (non-Huawei Cloud) into SecMaster |
Security logs of third parties are integrated by data collection. This section describes the data collection function. |
|
Transferring logs from SecMaster to a third-party system or product |
The procedure is the same as that for integrating logs from a third-party (non-Huawei Cloud) system into SecMaster. Major differences are as follows:
|

Data Collection Principles
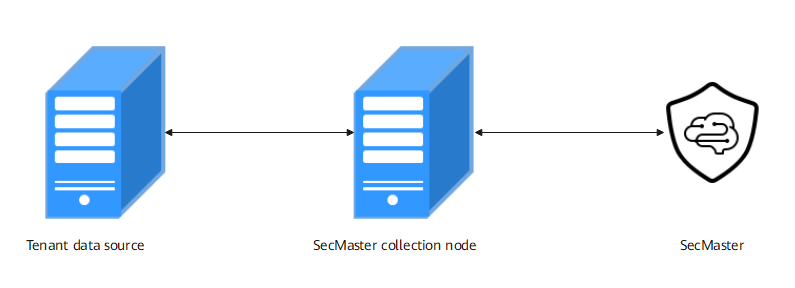
The basic principle of data collection is as follows: SecMaster uses a component controller (isap-agent) that is installed on your ECSs to manage the collection component Logstash, and Logstash transfer security data in your organization or between you and SecMaster.

Basic Concepts
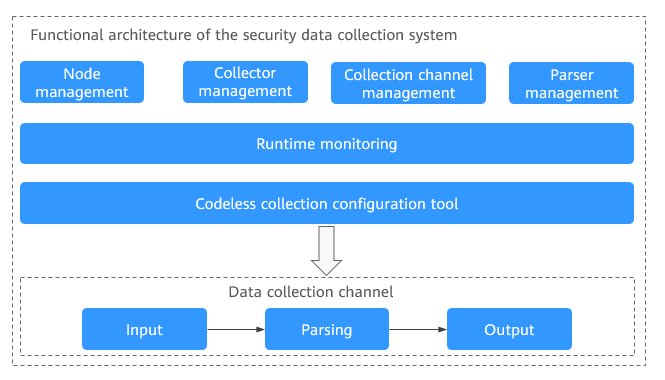
- Collector: custom Logstash. A collector node is a custom combination of Logstash+ component controller (isap-agent).
- Node: If you install SecMaster component controller isap-agent on an ECS and use IAM to authorize SecMaster to manage the ECS, the ECS is called a node. You need to deliver data collection engine Logstash to managed nodes on the Components page.
- Component: A component is a custom Logstash that works as a data aggregation engine to receive and send security log data.
- Connector: A connector is a basic element for Logstash. It defines the way Logstash receives source data and the standards it follows during the process. Each connector has a source end and a destination end. Source ends and destination ends are used for data inputs and outputs, respectively. The SecMaster pipeline is used for log data transmission between SecMaster and your devices.
- Parser: A parser is a basic element for configuring custom Logstash. Parsers mainly work as filters in Logstash. SecMaster preconfigures varied types of filters and provides them as parsers. In just a few clicks on the SecMaster console, you can use parsers to generate native scripts to set complex filters for Logstash. In doing this, you can convert raw logs into the format you need.
- Collection channel: A collection channel is equivalent to a Logstash pipeline. Multiple pipelines can be configured in Logstash. Each pipeline consists of the input, filter, and output parts. Pipelines work independently and do not affect each other. You can deploy a pipeline for multiple nodes. A pipeline is considered one collection channel no matter how many nodes it is configured for.
Limitations and Constraints
- The component controller of data collection can run only on x86 and Arm environments running Huawei Cloud EulerOS.
- Only IAM users can be used to install component controller and check details on the console. The IAM user can have only the minimum permissions assigned. For details, see Preparations.
Prerequisites
- You have an available ECS for installing the log collector.
- You have an available data disk attached to the ECS. The ECS has enough space to run the log collector.
- You have obtained a non-administrator IAM account to log in to SecMaster as a tenant.
- You have configured network connection to connect the tenant VPC to SecMaster.
Collector Specifications
The following table describes the specifications of the ECSs that are selected as nodes in collection management.
|
vCPUs |
Memory |
System Disk |
Data Disk |
Referenced Processing Capability |
|---|---|---|---|---|
|
4 vCPUs |
8 GB |
50 GB |
100 GB |
2,000 EPS @ 1 KB 4,000 EPS @ 500 B |
|
8 vCPUs |
16 GB |
50 GB |
100 GB |
5,000 EPS @ 1 KB 10,000 EPS @ 500 B |
|
16 vCPUs |
32 GB |
50 GB |
100 GB |
10,000 EPS @ 1 KB 20,000 EPS @ 500 B |
|
32 vCPUs |
64 GB |
50 GB |
100 GB |
20,000 EPS @ 1 KB 40,000 EPS @ 500 B |
|
64 vCPUs |
128 GB |
50 GB |
100 GB |
40,000 EPS @ 1 KB 80,000 EPS @ 500 B |
|
NOTE:
|
||||
Log Source Limit
You can add as many as log sources you need to the collectors as long as your cloud resources can accommodate those logs. You can scale cloud resources anytime to meet your needs.
Data Collection Process
|
No. |
Step |
Description |
|---|---|---|
|
0 |
Prerequisites (Preparations) |
|
|
1 |
Select or purchase an ECS and install the component controller isap-agent on the ECS to complete node management. |
|
|
2 |
Install data collection engine Logstash on the Components tab to complete the component installation. |
|
|
3 |
(Optional) Creating a Log Storage Pipeline |
Create a log storage location (pipeline) in SecMaster for log storage and analysis. This step is required when you transfer security logs from non-Huawei Cloud systems to SecMaster. For details, see Creating a Pipeline. Skip this step if you only need to transfer Huawei Cloud logs to a third-party system or product. |
|
4 |
Configure the source and destination connectors. Select a connector as required and set parameters.
|
|
|
5 |
Configure codeless parsers on the console based on your needs. |
|
|
6 |
Configure a connection channel, associate it with a node, and deliver the Logstash pipeline configuration to complete the data collection configuration. |
|
|
7 |
Verifying the Collection Result |
After the collection channel is configured, check whether data is collected. If logs are sent to the SecMaster pipeline, you can query the result on the SecMaster Security Analysis page. |
Data Collection Configuration Removal Process

|
No. |
Step |
Description |
|---|---|---|
|
1 |
Deleting a collection channel |
On the Collection Channels page, stop and delete the Logstash pipeline configuration. Note: All collection channels on related nodes must be stopped and deleted first. |
|
2 |
(Optional) Deleting a parser |
If a parser is configured, delete it on the Parsers tab. |
|
3 |
(Optional) Deleting a data connection |
If a data connection is added, delete the source and destination connectors on the Connections tab. |
|
4 |
Removing a component |
Delete the collection engine Logstash installed on the node and remove the component. |
|
5 |
Deregistering a node |
Remove the component controller to complete node deregistration. Note: Deregistering a node does not delete the ECS and endpoint resources. If the data collection function is no longer used, you need to manually release the resources. For details, see How Do I Release an ECS or VPC Endpoint? and Deleting a VPC Endpoint. |
Feedback
Was this page helpful?
Provide feedbackThank you very much for your feedback. We will continue working to improve the documentation.See the reply and handling status in My Cloud VOC.
For any further questions, feel free to contact us through the chatbot.
Chatbot


