Adding ECSs to One or More Security Groups
Scenarios
You can associate an ECS with a security group by associating its network interface with that security group. After the association is successful, the security group controls the inbound and outbound traffic of the ECS. You can change the association between the ECS network interface and the security group as needed. For details about how multiple security groups take effect, see How Security Groups Work.
To add ECS network interfaces to one or more security groups, perform the operations described in this section.
- Adding an Individual ECS to One or More Security Groups: add the network interfaces of one ECS to one or more security groups.
- Adding Multiple ECSs to One or More Security Groups: add the network interfaces of multiple ECSs to one or more security groups.
Constraints
- Adding an instance to a new security group does not affect their original security groups.
- Using multiple security groups may deteriorate ECS network performance. You are advised to select no more than five security groups.
- Only the primary network interfaces of an ECS can be batch added to a security group.
Adding an Individual ECS to One or More Security Groups
- Log in to the management console.
- Click
 . Under Compute, click Elastic Cloud Server.
 - In the ECS list, choose More > Manage Network > Add to Security Group in the Operation column.
The Add to Security Group dialog box is displayed.
- Select one or more security groups to which you want to add ECSs.
If you select multiple security groups, the access rules of all the selected security groups will apply to the ECS.
To create a security group, click Create Security Group.

Using multiple security groups may deteriorate ECS network performance. You are advised to select no more than five security groups.
- Add one or more security groups to the specified NIC of the ECS as instructed.
- In the NIC drop-down list, select the NIC for which you want to add a security group.
- (Optional) To create a security group, click Create Security Group.
- Select all the security groups that you would add the ECS to.
When multiple security groups are selected, they are sorted by the sequence in which they are selected. A smaller security group sequence number indicates a higher priority.
- Set Place Security Group At to select the position where the security groups will be placed.
If you select Top, the selected security group will be placed at the top of the list and has the highest priority. If you select Bottom, the selected security group will be placed at the bottom of the list and has the lowest priority.

- If a selected security group has been associated with the target instance, the security group will not be added again and the priority of the security group in the security group list remains unchanged.
- Using multiple security groups may deteriorate ECS network performance. You are advised to select no more than five security groups.
- Click OK.
Adding Multiple ECSs to One or More Security Groups
- Log in to the management console.
- Click
 . Under Compute, click Elastic Cloud Server.
 - Select the ECSs you want to add to one or more security groups.
- Choose More > Manage Security Group > Add to Security Group above the ECS list.
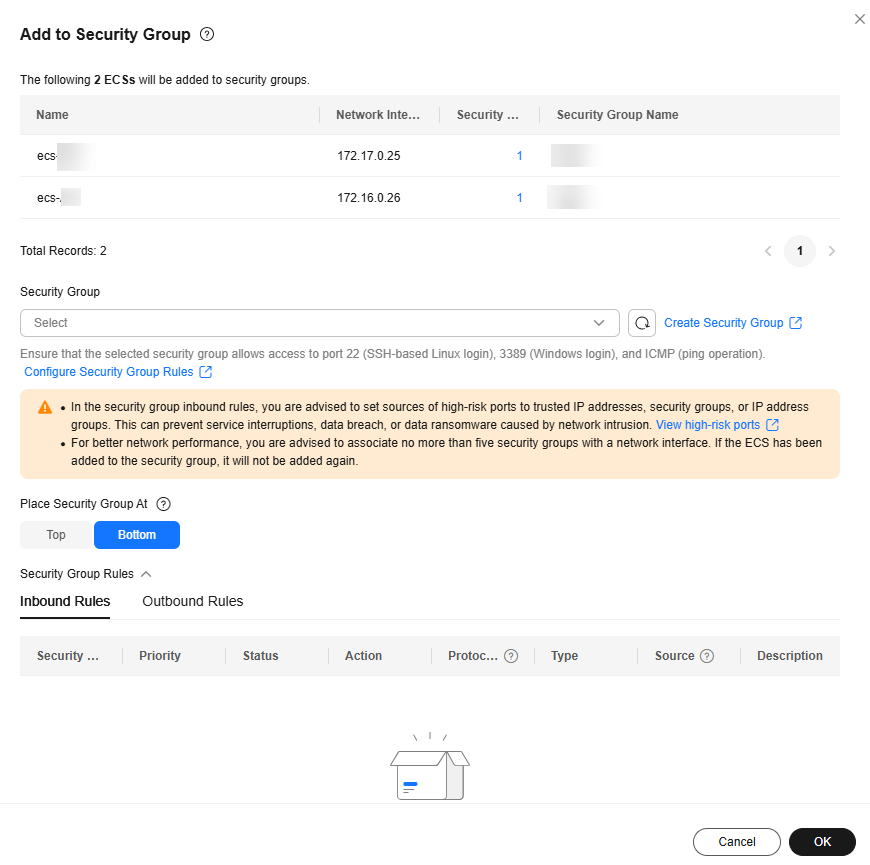
The Add to Security Group panel slides out from the right.
Figure 1 Batch adding ECSs to security groups
- Select one or more security groups to which you want to add ECSs.
You can select multiple security groups. The access rules of the ECSs take effect based on the sequence of the security groups associated with the ECSs and then the priority of the rules in each security group.
To create a security group, click Create Security Group.

Using multiple security groups may deteriorate ECS network performance. You are advised to select no more than five security groups.
- Add one or more security groups to the primary NIC of the selected ECSs as prompted.
- (Optional) To create a security group, click Create Security Group.
- Select all the security groups that you would add ECSs to.
When multiple security groups are selected, they are sorted by the sequence in which they are selected. A smaller security group sequence number indicates a higher priority.
- Set Place Security Group At to select the position where the security groups will be placed.
If you select Top, the selected security group will be placed at the top of the list and has the highest priority. If you select Bottom, the selected security group will be placed at the bottom of the list and has the lowest priority.

- If a selected security group has been associated with the target instance, the security group will not be added again and the priority of the security group in the security group list remains unchanged.
- Using multiple security groups may deteriorate ECS network performance. You are advised to select no more than five security groups.
- Click OK.
Viewing Security Groups Associated with an ECS
- Log in to the ECS console.
- Click the target ECS name to go to the details page.
- Click the Security Groups tab.
- Select a network interface from the drop-down list. All security groups and security group rules associated with that network interface are displayed.
Feedback
Was this page helpful?
Provide feedbackThank you very much for your feedback. We will continue working to improve the documentation.See the reply and handling status in My Cloud VOC.
For any further questions, feel free to contact us through the chatbot.
Chatbot


