Developing Launcher Tasks
This section describes how to develop Launcher tasks using a notebook instance.
Prerequisites
- Notebooks are enabled, and a notebook instance has been created. For how to create a notebook instance, see Creating a Notebook Instance.
- A DLI agency has been created and authorized to access notebook instances. For details about how to create a custom DLI agency, see Creating a Custom DLI Agency.
Make sure the agency includes the following permissions: DLI FullAccess, OBS Administrator, and IAM permission to pass agencies to cloud services.
If using role/policy-based authorization, grant the iam:agencies:* permission.
{
    "Version": "1.1",
    "Statement": [
        {
            "Effect": "Allow",
            "Action": [
                "iam:agencies:*"
            ]
        },
        {
            "Effect": "Deny",
            "Action": [
                "iam:agencies:update*",
                "iam:agencies:delete*",
                "iam:agencies:create*"
            ]
        }
    ]
}
Notes and Constraints
- Only DLI and MRS data sources are supported.
- For MRS Spark connections, only proxy connections created in Management Center are supported.
Accessing the Launcher Task Development Page
- In the navigation pane on the DataArts Factory console, choose Data Development > Notebook.
- Locate a running notebook instance.
- Click Open to go to the notebook development page.
- Click
 and select Launcher to access the launcher development page. Currently, tasks can be developed using DLI Spark x.x.x(PySpark), DLI Spark x.x.x(Scale)MRS x.x.x(PySpark) or python-x.x.x.

x.x.x indicates the version.
Figure 1 Selecting Launcher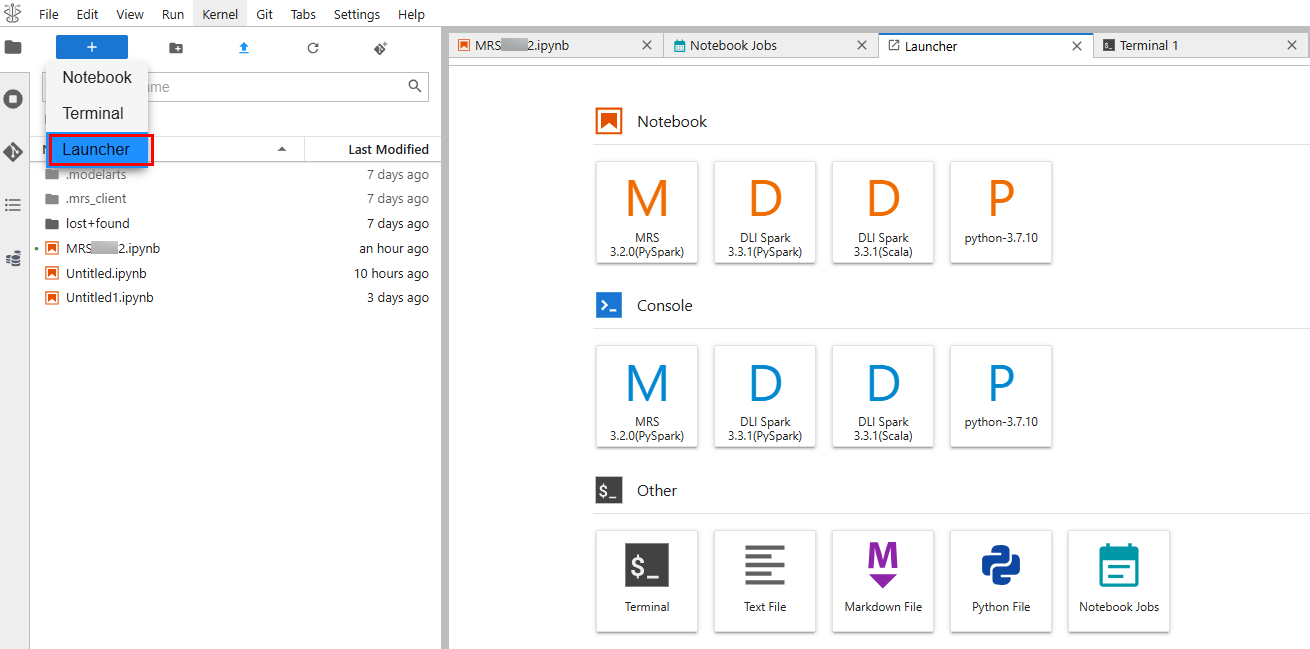
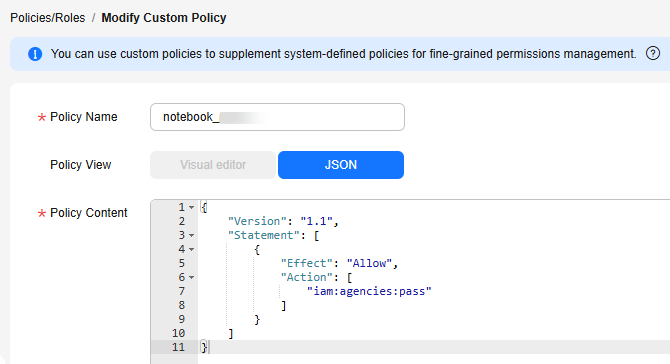
Developing a DLI Spark(PySpark) Task


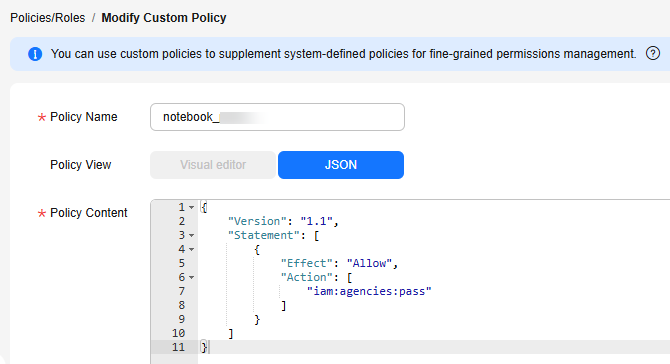
{
    "Version": "1.1",
    "Statement": [
        {
            "Effect": "Allow",
            "Action": [
                "iam:agencies:pass"
            ]
        }
    ]
}
- Click DLI Spark x.x.x(PySpark). The DLI Spark(PySpark) task development page is displayed.
- In the upper right corner of the page, click connect to configure connection parameters.
- Configure basic parameters Pool and Queue (indicating the DLI resource pool and queue name).
- Configure advanced settings.
Table 1 Spark Config Parameter
Description
--conf
Parameters for running the DLI task, such as the name of the DLI task agency
spark.dli.job.agency.name=notebook_agency (mandatory)
Set other parameters as required.
--jars
OBS path of the file. Separate multiple paths by pressing Enter. (optional)
--py-files
OBS path of the file. Separate multiple paths by pressing Enter. (optional)
--files
OBS path of the file. Separate multiple paths by pressing Enter. (optional)
Table 2 Resource Config Parameter
Description
Driver Memory
Driver memory, which ranges from 0 (excluded) to 16. The default value is 1.
Driver Cores
Number of driver cores, which ranges from 0 (excluded) to 4. The default value is 1.
Executor Memory
Executor memory, which ranges from 0 (excluded) to 16. The default value is 1.
Executor Cores
Number of executor cores, which ranges from 0 (excluded) to 4. The default value is 1.
Executors
Number of executors, which ranges from 0 (excluded) to 16. The default value is 1.
- Click Connect. After the configuration is complete, the DLI queue information and cluster status "cluster status: connected" are displayed.
- Click the code line, enter the development code, and debug the code.
- Click
 in front of the code line to run the code.
Table 3 Example code Example Code
Execution Result
%%spark
spark.read.parquet('obs://mytestbucket/demo/data.parquet').show()
Figure 4 Example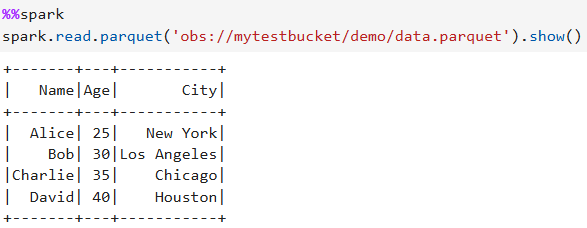
%%sql
show tables
Figure 5 Example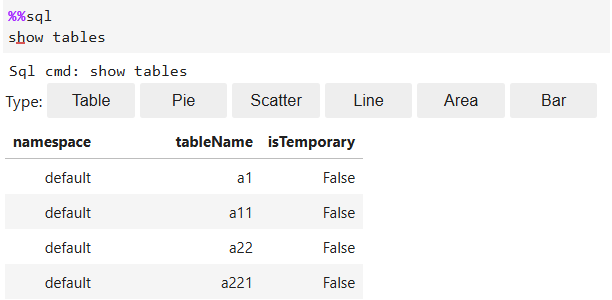
%scala
import org.apache.spark.sql.SparkSession
val spark = SparkSession.builder().appName("demo").getOrCreate();
val inputFile = "obs://mytestbucket/demo/test.txt"
val outputDir = "obs://mytestbucket/demo/test"
val textFile = spark.read.textFile(inputFile)
val wordCounts = textFile.flatMap(line => line.split(" ")).groupByKey(identity).count()
wordCounts.write.format("csv").save(outputDir)
wordCounts.show()
spark.stop()
Figure 6 Example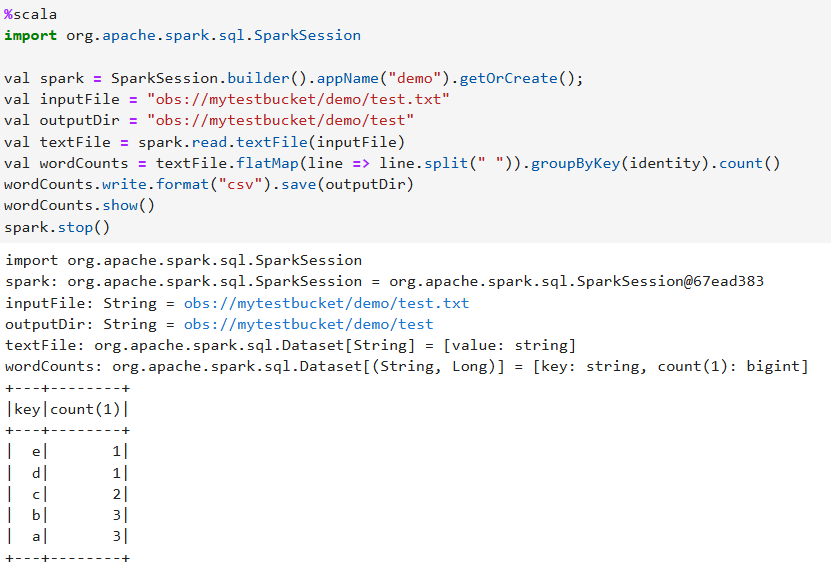
%python
from pyspark.sql import SparkSession
spark = SparkSession.builder.appName("PySpark Example").getOrCreate()
data = [("Alice", 34), ("Bob", 45), ("Charlie", 29), ("David", 35)]
columns = ["Name", "Age"]
df = spark.createDataFrame(data, columns)
df.show()
filtered_df = df.filter(df.Age > 30)
filtered_df.show()
average_age = df.groupBy().avg("Age").collect()[0][0]
print(f"Average Age: {average_age}")
spark.stop()
Figure 7 Example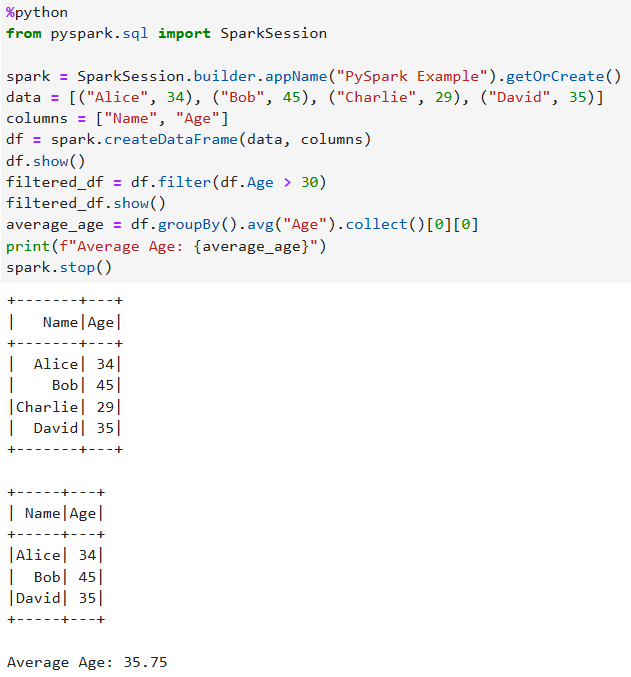
- Save and run the code.
- View the code execution result.
Developing a DLI Spark(Scala) Task


{
    "Version": "1.1",
    "Statement": [
        {
            "Effect": "Allow",
            "Action": [
                "iam:agencies:pass"
            ]
        }
    ]
}
- Click DLI Spark x.x.x(Scale). The DLI Spark(Scale) task development page is displayed.
- In the upper right corner of the page, click connect to configure connection parameters.
- Configure basic parameters Pool and Queue (indicating the DLI resource pool and queue name).
- Configure advanced settings.
Table 4 Spark Config Parameter
Description
--conf
Parameters for running the DLI task, such as the name of the DLI task agency
spark.dli.job.agency.name=notebook_agency (mandatory)
Set other parameters as required.
--jars
OBS path of the file. Separate multiple paths by pressing Enter. (optional)
--py-files
OBS path of the file. Separate multiple paths by pressing Enter. (optional)
--files
OBS path of the file. Separate multiple paths by pressing Enter. (optional)
Table 5 Resource Config Parameter
Description
Driver Memory
Driver memory, which ranges from 0 to 16. The default value is 1, and 0 is not allowed.
Driver Cores
Number of driver cores, which ranges from 0 to 4. The default value is 1, and 0 is not allowed.
Executor Memory
Executor memory, which ranges from 0 to 16. The default value is 1, and 0 is not allowed.
Executor Cores
Number of executor cores, which ranges from 0 to 4. The default value is 1, and 0 is not allowed.
Executors
Number of executors, which ranges from 0 to 16. The default value is 1, and 0 is not allowed.
- Click Connect. After the configuration is complete, the DLI queue information and cluster status "cluster status: connected" are displayed.
- Click the code line, enter the development code, and debug the code.
- Click
 in front of the code line to run the code.
Table 6 Example code Example Code
Execution Result
%%spark
spark.read.parquet('obs://mytestbucket/demo/data.parquet').show()
Figure 10 Example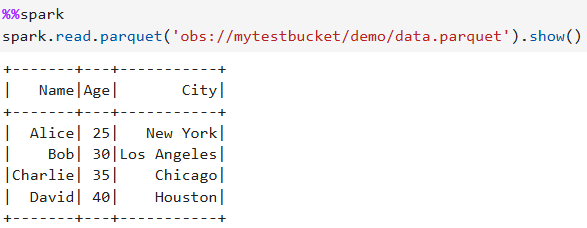
%%sql
show tables
Figure 11 Example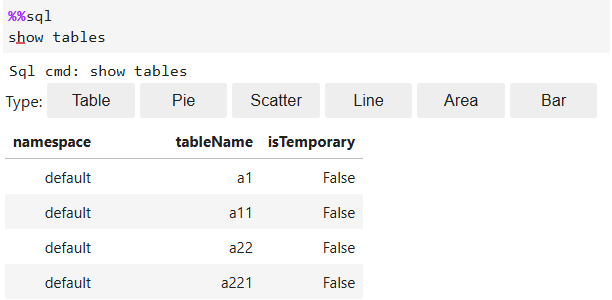
%scala
import org.apache.spark.sql.SparkSession
val spark = SparkSession.builder().appName("demo").getOrCreate();
val inputFile = "obs://mytestbucket/demo/test.txt"
val outputDir = "obs://mytestbucket/demo/test"
val textFile = spark.read.textFile(inputFile)
val wordCounts = textFile.flatMap(line => line.split(" ")).groupByKey(identity).count()
wordCounts.write.format("csv").save(outputDir)
wordCounts.show()
spark.stop()
Figure 12 Example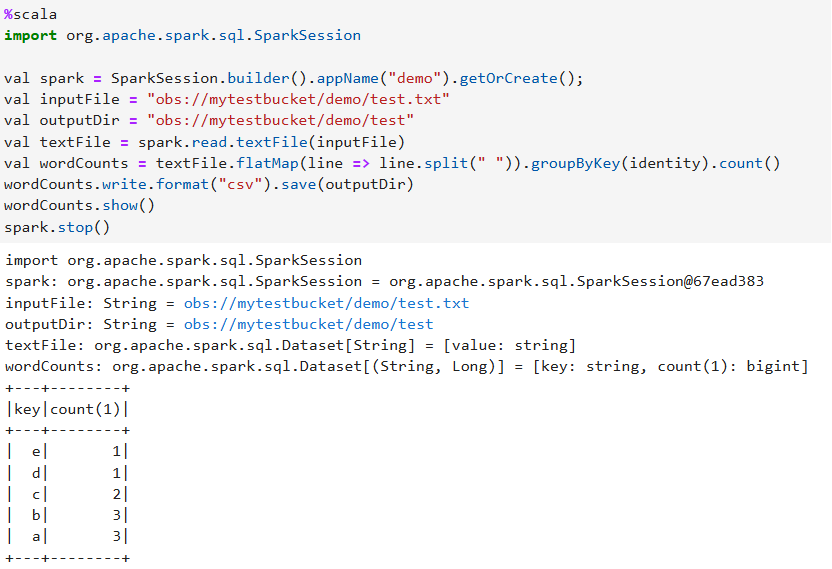
%python
from pyspark.sql import SparkSession
spark = SparkSession.builder.appName("PySpark Example").getOrCreate()
data = [("Alice", 34), ("Bob", 45), ("Charlie", 29), ("David", 35)]
columns = ["Name", "Age"]
df = spark.createDataFrame(data, columns)
df.show()
filtered_df = df.filter(df.Age > 30)
filtered_df.show()
average_age = df.groupBy().avg("Age").collect()[0][0]
print(f"Average Age: {average_age}")
spark.stop()
Figure 13 Example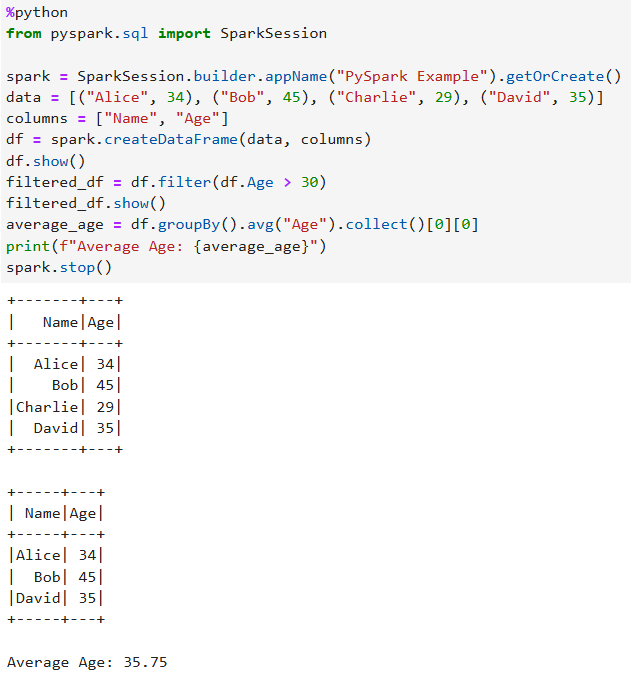
- Save and run the code.
- View the code execution result.
Developing an MRS(PySpark) Task
- Click MRS x.x.x(PySpark) to go to the MRS development page.
- In the upper right corner of the page, click connect to configure connection parameters. (Before the configuration, cluster status: init is displayed.)
- Configure Connect Name. Select the created MRS Spark connection from the drop-down list box.

Only MRS Spark connections using the proxy mode created in Management Center are supported. For details about how to create a connection, see MRS Spark Connection Parameters.
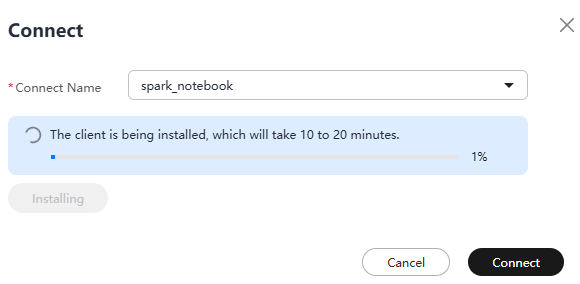
If the MRS cluster client is not installed in the current environment, the following message is displayed: "No cluster client has been installed in the current environment. Install the client, which will take 10 to 20 minutes."
- (Optional) Click Install to install the MRS cluster client. The information shown in the following figure is displayed during the installation. If the client has been installed, skip this step.
Figure 14 Installing the MRS cluster client
- After the installation is complete, click Connect.
- Configure Connect Name. Select the created MRS Spark connection from the drop-down list box.
- Click the code line, enter the development code, and debug the code.
- Click
 in front of the code line to run the code.
Table 7 Example code Example Code
Execution Result
from pyspark.sql import SparkSession
spark = SparkSession.builder.appName("PySpark Example").getOrCreate()
data = [("Alice", 34), ("Bob", 45), ("Charlie", 29), ("David", 35)]
columns = ["Name", "Age"]
df = spark.createDataFrame(data, columns)
df.show()
filtered_df = df.filter(df.Age > 30)
filtered_df.show()
average_age = df.groupBy().avg("Age").collect()[0][0]
print(f"Average Age: {average_age}")
spark.stop()
Figure 15 Example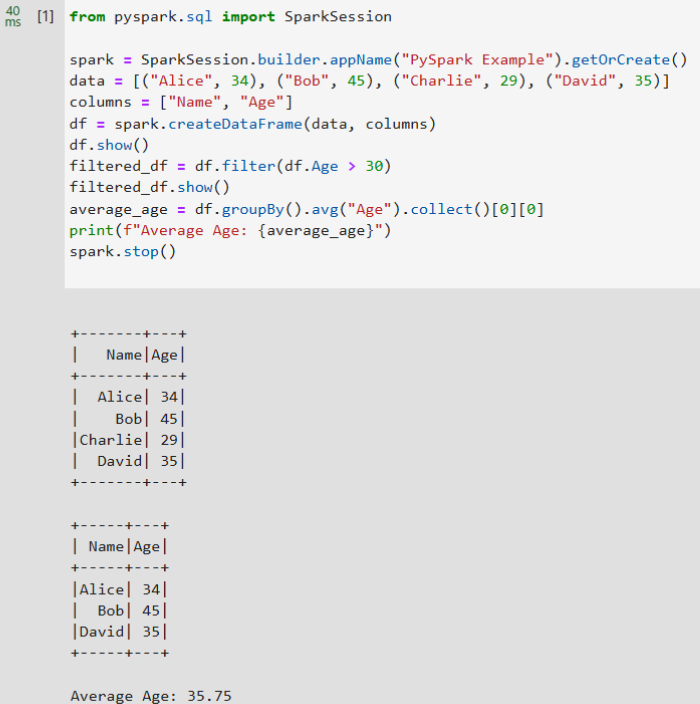
- Save and run the code.
- View the code execution result.
Developing a Python Task
- Click python-x.x.x to access the Python development page.
- Click the code line, enter the development code, and debug the code.
- Click
 in front of the code line to run the code.
 - Save and run the code.
- View the code execution result.
Feedback
Was this page helpful?
Provide feedbackThank you very much for your feedback. We will continue working to improve the documentation.See the reply and handling status in My Cloud VOC.
For any further questions, feel free to contact us through the chatbot.
Chatbot


