Mounting an SFS Turbo File System to a Lite Cluster
Scenario
If the inadequate disk space of the local server cannot meet your growing service requirements, you can mount the data disk to a Lite Cluster resource pool to dynamically allocate storage resources, meeting your requirements for flexible scheduling, efficient utilization, and secure access.
Huawei Cloud Scalable File Service Turbo (SFS Turbo) features on-demand, high-performance network-attached storage (NAS), ensuring large-scale data reads and writes. It allows multiple compute nodes to share the same file system. Mounting SFS Turbo to a Lite Cluster enhances data access performance, enables data sharing across multiple nodes, improves resource utilization, and boosts task collaboration efficiency, making it ideal for high-performance computing and distributed training scenarios.
This document uses IPv4 as an example to describe how to mount an SFS Turbo file system to a ModelArts Lite Cluster and how to mount the SFS Turbo file system to the host and Kubernetes container. Ensure that the Lite Cluster and the SFS Turbo file system to be mounted are in the same VPC subnet.
Precautions
You need to properly plan the resource pool and SFS Turbo CIDR block to avoid conflicts between ModelArts Lite Cluster nodes and SFS Turbo file systems. To be more specific:
If the SFS Turbo file system uses a VPC CIDR block starting with 192.168.x.x, the resource pool nodes must not use the 172.16.0.0/16 CIDR block.
If the SFS Turbo file system uses a VPC CIDR block starting with 172.x.x.x, the resource pool nodes must not use the 192.168.0.0/16 CIDR block.
If the SFS Turbo file system uses a VPC CIDR block starting with 10.x.x.x, the resource pool nodes must not use the 172.16.0.0/16 CIDR block.
Billing
- After Lite Cluster resources are enabled, compute resources are charged. For Lite Cluster resource pools, only the yearly/monthly billing mode is supported. For details, see Table 1.
Table 1 Billing items Billing Item
Description
Billing Mode
Billing Formula
Compute resource
Dedicated resource pool
Usage of compute resources.
For details, see ModelArts Pricing Details.
Yearly/Monthly
Specification unit price x Number of compute nodes x Purchase duration
- When purchasing a Lite Cluster resource pool, you need to select a CCE cluster. For details about CCE pricing, see CCE Price Calculator.
- The SFS Turbo file system is charged based on the storage capacity and duration you selected during purchase. For details, see SFS Billing.
Step 1: Creating a VPC
To mount an SFS Turbo file system to a Lite Cluster, you need to create a VPC subnet and add the Lite Cluster and the SFS Turbo file system to the subnet.
- Go to the page for creating a VPC.
- On the Create VPC page, set the parameters as prompted.
For details about certain parameters in this case, see Table 2. For more parameters, see Creating a VPC with a Subnet.Figure 1 Creating a VPC and subnet
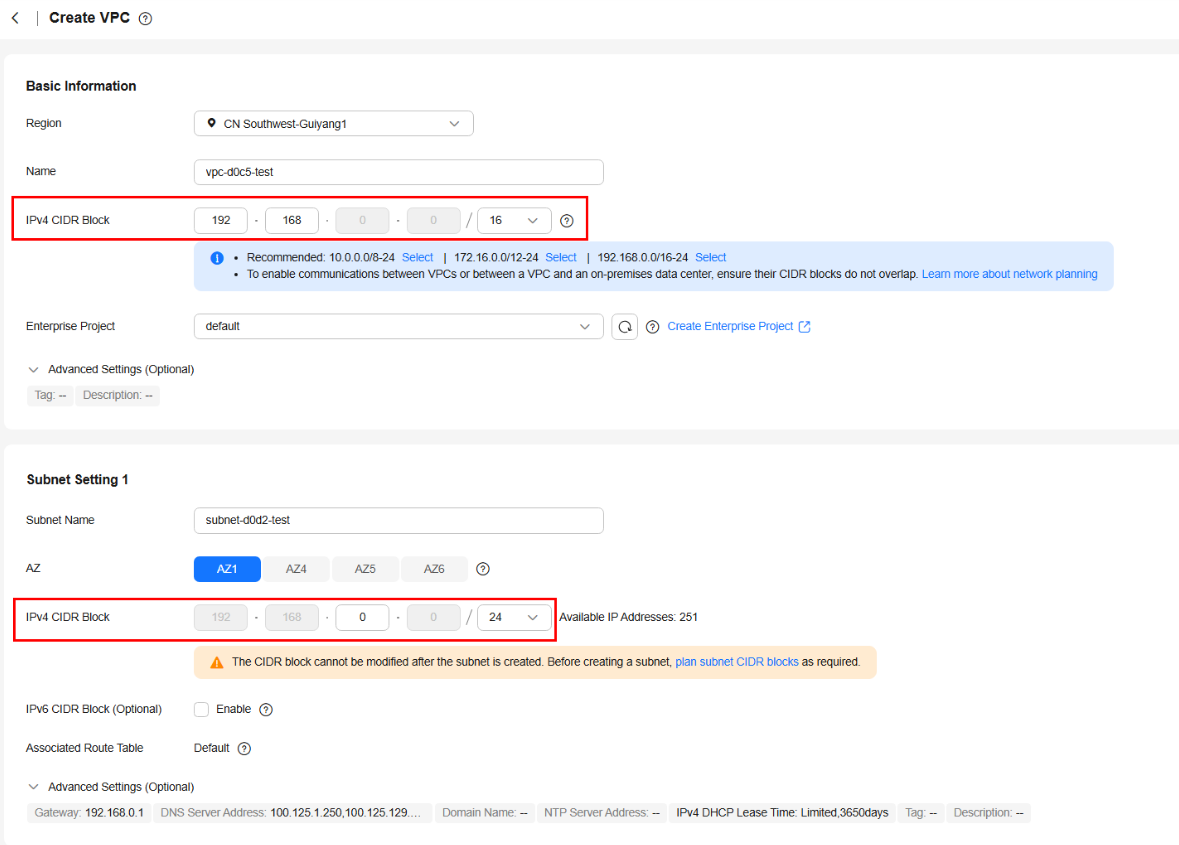
Table 2 VPC parameters Parameter
Description
Example Value
IPv4 CIDR Block
When SFS Turbo is mounted to Lite Cluster, you are recommended to use the private IPv4 addresses specified in RFC 1918 as the VPC CIDR block. To be more specific:
- 10.0.0.0/8–24: The IP address ranges from 10.0.0.0 to 10.255.255.255, and the mask ranges from 8 to 24.
- 172.16.0.0/12–24: The IP address ranges from 172.16.0.0 to 172.31.255.255, and the mask ranges from 12 to 24.
- 192.168.0.0/16–24: The IP address ranges from 192.168.0.0 to 192.168.255.255, and the mask ranges from 16 to 24.
192.168.0.0/16
Table 3 Subnet parameters Parameter
Description
Example Value
CIDR Block
This parameter is displayed only in regions where IPv4/IPv6 dual-stack is not supported.
Set the IPv4 CIDR block of the subnet. For details, see section "IPv4 CIDR Block".
192.168.0.0/24
IPv4 CIDR Block
This parameter is displayed only in regions where IPv4/IPv6 dual stack is supported.
A subnet is a unique CIDR block with a range of IP addresses in a VPC. Comply with the following principles when planning subnets:
- Planning CIDR block size: After a subnet is created, the CIDR block cannot be changed. You need to plan the CIDR block in advance based on the number of IP addresses required by your service.
- The subnet CIDR block cannot be too small. Ensure that the number of available IP addresses in the subnet meets service requirements. The first and last three addresses in a subnet CIDR block are reserved for system use. For example, in subnet 10.0.0.0/24, 10.0.0.1 is the gateway address, 10.0.0.253 is the system interface address, 10.0.0.254 is used by DHCP, and 10.0.0.255 is the broadcast address.
- The subnet CIDR block cannot be too large, either. If you use a CIDR block that is too large, you may not have enough CIDR blocks available for new subnets, which can be a problem when you want to create subnets.
- Avoiding subnet CIDR block conflicts: If you need to connect two VPCs or connect a VPC to an on-premises data center, there cannot be any CIDR block conflicts.
If the subnet CIDR blocks at both ends of the network conflict, create a subnet. For details, see Creating a Subnet for an Existing VPC.
A subnet mask can be between the netmask of its VPC CIDR block and /29 netmask. If a VPC CIDR block is 10.0.0.0/16, its subnet mask can be between 16 and 29.
For details about VPC subnet planning, see VPC and Subnet Planning.
192.168.0.0/24
- Click Create Now.
Return to the VPC list and view the created VPC.
Step 2: Creating an SFS Turbo File System
Create an SFS Turbo file system to be mounted and use the VPC created in Step 1: Creating a VPC.
- Log in to the SFS console. In the navigation pane on the left, choose SFS Turbo. Click Create File System in the upper right corner.
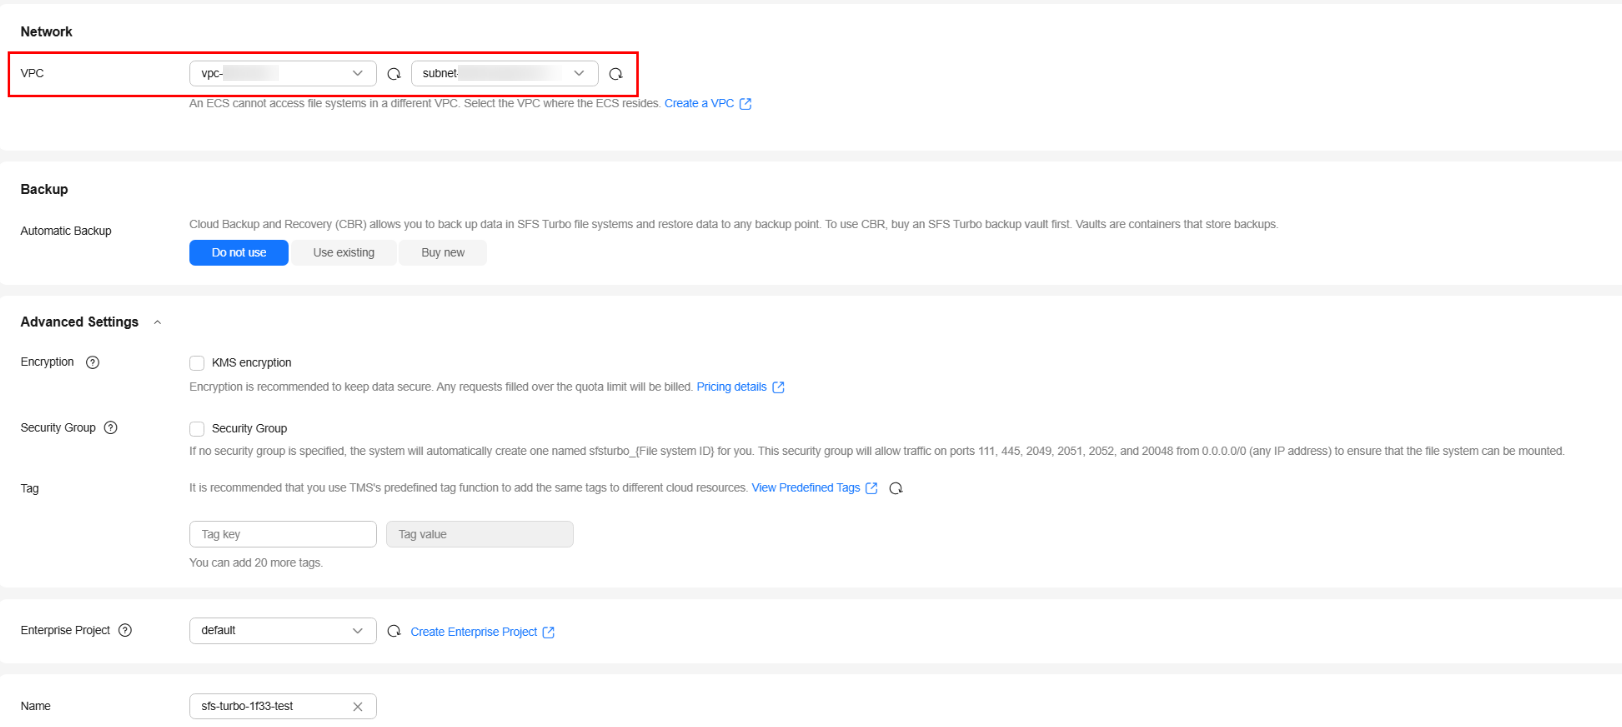
- Configure the parameters, as shown in Figure 2.
For VPC, select the VPC and subnet created in Step 1: Creating a VPC. For details about the parameters, see Creating an SFS Turbo File System.
- Click Create Now.
- Confirm the file system information and click Submit.
- Return to the file system list page to view the file system status.
Step 3: Creating a CCE Cluster
Lite Cluster resource pools depend on CCE clusters to provide a container-based environment. CCE clusters provide Lite resource pools with required computing, storage, and network resources. Therefore, you need to select CCE clusters when purchasing Lite Cluster resource pools.
If no CCE cluster is available, purchase one by referring to Buying a CCE Standard/Turbo Cluster. For details about the cluster version, see Software Versions Required by Different Models.
- Log in to the CCE console.
- If no cluster has been created, click Buy Cluster on the wizard page.
- If you already have a CCE cluster, choose Clusters in the navigation pane and click Create Cluster in the upper right corner.
- Configure the cluster basic information.
- VPC: Select the VPC created in Step 1: Creating a VPC.
- Default node subnet: Select the subnet created in Step 1: Creating a VPC.
- Enable IPv6: This document uses IPv4 as an example. Therefore, IPv6 is not enabled.
For details about the parameters, see Buying a CCE Standard/Turbo Cluster.
Figure 3 Buying a CCE cluster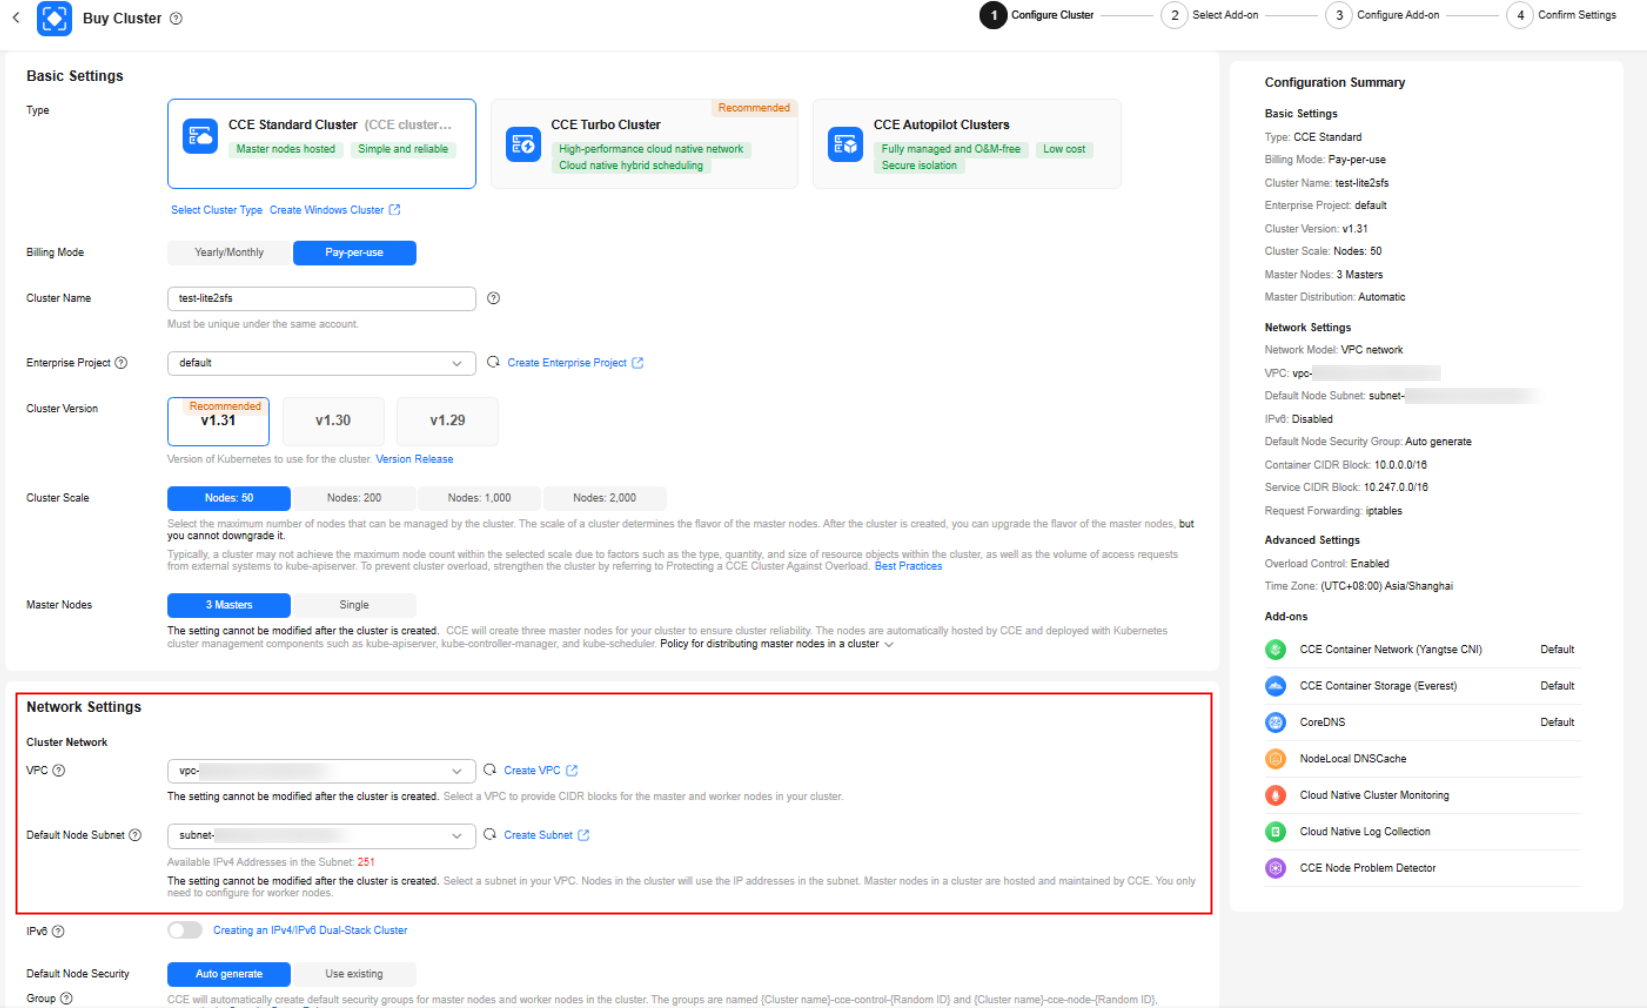
- Click Next: Confirm Settings, check the displayed cluster resource list, and click Submit.
It takes about 5 to 10 minutes to create a cluster. You can click Back to Cluster List to perform other operations on the cluster or click Go to Cluster Events to view the cluster details.
Step 4: Creating a Lite Cluster
Create a Lite Cluster using the CCE cluster created in Step 3: Creating a CCE Cluster.
- Log in to the ModelArts console. In the navigation pane on the left, choose Lite Cluster under Resource Management.
- Click Buy Lite Cluster. On the displayed page, configure parameters.
Select the CCE cluster created in Step 3: Creating a CCE Cluster. For details about the parameters, see Table 3.
- Click Buy Now and confirm the specifications. Confirm the information and click Submit.
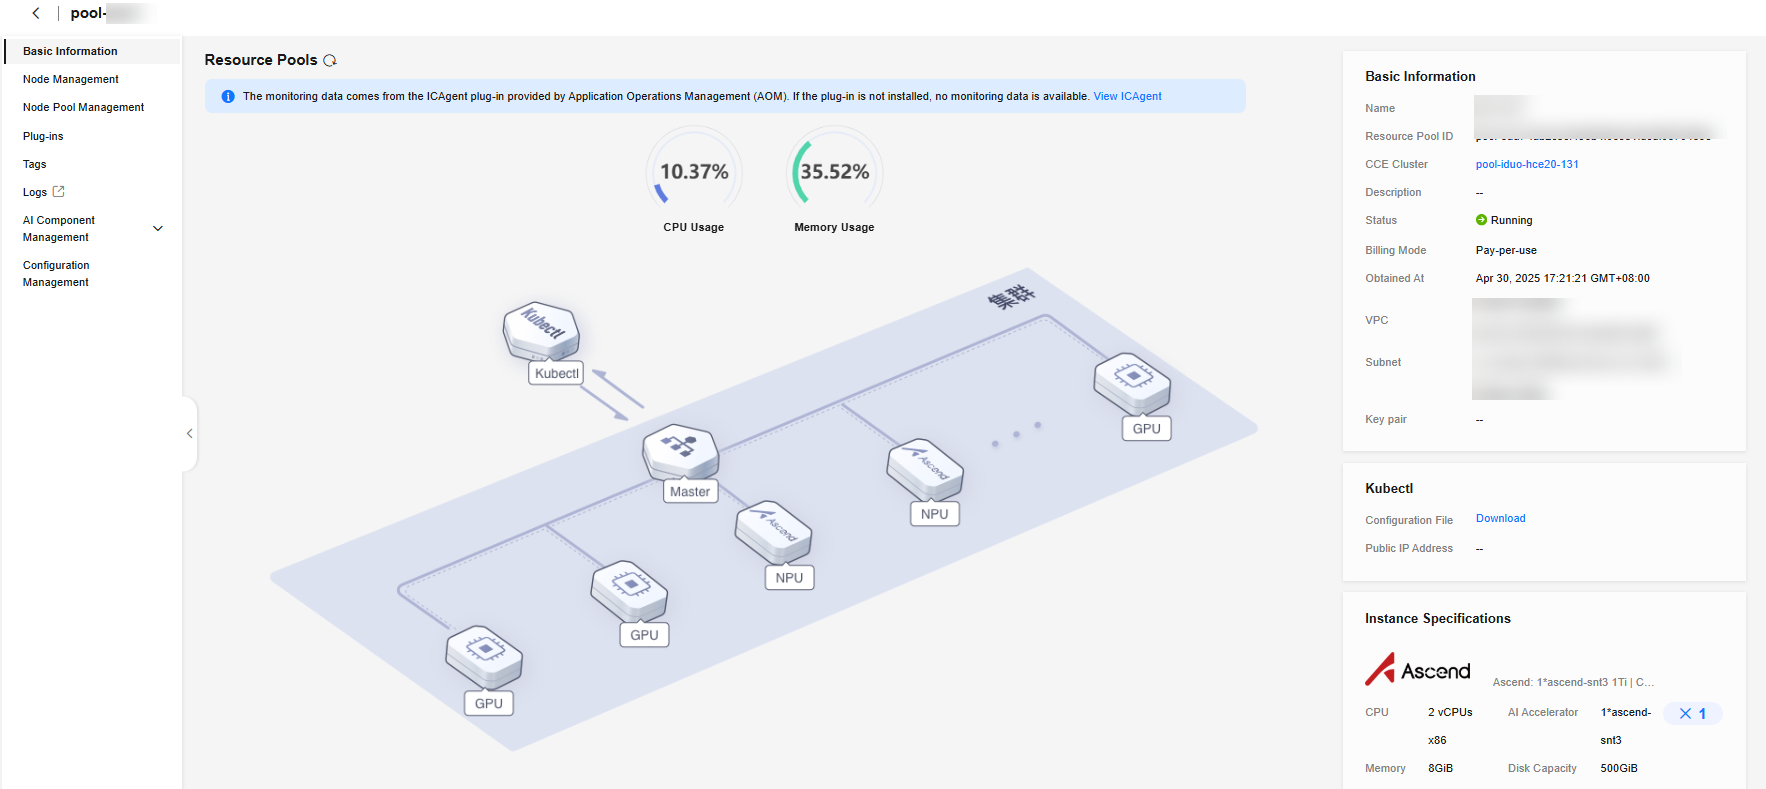
After a resource pool is created, its status changes to Running. Click the cluster resource name to access its details page. Check whether the purchased specifications are correct.Figure 4 Viewing resource details
Step 5: Mounting an SFS Turbo File System to a Lite Cluster Node
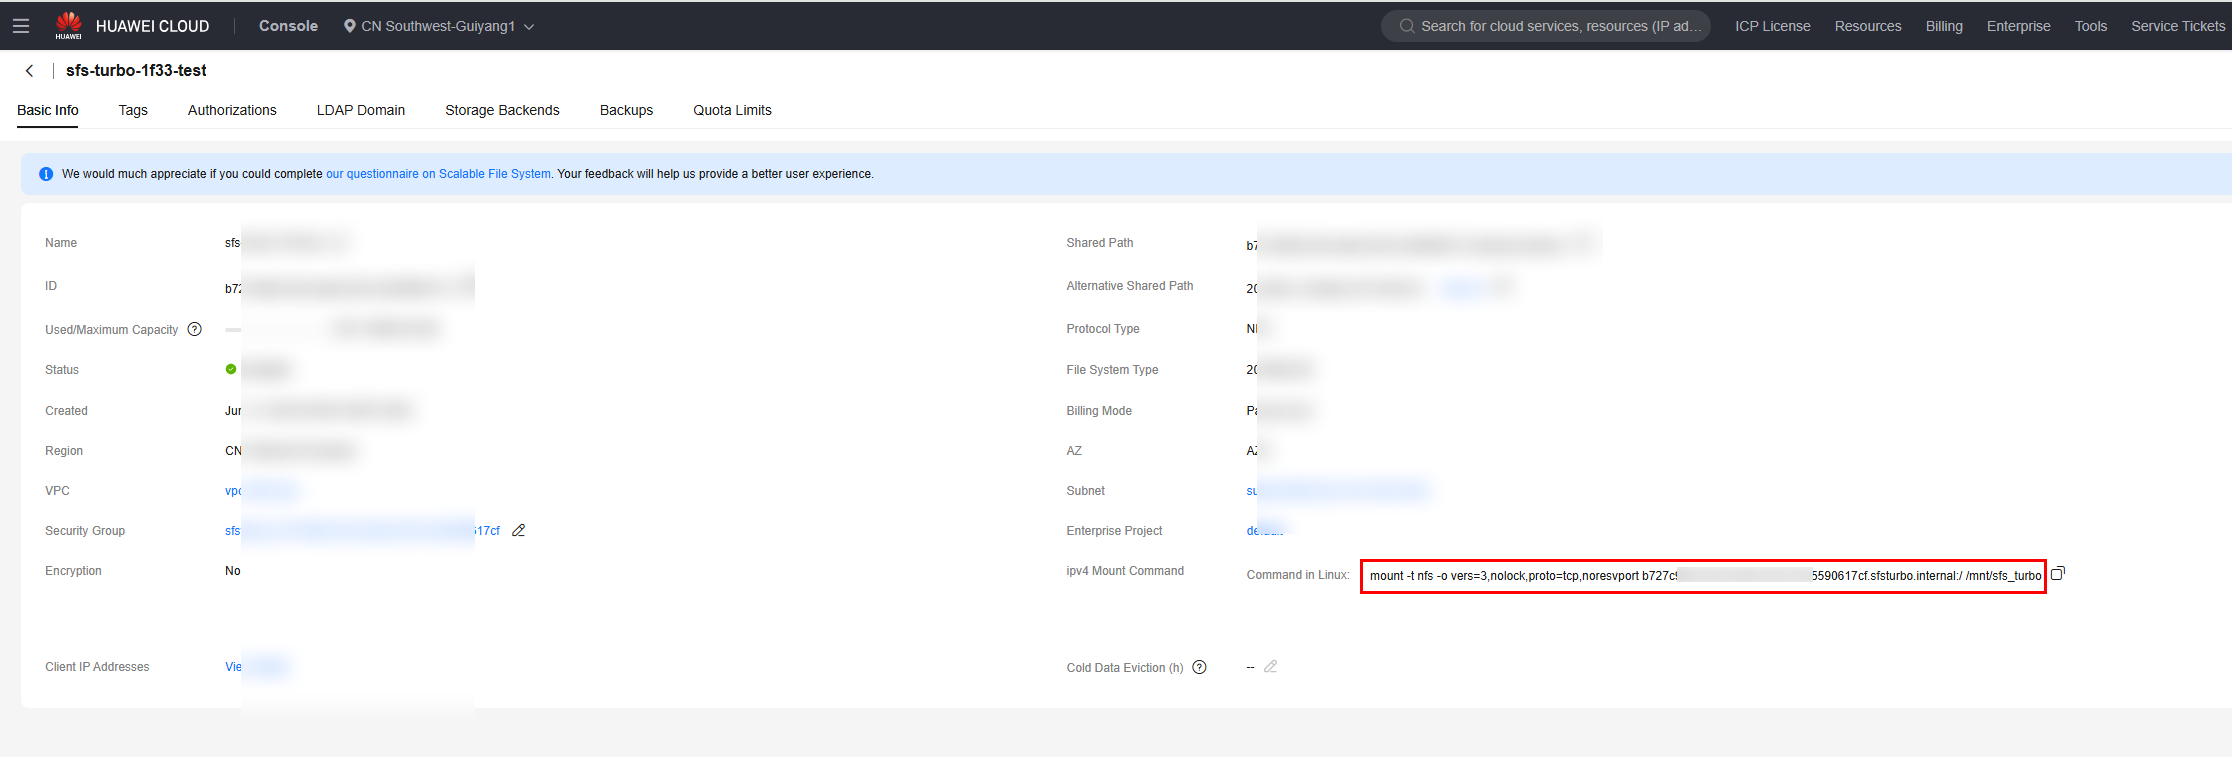
- Log in to the SFS console. In the navigation pane on the left, choose SFS Turbo. Click the SFS Turbo file system created in Step 2: Creating an SFS Turbo File System to access its details page, and copy the Linux mounting command.
Figure 5 Copying the Linux mounting command
- Log in to the Lite Cluster node using a bash tool such as Xshell or MobaXterm, and run the following command to create the folder to be mounted:
mkdir /mnt/sfs_turbo
- Run the Linux mounting command copied in the previous step.
mount -t nfs -o vers=3,nolock,proto=tcp,noresvport xxxx.sfsturbo.internal:/ /mnt/sfs_turbo
Run the df -h command to view the SFS Turbo file system mounting information.
As shown in the following figure, the SFS Turbo file system is mounted to the /mnt/sfs_turbo directory on the node.
Figure 6 Viewing mounting information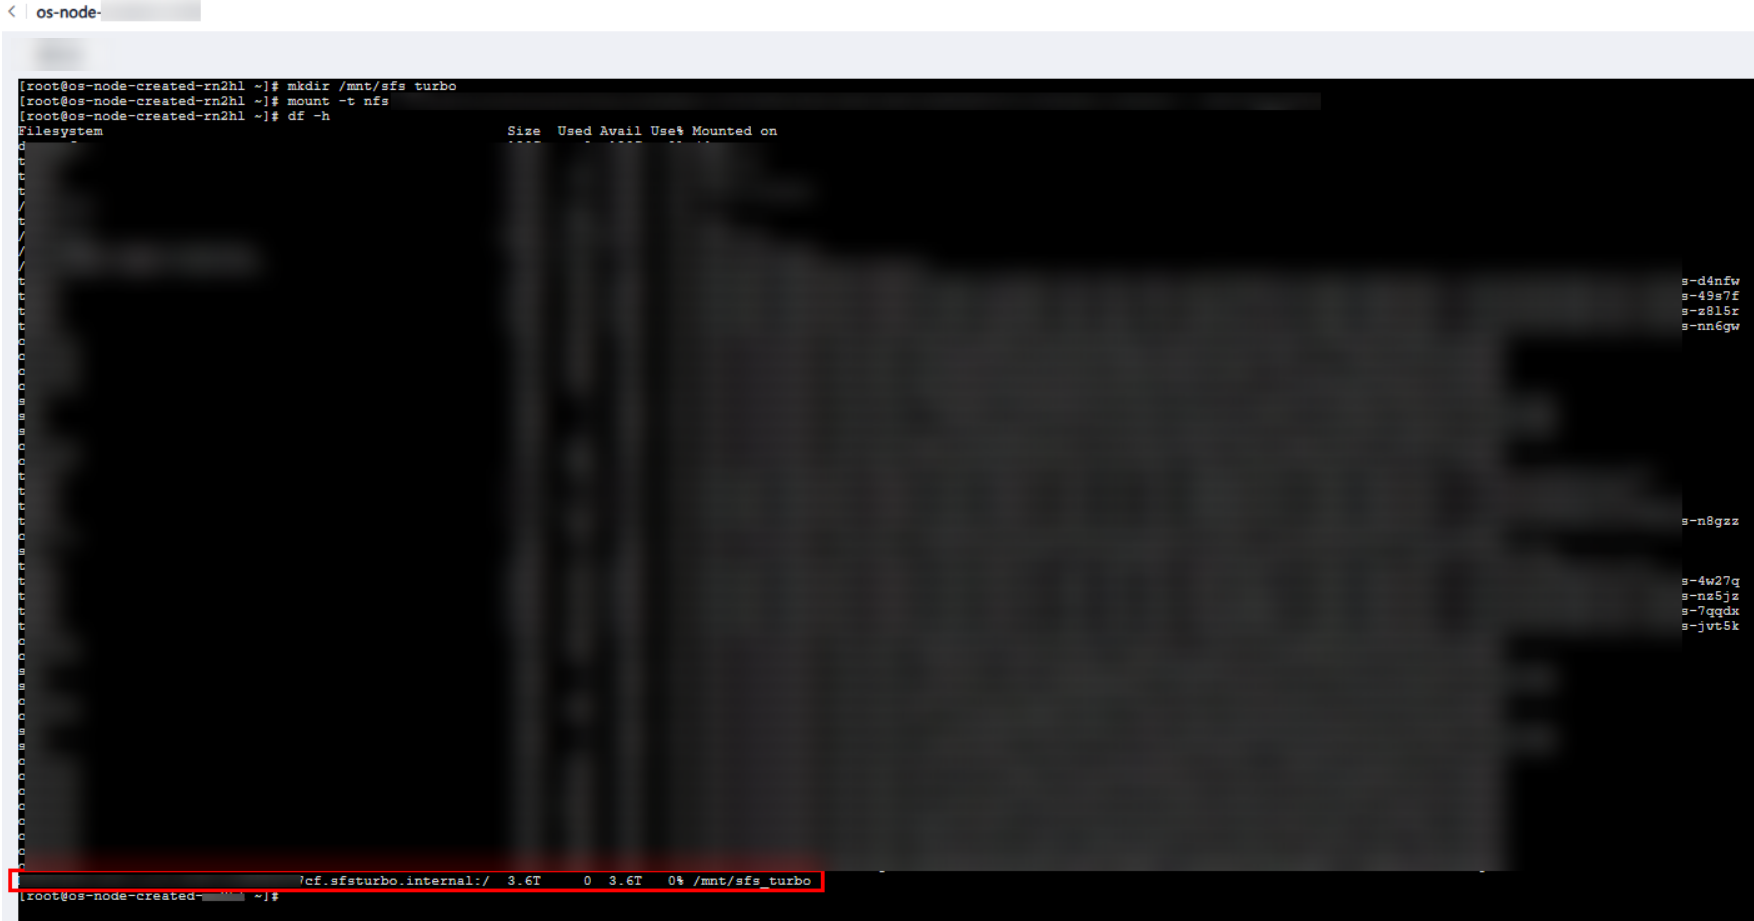
Step 6: Mounting the SFS Turbo File System to the Workload in the Lite Cluster Kubernetes Cluster
You can mount the SFS Turbo file system to the workload using Kubernetes NFS.
- Log in to the SFS console. In the navigation pane on the left, choose SFS Turbo. Click the SFS Turbo file system created in Step 2: Creating an SFS Turbo File System to access its details page, and copy the shared path.
xxxxx.sfsturbo.internal:/
The path divides the two parameters required for Kubernetes NFS mounting with a colon (:).
xxxxx.sfsturbo.internal is the NFS mounting parameter nfs.server of the workload.
/ is the NFS mounting parameter nfs.path of the workload.
Figure 7 Copying a shared path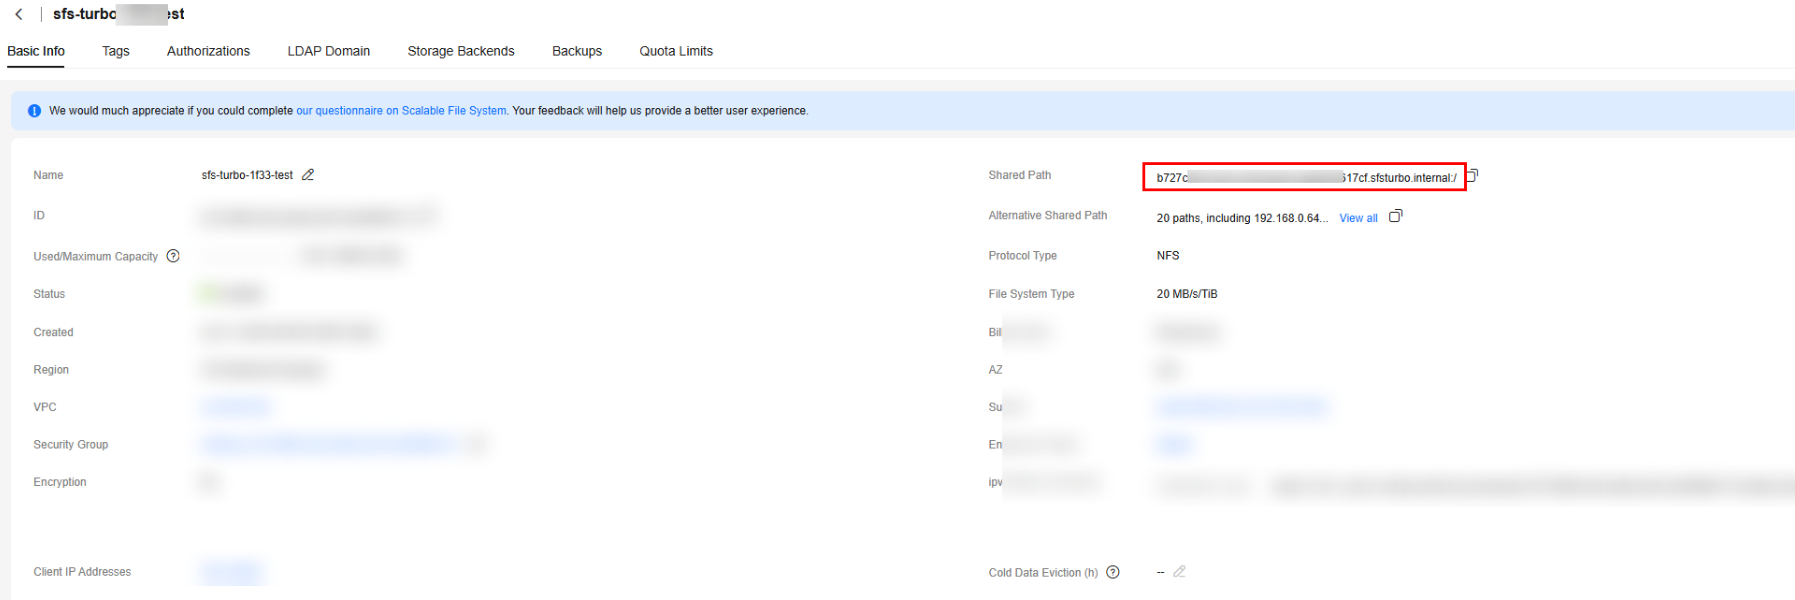
- Log in to the Lite Cluster node using a bash tool, such as Xshell or MobaXterm, and create the dep.yaml file. The file content is as follows:
kind: Deployment apiVersion: apps/v1 metadata: name: testlite2sfsturbo namespace: default spec: replicas: 1 selector: matchLabels: app: testlite2sfsturbo version: v1 template: metadata: labels: app: testlite2sfsturbo version: v1 spec: volumes: - name: nfs0 nfs: server: xxxxx.sfsturbo.internal ## Enter the server information in the shared path of the SFS Turbo file system. path: / containers: - name: pod0 image: swr.cn-southwest-2.myhuaweicloud.com/hwofficial/everest:2.4.134 ## Image path command: - /bin/bash - '-c' - while true; do echo hello; sleep 10; done env: - name: PAAS_APP_NAME value: testlite2sfsturbo - name: PAAS_NAMESPACE value: default - name: PAAS_PROJECT_ID value: xxxx resources: limits: cpu: 250m memory: 2000Mi requests: cpu: 250m memory: 2000Mi volumeMounts: - name: nfs0 mountPath: /mnt/sfsturbo/test imagePullPolicy: IfNotPresent - Run the kubectl apply -f dep.yaml command to create a workload.
- Run the kubectl get pod command to check whether the pod container group is started.
- Run the kubectl exec -it {pod_name} -- bash command to log in to the container.
- Run the df -h command.
As shown in the following figure, the SFS Turbo file system is mounted to the /mnt/sfs_turbo/test directory in the Kubernetes container.
Figure 8 Viewing mounting information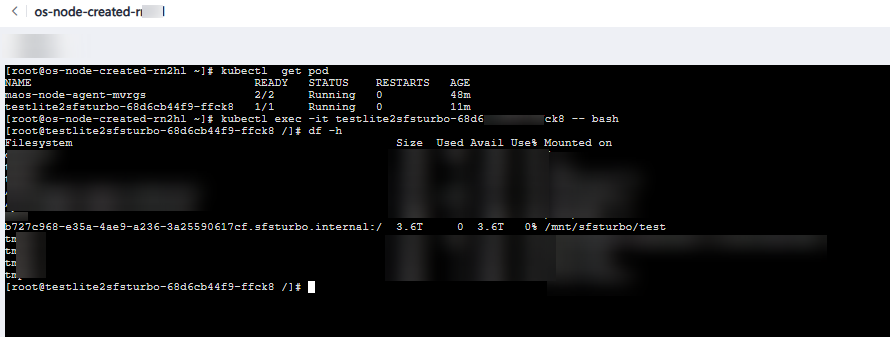
Feedback
Was this page helpful?
Provide feedbackThank you very much for your feedback. We will continue working to improve the documentation.See the reply and handling status in My Cloud VOC.
For any further questions, feel free to contact us through the chatbot.
Chatbot

