
Managing Blocklisted Outbound Numbers
You can blocklist the numbers of unfriendly customers or known numbers that cannot be called. These blocklisted numbers will not be called during the execution of outbound call tasks.
Prerequisites
Some operations under the current menu are controlled by separate permissions. If related operation permissions are not configured, the corresponding operations are not supported. For details about the operation permissions that can be configured separately, see Table 1.
Procedure
- Sign in to the AICC as a tenant administrator and choose .
By default, the outbound number blocklist displays the blocklisted numbers of the tenant space.
Figure 1 Blocklist page
- Add a blocklist group.
- Click New. The Add Number to Blocklist dialog box is displayed.
- Click the Blocklist Group selection box. The Select Blocklist Group dialog box is displayed.
- In the Select Blocklist Group dialog box, click New.
- Set Group Name, Organization Unit, and Group Description, and click OK.
- Add a blocklist type.
- Click the Blocklist Type selection box. The Select Blocklist Type dialog box is displayed.
- In the Select Blocklist Type dialog box, click New to create a blocklist type.
- Set parameters such as Type Name, Type Description, and Operation Type. The options of Operation Type are Auto Wrap Up and Pop Up. For details, see Table 1.
Table 1 Operation type description Operation Type
Procedure
Auto Wrap Up
- Set Type Name, Organization Unit, and Type Description.
- Set Operation Type to Auto Wrap Up.
- Set Business Result based on site requirements.
- Click OK.
Pop Up
- Set Type Name, Organization Unit, and Type Description.
- Set Operation Type to Pop Up.
- Set Prompt Content, Jump Address, and Business Result based on site requirements.
- Click OK.
- Configure outbound number blocklist data.
- Adding numbers one by one
- Click New. The Add Number to Blocklist dialog box is displayed. Figure 2 Add Number to Blocklist page
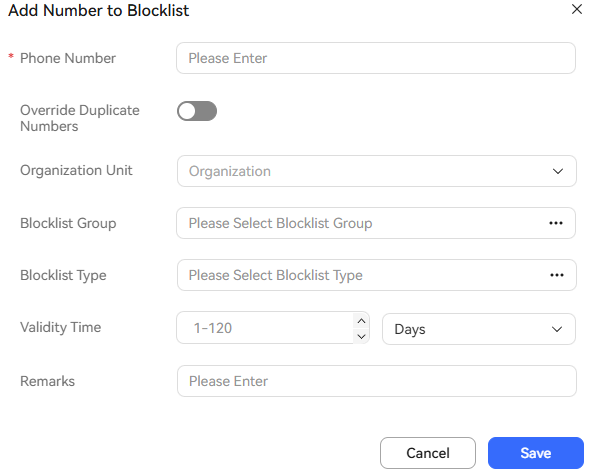
Table 2 GUI elements on the Add Number to Blocklist page Element/Component
Description
Called Number
Blocklisted number.
Override Duplicate Numbers
After this switch is turned on, duplicate numbers can be overwritten.
Organization Unit
The options are as follows:
- Tenant administrator: All OUs under the current tenant are available.
- Agent:
- If the tenant parameter Has the tenant enabled inter-organization data isolation enforcement is set to Yes, OUs that can be accessed by agents are available.
- If the tenant parameter Has the tenant enabled inter-organization data isolation enforcement is set to No, all OUs are available.
- Accessible OUs selected on the Configuration Center > Employee Center > Employee > Add Employee page are available. NOTE:
Contact the tenant administrator to set tenant parameters on the Configuration Center > System Management > Tenant Parameter page.
Blocklist Group
- If there is no blocklist group, create one by referring to 2.
- If a blocklisted number is not bound to a group, the number is a globally blocklisted number and takes effect for all outbound call tasks.
- If a blocklisted number is bound to a group and the group is bound to an outbound call task, the blocklisted number takes effect only for the outbound call task.
Blocklist Type
If there is no blocklist type, create one by referring to 3. The values of Operation Type in the Create Blocklist Type dialog box are as follows:- Auto Wrap Up
- Pop Up
Validity Time
Validity period of a blocklist.- The value ranges from 1 to 120.
- The unit can be year, month, day, or hour.
For example, if you enter 1 and set the unit to Hours, the blocklist is valid within one hour after being created.
Remarks
Remarks of a blocklisted number.
- Enter information as prompted and click OK.
- Click New. The Add Number to Blocklist dialog box is displayed.
- Importing numbers in batches
- Click
 . Figure 3 Setting Import Method to Using file
 Figure 4 Setting Import Method to Using server
- Set the file upload parameters.
Table 3 File upload parameters Parameter
Description
Import Method
The options are as follows:
- Using file: A maximum of 50,000 data records can be imported at a time.
- Using server: A maximum of 2,000,000 data records can be imported at a time.
Override Rule
- Skipping Duplicate Numbers
- Override Duplicate Numbers
- OverWrite All: After this rule is selected, the numbers filtered out are deleted and only the retained numbers are imported. Exercise caution when you select this rule. Blocklists to be imported are filtered by Organization Unit and Blocklist Group.
Organization Unit
The options are as follows:
- Tenant administrator: All OUs under the current tenant are available.
- Agent:
- If the tenant parameter Has the tenant enabled inter-organization data isolation enforcement is set to Yes, OUs that can be accessed by agents are available.
- If the tenant parameter Has the tenant enabled inter-organization data isolation enforcement is set to No, all OUs are available.
- Accessible OUs selected on the Configuration Center > Employee Center > Employee > Add Employee page are available. NOTE:
Contact the tenant administrator to set tenant parameters on the Configuration Center > System Management > Tenant Parameter page.
Blocklist Group
Blocklist group.
Blocklist Type
Operation type of a blocklist.
Server
Set this parameter to the IP address of the server where the blocklist file is located. This parameter is available when Import Method is set to Using server.
File Address
Set this parameter to the relative path of the default path on the file server where the blocklist file is located. This parameter is available when Import Method is set to Using server.
File Name
Enter the import file name including the file name extension. This parameter is available when Import Method is set to Using server.
Parsing Mode
The option is as follows:
- By template: Click
 to download the import file template.
Select File
If Import Method is set to Using File, upload a local file.
- Click
 to create a scheduled task for importing an outbound number blocklist.
 - In the dialog box that is displayed, click New to create a scheduled task for importing a blocklist. Set parameters by referring to Table 3.
- Click
 as shown in Figure 6 to start the scheduled task. Figure 5 Scheduled Import page

The number of scheduled tasks for importing blocklisted numbers is restricted by the tenant parameter Maximum number of scheduled tasks for importing outgoing call blocklists. The default value is 10. You can change the value on the page.
- Click OK.
- Click
 on the Blocklist page. In the Task View dialog box, view the import result.
- Click
- Adding numbers one by one
- Query a blocklisted outbound number.
- Click More on the Blocklist page.
- Blocklisted numbers can be queried based on the following search criteria:
- Phone Number: Enter a phone number to be queried.
- Blocklist Group: Select a blocklist group from the drop-down list.
- Blocklist Type: Select a blocklist type from the drop-down list.
- Click Search.

Exporting Blocklisted Outbound Numbers
- Sign in to the AICC as a tenant administrator and choose .
By default, the outbound number blocklist displays the blocklisted numbers of the tenant space.
Figure 7 Blocklist page - Export blocklisted outbound numbers.
- Click
 to export blocklisted outbound numbers by file or server. Enter a compression password and click
  to view the plaintext of the compression password. Figure 8 Setting Export Mode to File export
 Figure 9 Setting Export Mode to Server export
- Set related parameters. Click OK. An outbound number blocklist is exported.
Table 4 Parameters in the Export dialog box Parameter
Description
Export Mode
Mode of exporting blocklisted outbound numbers. The options are as follows:NOTE:- A single file can contain a maximum of 100,000 data records, and the file is exported as a compressed package. If the number of data records to be exported exceeds this threshold, multiple files are exported and compressed into one package.
- In addition, a maximum of 2 million data records can be exported at a time, regardless of which export mode is used.
- File export
- Server export
Server
Address of the target server that stores the outbound number blocklist data when the export mode is set to Server export.
File Address
Relative path in the default path of the target file server that stores the outbound number blocklist data when the export mode is Server export.
Compressed Password
Password for generating compressed files. The password must meet the following requirements:- The password can contain 8 to 12 characters.
- The value must contain letters, digits, and the following special characters: @_?=.*
- Set related parameters. Click OK. An outbound number blocklist is exported.
- Click
 to create a scheduled task for exporting an outbound number blocklist. Figure 10 Managing Scheduled Export Tasks page
 Figure 11 Creating a Scheduled Export Task page
- Set related parameters. Click OK. A scheduled export task is created.
Table 5 Parameters in the Creating a Scheduled Export Task dialog box Parameter
Description
Task Name
Name of a scheduled export task.
Executed
Execution time of a scheduled task.
Querying Organizations
Home OU of a blocklisted number.
Blocklist Group
For details, see 2.
Blocklist Type
For details, see 3.
Server
Address of the target server that stores the outbound number blocklist data.
File Address
Relative path in the default path of the target file server that stores the outbound number blocklist data when the export mode is Server export.
Compressed Password
Password for generating compressed files. The password must meet the following requirements:- The password can contain 8 to 12 characters.
- The value must contain letters, digits, and the following special characters: @_?=.*
- Set related parameters. Click OK. A scheduled export task is created.
- Click
- View the export result.
Click
 on the Blocklist page. In the Task View dialog box, view the export result.
Feedback
Was this page helpful?
Provide feedbackThank you very much for your feedback. We will continue working to improve the documentation.See the reply and handling status in My Cloud VOC.
For any further questions, feel free to contact us through the chatbot.
Chatbot


