
Connecting VPCs in Different Accounts
Process Description
If you want to connect VPCs in your account to the VPCs in another user's account, you can create a cloud connection, request this other user to allow you to load their VPCs to the cloud connection, and load all the VPCs to the cloud connection. Then, purchase a bandwidth package and assign bandwidths between regions so that VPCs in these regions can communicate with each other. If a VPC is outside the Chinese mainland and other VPCs are inside the Chinese mainland, you need to apply for a cross-border permit before you purchase bandwidth packages.
Figure 1 shows an example.
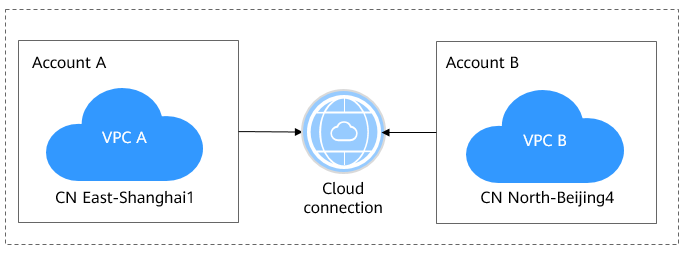
Figure 2 illustrates how you can enable network communications among VPCs that are in different accounts and regions.

Procedure
- Apply for a cross-border permit.
Skip this step if you do not require cross-border communications.
Apply for a cross-border permit only when a VPC to be connected is outside the Chinese mainland and other VPCs are inside the Chinese mainland.
- Log in to the management console.
- Hover on
 to display Service List and choose Networking > Cloud Connect.
 - In the navigation pane on the left, choose Cloud Connect > Bandwidth Packages.
- On the displayed page, click apply now.
The Cross-Border Service Application System page is displayed.
- On the application page, configure the parameters and upload the required materials.
Table 1 Online cross-border permit application Parameter
Description
Applicant Name
The applicant name, which must be the same as the company name in the Letter of Commitment to Information Security.
Huawei Cloud UID
The account ID to log in to the management console. You can take the following steps to obtain your account ID.- Log in to the management console.
- Click the username in the upper right corner and select My Credentials from the drop-down list.
- On the API Credentials page, view the Account ID.
Type of Product
Select Cloud Connect.
Bandwidth (M)
The bandwidth must be the same as the bandwidth in the Letter of Commitment to Information Security.
The information is for reference only and does not affect the actual service bandwidth.
Start Date
For reference only
Termination Date
For reference only
Customer Type
Select a type based on the actual situation.
Country of the Customer
Country where the applicant is located.
Contact Name
-
Contact Number
-
Type of ID
-
ID Number
-
Scope of Business
Briefly describe the main business.
Number of Employees
For reference only
Per Capita Bandwidth
For reference only
Branch Location Country
Country where the applicant branch is located. Set this parameter based on the actual situation.
Table 2 Required materials Material
Signature
Seal
Description
A scanned copy of your company's business license
N/A
Required
For the position of the seal, see the template provided by Huawei Cloud.
A scanned copy of the Huawei Cloud Cross-Border Circuit Service Agreement
Required
Required
- Sign the material on the signature block.
- Stamp the seal over the signature.
A scanned copy of the China Unicom Letter of Commitment to Information Security of the Cross-Border Circuit Service
Required
Required
- Sign the material on the signature block.
- Stamp the seal over the signature.
- Specify the bandwidth you estimated and your company name.
- Click Submit.
- Create a cloud connection.
- Log in to the management console.
- Hover on the upper left corner to display Service List and choose Networking > Cloud Connect.
- On the Cloud Connections page, click Create Cloud Connection.
Figure 3 Create Cloud Connection

- Configure the parameters based on Table 3.
Table 3 Parameters required for creating a cloud connection Parameter
Description
Name
Specifies the cloud connection name.
The name can contain 1 to 64 characters, including letters, digits, underscores (_), hyphens (-), and periods (.).
Enterprise Project
Provides a cloud resource management mode, in which cloud resources and members are centrally managed by project.
Scenario
VPC: VPCs or virtual gateways can use this cloud connection.
Tag
Identifies the cloud connection. A tag consists of a key and a value. You can add 20 tags to a cloud connection.
Tag keys and values must meet the requirements listed in Table 4.
NOTE:If a predefined tag has been created on TMS, you can directly select the corresponding tag key and value.
For details about predefined tags, see Predefined Tags.
Description
Provides supplementary information about the cloud connection.
The description can contain a maximum of 255 characters.
Table 4 Tag key and value requirements Parameter
Requirements
Key
- Cannot be left blank.
- Must be unique for each resource.
- Can contain a maximum of 36 characters.
- Can contain only letters, digits, hyphens, and underscores.
Value
- Can be left blank.
- Can contain a maximum of 43 characters.
- Can contain only letters, digits, period, hyphens, and underscores.
- Click OK.
- Request the other user to allow you to load their VPCs to your cloud connection.
If your VPCs need to communicate with the VPCs of another user, ask this other user to grant you the permissions to load their VPCs to your cloud connection. This other user can take the following steps to grant you the permissions to load their VPCs:
- In the navigation pane, choose Cloud Connect > Cross-Account Authorization.
- Click Network Instances Authorized by Me.
- Click Authorize Network Instance.
Configure the parameters based on Table 5.
Table 5 Parameters required for asking the other user to grant the permissions on access to their VPCs Parameter
Description
Region
Specifies the region where the VPC is located.
VPC
Specifies the VPC to be loaded to your cloud connection.
Peer Account ID
Specifies the ID of your account.
Peer Cloud Connection ID
Specifies the ID of your cloud connection to which the VPCs are to be loaded.
Remarks
Provides supplementary information about cross-account authorization, if any.
- Click OK.
Figure 4 Cross-account authorization

- Load network instances.
Load the VPCs that need to communicate with each other to the cloud connection. To load a VPC in this other user's account, perform the following steps:
- Log in to the management console
- In the cloud connection list, locate the cloud connection and click its name.
- Click Network Instances.
- Click Load Network Instance.
- Select Peer account for Account, select this other user's account ID, project ID, and the VPC, and specify the CIDR blocks.
For details, see Table 6.
Table 6 Parameters for loading network instances across accounts Parameter
Description
Account
Specifies whether the network instance is in the current account or another account.
Peer Account ID
Specifies the ID of this other user's account.
Region
Specifies the region where the VPC is located.
Peer Project ID
Specifies the project ID of the VPC in the other user's account.
Instance Type
Specifies the type of the network instance to be loaded.
Currently, you can load only VPCs across accounts.
Peer VPC
Specifies the ID of the VPC you want to load.
VPC CIDR Block
Specifies the subnets of the VPC you want to load and the custom CIDR blocks.
Remarks
Provides supplementary information about the network instance.
- Click OK.
Figure 5 Loading a network instance

- Click Load Another Instance to add all the VPCs that need to communicate with each other. Then click the Network Instances tab to view the VPCs you loaded.

You can load a network instance to only one cloud connection.
A VPC and the associated virtual gateway cannot be both loaded.
If the VPCs are in another user's account, you need to request for the permissions to load the network instances before you can load them to your cloud connection.
- Buy a bandwidth package and bind it to the created cloud connection.
By default, the system allocates 10 kbit/s of bandwidth for testing network connectivity across regions. To ensure normal network communications between regions in the same geographic region or across geographic regions, you need to purchase a bandwidth package and bind it to a cloud connection.
One cloud connection can only have one bandwidth package regardless of if the cloud connection is used for communications within a geographic region or between geographic regions. For example, if network instances are in the Chinese mainland and Asia Pacific, your cloud connection can only have one bandwidth package.
Buy a bandwidth package.
- In the navigation pane on the left, choose Cloud Connect > Bandwidth Packages.
- Click Buy Bandwidth Package.
- Configure the parameters based on Table 7 and click Buy Now.
Table 7 Parameters required for buying a bandwidth package Parameter
Description
Billing Mode
Specifies how you want the bandwidth package to be billed. Currently, only Yearly/Monthly is available.
Name
Specifies the bandwidth package name.
The name can contain 1 to 64 characters, including letters, digits, underscores (_), hyphens (-), and periods (.).
Billed By
Specifies by what you want the bandwidth package to be billed.
Applicability
Specifies whether you want to use the bandwidth package for network communications within a geographic region or between geographic regions.
Two options are available:
- Single geographic region: Use the bandwidth package between regions in the same geographic region.
- Across geographic regions: Use the bandwidth package between regions in different geographic regions.
Geographic Region
Specifies the geographic region.
Bandwidth
Specifies the bandwidth you require for network communications across regions, in Mbit/s. The sum of all inter-region bandwidths you assign cannot exceed the total bandwidth of the bandwidth package. Assign the bandwidth based on your network plan.
Unit: Mbit/s
Tag
Identifies the bandwidth package. A tag consists of a key and a value. You can add 20 tags to a bandwidth package.
Tag keys and values must meet the requirements listed in Table 8.
NOTE:If a predefined tag has been created on TMS, you can directly select the corresponding tag key and value.
For details about predefined tags, see Predefined Tags.
Required Duration
Specifies how long you require the bandwidth package for.
Auto renewal is supported.
Cloud Connection
Specifies the cloud connection you want to bind the bandwidth package to.
Two options are available, Bind now and Bind later.
Table 8 Tag key and value requirements Parameter
Requirements
Key
- Cannot be left blank.
- Must be unique for each resource.
- Can contain a maximum of 36 characters.
- Can contain only letters, digits, hyphens, underscores, and Unicode characters from \u4e00 to \u9fff.
Value
- Can be left blank.
- Can contain a maximum of 43 characters.
- Can contain only letters, digits, period, hyphens, underscores, and Unicode characters from \u4e00 to \u9fff.
- Confirm the information and click Pay Now.
- Click Pay.
Go back to the bandwidth package list and locate the bandwidth package. If its status changes to Normal, you can bind the bandwidth package to the cloud connection.
Bind the bandwidth package to the cloud connection.
Bind the purchased bandwidth package to the created cloud connection to enable communication between network instances.
- In the cloud connection list, click the name of the created cloud connection.
- On the Bound Bandwidth Packages tab, click Bind Bandwidth Package.
- Select the purchased bandwidth package and bind it to the cloud connection.
- Assign inter-region bandwidth.
- In the cloud connection list, click the name of the created cloud connection.
- Click Inter-Region Bandwidths.
- Click Assign Inter-Region Bandwidth and configure the parameters based on Table 9.
Table 9 Parameters required for assigning inter-region bandwidth Parameter
Description
Regions
Specifies the two regions between which network communications are required.
Bandwidth Package
Specifies the bandwidth package you want to bind to the cloud connection.
Bandwidth
Specifies the bandwidth you require for communications between regions, in Mbit/s.
The sum of all inter-region bandwidths you assign cannot exceed the total bandwidth of the bandwidth package. Plan the bandwidth in advance.
- Click OK.
Now the VPCs in the two regions can communicate with each other.
The default security group rule denies all the inbound traffic. Ensure that security group rules in both directions are correctly configured for resources in the regions to ensure normal communications.
Feedback
Was this page helpful?
Provide feedbackThank you very much for your feedback. We will continue working to improve the documentation.See the reply and handling status in My Cloud VOC.
For any further questions, feel free to contact us through the chatbot.
Chatbot


