Installing and Instantiating a Chaincode
To obtain the chaincode file used in the example, go to the BCS console and click Use Cases. Download the example Go chaincode in the Getting Started area.
Installing a Chaincode
- Click Manage Blockchain on the card of the BCS instance you just created.
- On the login page, enter the username and password, and click Log In.

The username is admin, and the password is the Blockchain Mgmt. Initial Password set when you created the BCS instance. If you have not set this password, use the resource access initial password. For details, see Purchasing a BCS Instance. For security purposes, change the password periodically.
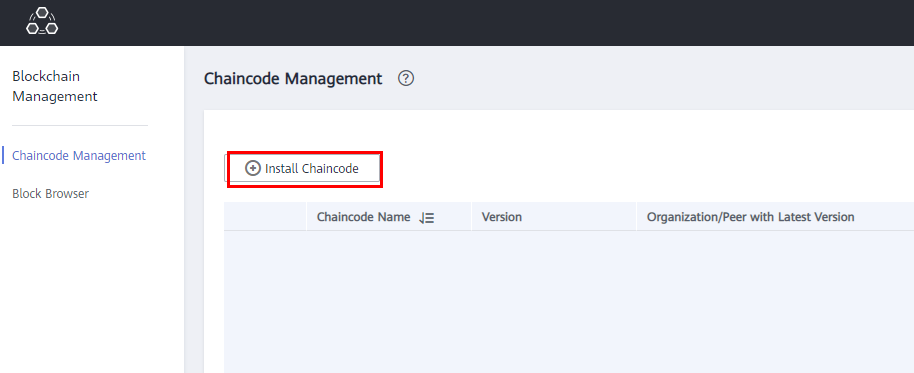
- Click Install Chaincode in the upper left corner of the page.

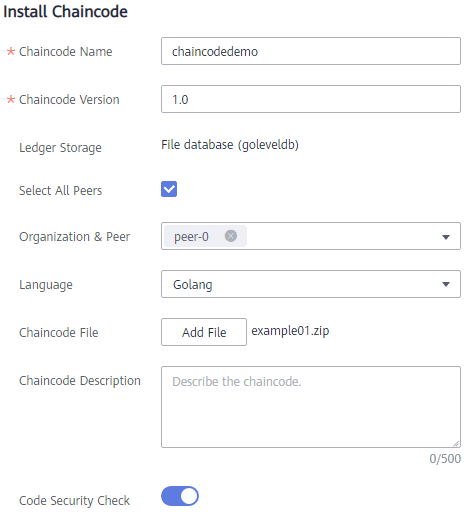
- Enter the chaincode name and version number, select the peers where the chaincode is to be installed, specify the programming language of the chaincode, and add the chaincode file.
Table 1 Chaincode installation configurations Parameter
Description
Chaincode Name
Enter chaincodedemo
Chaincode Version
Enter 1.0
Ledger Storage
Default option: File database (goleveldb).
Peer
Manually select organizations and peers.
Language
Select Golang.
Chaincode File
Add a chaincode file. To obtain the chaincode file used in the example, go to the BCS console and click Use Cases. Download the example Go chaincode in the Getting Started area.
Chaincode Description
Enter a description of the chaincode.
Code Security Check
This option is displayed only when the chaincode language is Golang. Enable this option to check code security.
Figure 1 Installing a Chaincode
- Click Install.
- Click
 next to a chaincode name to view the details.
 - Click Download in the Operation column to view the check result. (The following example is for reference only.)

If Code Security Check is not enabled, no check report will be generated, and the Download button will not be displayed.
Figure 2 Downloading the check report
- Decompress the package and open the HTML file to view the check result details. There are three types of issues: error, warning, and info. Error-level issues must be resolved. Otherwise, the chaincode functions will be affected. Warning-level issues can be handled by reconstructing the code. Info-level issues can be handled selectively as required.
Figure 3 Scanned files

- For example, there is an info-level issue in the proceeding figure. You can click the issue to view its details, including a brief description, wrong example, scanning details, modification advice, and revision example.
- Decompress the package and open the HTML file to view the check result details. There are three types of issues: error, warning, and info. Error-level issues must be resolved. Otherwise, the chaincode functions will be affected. Warning-level issues can be handled by reconstructing the code. Info-level issues can be handled selectively as required.
Instantiating a Chaincode
- After installing the chaincode, click Instantiate in the Operation column that contains a target chaincode.

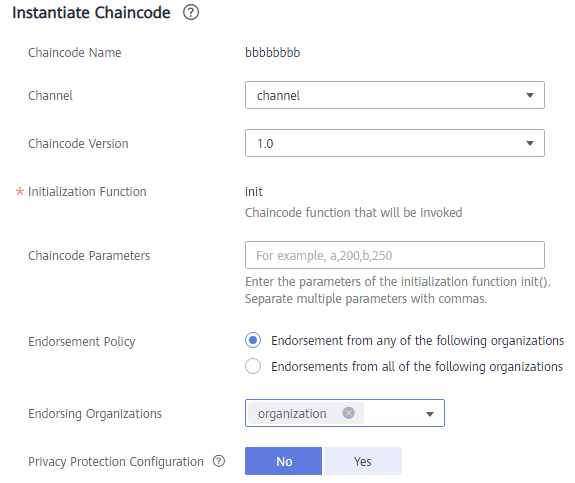
- Specify the channel, chaincode version, initialization function, endorsement policy, endorsing organizations, and other parameters.

- Click Instantiate. Wait 2 to 3 minutes for the instantiation on the specified channel to complete.
Feedback
Was this page helpful?
Provide feedbackThank you very much for your feedback. We will continue working to improve the documentation.See the reply and handling status in My Cloud VOC.
For any further questions, feel free to contact us through the chatbot.
Chatbot


