
Java
Scenarios
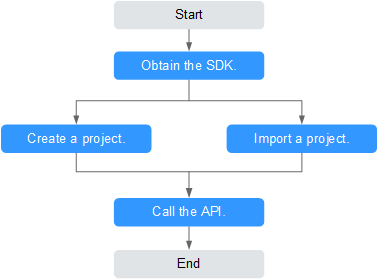
To use Java to call an API through App authentication, obtain the Java SDK, create a project or import an existing project, and then call the API by referring to the API calling example.
Prerequisites
- You have obtained API calling information. For details, see Preparations.
- You have installed the development tool and Java development environment. For details, see Preparations.
Obtaining the SDK
Old version: Log in to the ROMA Connect console, choose API Connect > API Calling > SDKs, and download the SDK.
New version: Log in to the ROMA Connect console, choose API Connect > Credentials > SDKs, and download the SDK.
The following shows the directory structure after the decompression.
| Name | Description |
|---|---|
| libs\ | SDK dependencies |
| libs\java-sdk-core-x.x.x.jar | SDK package |
| src\com\apig\sdk\demo\Main.java | Sample code for signing requests |
| src\com\apig\sdk\demo\OkHttpDemo.java | |
| src\com\apig\sdk\demo\LargeFileUploadDemo.java | |
| .classpath | Java project configuration files |
| .project |
Importing a Project
- Start IntelliJ IDEA and choose Import Project.
The Select File or Directory to Import dialog box is displayed.
- Select the directory where the SDK is decompressed and click OK.

- Select Eclipse for Import project from external model and click Next. Retain the default settings and click Next until the Please select project SDK page is displayed. Figure 2 Import Project

- Click Finish. Figure 3 Finish

- After the import is complete, the directory structure is shown in the following figure. Figure 4 Directory structure

Creating a Project
- Start IntelliJ IDEA and choose Create New Project.
The New Project dialog box is displayed.
- In the right pane, select Java and click Next. Figure 5 New Project dialog box

- Retain the default settings and click Next. On the page displayed, set Project name and select the local directory where the project is created for Project location. Figure 6 New Project dialog box

- Import the .jar files in the Java SDK.
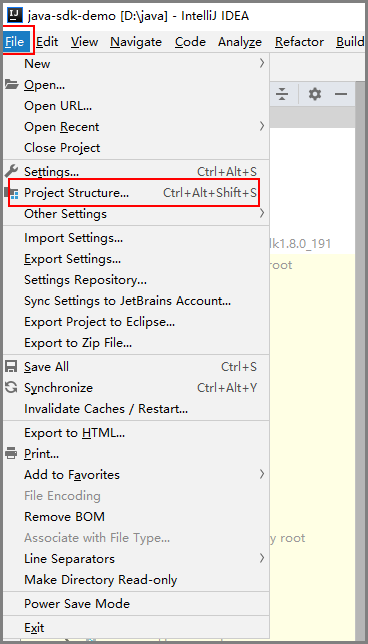
- Choose File > Project Structure. The Project Structure dialog box is displayed. Figure 7 Importing the .jar files
- In the Project Structure dialog box, choose Libraries > + > Java. The Select Library Files dialog box is displayed.
- Select all .jar files in \libs of the directory where the SDK is located and click OK. Figure 8 Selecting the .jar files

- Select the project created in step 3 and click OK. Figure 9 Selecting a project

- Enter the name of the directory where the JAR file is located and click Apply and OK. Figure 10 JAR file directory

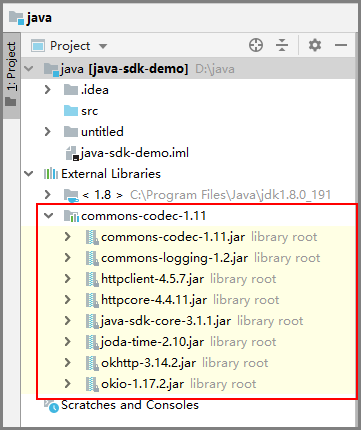
- After the JAR file is imported, the directory structure is shown in the following figure. Figure 11 Directory structure
- Choose File > Project Structure. The Project Structure dialog box is displayed.
- Create a package and a class named Main.
- Right-click src and choose New > Package from the shortcut menu. Figure 12 Creating a package

- Enter com.apig.sdk.demo for Name. Figure 13 Setting a package name
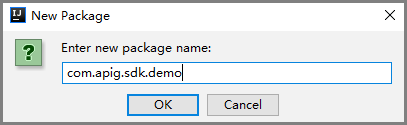
- Click OK.
- Right-click com.apig.sdk.demo, choose New > Java Class from the shortcut menu, enter Main in the Name text box, and click OK. Figure 14 Creating a class

- Configure a class.
- Right-click src and choose New > Package from the shortcut menu.
- View the directory structure of the project. Figure 16 Directory structure of the new project

Before using Main.java, enter the required code according to API Calling Example.

API Calling Example

- This section demonstrates how to access a published API.
- Before accessing an API, you must create and publish the API on the ROMA Connect console. You can specify the Mock backend for the API.
- The backend of this API is a fake HTTP service, which returns response code 200 and message body Congratulations, sdk demo is running.
- Add the following references to Main.java:
import java.io.IOException;
import javax.net.ssl.SSLContext;

import org.apache.http.Header;
import org.apache.http.HttpEntity;
import org.apache.http.HttpResponse;
import org.apache.http.client.methods.HttpRequestBase;
import org.apache.http.conn.ssl.AllowAllHostnameVerifier;
import org.apache.http.conn.ssl.SSLConnectionSocketFactory;
import org.apache.http.conn.ssl.SSLContexts;
import org.apache.http.conn.ssl.TrustSelfSignedStrategy;
import org.apache.http.impl.client.CloseableHttpClient;
import org.apache.http.impl.client.HttpClients;
import org.apache.http.util.EntityUtils;

import com.cloud.apigateway.sdk.utils.Client;
import com.cloud.apigateway.sdk.utils.Request;
- Create a request with the following parameters. For details about how to obtain the values, see Obtaining API Calling Information.
- Key: key of the credential authorized by the API. Set this parameter as required.
- Secret: secret of the credential authorized by the API. Set this parameter as required.
Hard-coded or plaintext AK and SK are risky. For security purposes, encrypt your AK and SK and store them in the configuration file or environment variables. In this example, the AK and SK are stored in environment variables. Before running the code in this example, configure environment variables HUAWEICLOUD_SDK_AK and HUAWEICLOUD_SDK_SK.
- Method: request method. The sample code uses POST.
- url: request URL of the API, excluding the QueryString and fragment parts. For the domain name, use your own independent domain name bound to the group to which the API belongs. The example code uses http://serviceEndpoint/java-sdk as an example.
- QueryStringParam: query parameters carried in the URL. Characters (0-9a-zA-Z./;[]\-=~#%^&_+:") are allowed. The sample code uses name=value.
- Header: request header. Set a request header as required. It cannot contain underscores (_). The sample code uses Content-Type:text/plain. If you are going to publish the API in a non-RELEASE environment, specify an environment name. The sample code uses x-stage:publish_env_name.
- body: request body. The sample code uses demo.
The sample code is as follows:
Request request = new Request(); try { // Directly writing AK/SK in code is risky. For security, encrypt your AK/SK and store them in the configuration file or environment variables. // In this example, the AK/SK are stored in environment variables for identity authentication. // Before running this example, set environment variables HUAWEICLOUD_SDK_AK and HUAWEICLOUD_SDK_SK. request.setKey(System.getenv("HUAWEICLOUD_SDK_AK")); request.setSecret(System.getenv("HUAWEICLOUD_SDK_SK")); request.setMethod("POST"); request.setUrl("http://serviceEndpoint/java-sdk"); request.addQueryStringParam("name", "value"); request.addHeader("Content-Type", "text/plain"); //request.addHeader("x-stage", "publish_env_name"); //If the API is published in an environment other than RELEASE, uncomment this line and add an environment name. request.setBody("demo"); } catch (Exception e) { e.printStackTrace(); return; } - Sign the request, access the API, and print the result. The sample code is as follows:
CloseableHttpClient client = null; try { HttpRequestBase signedRequest = Client.sign(request); //If the subdomain name allocated by the system is used to access the API of HTTPS requests, uncomment the two lines of code to ignore the certificate verification. // SSLContext sslContext = SSLContexts.custom().loadTrustMaterial(null, new TrustSelfSignedStrategy()).useTLS().build(); // SSLConnectionSocketFactory sslSocketFactory = new SSLConnectionSocketFactory(sslContext, new AllowAllHostnameVerifier()); //If the subdomain name allocated by the system is used to access the API of HTTPS requests, add .setSSLSocketFactory(sslSocketFactory) to the end of custom() to ignore the certificate verification. client = HttpClients.custom().build(); HttpResponse response = client.execute(signedRequest); System.out.println(response.getStatusLine().toString()); Header[] resHeaders = response.getAllHeaders(); for (Header h : resHeaders) { System.out.println(h.getName() + ":" + h.getValue()); } HttpEntity resEntity = response.getEntity(); if (resEntity != null) { System.out.println(System.getProperty("line.separator") + EntityUtils.toString(resEntity, "UTF-8")); } } catch (Exception e) { e.printStackTrace(); } finally { try { if (client != null) { client.close(); } } catch (IOException e) { e.printStackTrace(); } } - Choose Main.java, right-click, and choose Run As > Java Application to run the project test code. Figure 17 Running the project test code

- On the Console tab page, view the running result. Figure 18 Response displayed if the calling is successful

Feedback
Was this page helpful?
Provide feedbackThank you very much for your feedback. We will continue working to improve the documentation.See the reply and handling status in My Cloud VOC.
For any further questions, feel free to contact us through the chatbot.
Chatbot


