
Configuring HTTPS at the Frontend and Backend for Access Encryption
Scenarios
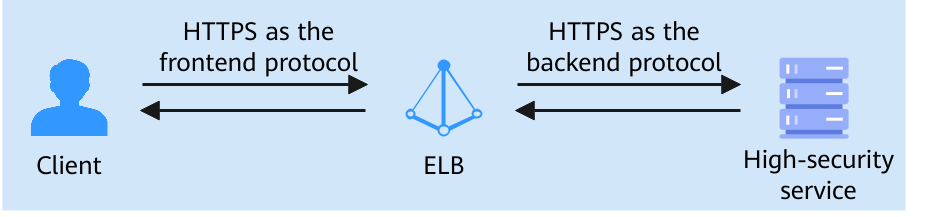
If your sensitive service data (such as finance and government service data) requires high secure data transmission on the cloud, and you want secure communications between the client and the load balancer, and between the load balancer and backend servers, you can use HTTPS as the frontend and backend protocols. This allows you to use ELB to route traffic securely from clients to backend servers, ensuring high performance and O&M efficiency.
Prerequisites
- There is a dedicated load balancer with an EIP bound to it. If there is no such resource, you can buy one and bind an IPv4 EIP to the load balancer.
- You have either purchased a certificate or uploaded a third-party certificate to the SSL Certificate Manager (SCM) console, and configured a domain name for the certificate. It is recommended to purchase an SSL certificate on the Cloud Certificate & Manager (CCM) console.
You have uploaded the certificate to ELB.
- You have purchased an ECS (ECS01) and deployed an application on it. For details about how to deploy a test service, see Deploy the Application.
Procedure

Step 1: Create an HTTPS Backend Server Group
- Go to the backend server group list page.
- Click Create Backend Server Group in the upper right corner.
- Configure the parameters based on Table 1. Retain the default values for other parameters.
Table 1 Parameters required for configuring a routing policy Parameter
Example Value
Description
Backend Server Group Name
server_group
Specifies the name of the backend server group.
Type
Dedicated
Specifies the type of load balancer that can use the backend server group.
Load Balancer
Associate existing
Specifies whether to associate a load balancer.
Click Associate existing and select a load balancer you have created.
Backend Protocol
HTTPS
Specifies the protocol that backend servers in the backend server group use to receive requests from the listeners.
Load Balancing Algorithm
Weighted round robin
Specifies the load balancing algorithm used by the load balancer to distribute traffic.
Weighted round robin: Requests are routed to different servers based on their weights. Backend servers with higher weights receive proportionately more requests, whereas equal-weighted servers receive the same number of requests.
For more information, see Load Balancing Algorithms.
- Click Next to add backend servers and configure health check.
- Click Add Cloud Server, select ECS01, set the service port to 443, and retain the default values for other parameters.
- Enable health check and retain the default values for other health check parameters.
- Click Next.
- Confirm the configuration and click Create Now.
Step 2: Add an HTTPS Listener
- Go to the load balancer list page.
- Locate the target load balancer and click Add Listener in the Operation column.
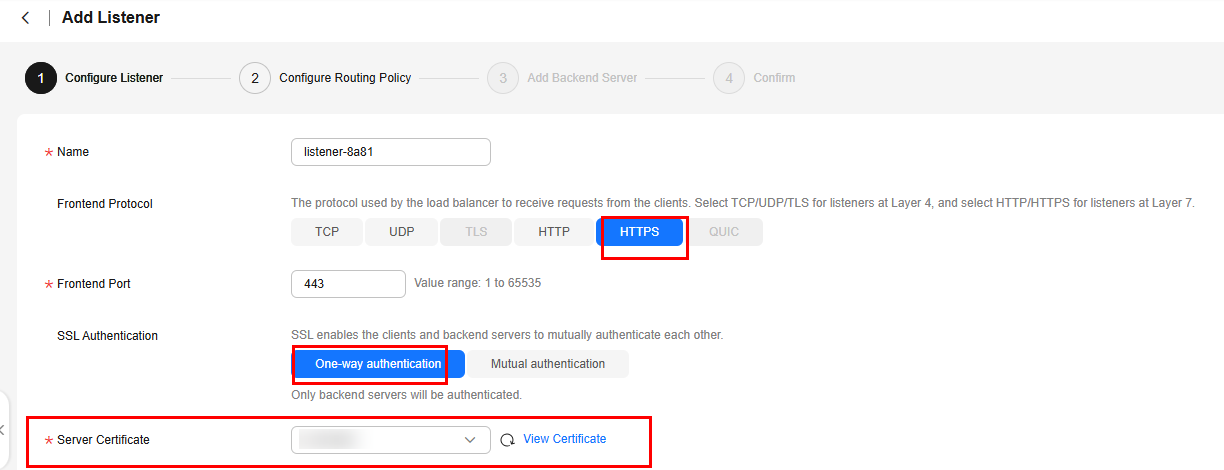
- On the Add Listener page, set Frontend Protocol to HTTPS.
Figure 3 Configuring one-way authentication
- Click Next: Configure Request Routing Policy and select Use existing for Backend Server Group. Select an existing backend server group and click Next: Confirm.
- Confirm the configurations and click Submit.
Step 3: Configure Domain Name Resolution
You can add an A record set to resolve the domain name to the public IP address of the load balancer so that clients can access the load balancer using the public domain name.
The following provides an example for resolving a website domain name to an IPv4 address. For details about how to configure an A record set, see Routing Internet Traffic to a Website.
- Go to the DNS console.
- In the navigation pane on the left, choose Public Zones.
The zone list is displayed.
- Locate the public zone and click Manage Record Sets in the Operation column.
- Click Add Record Set.
- Configure the parameters based on Table 2.
Table 2 Parameters for adding an A record set Parameter
Example Value
Description
Type
A – Map domains to IPv4 addresses
Type of the record set. In this example, set it to A - Map domains to IPv4 addresses.
Name
www
Prefix of the domain name to be resolved.
Line
Default
Resolution line. The DNS server will return the IP address of the specified line, depending on where end users come from.
The default value is Default.
Default: returns the default resolution result irrespective of where the visitors come from.
TTL (s)
300
Cache duration of the record set on a local DNS server, in seconds.
In this example, the default value 300 is used.
Value
192.168.12.2
IPv4 addresses mapped to the domain name. In this example, set this parameter to the EIPs bound to the load balancer.
Advanced Settings (Optional)
-
Click
 to expand the advanced settings, set the alias and weight of the record set, and add a description and tags. In this example, the default settings are used.
 - Click OK.
- Switch back to the Record Sets tab.
The added record set is in the Normal state.
Step 4: Verify Load Balancing
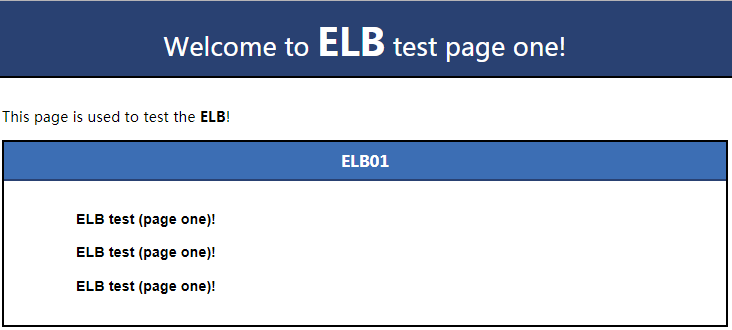
Deploy an application on ECS01, so that a page with message "Welcome to ELB test page one!" is returned when ECS01 is accessed. For details, see Deploy the Application.
Feedback
Was this page helpful?
Provide feedbackThank you very much for your feedback. We will continue working to improve the documentation.See the reply and handling status in My Cloud VOC.
For any further questions, feel free to contact us through the chatbot.
Chatbot


