Creating an Edge Resource Pool
Edge deployment refers to deploying models on edge devices. These devices are usually servers purchased by users. ModelArts manages these servers as edge resource pools, and models can be deployed in these edge resource pools using the PanguLM service.
ModelArts edge nodes are devices provided by ModelArts for deploying edge services. Before creating an edge resource pool, you must create a ModelArts edge node. After a node is created, download the certificate and edge agent firmware, copy the firmware to the node, and run the registration command to register the device.
For details about how to create an edge resource pool, see Table 1.
|
Step |
Description |
|---|---|
|
Preparations for creating an edge resource pool |
|
|
Procedure for registering edge resource pool nodes |
|
|
Procedure for setting up an edge server cluster |
|
|
Guidance for installing the Ascend plug-in |
|
|
Procedure for creating a certificate required for creating a load balancer |
|
|
Procedure for creating a load balancer |

- Currently, only some models on ModelArts Studio support edge deployment. For details, see "Model Capabilities and Specifications" in Service Overview.
- To use the edge deployment function, you need to enable the edge resource pool function in ModelArts. This function is a whitelist feature. To enable this function, contact ModelArts customer service.
- Creating an edge resource pool is complex. You are advised to contact Pangu customer service for assistance.
Preparations
This section uses the largemodel cluster as an example to describe how to deploy models on edge services. The following table lists the example cluster information.
|
Cluster Name |
Node Type |
Node Name |
Specifications |
Remarks |
|---|---|---|---|---|
|
largemodel |
Controller |
ecs-edge-XXXX |
Kunpeng General computing | 8 vCPUs | 29 GiB | rc3.2xlarge.4 image EulerOS 2.9 64-bit with Arm for Tenant 20230728 base 2.9.15 |
Public IP address: 100.85.220.207 root password: / CPU architecture: AArch64 (Log in to the device and run the arch command to view the CPU architecture.) |
|
Worker |
bms-panguXXXX |
CPU:Kunpeng Memory: 24 x 64 GB DDR4 RAM (GB) Local disk: 3 x 7.68 TB NVMe SSDs Extended configuration: 2 x 100GE + 8 x 200GE Type: physical.kat2e.48xlarge.8.313t.ei.pod101 euler2.10_arm_sdi3_1980b_hc_sdi5_b080_20230831v2 |
Public IP address: 100.85.216.151 root password: / CPU architecture: AArch64 (Log in to the device and run the arch command to view the CPU architecture.) |
- Download the dependency package.
- Docker download: https://download.docker.com/linux/static/stable
Select the corresponding CPU architecture and download Docker 19.0.3 or later.
Download the binary file and air-gap image based on the CPU architecture.
- Install the NPU driver and firmware.
Run the npu-smi info command to check whether the driver has been installed. If NPU information is displayed, the driver has been installed.
- Run the hccn_tool command to view the NIC configuration.
- Run the following command and check whether NIC information is displayed. If yes, the NIC has been configured. Otherwise, go to the next step.
cat /etc/hccn.conf
- Run the following command to check the number of NPUs:
npu-smi info
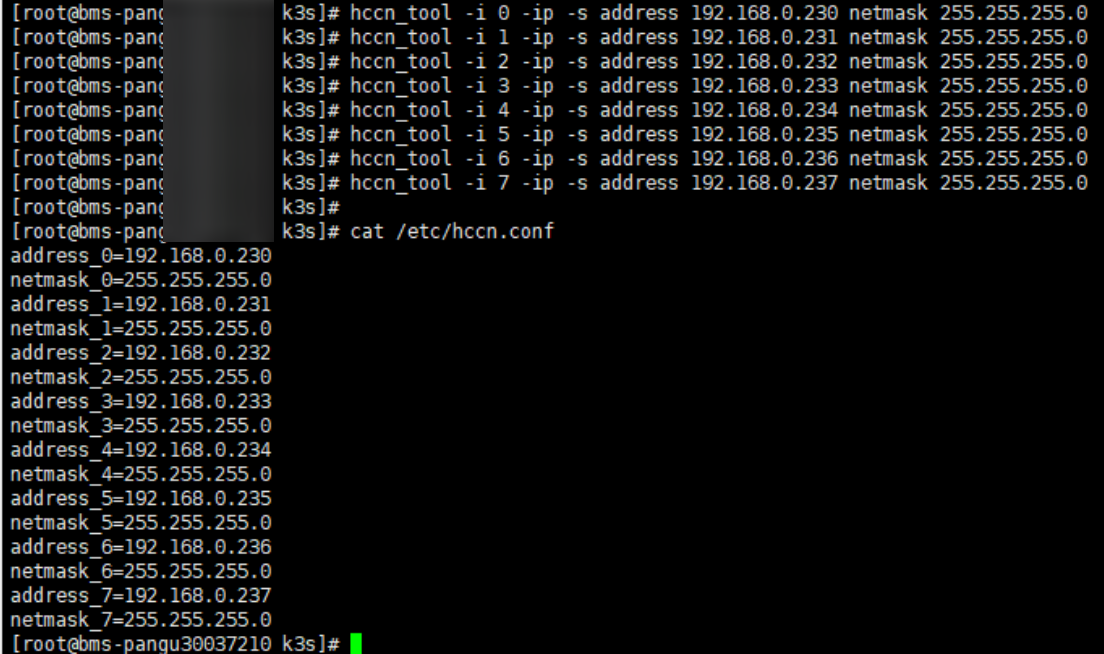
- Run the following commands (replace the IP addresses with actual ones):
hccn_tool -i 0 -ip -s address 192.168.0.230 netmask 255.255.255.0hccn_tool -i 1 -ip -s address 192.168.0.231 netmask 255.255.255.0hccn_tool -i 2 -ip -s address 192.168.0.232 netmask 255.255.255.0hccn_tool -i 3 -ip -s address 192.168.0.233 netmask 255.255.255.0hccn_tool -i 4 -ip -s address 192.168.0.234 netmask 255.255.255.0hccn_tool -i 5 -ip -s address 192.168.0.235 netmask 255.255.255.0hccn_tool -i 6 -ip -s address 192.168.0.236 netmask 255.255.255.0hccn_tool -i 7 -ip -s address 192.168.0.237 netmask 255.255.255.0
- Run the cat /etc/hccn.conf command. If the following NIC information is displayed, the configuration is complete.
- Run the following command and check whether NIC information is displayed. If yes, the NIC has been configured. Otherwise, go to the next step.
- Configure the NFS web disk service.
If a large model is deployed as mirrored models in different nodes, one of them needs to provide Network File System (NFS), which allows you to access the model by mounting NFS.
Step 1: Registering an Edge Computing Node
- Go to the ModelArts console and select the required workspace.
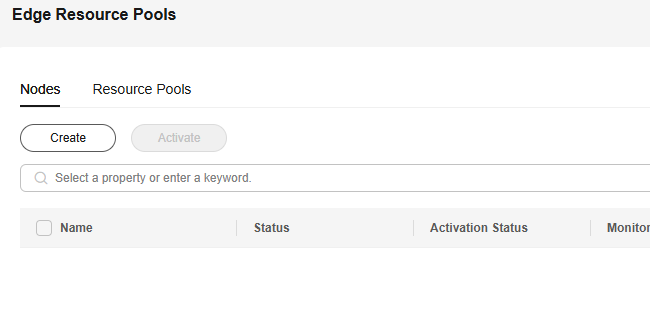
- In the navigation pane, choose Resource Management > Edge Node. On the Nodes tab page, click Create.
Figure 1 Edge Node
- On the Create Edge Node page, enter the node name and configure the AI accelerator card and log information.
- If the node has NPUs, select Ascend for AI Accelerator Card and select the accelerator card type.
- If the node does not have an accelerator card, set AI Accelerator Card to Do not use.
Figure 2 Configuring edge node parameters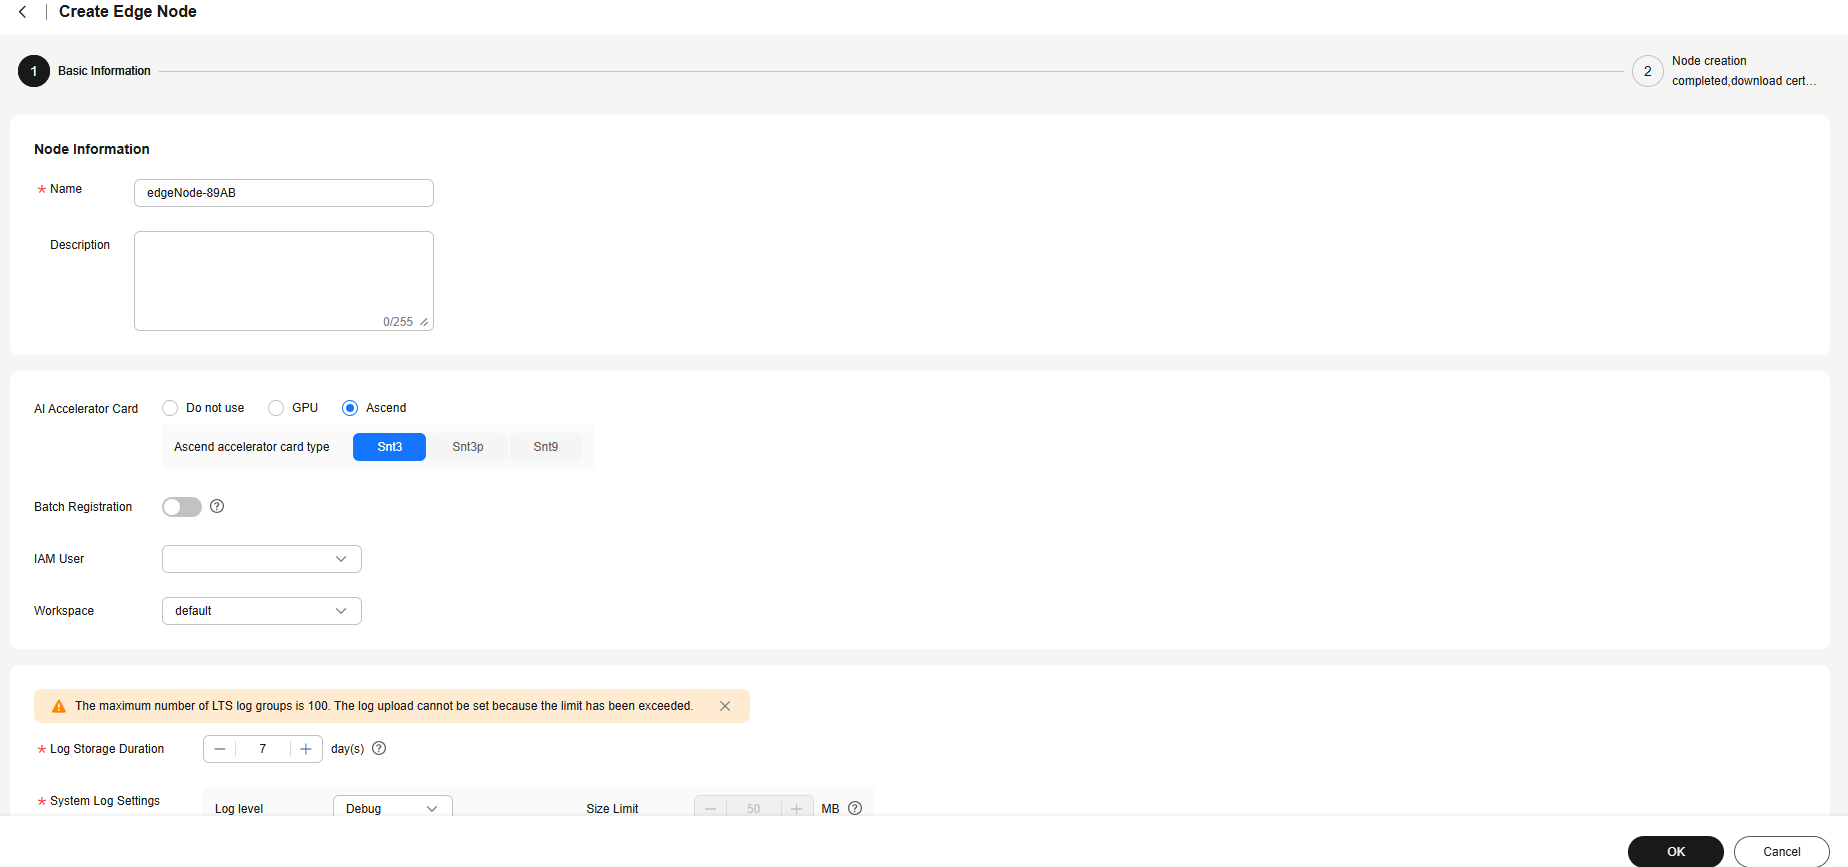
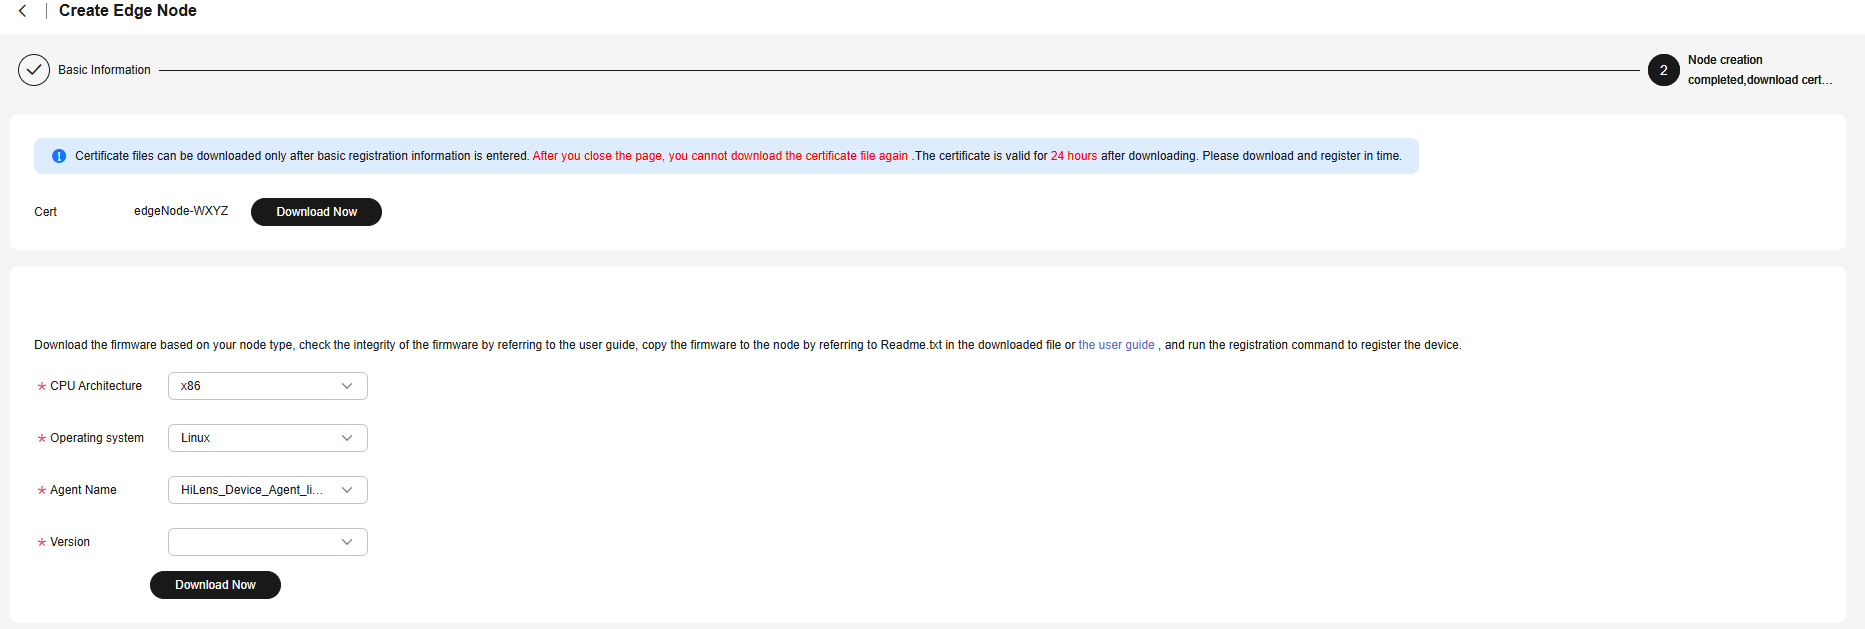
- After the basic information is configured, click OK. Click Download Now to download the device certificate and Agent firmware, and rename the device certificate and Agent firmware as license.tgz and hilens-agent.tgz, respectively.
Figure 3 Downloading the required certificate
Step 2: Setting Up an Edge Server Cluster
- Run the following command to generate a Docker certificate:
bash cluster_install-ascend.sh generate_docker_cert --pkg-path=/home/hilens/pkgs

Note that this command needs to be executed only once. If the related certificate exists, skip this step.
- Save the downloaded files in the following directories based on Preparations and Step 1: Registering an Edge Computing Node. Modify the names of the downloaded files. The certs certificate in Docker is automatically generated and does not need to be modified.
pkgs // Package directory, which is user-defined. docker docker.tgz // Docker binary file. The version must be later than 19.0.3. certs // Certificate generated by running the generate command. After --pkg-path is specified, the certificate is automatically created in the certs directory. ca.crt server.crt server.key k3s k3s // Executable k3s file agent images k3s-airgap-images-[arm64|amd64].tar.gz // K3s offline image hilens-agent hilens-agent.tgz // HiLens Agent firmware package license.tgz // HiLens device license
- Run the following command on the worker node:
bash -x cluster_install-ascend.sh --pkg-path=/home/hilens/pkgs --node-type=worker --host-ip=192.168.0.209
Run the following command on the master node:
bash -x cluster_install-ascend.sh --pkg-path=/home/hilens/pkgs --node-type=controller --host-ip=192.168.0.150
- cluster_install-ascend.sh is used to install Docker, HDAD, and K3S. Contact Pangu customer service to obtain it.
- pkg-path is the directory of the installation package file integrated in step 2.
- host-ip indicates the IP address of the device in the cluster. Generally, it is an internal IP address.
- node-type indicates the cluster node type. worker indicates a worker node, and controller indicates a master node.
- Run the following command on the server to check whether Docker is installed:
systemctl status docker

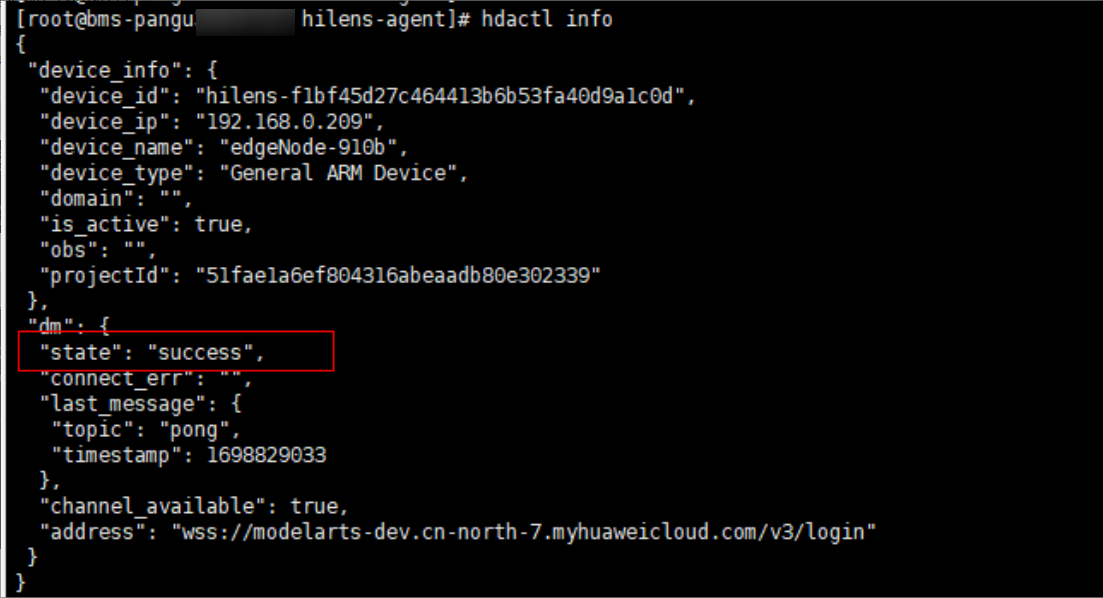
- Run the following command on the server to check whether the edge agent is installed:
hdactl info
- Configure the NFS web disk service.
- Install NFS.
Connect to the Internet and download the dependencies.
- Ubuntu
Online installation:
sudo apt install nfs-kernel-server
- EulerOS
Online installation:
sudo yum install nfs-utils

If you need to install it offline, contact Pangu customer service.
- (Optional) Enable the rpc-bind and nfs services on the firewall:
sudo firewall-cmd --zone=public --permanent --add-service={rpc-bind,mountd,nfs}sudo firewall-cmd --reload
- Ubuntu
- Create a shared directory on the web disk.
The storage space of this path should be sufficient for storing large model files. Set /var/docker/hilens as the root directory of the web disk to access it in the container. Run the following command:
sudo mkdir -p /var/docker/hilens
Run the following command to set the access permission of the path to 1000:100 (consistent with the configuration of /etc/exports):
sudo chmod 750 /var/docker/hilenschown -R 1000:100 /var/docker/hilens
Run the following command to view the permission:
ls -l /var/docker | grep hilens
- Add the web disk access permission.
Run the following command to configure the nfs-server access whitelist and the path of the web disk shared file:
sudo vim /etc/exports
Add the following configurations:
/var/docker/hilens 172.xxx.0.0/24(rw,no_all_squash,anonuid=1000,anongid=100,fsid=0)
172. xxx.0.0/24 is the internal IP network segment of the cluster. To view the IP address, log in to the master node and run the hdactl info command. For example, if the queried IP address is 172.16.0.22, you can set the IP address to 172.16.0.0/24.
In this configuration:
- /var/docker/hilens: root directory of the web disk.
- 192.168.0.0/24: client IP address range. All nodes whose IP addresses are in this range can access /var/docker/hilens. The asterisk (*) indicates that there is no restriction. You can also enter the IP address of a specific node.
- rw indicates read and write permission.
- anonuid indicates the ID of the mapped anonymous user, and anongid indicates the mapped anonymous user group, that is, the file owner displayed in the container after the file is mounted to the container.
- no_all_squash: Common users can be authorized to use the files.
Run the :wq command to save the settings and update the NFS configuration. Then, run the following command:
exportfs -rv
- Start NFS and rpcbind.
Set the service to start upon system startup.
systemctl enable nfs-server && systemctl enable rpcbind && systemctl start rpcbind nfs-server
Run the following command to check whether the preceding configuration is correct. If the following information is displayed, the configuration is correct, that is, the NFS service is installed.
showmount -e localhost
- (Optional) Verify the NFS configuration.
Create a directory on the non-NFS service node.
sudo mkdir ~/data
Mount an NFS server:
sudo mount -t nfs 192.168.xx.xxx:/var/docker/hilens ~/data
After the mounting, run the following command to view the result:
mount
The mounting is successful if the following information is displayed:
... ... 192.168.0.150:/var/docker/hilens on ~/data type nfs4
- Test the NFS function.
On the client, create a file in the shared directory.
cd ~/data sudo touch a
View the created file on the NFS server whose IP address is 192.168.0.150.
cd /var/docker/hilens ls -l
- Configure a Yum repository.
If yum install is running properly, skip this section.
- Configure the Yum repository address.
- Backing up Yum configurations
mkdir -p /etc/yum.repos.d/bak/ mv -f /etc/yum.repos.d/*.repo /etc/yum.repos.d/bak/
- x86 EulerOS configuration
cat> /etc/yum.repos.d/his-mirrors.repo<<"EOF" [EulerOS_2.10_base] name=EulerOS_2.10_base baseurl=http://his-mirrors.huawei.com/install/euleros/2.10/os/x86_64/ gpgkey=file:///etc/pki/rpm-gpg/RPM-GPG-KEY-EulerOS gpgcheck=0 enabled=1 [EulerOS_2.10_devel_tool] name=EulerOS_2.10_devel_tool baseurl=http://his-mirrors.huawei.com/install/euleros/2.10/devel_tools/x86_64/ gpgkey=file:///etc/pki/rpm-gpg/RPM-GPG-KEY-EulerOS gpgcheck=0 enabled=1 [EulerOS_2.10_updates] name=EulerOS_2.10_updates baseurl=http://his-mirrors.huawei.com/install/euleros/2.10/updates/x86_64/ gpgkey=file:///etc/pki/rpm-gpg/RPM-GPG-KEY-EulerOS gpgcheck=0 enabled=1 EOF yum clean all && yum makecache > /dev/null 2>&1
- Arm EulerOS configuration
cat> /etc/yum.repos.d/his-mirrors.repo<<"EOF" [EulerOS_2.10_base] name=EulerOS_2.10_base baseurl=http://his-mirrors.huawei.com/install/euleros/2.10/os/aarch64/ gpgkey=file:///etc/pki/rpm-gpg/RPM-GPG-KEY-EulerOS gpgcheck=1 enabled=1 [EulerOS_2.10_devel_tool] name=EulerOS_2.10_devel_tool baseurl=http://his-mirrors.huawei.com/install/euleros/2.10/devel_tools/aarch64/ gpgkey=file:///etc/pki/rpm-gpg/RPM-GPG-KEY-EulerOS gpgcheck=1 enabled=1 [EulerOS_2.10_updates] name=EulerOS_2.10_updates baseurl=http://his-mirrors.huawei.com/install/euleros/2.10/updates/aarch64/ gpgkey=file:///etc/pki/rpm-gpg/RPM-GPG-KEY-EulerOS gpgcheck=1 enabled=1 EOF yum clean all && yum makecache > /dev/null 2>&1
- Configure a DNS server.
cat >> /etc/resolv.conf<<"EOF" nameserver 10.189.32.59 nameserver 10.72.55.103 nameserver 10.98.48.39 EOF
Certificates are automatically downloaded. However, if the certificates are not automatically installed on some servers or if there are issues with the installed certificates, you can manually install them by running the following command.
cat > /etc/pki/rpm-gpg/RPM-GPG-KEY-EulerOS <<"EOF" -----BEGIN PGP PUBLIC KEY BLOCK----- mQENBFx4vK4BCACrq4PA8EZEr5XH08bfh9rlms+QDZsJYhqqIXWx4qsZ8dAqdWLH O2Dm0HYk17xVwTZjXUYH9rz1gn2bGa5At4xTpH7FHMDpNG8DfwC6UpMKEmGGvy/S OfL4fl6Yq2tCHAx3LrHXO9PGigafz5XMDtBySI4ixOR4M/w8IaIPEyN0BfGC6DQ5 PZlXMPDOc5VW1NhxwH0u0yHH1lLITKBAEifTQa8+3YZY54PWvBbYxOcCCS63FOTn pk0wWuwm2JqozDBxV/w8Ty0c25+y4FTiUGzOj2e/3K1ls+Zs/tTxf8asKpFH/dYN ffXmdkPLDCHRGkTyrLPdghoFmVg4XhrOhsf/ABEBAAG0LkV1bGVyT1MgKEV1bGVy T1MgMi4wIFNQOCkgPGV1bGVyb3NAaHVhd2VpLmNvbT6JAVQEEwEIAD4WIQS4wSv5 6CWqOEUVIHBxp+kP4ux1vAUCXHi8rgIbAwUJA8JnAAULCQgHAgYVCgkICwIEFgID AQIeAQIXgAAKCRBxp+kP4ux1vN/UB/4jy2kRiFznSXfWz5SX0szLOf1FgDssdRZG xASHonAJqrV19mkG2pNTkgip9LZQsCqLbxj5FV+TMm1o+6jubd9qRPePlV2Tpc0T m3cDmpcZbW/XrFh4dLdN644TwKDAPcK8TK/wOepFVtjhx1Qc8o+8nuoFhmsMoKkf AA1DYDDCZbpbgMQwMV3yKh002CFRlCnVMylqOi8U+FrYfphnsYfujXpKu9g+FmO6 ju0xVhxyFOVCEicamKiel3ZS9z06+PIFL3KP/nKC7pu0tfaxogJjCh8y+ZIF/FJU ygHpZYKQJyJNO8Do7AucudbruOxqGqhD2BIBtX1JNP/hkKj4w+OJuQENBFx4vK4B CAD1SYnEWn0mf3umbucovVYHaywJqhErB3ia+Ykq3InKvIORf1reiCRvVuse2wZr cnPWEKeRE7tTEIZ5hCuLYQzaqngqVkwqLbRR6vtxiDhTWNgJH9+GuokgjotQ3/7T AXH7AwG57OPp6vvaiazCDjhy5t3Vr1snWkiwWkJR2GFRkuwKu7FDLjc1n2dx4zLF zRZJa5TTAR1zrHWgVwkLxgq0+eJHWq7eHFw1SBjmc4Vs4z/QI+Q+3rkVBiqCmr11 /XQz9ZePdOl/8fCuNh4l480c7AFlFt8IvKBP6Kh+jShxbED2NJpRV04MhV6SyA69 ixd/VKtPJMRcRg3phyuuCedrABEBAAGJATwEGAEIACYWIQS4wSv56CWqOEUVIHBx p+kP4ux1vAUCXHi8rgIbDAUJA8JnAAAKCRBxp+kP4ux1vBGeB/4ubYvxZ6/apb+i MCtRIuA15PWEwVFTVfKirvEliY4fAjw5HSlfrnN4FV/OCTIRHecuNBNBfLt78DoK 08x7fYtEBqIN6pDanjsSwbPhuzhz6m4C/GWLqqDi8SCaVTQsJqKc2QHjr7CaBIuo GRlB84/pOq+kGAnMZPhCjy52K9x5zRpq6zTUpV5XPeLCBn6Kc8GW1Lk6K1eXsn09 KdIhb9JqTDtQx0eOS1p0fJlTb68Pj406IYJ16FaXmMTcYvep6HhVATQGbPDuIepd BK12nQEDrezkGR5vH9nMraQuZTvADuRFFgQvZQ5QMYAzMa0RhQTHKMOwCMq8mBq7 3Csgrxwa =kXkt -----END PGP PUBLIC KEY BLOCK----- EOF
- Configure the Yum repository address.
- Install NFS.
- Configure the hda.conf configuration file.
- Log in to the microservice node and run the following command:
vi /etc/hilens/hda.conf
- Add the following configurations:
hilens.nfs.server.ip=192.168.0.150hilens.nfs.mount.dir=/home/mind/modelhilens.nfs.source.dir=/var/docker/hilens
In the preceding command, server.ip indicates the internal IP address of the NFS storage node, mount.dir indicates the default mount directory of the large model, and source.dir indicates the download directory of the large model.
- After the configuration is complete, run the following command to restart the firmware:
systemctl restart hdad
- Log in to the microservice node and run the following command:
- Go to the ModelArts console and select the required workspace. Choose Edge Resource Pools > Nodes and click Activate in the Operation column of the current node. Check that the node status changes from Inactive to Active.
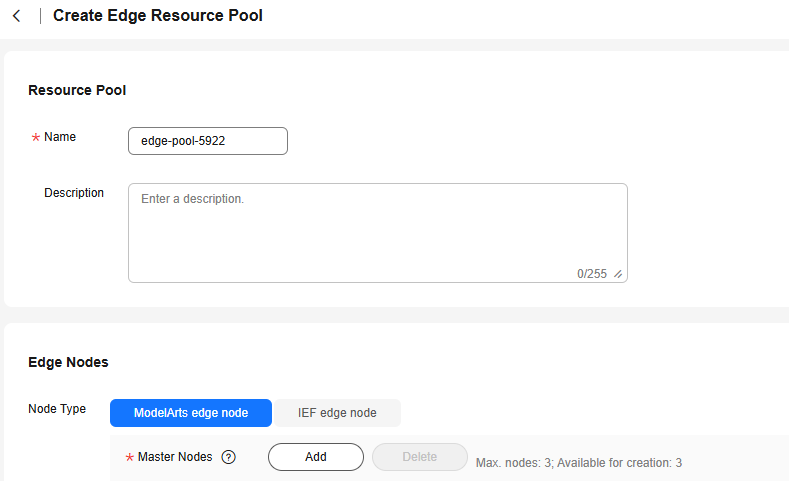
- Choose Edge Resource Pools > Resource Pools and click Create. Enter the resource pool name, select ModelArts Edge Node, click Add next to Master Node, select the master node to be added, and click OK.
Figure 4 Adding a master node
- In the Worker Nodes area, click Add, select the worker node to be added, and click OK.
Figure 5 Adding a Worker node

- Click Create Now. You can view the node status in the resource pool list. If the status is Running, the creation is successful.
- Run the following Kubernetes command on the master node to verify the edge pool creation:
- Run the following command to set up a connection:
ln -s /home/k3s/k3s /usr/bin/kubectl
- Run the following command to query the node status:
kubectl get node -o wide
- If the status of all nodes is Ready, the cluster is created.

- Run the following command to set up a connection:
Step 3: Installing the Ascend Plug-in
For details, visit https://www.hiascend.com/document/detail/en/mindx-dl/300/productdescription/dlug_description_01_000001.html.
Step 4: Creating a Certificate
If no certificate is available on the Edge Resource Pools tab page, as shown in Figure 6, create one by referring to the following steps.
- Prepare a Linux server where OpenSSL has been installed and run the following commands to create a certificate:
When you run the command, the system prompts you to enter a password that contains at least four characters, for example, 123456. Remember the password, which will be used in subsequent steps.
1. Generate the server.key file.openssl genrsa -des3 -out server.key 20482. Generate an unencrypted server.key file.openssl rsa -in server.key -out server.key3. Generate the ca.crt file.openssl req -new -x509 -key server.key -out ca.crt -days 36504. Generate the server.csr file.openssl req -new -key server.key -out server.csr5. Generate the server.crt file.openssl x509 -req -days 3650 -in server.csr -CA ca.crt -CAkey server.key -CAcreateserial -out server.crt
Figure 7 Command execution example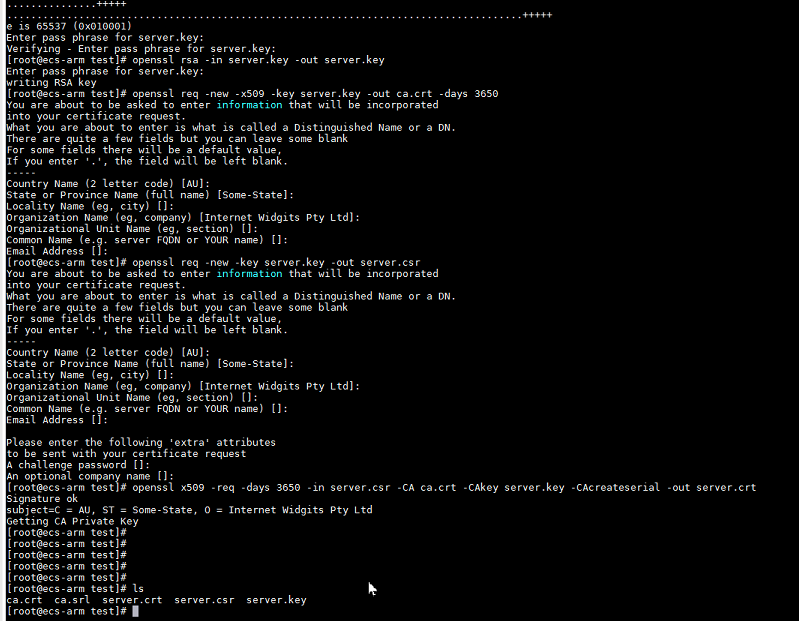
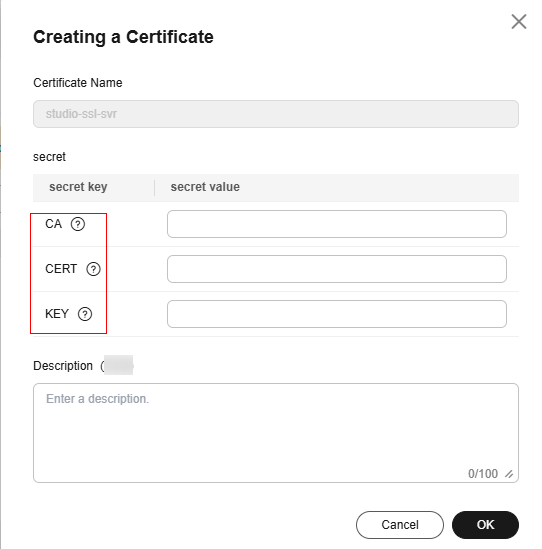
- After the certificate is created, run the ls command to view the generated certificate file. The mapping between certificate files and certificate items on ModelArts Studio is as follows:
ca.crt -- CAserver.crt -- CERTserver.key -- KEY
- On the ModelArts Studio homepage, click Setting in the upper right corner. On the Resource Pool Management > Edge Resource Pools tab page, click Create Certificate and set certificate parameters and description.
Figure 8 Certificate key
- You can run the view command to view the certificate key value, for example, view server.crt. The key value entered on ModelArts Studio must be encrypted using Base64 (echo -n "Copied key value" | base64).
Step 5: Creating a Load Balancer
After an edge resource pool is created, go back to the homepage of ModelArts Studio and click Setting to create a load balancer and a monitoring plug-in for the edge resource pool.
To create a load balancer, perform the following steps:
- Log in to ModelArts Studio and click Setting in the upper right corner.
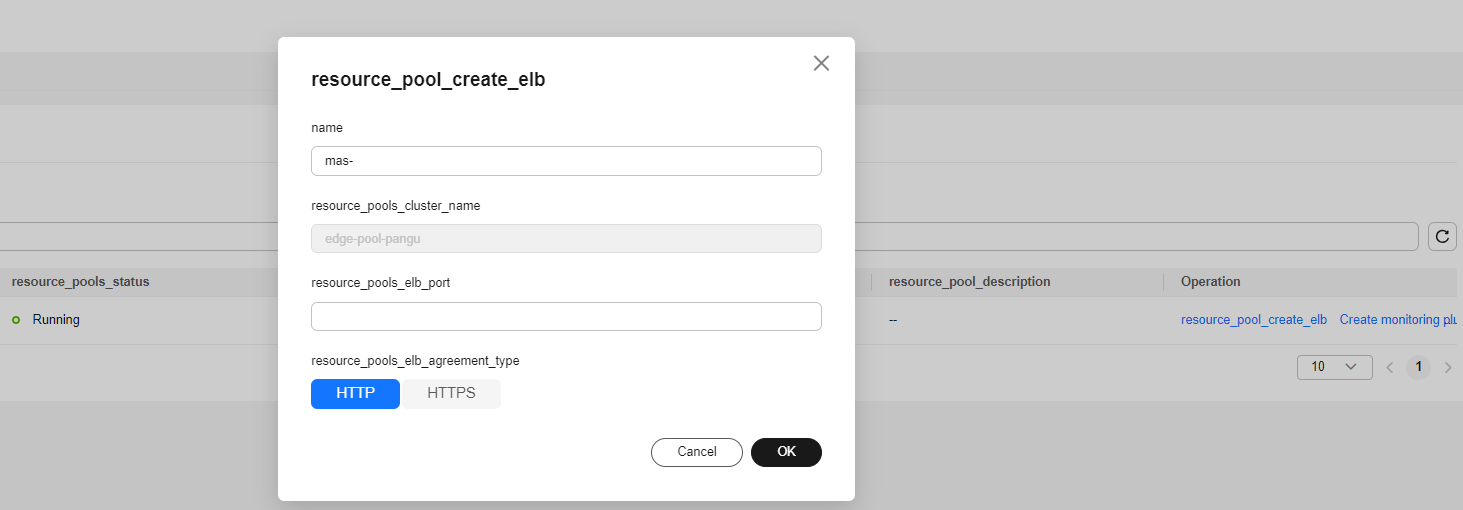
- On the Resource Pool Management tab page, click the Edge Resource Pool tab. View the created edge resource pool, and click resource_pool_create_elb in the Operation column.
- Enter the load balancer name (in the format of mas-xxx), set the listening port (ranging from 30000 to 40000), and set the protocol type (using HTTP or HTTPS requests for calling the inference model). Click OK.
Figure 9 Creating a load balancer
Feedback
Was this page helpful?
Provide feedbackThank you very much for your feedback. We will continue working to improve the documentation.See the reply and handling status in My Cloud VOC.
For any further questions, feel free to contact us through the chatbot.
Chatbot


