Deploying an Application with a Custom Kubernetes Cluster
This section introduces how to deploy an application in a Kubernetes cluster with a manifest file defining Kubernetes objects. In this way, you can deploy applications in self-built or third-party Kubernetes clusters.
Prerequisites
A custom cluster is available.
Procedure
- Obtain the kubeconfig file.
- Your Kubernetes cluster is used as an example.
For details, see Configure Access to Multiple Clusters.
- Example of a CCE cluster.
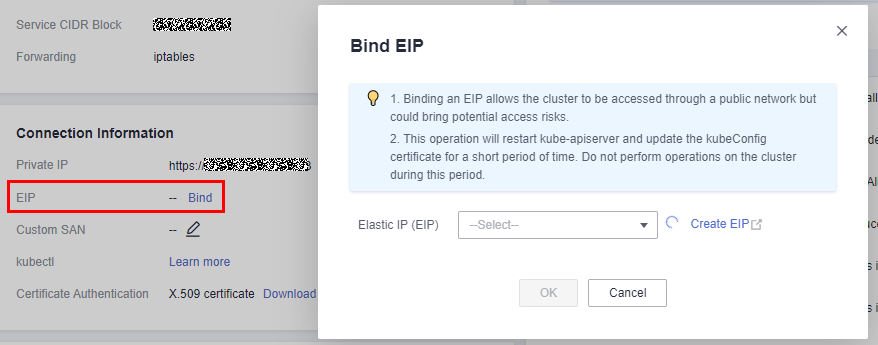
- Go to the console. In the upper left corner of the page, choose Service List > Containers > . Click the target cluster and click Bind next to EIP to bind a public IP address.


The CodeArts Deploy official agent pool and your Kubernetes cluster are not in the same VPC. Therefore, you can access CodeArts Deploy only through an EIP.
- Click Configure next to kubectl in the Connection Information area. On the displayed page, click Download under Download the kubeconfig file to download the configuration file.

After the download is complete, a kubeconfig.json file is available.
- Go to the console. In the upper left corner of the page, choose Service List > Containers > . Click the target cluster and click Bind next to EIP to bind a public IP address.
- Your Kubernetes cluster is used as an example.
- Create a Kubernetes endpoint.
- Go to the CodeArts Deploy homepage.
- Click Create Application, enter basic information, click Next, select Blank Template, and click OK. The Deployment Actions page is displayed.
- Click All, search for Kubernetes Custom Cluster Deployment, and click Add.
- Create an endpoint for accessing your Kubernetes cluster.
Click Create to create a Kubernetes access point.
After entering the information, click Confirm to check whether the endpoint is configured successfully.Table 1 Parameters Parameter
Description
Service Endpoint Name
Name of the service endpoint.
Kubernetes URL
Set this parameter to the public API Server address of the custom cluster.
Kubeconfig
Copy all content in the kubeconfig.json file.
- Configure other required parameters as prompted to complete Kubernetes-based deployment over the public network.
Table 2 Parameters Parameter
Description
Kubernetes Service Endpoint
Select the target Kubernetes access point. You can create and manage Kubernetes access points.
kubectl Command
Select the kubectl command you want to use. For details about such commands, see Command line tool (kubectl).
Use manifest file
If this option is selected, select the target manifest file for deployment. The file name must be suffixed with .yaml, .yml, or .json.
Manifest File Source
Select Artifact or Repo as the file source.
Manifest file or folder
Mandatory. Select a manifest file or folder to be deployed. Files must be suffixed with .yaml, .yml, or .json.
Click
 . On the file selection page that is displayed, select a manifest file to be deployed in Artifact. By default, the project cannot be changed. You can search for the manifest file by keyword or upload the local manifest file to the repository, click
  , refresh the repository file, and select a manifest file. Click
  .
.kubectl Command Parameters
Parameters of the kubectl command to be executed.
If the kubectl Command is set to patch, the -p option and file path will be automatically added in the kubectl Command Parameters. The node, pod, and deployment types can be modified in the patch command.
For example, to change the deployment type, enter deployment deployment-test in Kubectl Command Parameters. deployment is the kind (or resource type), and deployment-test is the kind name (or type name).

Action Control
Continue the task even if this action fails.
Feedback
Was this page helpful?
Provide feedbackThank you very much for your feedback. We will continue working to improve the documentation.See the reply and handling status in My Cloud VOC.
For any further questions, feel free to contact us through the chatbot.
Chatbot


