
Checking/Modifying the DNS and Security Group Configurations
When installing the Cloud Eye Agent, you need to configure Huawei Cloud DNS to resolve the OBS domain name. The Agent also uses Huawei Cloud DNS to resolve the Cloud Eye backend domain name, allowing intranet access for reporting metrics and its status. Before installing the Agent, check your DNS and security group settings to avoid exceptions when downloading the installation package or collecting monitoring data.
Prerequisites
You have obtained the DNS server address of the current region. The address varies with the region. For details, see What Are Huawei Cloud Private DNS Server Addresses?
Constraints
DNS and security group configurations are intended for the primary NIC.
Checking the DNS Configuration (on the Management Console)
- Log in to the ECS console.
- On the ECS console, click the target ECS name to view its details.
- In the ECS information area, click the VPC name.
- Locate the target VPC and click the number of subnets.
- In the subnet list, locate the target subnet and click its name.
- In the Gateway and DNS Information area, check whether the DNS server address is the same as the private DNS server address provided by Huawei Cloud.
- If yes, you do not need to change the DNS server addresses.
Figure 2 Viewing the DNS server address

- If not, change the DNS server address as instructed in Modifying DNS Configurations (Linux) or Modifying DNS Configurations (Windows).
- If yes, you do not need to change the DNS server addresses.

Modifying DNS Configurations (Linux)
You can add DNS server addresses for an ECS by running commands or through the management console.
The following describes how to add DNS server addresses to the resolv.conf file in CN North-Beijing1.
- Log in to an ECS as user root.
- Open the resolv.conf file.
vi /etc/resolv.conf
- Add the DNS server addresses to the file, press Esc to exit the edit mode, enter :wq, and press Enter to save the settings and exit.
nameserver 100.125.1.250
nameserver 100.125.21.250
Figure 3 Adding DNS server addresses (Linux)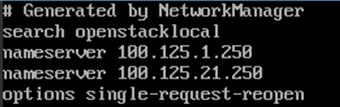
The following describes how to change the DNS server addresses of an ECS on the management console in CN North-Beijing1. The operations for BMSs are similar.
- Log in to the ECS console.
- On the ECS console, click the target ECS name to view its details.
- In the ECS Information area of the Summary tab, click the VPC name. See Figure 4.
- Locate the target VPC and click the number of subnets.
- In the subnet list, locate the target subnet and click its name.
- In the Gateway and DNS Information area, click
 after the DNS Server Address.
 - Enter the DNS server addresses. Use commas (,) to separate multiple IP addresses.

The nameserver value varies depending on the region. For details, see What Are Huawei Cloud Private DNS Server Addresses?
Figure 5 Changing DNS server addresses
- Click OK.
- Restart the ECS or BMS. For details, see Restarting an ECS or Restarting a BMS.

Modifying DNS Configurations (Windows)
You can modify DNS configurations of an ECS on the Windows GUI or management console.
The following describes how to configure domain name resolution on the GUI of Windows Server 2012 in CN North-Beijing1.
- Log in to the ECS console.
- Use VNC to log in to a Windows ECS.
- Choose Control Panel > Network and Sharing Center, and click Change adapter settings.
- Right-click the network in use and select Properties.
- Double-click Internet Protocol Version 4 (TCP/IPv4).
- In the displayed dialog box, select Use the following DNS server addresses: and configure the addresses.
Figure 6 Adding DNS server addresses (Windows)

- Click OK.
The following describes how to change the DNS server addresses of an ECS on the management console in CN North-Beijing1. The operations for BMSs are similar.
- Log in to the ECS console.
- On the ECS console, click the target ECS name to view its details.
- In the ECS Information area of the Summary tab, click the VPC name. See Figure 4.
The Virtual Private Cloud page is displayed.Figure 7 Virtual Private Cloud

- Locate the target VPC and click the number of subnets.
- In the subnet list, locate the target subnet and click its name.
- In the Gateway and DNS Information area, click
 after the DNS Server Address.
 - Enter the DNS server addresses. Use commas (,) to separate multiple IP addresses.
The nameserver value varies depending on the region. For details, see What Are Huawei Cloud Private DNS Server Addresses?
Figure 8 Changing DNS server addresses
- Click OK.
- Restart the ECS or BMS. For details, see Restarting an ECS or Restarting a BMS.
Checking and Adding Security Group Rules (on the Management Console)
- Log in to the ECS console.
- On the ECS console, click the target ECS name to view its details.
- On the ECS details page, click the Security Groups tab.
The security group list is displayed.
- In the Security Group Rules area, click Outbound Rules.
- Check whether the outbound rules contain the security group rules listed in Table 1.
- If yes, no more security group rules need to be added. Then you can install the Agent by referring to Installing the Agent.
If Protocol & Port of an outbound rule is set to All, all traffic is allowed to pass through. You do not need to add new security group rules.
- If not, go to the next step to add security group rules.
- If yes, no more security group rules need to be added. Then you can install the Agent by referring to Installing the Agent.
- Click the security group name to go to its details page.
Procedure for BMSs:
- Click the security group ID in the upper left corner of the list.
- Locate the security group and click Manage Rule in the Operation column.
- Click the Outbound Rules tab and click Add Rule.
- Add rules based on Table 1.
Table 1 Security group rules Priority
Action
Type
Protocol & Port
Destination
Description
1
Allow
IPv4
TCP
80
100.125.0.0/16
Used to download the Agent installation package from an OBS bucket to an ECS or BMS and obtain the ECS or BMS metadata and authentication information.
1
Allow
IPv4
TCP
53
100.125.0.0/16
Used by DNS to resolve domain names, for example, the OBS domain name for downloading the Agent installation package, and the Cloud Eye endpoint for sending monitoring data to Cloud Eye.
1
Allow
IPv4
UDP
53
100.125.0.0/16
Used by DNS to resolve domain names, for example, the OBS domain name for downloading the Agent installation package, and the Cloud Eye endpoint for sending monitoring data to Cloud Eye.
1
Allow
IPv4
TCP
443
100.125.0.0/16
Used to collect monitoring data to Cloud Eye.
Configuring host resolution in the private DNS scenario
If an instance uses an on-premises DNS, the Cloud Eye Agent installation package cannot be downloaded, and the metrics and plug-in status cannot be reported because the OBS and Cloud Eye backend domain names cannot be resolved. In this case, you need to configure host resolution for the OBS and Cloud Eye backend domain names.
This section uses an ECS as an example to describe how to configure host resolution in the private DNS scenario. The procedure for a BMS is similar.
- Check the OBS and Cloud Eye backend domain names in the current region.
- Log in to the Cloud Eye console.
- In the navigation pane, choose Server Monitoring > Elastic Cloud Server.
- Click Usage Guide in the upper right corner of the Server Monitoring page. On the displayed page, click manually install the Agent.
Figure 9 Agent installation guide

- Obtain the Agent installation command in Procedure.
The installation address of CN North-Beijing4 is used as an example. In the installation command, uniagent-cn-north-4.obs.cn-north-4.myhuaweicloud.com is the OBS domain name. Check whether the -d parameter is found in the installation command. If yes, the domain name following -d is the Cloud Eye backend domain name of the current region. If no, the default value agent.ces.myhuaweicloud.com is used.
cd /usr/local && curl -k -O https://uniagent-cn-north-4.obs.cn-north-4.myhuaweicloud.com/package/agent_install.sh && bash agent_install.sh -r cn-north-4 -u 0.2.1 -t 2.7.5 -o myhuaweicloud.com
- Check the resolution addresses of the OBS and Cloud Eye backend domain names.
- Log in to the ECS and run the ping command to obtain the OBS and CES backend domain names. For CN North-Beijing4:
Resolution address of the OBS domain name
ping uniagent-cn-north-4.obs.cn-north-4.myhuaweicloud.com
Resolution address of the Cloud Eye backend domain name
ping agent.ces.myhuaweicloud.com
If there is no response after you run the ping command, the current host may fail to resolve the IP address. In this case, purchase an ECS with any Huawei Cloud official image and perform DNS resolution.
Figure 10 Running the ping command
- Log in to the ECS and run the ping command to obtain the OBS and CES backend domain names. For CN North-Beijing4:
- Modify the hosts file to configure host resolution for the OBS and Cloud Eye backend domain names.
Configuring host resolution for Linux ECSs
- Log in to the ECS for installing the Agent as user root.
- Open and edit the hosts file.
vi /etc/hosts
- Add the IP address and domain name obtained in step 2 to the file. The following uses CN North-Beijing4 as an example.
100.125.81.190 uniagent-cn-north-4.obs.cn-north-4.myhuaweicloud.com
100.125.21.250 agent.ces.myhuaweicloud.com
- Enter :wq and press Enter to save the settings and exit.
Figure 11 Configuring host resolution for Linux ECSs

Configuring host resolution for Windows ECSs
- Go to the C:\Windows\System32\drivers\etc directory.
- Edit the hosts file, add the IP address and domain name obtained in step 2 to the file. The following uses CN North-Beijing4 as an example.
100.125.81.190 uniagent-cn-north-4.obs.cn-north-4.myhuaweicloud.com
100.125.21.250 agent.ces.myhuaweicloud.com
Feedback
Was this page helpful?
Provide feedbackThank you very much for your feedback. We will continue working to improve the documentation.See the reply and handling status in My Cloud VOC.
For any further questions, feel free to contact us through the chatbot.
Chatbot


