Starting BPMs
Starting a BPM involves initiating a BPM instance. Activating a BPM, on the other hand, is the process of transitioning the BPM from an inactive state to an active one, making it ready for use. This section describes three methods of starting a BPM.
Activating a BPM on the Design Page
You do not need to compile any code. You only need to click the run button on the BPM design page.
- Log in to the application designer by referring to Logging In to the Application Designer.
- In the navigation pane, choose BPMs.
- Move the cursor to
 of the corresponding BPM, and choose Edit.
 - On the BPM design page, click
 in the upper part of the page to run the BPM.
On the BPM design page, you can start a BPM in either of the following ways:
in the upper part of the page to run the BPM.
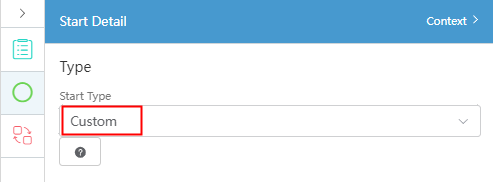
On the BPM design page, you can start a BPM in either of the following ways:- Custom: Set the start type of the Start diagram element to Custom. The event cause is not specified, that is, the trigger condition does not need to be specified.
Figure 1 Custom

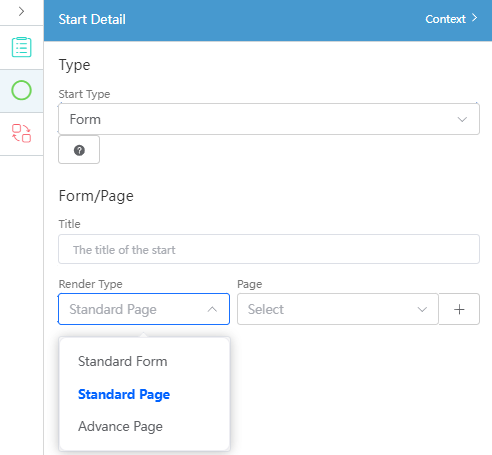
- Form: A BPM is started using forms or pages. If this option is selected, you need to configure a specific form, standard page, or advanced page.
Figure 2 Form

- Custom: Set the start type of the Start diagram element to Custom. The event cause is not specified, that is, the trigger condition does not need to be specified.
Starting a BPM Using an API
Start a BPM by calling its RESTful API, http://Default domain name provided by Huawei Cloud Astro Zero/u-route/baas/bp/v2.0.
API URI: POST Huawei Cloud Astro Zero domain name/u-route/baas/bp/v2.0/runtime/instances
|
Parameter |
Mandatory or Not |
Data Type |
Description |
|---|---|---|---|
|
name |
Yes |
String |
BPM name, which is configured when the BPM is created. |
|
version |
No |
String |
BPM version. A BPM can have multiple versions. If this parameter is not specified, the current version is used. |
|
variables |
No |
Object |
Variables defined in BPM metadata, including custom variables and system variables. The variable is in key-value format, in which key indicates the variable name and value indicates the variable value. To set BPM variables before starting a BPM instance, you can specify this parameter. To set variables during startup, you can set the system variable $Flow.BusinessKey in variables. To set BP title, you can set the system variable $Flow.Title. |
|
Parameter |
Type |
Description |
|---|---|---|
|
resCode |
String |
Return code. If the request is successful, 0 is returned. |
|
resMsg |
String |
Message returned. If the request is successful, Success is returned. In other cases, an error message is returned. |
|
result |
Object |
If the request is successful, the running information about the BPM instance after being started will be returned. |
For example, you can create and start a BPM instance whose name is createCloudOK_NEW, version is 1.0.1, and four input parameters are contained.
- Example request
POST Huawei Cloud Astro Zero domain name/u-route/baas/bp/v2.0/runtime/instances { "name":"createCloudOK_NEW", "version":"1.0.1", "variables":{ "name":"sun", "memorySize":"15", "storageSize":"15", "expiryDate":"2018-12-12" } } - Example response
{
    "resCode":"0",
    "resMsg":"Success",
    "result":{
        "name":"bpName1",
        "version":"1.0.1",
        "id":"002N000000Sy2NphoRbU",
        "processDefID":"001L000000S8Yi3xG9Gi",
        "interviewLabel":"BP Label 1",
        "nextElem":"subProcess",
        "isTest":true,
        "state":"Dispatched",
        "bpStatus":"New",
        "urgency":0,
        "taskOutcome":"",
        "businessKey":"002N000000Sy2NphoRbU",
        "startTime":"2019-08-27 10:53:04",
        "endTime":"",
        "Ext1":"",
        "Ext2":"",
        "Ext3":"",
        "Ext4":"",
        "Ext5":"",
        "Ext6":"",
        "Ext7":0,
        "Ext8":0,
        "suspended":false,
        "isClosed":false
    }
}
Starting a BPM in a Script
In the script code, import the script library of a BPM to start the BPM.
- Create an empty script by referring to Creating a Blank Script.
- In the script code, import the script library of a BPM to start the BPM.
import * as bp from "bp";
//...... (other code)
const client = bp.newInstanceClient();
client.start (BPM name, BPM version, variables defined in the BPM);
The following is an example script:
import * as bp from 'bp'; let client = bp.newInstanceClient(); let res = client.start("test", "1.0.1", { "foo": 1, "bar": 3}); - Click
 in the upper part of the page to save the script.
 - Click
 in the upper part of the page to run the script.
 - Click
 at the upper right corner of the test window at the bottom of the page to view the output parameters.
Example output:
{
    "interviewId": "002N000000FdtN6xwgjI",
    "screen": {
        "allowBack": false,
        "allowFinish": true,
        "allowNext": true,
        "allowPause": false,
        "helpText": "",
        "label": "input phone number",
        "name": "inputphonenumber",
        "pausedText": "",
        "screenFields": [
            {
                "dataType": "text",
                "defaultValue": "135xxxxxxxx",
                "fieldType": "InputField",
                "helpText": "",
                "isRequired": false,
                "label": "phone number",
                "name": "phoneNumber"
            }
        ]
    }
Feedback
Was this page helpful?
Provide feedbackThank you very much for your feedback. We will continue working to improve the documentation.See the reply and handling status in My Cloud VOC.
For any further questions, feel free to contact us through the chatbot.
Chatbot


