
Adding a Name Prefix or Path Prefix to Migrated Objects
Overview
The Specify Prefix parameter enables you to:
- Add a name prefix to objects migrated to the destination bucket.
For example, if you set Specify Prefix to Yes and specify the prefix Test-Prefix when you create a migration task or task group, source objects oms_a.txt and oms_b.txt will be renamed Test-Prefixoms_a.txt and Test-Prefixoms_b.txt after they are migrated to the destination bucket.
- Add a path prefix to objects migrated to the destination bucket.
For example, if you set Specify Prefix to Yes and specify the path prefix Test-Prefix/ when you create a migration task or task group, OMS will create a Test-Prefix/ directory in the root directory of the destination bucket, and migrate source objects, such as oms_a.txt and oms_b.txt to it. The paths to oms_a.txt and oms_b.txt will be Destination bucket name/Test-Prefix/oms_a.txt and Destination bucket name/Test-Prefix/oms_b.txt.
Scenarios
This section uses the File/Folder migration method as an example to describe how to configure Specify Prefix during the creation of a migration task or task group.
You can use Specify Prefix to:
Add a Name Prefix to Migrated Files
- Sign in to the OMS console.
- Click
 in the upper left corner and select the desired region.
 - On the Migration Tasks page, click Create Migration Task in the upper right corner.
Figure 1 Creating a migration task

- Read the service disclaimer, select I have read and agree to the service disclaimer, and click OK. On the Create Migration Task page, choose whether to enable Pre-Migration Evaluation.
- If you disable it, pre-migration evaluation will not be performed.
- If you enable it, specify the number of files to be migrated, the amount of data to be migrated, and the desired migration duration. Then click Start Evaluation. After the evaluation is complete, the pre-migration evaluation result is displayed under Start Evaluation.
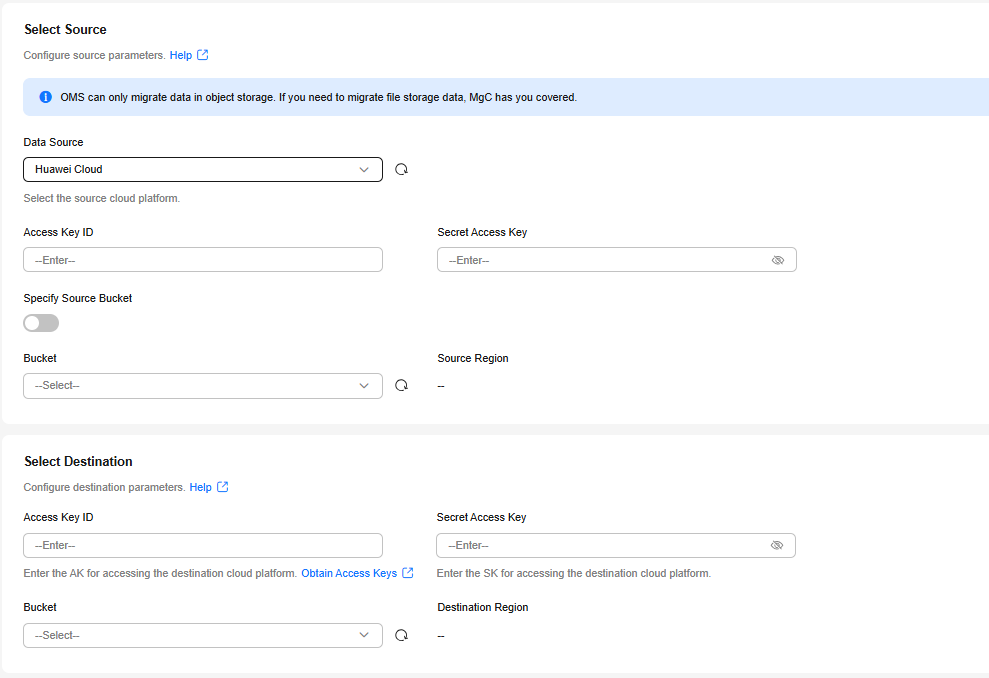
- On the Source/Destination page, select the source and destination, as shown in Figure 2.
- Set parameters in the Select Source area. For details, see Table 1.
Table 1 Parameters for configuring a source bucket Parameter
Configuration
Data Source
Select Huawei Cloud.
Access Key ID
Enter the AK for the Huawei Cloud account to which the source bucket belongs.
Secret Access Key
Enter the SK for the Huawei Cloud account to which the source bucket belongs.
Specify Source Bucket
Disable Specify Source Bucket. This feature is disabled by default.
Click the Bucket drop-down list or the "Refresh" icon and select the bucket where data needs to be migrated.
OMS will check whether the source platform can be connected using the information you provided. Once the source platform is connected, as long as your account has the necessary permissions to list buckets, all buckets in your account will appear in the Bucket drop-down list.
NOTE:If the source account does not have the permissions required to list buckets, enable Specify Source Bucket.
If you enable Specify Source Bucket, you need to:
- Select the region where the source bucket resides from the Region drop-down list.
- In the Bucket text box, enter the bucket or the path to be migrated. The path must have the bucket name included.
- Click Connect.
- Set parameters in the Select Destination area and click Next. For details, see Table 2.
Table 2 Parameters for configuring a destination bucket Parameter
Configuration
Access Key ID
Enter the AK for the Huawei Cloud account to which the destination bucket belongs.
Secret Access Key
Enter the SK for the Huawei Cloud account to which the destination bucket belongs.
Bucket
Click the Bucket drop-down list or the "Refresh" icon and select the Huawei Cloud OBS bucket for storing the migrated data. The bucket must be located in the region where you are using OMS.
- Click Next in the lower right corner to open the Set Task Parameters page, as shown in Figure 3.
- In the Source Configuration area, set Migration Method to File/Folder.
Figure 4 Selecting a migration method

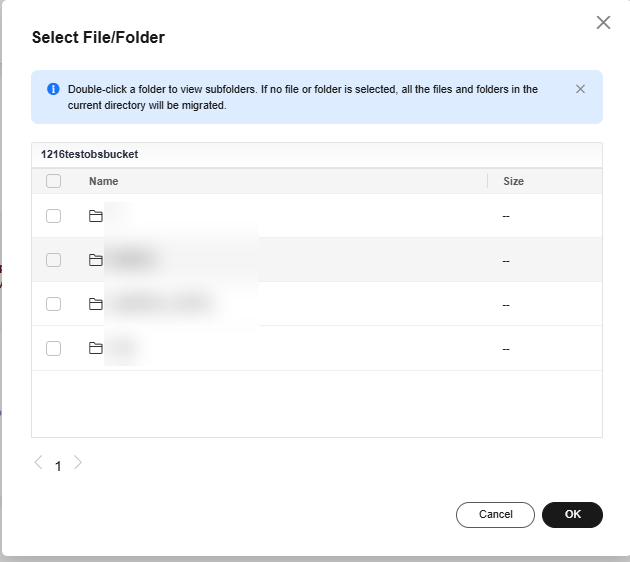
- Click Select. In the Select File/Folder dialog box shown in Figure 5, select one or more files to be migrated and click OK.
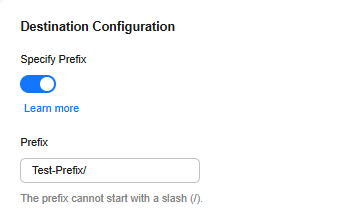
- In the Destination Configuration area, enable Specify Prefix and enter a prefix, for example, Test-Prefix.
Figure 6 Specifying a prefix

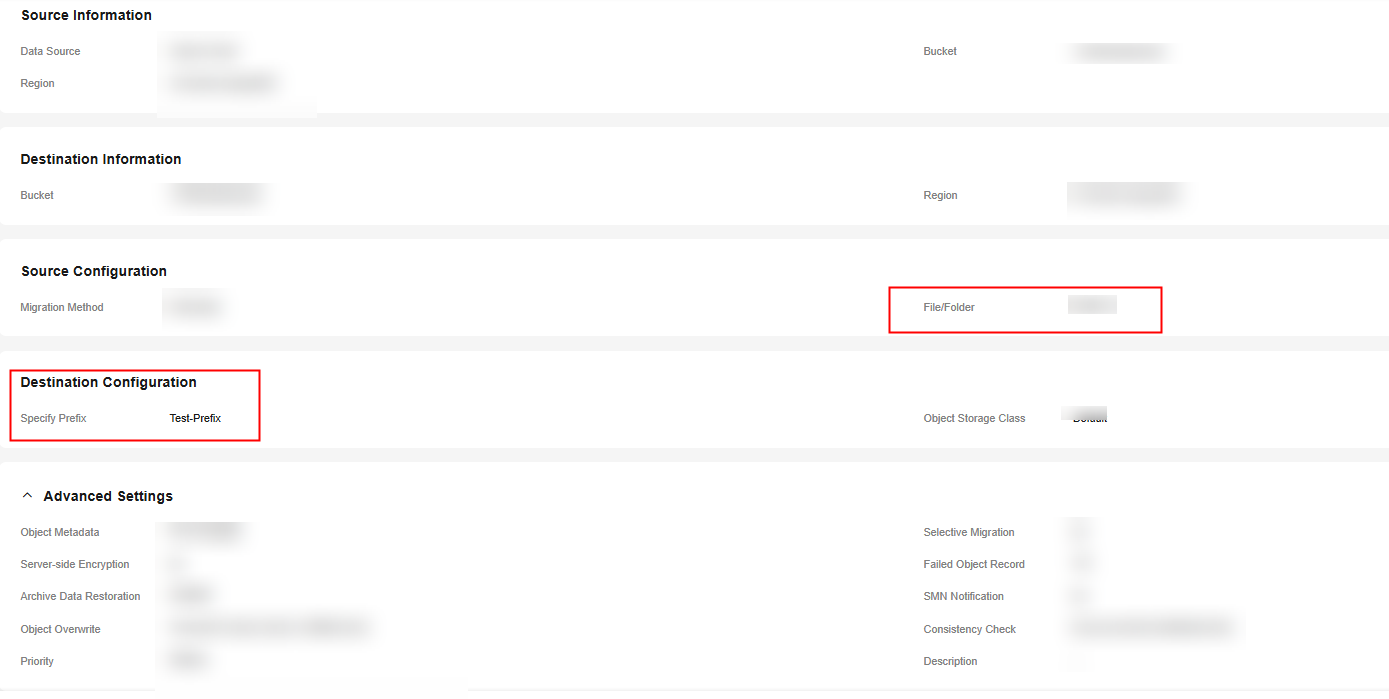
- Click Next to open the confirmation page.
Figure 7 Confirmation

- Confirm the configuration and click Migrate Now.
- After the migration is complete, view the migrated files in the destination bucket. You will see the prefix Test-Prefix has been added to the names of these files.
Figure 8 Verification


Add a Path Prefix to Migrated Files
- In the Source Configuration area, set Migration Method to File/Folder.
Figure 9 Selecting a migration method
- Click Select. In the Select File/Folder dialog box shown in Figure 10, select one or more files to be migrated and click OK.
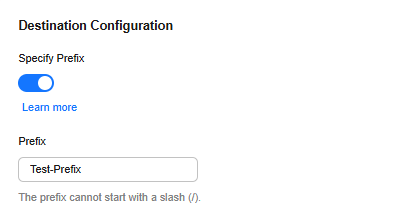
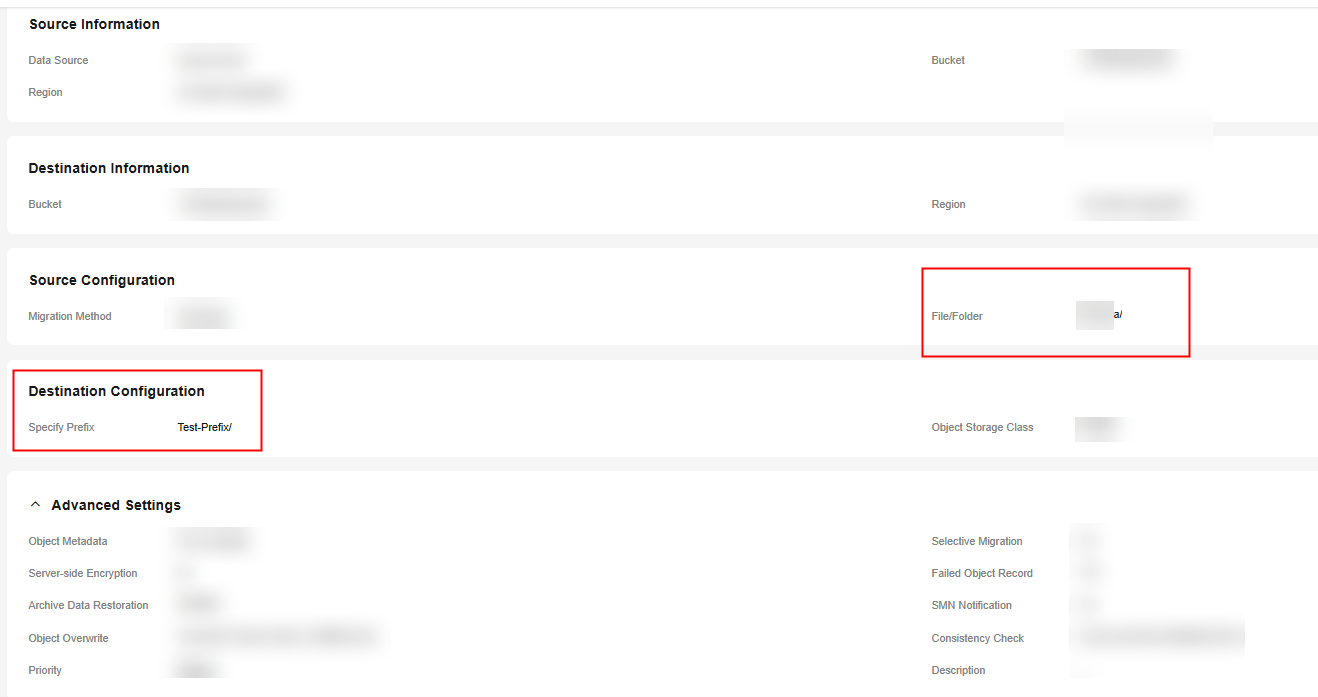
- In the Destination Configuration area, select Yes for Specify Prefix and enter a path prefix, for example, Test-Prefix/.
Figure 11 Specifying a path prefix
- Click Next to open the confirmation page.
Figure 12 Confirmation
- Confirm the configuration and click Migrate Now.
- After the migration is complete, view the migrated files in the destination bucket. You will see that these files are all stored in the Test-Prefix/ directory of the destination bucket.
Figure 13 Verification

Add a Name Prefix to Migrated Folders
- In the Source Configuration area, set Migration Method to File/Folder.
Figure 14 Selecting a migration method
- Click Select. In the Select File/Folder dialog box shown in Figure 15, select one or more folders to be migrated and click OK.
- In the Destination Configuration area, select Yes for Specify Prefix and enter a prefix, for example, Test-Prefix.
Figure 16 Specifying a prefix
- Click Next to open the confirmation page.
Figure 17 Confirmation
- Confirm the configuration and click Migrate Now.
- After the migration is complete, view the migrated folders in the destination bucket. You will see the prefix Test-Prefix has been added to the names of these folders.
Figure 18 Verification

Add a Path Prefix to Migrated Folders
- In the Source Configuration area, set Migration Method to File/Folder.
Figure 19 Selecting a migration method
- Click Select. In the Select File/Folder dialog box shown in Figure 20, select one or more folders to be migrated and click OK.
- In the Destination Configuration area, select Yes for Specify Prefix and enter a path prefix, for example, Test-Prefix/.
Figure 21 Specifying a path prefix

- Click Next to open the confirmation page.
Figure 22 Confirmation

- Confirm the configuration and click Migrate Now.
- After the migration is complete, view the migrated folders in the destination bucket. You will see that these folders are all moved to the Test-Prefix/ directory of the destination bucket.
Figure 23 Verification


Add a Path Prefix to the Whole Bucket
- In the Source Configuration area, set Migration Method to File/Folder.
Figure 24 Selecting a migration method
- In the Destination Configuration area, select Yes for Specify Prefix and enter a path prefix, for example, Test-Prefix/.
Figure 25 Specifying a path prefix

- Click Next to open the confirmation page.
Figure 26 Confirmation
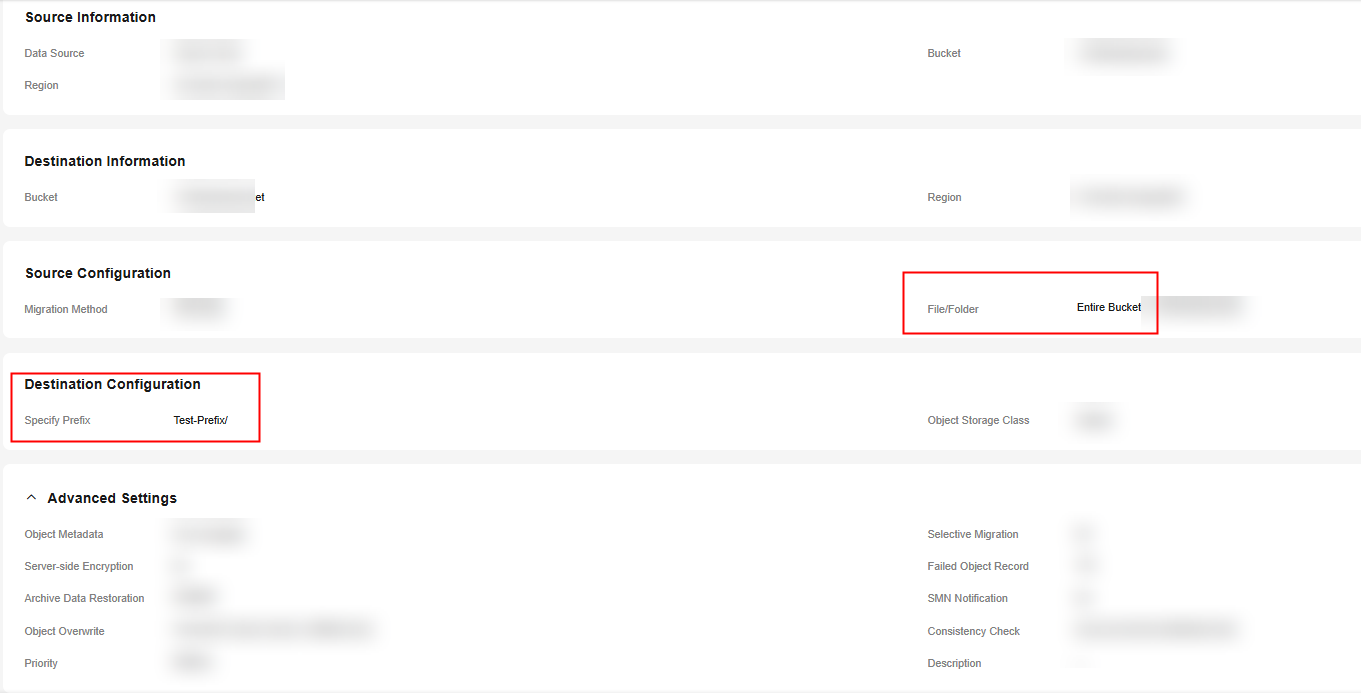
- Confirm the configuration and click Migrate Now.
- After the migration is complete, view the directory where the entire bucket is stored. You will see all objects in the source bucket are moved to the Test-Prefix/ directory of the destination bucket.
Figure 27 Verification

Feedback
Was this page helpful?
Provide feedbackThank you very much for your feedback. We will continue working to improve the documentation.See the reply and handling status in My Cloud VOC.
For any further questions, feel free to contact us through the chatbot.
Chatbot


