Restoring an Instance from a Backup
Scenarios
If a manual backup was created before an instance was deleted, you can restore the instance on the Backups page.
Procedure
|
Step |
Description |
|---|---|
|
Use Data Admin Service (DAS) to create a database and table and insert data into the table. |
|
|
Delete the instance. |
|
|
Restore your instance data from a backup. |
|
|
Log in to the DAS console and check whether the data was restored. |
Step 1: Prepare Data
- Log in to the management console.
- Click
 in the upper left corner and select a region and project.
 - Click
 in the upper left corner of the page and choose .
 - On the Instances page, locate the instance and, in the Operation column, click Log In to access the DAS console.
Alternatively, click the instance name on the Instances page. On the displayed Basic Information page, click Log In in the upper right corner.
- Enter the database username and password and click Test Connection. After the connection test is successful, click Log In.
- On the menu bar on top, choose SQL Operations > SQL Query.
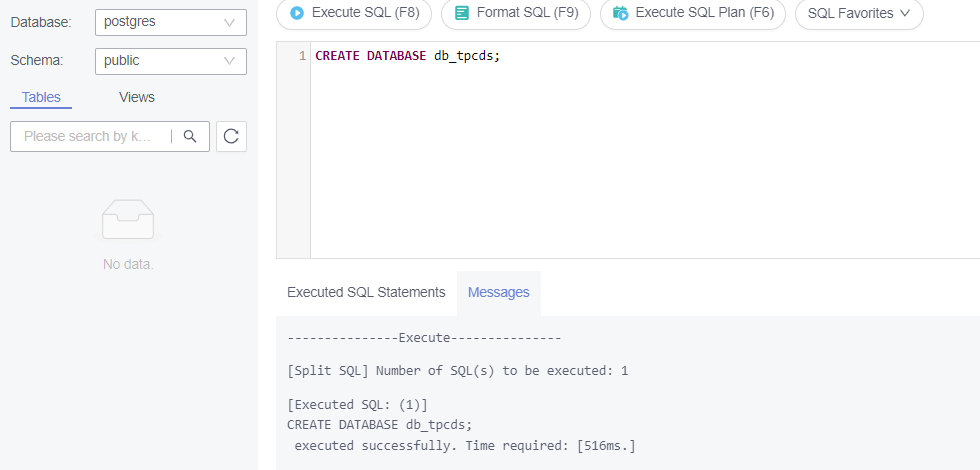
- In the SQL execution window, run the following statement to create a database:
CREATE DATABASE db_tpcds;
If information shown in the following figure is displayed, the creation was successful.
Figure 1 Creating a database
Switch to the newly created database db_tpcds in the upper left corner.
- Use SQL statements to create a table and insert data.
- Create a schema.
CREATE SCHEMA myschema;
Switch to the newly created schema in the upper left corner.
- Create a table named mytable that has only one column. The column name is firstcol and the column type is integer.
CREATE TABLE myschema.mytable (firstcol int);
- Insert data into the table.
INSERT INTO myschema.mytable values (100);
- Create a schema.
- Query table data.
SELECT * FROM myschema.mytable;
Step 2: Delete the Instance
- Log in to the management console.
- Click
 in the upper left corner and select a region and project.
 - Click
 in the upper left corner of the page and choose .
 - On the Instances page, locate the instance you want to delete, click More in the Operation column, and choose Delete.
- In the Delete DB Instance dialog box, enter DELETE, select the confirmation check box in the Confirm field, and click OK. Refresh the Instances page later to confirm that the deletion was successful.
Step 3: Restore an Instance Using a Backup File
- Log in to the management console.
- Click
 in the upper left corner and select a region and project.
 - Click
 in the upper left corner of the page and choose .
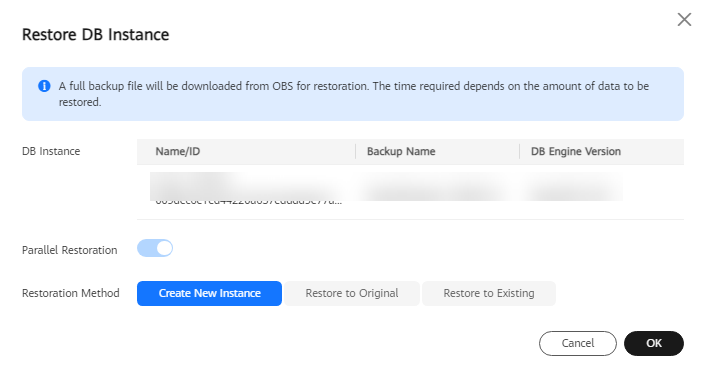
 - In the navigation pane, choose Backups. On the Backups page, locate the backup to be restored and click Restore in the Operation column.
- Set Restoration Method to Create New Instance and click OK.
Figure 2 Restoring data from a backup

- On the Create New Instance page, select the billing mode, enter the instance name, and specify other parameters such as the AZs and time zone.
Figure 3 Basic Settings and Instance Configuration

Table 1 Parameter description Parameter
Example Value
Description
Billing Mode
Pay-per-use
GaussDB provides yearly/monthly billing and pay-per-use billing.
- Yearly/Monthly: You pay upfront for the amount of time you expect to use the DB instance for. You will need to make sure you have a top-up account with a sufficient balance or have a valid payment method configured first.
For distributed instances using the combined deployment model, yearly/monthly billing is only available to authorized users. To apply for the permissions needed, submit a service ticket.
- Pay-per-use: You can start using the DB instance first and then pay as you go. Pricing is listed on a per-hour basis, but bills are calculated based on the actual usage duration.
DB Instance Name
gauss-7e3d
The instance name is case-sensitive, must start with a letter, and can contain 4 to 64 characters. Only letters, digits, hyphens (-), and underscores (_) are allowed.
Edition Type
Enterprise edition
GaussDB provides Basic edition and Enterprise edition.
The basic edition lacks certain advanced features that are available in the enterprise edition. The basic edition delivers the same level of performance as the enterprise edition at a more affordable price. This edition is ideal for users who prioritize cost and do not need advanced features.
For more details about the differences between the two editions, see Differences Between the Basic and Enterprise Editions of GaussDB Instances.
Failover Priority
Reliability
This parameter is only available for distributed instances using independent deployment.
Additionally, this parameter is only available for authorized users. To apply for the permissions needed, submit a service ticket.
- Reliability: Data consistency is prioritized during a failover. This is recommended for applications whose highest priority is data consistency.
- Availability: Database availability is prioritized during a failover. This is recommended for applications that require their databases to provide uninterrupted online services.
AZ
AZ1
An AZ is a physical region where resources have independent power supply and networks. AZs are physically isolated but interconnected through an internal network.
- Yearly/Monthly: You pay upfront for the amount of time you expect to use the DB instance for. You will need to make sure you have a top-up account with a sufficient balance or have a valid payment method configured first.
- Configure instance specifications.
Figure 4 Resource Configuration

Table 2 Parameter description Parameter
Example Value
Description
Instance Specifications
Dedicated(1:8); 8 vCPUs | 64 GB
The vCPUs and memory of an instance.
Storage Space
40 GB
The storage space contains the file system overhead required for inodes, reserved blocks, and database operations.
Disk Encryption
Disable
Enabling disk encryption improves data security, but slightly affects the read and write performance of the database.
If a shared KMS key is used, the corresponding CTS event is createGrant. Only the key owner can receive this event.
Transparent Data Encryption
Disable
- Disable: Encryption is disabled.
- Enable: Encryption is enabled, which improves data security but affects system performance.
If you select Enable, the Key Name parameter is displayed. You can select an existing key or create a new one as the tenant key.
- Retain the default settings for the network configuration.
Figure 5 Network configuration

- Configure the administrator password and enterprise project.
Figure 6 Database configuration

Table 3 Parameter description Parameter
Example Value
Description
Administrator Password
-
Enter a strong password and periodically change it to improve security, preventing security risks such as brute force cracking.
Confirm Password
-
Enter the administrator password again.
Enterprise Project
default
If the instance has been associated with an enterprise project, select the target project from the Enterprise Project drop-down list.
You can also go to the Enterprise Project Management console to create a project. For details, see Enterprise Management User Guide.
- Click Next.
- Confirm the information and click Submit.
- After the task is submitted, check the instance status on the Instances page. The restoration is complete when the status shows Available.
Step 4: Check the Results
- Log in to the management console.
- Click
 in the upper left corner and select a region and project.
 - Click
 in the upper left corner of the page and choose .
 - On the Instances page, locate the instance and, in the Operation column, click Log In to access the DAS console.
- Enter the database username and password and click Test Connection. After the connection test is successful, click Log In.
- Check the database name and table data to verify that the restoration is complete.
Feedback
Was this page helpful?
Provide feedbackThank you very much for your feedback. We will continue working to improve the documentation.See the reply and handling status in My Cloud VOC.
For any further questions, feel free to contact us through the chatbot.
Chatbot


