Implementing Public Network and Cross-VPC Access for CAE Applications Through a NAT Gateway
Context
Applications deployed on CAE usually run in VPCs. VPCs are logically isolated network space. Internal resources of VPCs use private IP addresses and cannot directly communicate with the public network or other VPCs by default. With diversified service requirements, CAE applications need to obtain public network resources or interact with services in other VPCs.
Solution
You can configure a NAT gateway to establish public network and cross-VPC access streams for CAE applications. With the address translation function of the NAT gateway, multiple CAE applications can share an EIP to access the Internet. You can configure routes and destination network addresses to enable data transmission between different VPCs.
This section describes how to use a NAT gateway to implement public network and cross-VPC access for CAE applications.
- Step 1: Create a Public NAT Gateway
VPCs are logically isolated network space. Internal resources of VPCs use private IP addresses and cannot directly communicate with the public network. Applications deployed on CAE cannot access public network resources using private IP addresses.
Create a public NAT gateway to translate private IP addresses in a VPC into a public IP address so that servers in the VPC can share an EIP to access the Internet.
- Step 2: Add an SNAT Rule
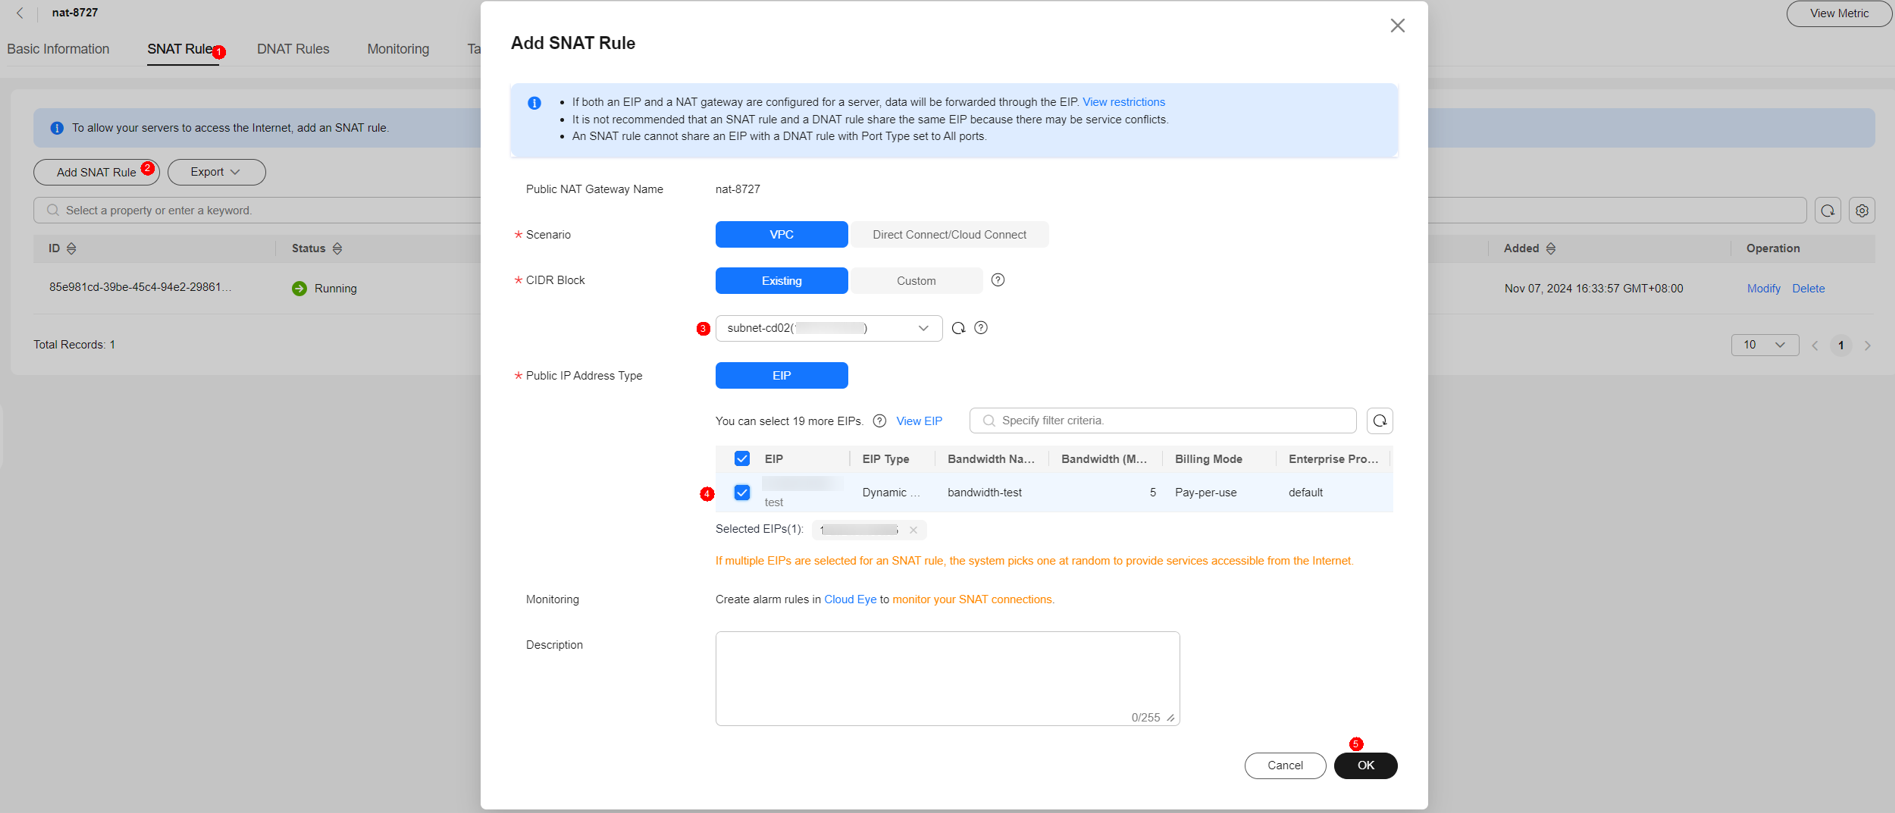
Add a SNAT rule to translate private IP addresses into public IP addresses.
- Step 3: Add a Route to the VPC
You can add routes to a VPC to plan transmission paths for network traffic in the VPC. When a CAE application needs to access public network resources, the next hop of the route is specified as the NAT gateway. In this way, data packets can be transmitted to the NAT gateway based on the routing rule. After the NAT gateway translates the address, the CAE application can access the public network. In the cross-VPC access scenario, proper route configurations can enable network streams between different VPCs to ensure that data packets can be successfully transmitted from the source VPC to the destination VPC.
- Step 4: Add a Destination Network Address
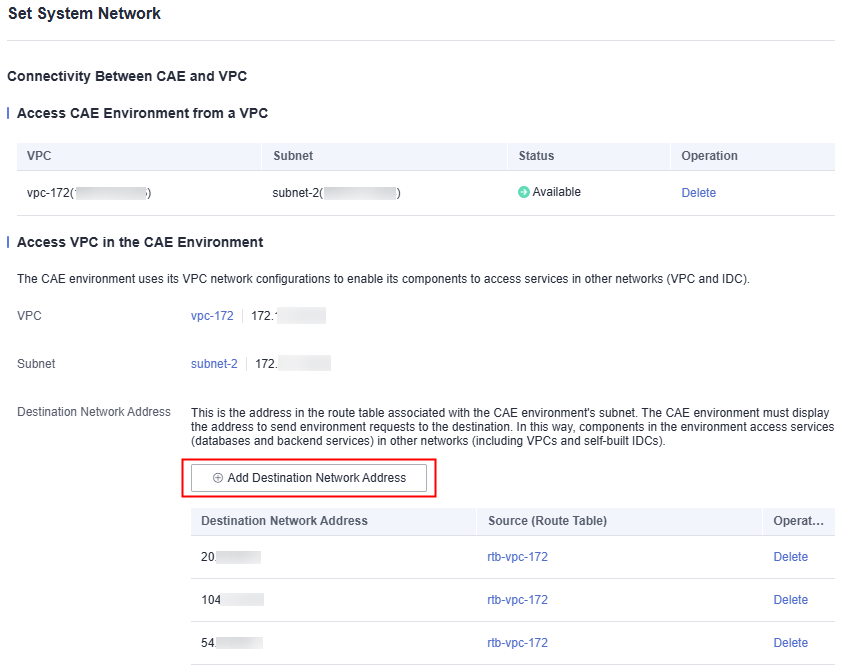
A VPC requires a network address with a clear access destination (such as a public IP address segment or a CIDR block of another VPC). Otherwise, traffic cannot be forwarded to the destination. You can specify a destination address and the next hop in the routing rule to form a complete path guide. This ensures that the traffic generated by the CAE application can be accurately forwarded to the public network or the destination VPC through the NAT gateway, implementing resource access and cross-network communication.
Step 1: Create a Public NAT Gateway
- Go to the NAT Gateway console.
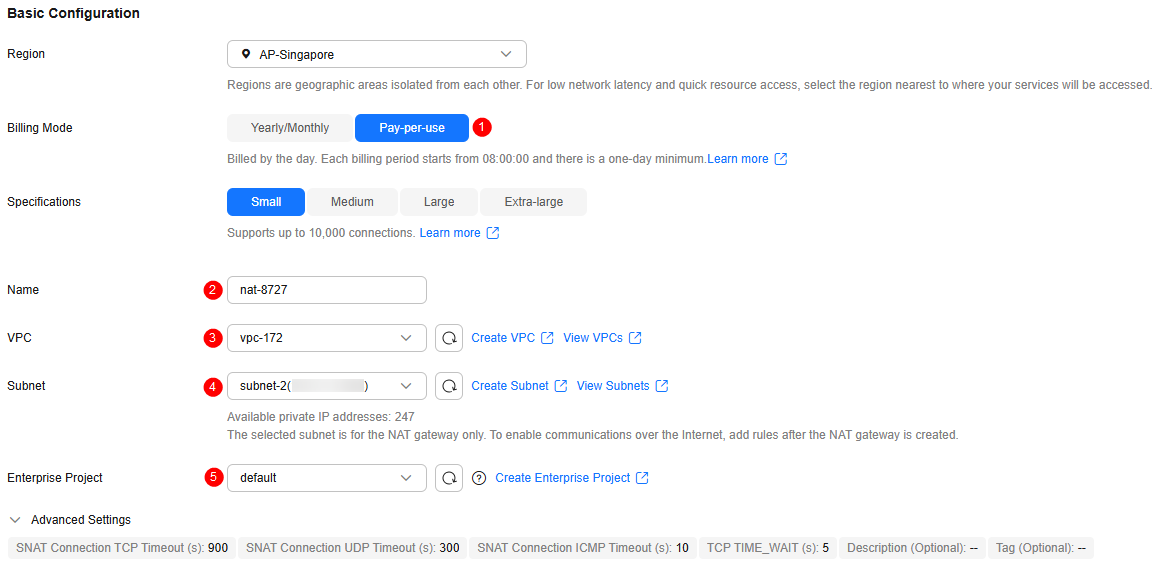
- Click Buy Public NAT Gateway and set the parameters by referring to Table 1. For details, see Buying a Public NAT Gateway.
Table 1 Parameters for buying a public NAT gateway Parameter
Example Value
Region
Select the region where the public NAT gateway is located.
Billing Mode
Select pay-per-use.
Specifications
Select Small.
Name
Enter nat-8727.
VPC
VPC to which the public NAT gateway belongs. Select the VPC that is the same as that of the CAE environment. In this example, select vpc-172.
Subnet
Subnet in the VPC where the public NAT gateway is located. Select the subnet that is the same as that of the CAE environment. In this example, select subnet-2 (xx.xx.xx.xx/xx).
Enterprise Project
Select default.
Figure 1 Parameters for buying a public NAT gateway
- After the settings, click Next > Submit.
Step 2: Add an SNAT Rule
- On the public NAT gateway page, click the NAT gateway created in the previous step. The NAT gateway details page is displayed.

- Click SNAT Rules > Add SNAT Rule and configure the SNAT rule. If no EIP is available, click Buy EIP. For details about how to apply for an EIP, see Assigning an EIP.

- Click OK.
Step 3: Add a Route to the VPC
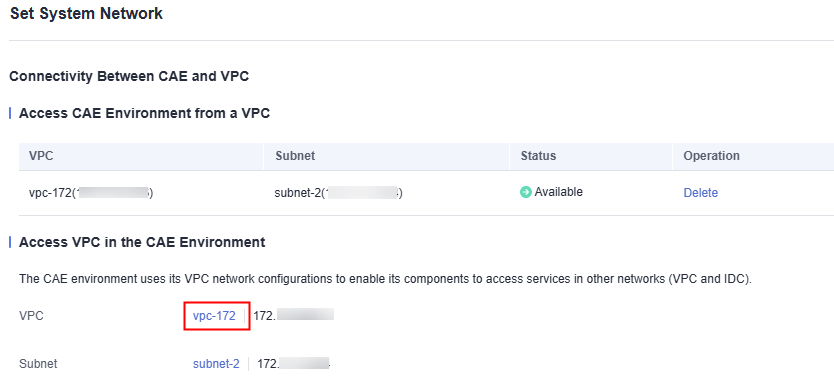
- Go to the CAE console. In the navigation pane, choose System Settings.
- Click Edit under System Networks.
- Click the VPC in the VPC column.

- On the VPC page, click the link next to Route Tables.

- In the route table list, click the route table to go to the route table details page.
- Click Add Route and set the route information. Set Next Hop Type to NAT gateway and Next Hop to the public NAT gateway created in step 1.

Step 4: Add a Destination Network Address
- Go to the CAE console. In the navigation pane, choose System Settings.
- Click Edit under System Networks.
- Click Add Destination Network Address to add the destination IP address segment to be accessed.

- Complete the settings.
Feedback
Was this page helpful?
Provide feedbackThank you very much for your feedback. We will continue working to improve the documentation.See the reply and handling status in My Cloud VOC.
For any further questions, feel free to contact us through the chatbot.
Chatbot


