
Using Email Templates to Send Email Notifications
Application Scenarios
Huawei Cloud Astro Zero enables quick creation of Word, Excel, Email, and SMS templates, enhancing document efficiency and standardization.
This practice uses an Email template as an example. Developers can set the email format and framework in advance to save time and effort. For example, in business communication (order confirmations, conference invitations) or daily life (holiday greetings, activity notifications), simply input key information like the recipient, subject, and content to quickly generate a complete email.
Advantages
In a flow, you can call an email template node and configure its input and output parameters to generate a complete email.
Constraints
You can set multiple email addresses for the recipient, CC, and BCC. Use semicolons (;) to separate email addresses. The recipient, CC, BCC, and subject fields cannot exceed 4,096 characters.
Procedure
Figure 1 shows the process of sending an email using an email template.

Step 1: Creating an SMTP Email Service Connector
Create an SMTP email service connector in the application to implement the email sending function. SMTP is a protocol that provides reliable and efficient email transmission.
- Create a low-code application.
- Apply for a free trial or purchase a commercial instance by referring to Authorization of Users for Huawei Cloud Astro Zero Usage and Instance Purchases.
- After the instance is purchased, click Access Homepage on Homepage. The application development page is displayed.
- In the navigation pane, choose Applications. On the displayed page, click Low-Code or
 .
. When you create an application for the first time, create a namespace as prompted. Once it is created, you cannot change or delete it, so check the details carefully. Use your company or team's abbreviation for the namespace.
- In the displayed dialog box, choose Standard Applications and click Confirm.
- Enter a label and name of the application, and click the confirm button. The application designer is displayed. Figure 2 Creating a blank application

- Create an SMTP email service connector.
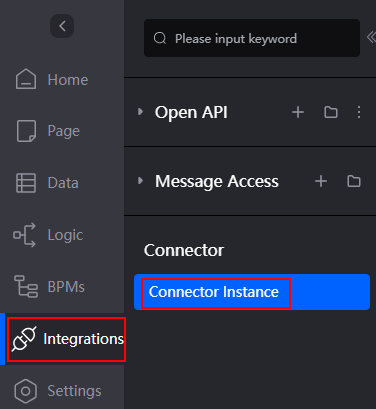
- In the navigation pane of the application designer, choose Integrations and choose Connector > Connector Instance. Figure 3 Clicking Connector Instance
- Choose Type > Message > Email by SMTP. On the displayed page, click +. The page for creating an SMTP email service connector is displayed.
- Set the information about the SMTP mailbox service connector and click Save. Figure 4 Creating an SMTP email service connector

Table 2 describes only the parameters used in this practice. For details about other parameters, see Interconnecting with SMTP to Send Emails.
Table 2 Parameter description Parameter
Description
Example
Name
Name of the SMTP email server connector to be created. The name cannot be changed after the connector is created. The naming requirements are as follows:
- Max. 64 characters, including the prefix namespace.
The content that is blurred in front of the ID is a namespace. To prevent duplicate data names among different tenants, each tenant must define a unique namespace when first creating an application. A tenant can only create one namespace, and once it is created, it cannot be modified.
- Start with a letter and use only letters, digits, and underscores (_). Do not end with an underscore (_).
smtp
SMTP Host:port
Server address and port number configured when the SMTP function is enabled for the mailbox.
For details about the SMTP server address and port number after the SMTP function is enabled for a common mailbox, see Table 3.
smtp.163.com:465
User Name
The username of the mailbox. If the username has not been changed, the default value is the email address.
example@163.com
Password
A random character string generated when SMTP is enabled for the mailbox.
-
Sender Email Address
Email address for sending emails. The format is username@domain name.
zhangsan@163.com
Table 3 Address and port number of the SMTP server for common mailboxes Mailbox
SMTP Server IP Address
Service Port
163 mailbox
smtp.163.com
- If SSL is used, set the port number to 465 or 994.
- Set the parameter to 25 for other protocols.
126 mailbox
smtp.126.com
25
Yeah mailbox
smtp.yeah.net
25
QQ enterprise mailbox
- For users in China: smtp.exmail.qq.com
- For users outside the Chinese mainland: hwsmtp.exmail.qq.com
The SSL protocol is used, and the port number is 465.
Sina mailbox
smtp.sina.com
25
- Max. 64 characters, including the prefix namespace.
- In the navigation pane of the application designer, choose Integrations and choose Connector > Connector Instance.
- Check whether the email can be sent.
- On the connector details page, click the send button.
- Enter the recipient, subject, and email content, and click Send. Figure 5 Sending an email

If the recipient receives an email, the test is successful, as shown in Figure 6.

Step 2: Creating an Email Template Scenario and Configure the Template
Create a template scenario and add an email template to the scenario. In the template scenario configuration, add the parameters to be replaced in the email template. A template scenario is a collection of service scenarios. Multiple templates can be created in a template scenario. The templates share the data structure.
- Create an email template scenario.
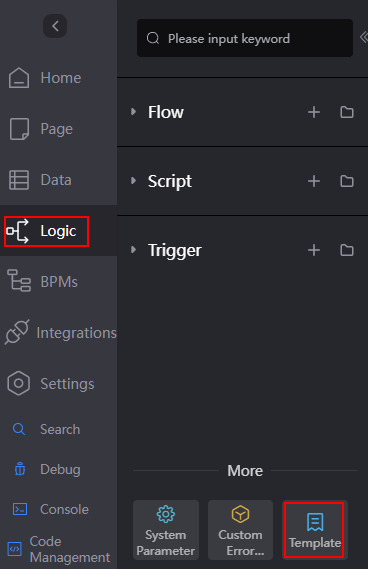
- In the navigation pane of the application designer, choose Logic > More > Template. Figure 7 Clicking Template
- Click Add Template Scenario, set the label and name of the template scenario, and click Confirm. Figure 8 Creating a template scenario

- In the navigation pane of the application designer, choose Logic > More > Template.
- On the Configurations tab page, select the connector created in Step 1: Creating an SMTP Email Service Connector and click Save. Figure 9 Selecting a connector

- On the Data tab page, add the parameters in Table 5 to the notification template. The template parameters added here correspond to the content to be replaced in the notification template.Figure 10 Adding a company name parameter to a notification template
 Figure 11 Viewing added parameters
- On the Templates tab page, click Add to create an email template. Figure 12 Creating an email template

- Edit the email template.
- On the Templates tab page, click
 next to the template created in 4. The email template page is displayed. Figure 13 The template editing page
- Click Edit in the upper right corner of the page. Figure 14 Clicking Edit

- Edit the email content. The variables in the email are the template parameters added in 3. Figure 15 Editing the email content

Table 7 Email content parameters Parameter
Description
Example
Recipient
Recipient's email address (max. 4,096 characters). Use semicolons (;) to separate multiple addresses.
***.com
Subject
Email subject (max. 4,096 characters).
Festival greetings
Content
Email content (max. 4,096 characters). Keep email content concise, clear, and logical to ensure accurate information delivery.
Hello,
I am ${Namespace__name} from ${Namespace__companyName}.
On this special day, I wish you and your team (${Namespace__customerCompanyName}) continued success and happiness in the coming year.
Best regards,
${Namespace__name}
- After the content is edited, click the save button and then click Enable to enable the email template.
- On the Templates tab page, click
- Return to the email template scenario and click the enable button to enable the template scenario. If the value of Status of the template scenario changes to Enable, the template scenario is enabled.Figure 16 Viewing the template creation status

Step 3: Calling the Template to Send Emails in a Flow
Create a flow and add the Invoke Template diagram element to send emails.
- In the navigation pane, choose Logic, and click + next to Flow.
- Specify the label and name and click Add. Figure 17 Creating a flow

- Create a global context variable.
- On the flow design page, select the start node and click
 .
. - Click Context and click
 next Variable to create the variable variable0.
 - Click
 next to variable0 and select Set.
 - Set Name to companyName and click Save. Figure 18 Creating the companyName variable

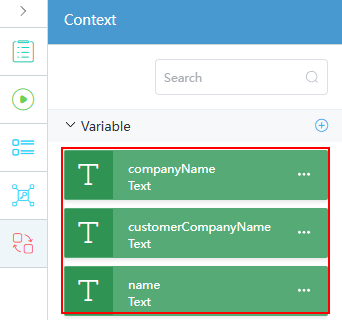
- Repeat the preceding operations to create variables in Table 9. Figure 19 Viewing created variables
- On the flow design page, select the start node and click
- Add the Invoke Template diagram element.
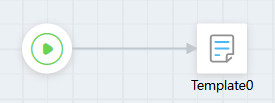
- Under Basic, drag the Invoke Template diagram element to the end of the start diagram element. Figure 20 Dragging the Invoke Template diagram element to the canvas

- Select Template0, click
 , and set the diagram element. Figure 21 Setting the Invoke Template diagram element
Table 10 Parameter description Parameter
Description
Example
Template Scenario
Select the template scenario associated with the Invoke Template diagram element, that is, the template scenario created in 1.
Namespace__notify
Template Type
Select a type.
Email
Template Name
Select the email template created in 4.
Namespace__emailModel
- In the Input Parameter area, click Add Row and drag the variables created in 3 to the input parameters of the flow as the input parameters of the flow. Figure 22 Setting the input parameters of the flow

- Under Basic, drag the Invoke Template diagram element to the end of the start diagram element.
- Specify the logical relationship of the diagram elements: from Start to Invoke Template. Figure 23 Specifying the logical relationship between diagram elements
- Click
 to save the flow.
 - Click
 . The flow debugging page is displayed.
 Enter the following information in the input parameter text box and click Run.
Figure 24 Debugging the flow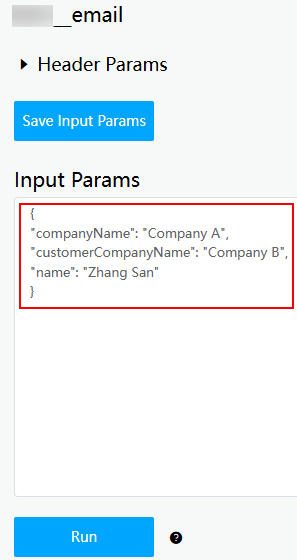
{
    "companyName": "Company A",
    "customerCompanyName": "Company B",
    "name": "Zhang San"
}
After the execution is successful, the email recipient set in 5 can receive the greeting email, as shown in Figure 25.
- Click
 to activate the flow.

Feedback
Was this page helpful?
Provide feedbackThank you very much for your feedback. We will continue working to improve the documentation.See the reply and handling status in My Cloud VOC.
For any further questions, feel free to contact us through the chatbot.
Chatbot


