
Chaincode Management
You can install, instantiate, and update chaincodes on the web. You can also check the Golang chaincode security during installation and update.
Note
- Before installing a chaincode, compress the chaincode file into a .zip package.
- If the Network Status displayed in the upper right corner of the Blockchain Management page is abnormal, do not perform any operations. Wait for a few minutes until the network is recovered.
Figure 1 Normal network status

Installing a Chaincode
- Log in to the Blockchain Management console. Click Manage Blockchain on an instance card. Enter the username and password, and click Log In.

The username is admin, and the initial login password is the resource access initial password set when you deploy the BCS instance. To ensure system security, change the password periodically.
- On the Chaincode Management page, click Install Chaincode.
- Specify the chaincode name, version, and other parameters by referring to Table 1.
Figure 2 Installing a chaincode

Table 1 Chaincode parameters Parameter
Description
Chaincode Name
Chaincode name, which can contain 6 to 25 including lowercase letters and digits, and must start with a letter.
Chaincode Version
Chaincode version.
Ledger Storage
Default option: File database (goleveldb).
Select All Peers
Check the box to select all peers.
Organization & Peer
Manually select organizations and peers.
Language
Golang, Node.js, and Java are supported.
Chaincode File
Add a chaincode file.
Chaincode Description
Enter a description.
Code Security Check
This option is displayed only when the chaincode language is Golang. Enable this option to check code security.
- Click Install.
- Click
 next to a chaincode name to view the details.
 - Click Download in the Operation column to view the check result. (The following example is for reference only.)
If Code Security Check is not enabled, no check report will be generated, and the Download button will not be displayed.
Figure 3 Downloading the check report
- Decompress the package and open the HTML file to view the check result details. There are three types of issues: error, warning, and info. Error-level issues must be resolved. Otherwise, the chaincode functions will be affected. Warning-level issues can be handled by reconstructing the code. Info-level issues can be handled selectively as required.
Figure 4 Scanned files
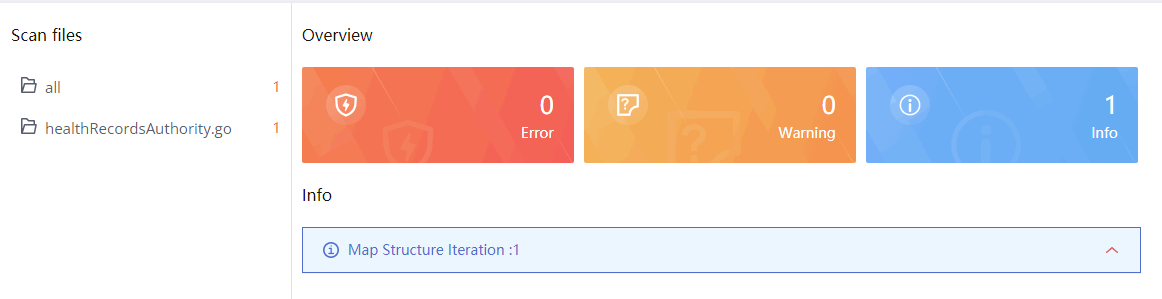
- For example, there is an info-level issue in the proceeding figure. You can click the issue to view its details, including a brief description, wrong example, scanning details, modification advice, and revision example.
- Decompress the package and open the HTML file to view the check result details. There are three types of issues: error, warning, and info. Error-level issues must be resolved. Otherwise, the chaincode functions will be affected. Warning-level issues can be handled by reconstructing the code. Info-level issues can be handled selectively as required.
Instantiating a Chaincode
After a chaincode is installed, it must be instantiated on the channel so that the peers can interact with each other using the distributed ledger and the chaincode container. Before instantiating a chaincode, add the peers to the channel. Otherwise, the chaincode cannot be instantiated.
- Click Instantiate in the Operation column of the chaincode list.
- Specify the channel for instantiation, chaincode version, endorsement policy, endorsing organizations, and chaincode parameters.
Endorsement is a process in which organizations perform a chaincode transaction and return a proposal response to a client application. An endorsement policy specifies how many members of different organizations on a channel are required to execute and validate a transaction based on the specified smart contract to make the transaction valid. Therefore, an endorsement policy defines the organization peers that must "endorse" (that is, approve of) the execution of a proposal.
- Endorsement from any of the following organizations: A transaction is valid as long as any one of the organizations endorses it.
- Endorsement from all of the following organizations: A transaction is valid only when all organizations endorse it.
Figure 5 Instantiating a chaincode
- Enter the private data (JSON format) to be protected in the text box below Privacy Protection.
If you want to restrict data in a shared channel to certain specified members, use the privacy protection function. Skip this step if privacy protection is not required for your chaincode.
Configure privacy protection by referring to the example and the following parameter description:- name: Name of the collection of private data, for example, collectionPrivateDetails.
In a chaincode, if you want to write data to the collection of private data, ensure that the collection name is the same as that defined here.
stub.PutPrivateData("collectionPrivateDetails", key, value) - policy: Peers allowed to access the data in the collection. In the example, only peers of organizations Org1 and Org2 are allowed to obtain the data in the collection.
Click View Peer on the Channel Management page, and obtain the MSP IDs of the two organizations, as shown in the following figure.
Figure 6 Checking the MSP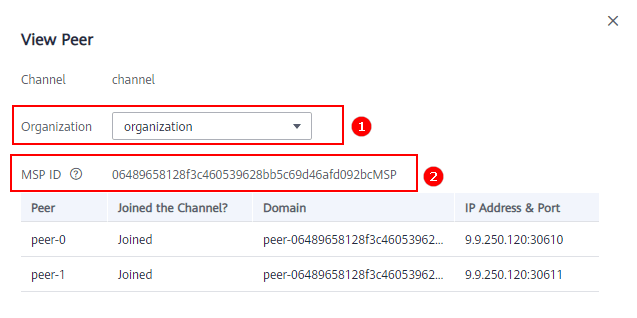
- requiredPeerCount: Number of endorsing peers to which the private data can be disseminated. In the example, value 0 indicates that there is no endorsing peer.
- maxPeerCount: Maximum number of orderers, which is 3 in the example. Multiple orderers can be used for data redundancy. If one orderer is unavailable, other orderers can respond to requests for obtaining the private data.
- blockToLive: Maximum number of blocks that the private data can live for. If the number of blocks exceeds the threshold, the private data will be cleared. To keep private data indefinitely, set this parameter to 0.
- memberOnlyRead: The default value is true. The access policy set in policy takes effect only when memberOnlyRead is set to true.
Example of privacy protection configuration (JSON):
[
  {
    "name": "collectionPrivateDetails",
    "policy": "OR('<Org1MSP>.member','<Org2MSP>.member')",
    "requiredPeerCount": 0,
    "maxPeerCount": 3,
    "blockToLive": 0,
    "memberOnlyRead": true
  }
]
This configuration indicates that the chaincode uses a private data space called collectionPrivateDetails. Only the peers of organizations Org1 and Org2 have access to the data in this space.
The values of name and blockToLive cannot be modified during subsequent chaincode upgrade. For more information, see Using Private Data in Fabric.
- name: Name of the collection of private data, for example, collectionPrivateDetails.
- Click Instantiate.
If privacy protection is configured, you can click View More after the chaincode is successfully instantiated to download the private data and check whether the privacy protection settings are correct.
Figure 7 Downloading private data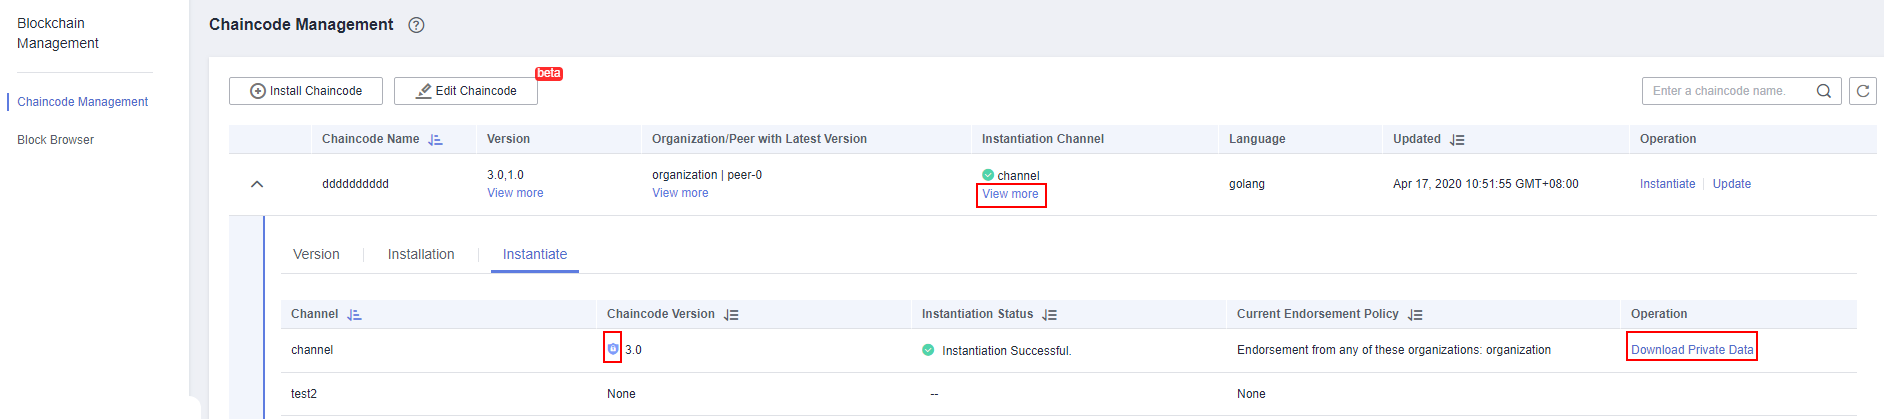
If chaincode instantiation fails, refer to Chaincode Instantiation Error Codes to determine the cause.
Updating a Chaincode
If your chaincode is updated, install and instantiate it again to meet new business requirements.
- Click Update in the Operation column of the chaincode list.
- Specify the chaincode version, select peers, add a chaincode file, and click Update.
- Instantiate the updated chaincode. For details, see Instantiating a Chaincode.
- (Optional) Click
 in front of the chaincode name. You can see details about this chaincode, including versions, and installation and instantiation information.
Chaincode Instantiation Error Codes
Chaincode instantiation may fail due to various causes. When confronted with an instantiation failure, you can refer to the following table to determine the cause.
|
Error Code |
Message |
|---|---|
|
6001 |
Instantiation timed out. |
|
6999 |
Unknown error. |
|
6701 |
Client failed to connect to a peer. |
|
6703 |
Endorsement signature failed verification. |
|
6704 |
Failed to pull the ccenv image during chaincode compilation. |
|
6705 |
Chaincode compilation failed. |
|
6707 |
Failed to build a chaincode image. |
|
6708 |
Failed to create a chaincode container. |
|
6709 |
Failed to register the chaincode container. |
|
6710 |
Client failed to connect to an orderer. |
|
6712 |
Transaction recording in distributed ledgers failed. |
|
6713 |
Request error determined by the orderer. |
|
6714 |
The endorsement policy failed the verification. |
|
6715 |
Instantiation failed because instantiation of another chaincode has already been started. |
|
6716 |
Error detected in the init() function parameters. |
|
6717 |
Error detected in the invoke() function parameters. |
|
6720 |
Failed to create a chaincode certificate. |
|
6721 |
Chaincode container startup timed out. |
|
6722 |
Transaction timed out because init() execution abnormally terminates after startup of the chaincode container. |
|
6723 |
A chaincode with the same schema has already been instantiated on this channel. |
|
6725 |
The signature set does not satisfy the endorsement policy. |
|
6726 |
The instantiation policy failed the verification. Select a peer of an organization that exists in the channel before chaincode instantiation to upgrade the chaincode. |
|
6901 |
Instantiation failed. The chaincode to be instantiated must contain all the tables in the previously instantiated chaincode. |
|
6902 |
Instantiation failed. The chaincode to be instantiated must contain all the fields in the previously instantiated chaincode. |
|
6903 |
Instantiation failed. The chaincode to be instantiated must not contain any changes to the field attributes included in the previously instantiated chaincode. |
|
6904 |
The schema file of the instantiated chaincode does not exist. |
|
6905 |
Failed to resolve the schema file. |
|
6906 |
Insufficient disk space. |
Feedback
Was this page helpful?
Provide feedbackThank you very much for your feedback. We will continue working to improve the documentation.See the reply and handling status in My Cloud VOC.
For any further questions, feel free to contact us through the chatbot.
Chatbot


