Enabling the Connection Pool for a Proxy Instance
Scenarios
When an application connects to a proxy instance to execute requests, the proxy instance needs to connect to the database to distribute requests and obtain execution results. If the application frequently establishes and closes connections, database load will increase.
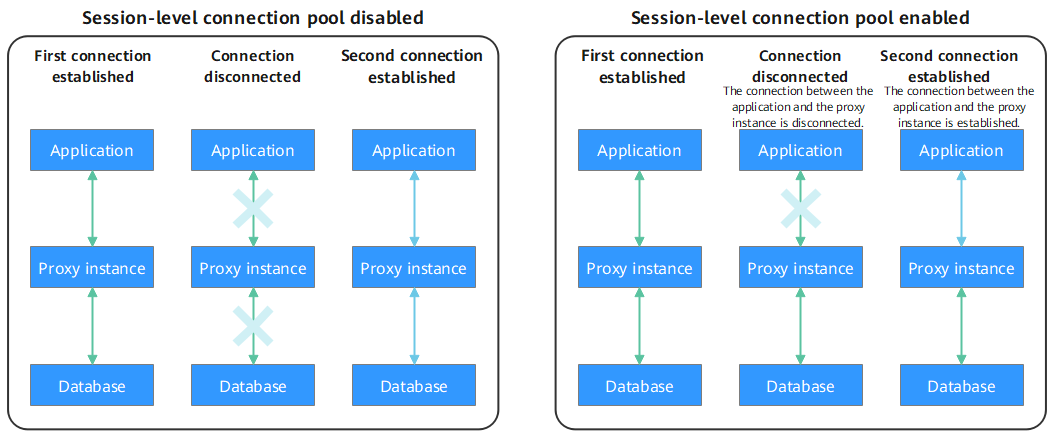
A session-level connection pool is suitable for short connections. When your client disconnects from your database, the system checks whether the connection is idle. If it is, the system places the connection in the connection pool of a proxy instance and retains the connection for a short period of time. When your client re-initiates a connection, any available connection in the connection pool is used, reducing the overhead of establishing a new connection to the database. If no connections are available in the connection pool, a new connection will be established.
Principles
A session-level connection pool helps reduce the database load caused by frequent establishment of short connections.

Constraints
- To use a connection pool, the kernel versions of proxy instances must be 2.22.07.000 or later. For details about how to check the kernel version, see How Can I Check the Version of a TaurusDB Instance?
- When any of the following operations is performed, the connection is locked until the connection ends. That is, the connection will not be placed in the connection pool for other users to use.
- Running the PREPARE statement
- Creating a temporary table
- Modifying user variables
- Inserting or querying big data (for example, more than 16 MB)
- Running the LOCK TABLE statement
- Executing a multi-statement query (concatenated SQL statements with semicolons, for example, SELECT 1;SELECT 2)
- Calling a stored procedure
Configuring a Session-Level Connection Pool
- Log in to the TaurusDB console.
- On the Instances page, click the instance name.
- In the navigation pane, choose Database Proxy.
- Click the name of a proxy instance.
- On the Basic Information page, click Configure under Connection Pool.
Figure 1 Configuring a connection pool

- In the displayed dialog box, set Connection Pool to Session level and click OK. This process takes several seconds.
- Check that the connection pool is successfully configured.
Disabling a Connection Pool
- Log in to the TaurusDB console.
- On the Instances page, click the instance name.
- In the navigation pane, choose Database Proxy.
- Click the name of a proxy instance.
- On the Basic Information page, click Configure under Connection Pool.
- In the displayed dialog box, disable the connection pool and click OK. This process takes several seconds.
- On the Basic Information page of the proxy instance, check that the connection pool is disabled.
Feedback
Was this page helpful?
Provide feedbackThank you very much for your feedback. We will continue working to improve the documentation.See the reply and handling status in My Cloud VOC.
For any further questions, feel free to contact us through the chatbot.
Chatbot


