Processing Text Datasets
Before processing a text dataset, import data. For details, see Importing Data to the Pangu Platform.
To create a text dataset processing task, perform the following steps:
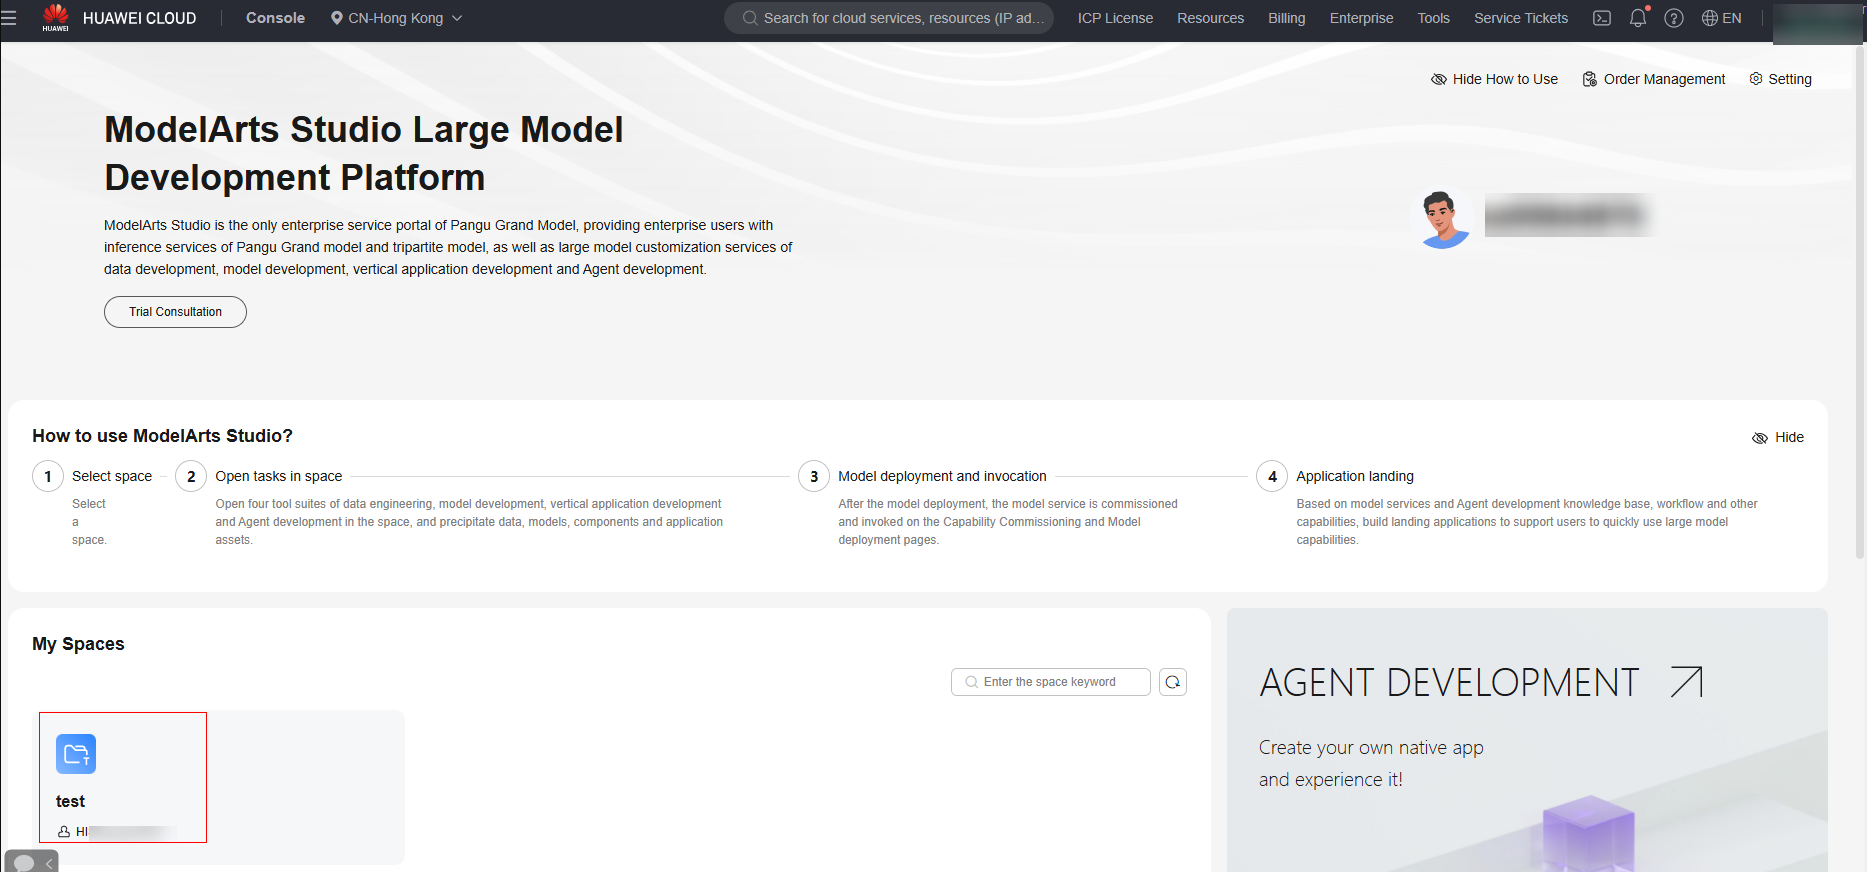
- Log in to ModelArts Studio Large Model Deveopment Platform. In the My Spaces area, click the required workspace.
Figure 1 My Spaces

- In the navigation pane, choose Data engineering > Data Processing > Processing Tasks. Click Create Processing Job in the upper right corner.
- On the Create Processing Job page, select the text dataset to be processed and click Next.
- Go to the processing step arrangement page. For details about available processing operators for text datasets, see Text Dataset Processing Operators.
- In the Adding Operator pane on the left, select the required operators. You can select one or more operators based on the actual scenario.
The platform supports preset operators and custom operators. For details about how to create a custom operator, see Custom Data Processing Operators.
- On the processing step orchestration page on the right, set operator parameters. You can drag
 on the right to adjust the operator execution sequence.
Figure 2 Operator orchestration

If the operator parameters involve the selection of a model, you need to purchase and deploy the model in ModelArts Studio.
- During orchestration, you can click Save as template in the upper right corner to save the current orchestration process as a template. When creating a data processing task, you can use the saved template to create the task. For details, see Using a Processing Template.
- In the Adding Operator pane on the left, select the required operators. You can select one or more operators based on the actual scenario.
- After the processing steps are orchestrated, click Next to go to the Task Configuration page.
- Resource Allocation
Click
 to expand resource configuration and set task resources. You can also customize parameters. Click Add Parameters and enter the parameter name and value.
Table 1 Parameter configuration Parameter Name
Description
numExecutors
Number of executors. The default value is 2. An executor is a process running on a worker node. It executes tasks and returns the calculation result to the driver. One core in an executor can run one task at the same time. Therefore, more tasks can be processed at the same time if you increase the number of the executors. You can add executors (if they are available) to process more tasks concurrently and improve efficiency.
numExecutors x executorMemory must be greater than or equal to 4 and less than or equal to 16.
executorCores
Number of CPU kernels used by each executor process. The default value is 2. Multiple cores in an executor can run multiple tasks at the same time, which increases the task concurrency. However, because all cores share the memory of an executor, you need to balance the memory and the number of cores.
numExecutors x executorMemory must be greater than or equal to 4 and less than or equal to 16. The ratio of executorCores to executorMemory must be in the range of 1:2 to 1:4.
executorMemory
Memory size used by each Executor process. The default value is 4. The executor memory is used for job execution and communication. You can increase the memory for a job that requires a great number of resources, and run small jobs concurrently with a smaller memory.
The ratio of executorCores to executorMemory must be in the range of 1:2 to 1:4.
driverCores
Number of CPU kernels used by each driver process. The default value is 2. The driver schedules jobs and communicates with executors.
The ratio of driverCores to driverMemory must be in the range of 1:2 to 1:4.
driverMemory
Memory used by the driver process. The default value is 4. The driver schedules jobs and communicates with executors. Add driver memory when the number and parallelism level of the tasks increases.
The ratio of driverCores to driverMemory must be in the range of 1:2 to 1:4.
Figure 3 Resource Allocation
- Automatically Generate Processing Dataset
Select and configure the information about the generated dataset, as shown in Figure 4. Click OK in the lower right corner. The platform starts the data combination task. After the processing task is successfully executed, a processed dataset is automatically generated.
- (Optional) Extended Info
You can select the industry and language, or customize dataset properties.
Figure 5 Extended Info
- Resource Allocation
- Click Start Process to start the processing task. After the data processing job is successfully executed, the status changes from Running to Succeeded, indicating that the data has been processed.

- After data processing is complete, if you do not need to use the data labeling and data synthesis functions, click Generate in the Operation column on the Processing Tasks page to generate a processed dataset.
- To view the processed dataset, choose Data Engineering > Data Management > Datasets, and click the Processed Dataset tab.
Feedback
Was this page helpful?
Provide feedbackThank you very much for your feedback. We will continue working to improve the documentation.See the reply and handling status in My Cloud VOC.
For any further questions, feel free to contact us through the chatbot.
Chatbot


