Changing Kafka Partition Quantity
After creating a topic, you can change the number of partitions as required. Changing the number of partitions does not restart the instance or affect services.
Notes and Constraints
- The number of partitions can only be increased.
- Instances created since May 17, 2023 do not have Kafka Manager. You cannot modify topic partitions for these instances using Kafka Manager.
- The partition quantity of topics of a single-node or cluster Kafka instance is limited. When the partition quantity limit is reached, you can no longer create topics. The total number of partitions varies with instance specifications. For details, see Kafka Instance Specifications.
- For an instance with ciphertext access enabled, if allow.everyone.if.no.acl.found is set to false, the topic partition quantity can be modified on the client only by the initial user (set in first ciphertext access enablement).
- A maximum of 50 partitions can be modified in a batch at a time.
Procedure
You can repartition a topic on the Kafka console, using Kafka Manager, or on a client.
- Log in to the Kafka console.
- Click
 in the upper left corner to select the region where your instance is located.
 - Click the desired instance to go to the instance details page.
- In the navigation pane, choose Instance > Topics.
- In the row containing the desired topic, click Edit.
- In the Edit Topic dialog box, enter the number of partitions by referring to Table 1, and click OK.
Table 1 Partitions parameters Parameter
Description
Partitions
Enter the number of partitions. The number of partitions can only be increased.
To ensure performance, a maximum of 200 partitions is allowed for each topic on the Kafka console.
Broker
Set the broker where the new partition is located.
- Auto: The Kafka service automatically allocates brokers to the new partition.
- Specified: Select brokers from the drop-down list box. The number of brokers cannot be less than the number of topic replicas.
View the partition quantity on the Topics page.
- Log in to the Kafka console.
- Click
 in the upper left corner to select the region where your instance is located.
 - Click the desired instance to go to the instance details page.
- In the navigation pane, choose Instance > Topics.
- Select the desired topics and click Batch Edit Topic on the upper left.
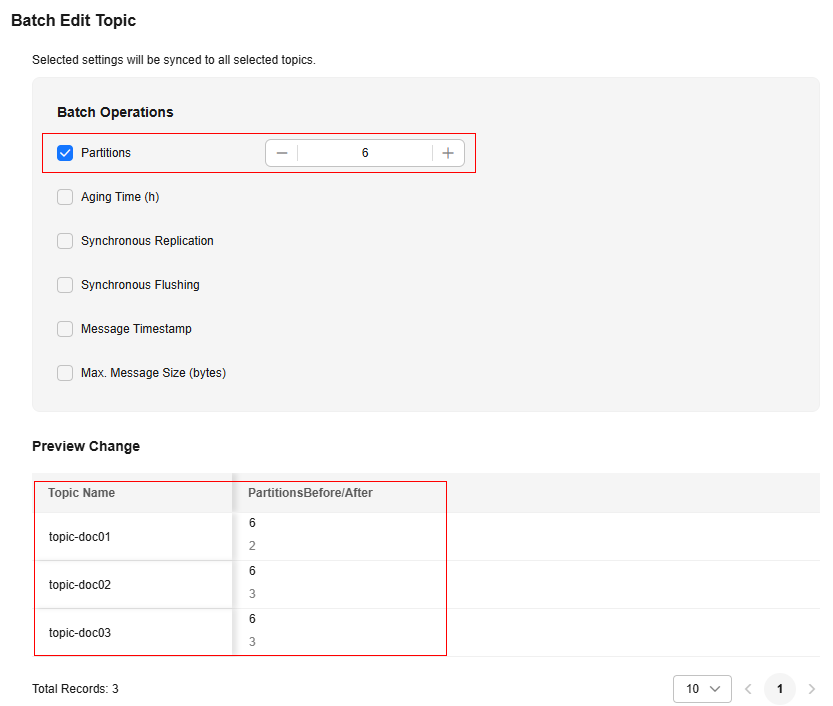
- In the Batch Operations area, select Partitions and enter a value. In the Preview Change area, view the unchanged and changed item. Click OK.
The number of partitions is subject to the following constraints:
- To ensure performance, a maximum of 200 partitions is allowed for each topic on the Kafka console.
- This value must be set to a value greater than or equal to the maximum number of partitions among the topics. For example, when topic Topic01 has three partitions and topic Topic02 has six partitions, the value must be greater than or equal to 6.
Figure 1 Batch modifying the number of partitions
View the partition quantity on the Topics page.
- Log in to Kafka Manager.
- Choose Topic > List to view the list of topics.
- Click a topic to view its details.
- Click Add Partitions.
Figure 2 Topic details page

- Enter the number of partitions and click Add Partitions.
To ensure performance, 200 or less partitions are recommended for each topic.Figure 3 Adding partitions

If "Done" is displayed, the partitions are added successfully.
Figure 4 Partitions added
If your Kafka client version is later than 2.2, you can use kafka-topics.sh to change the partition quantity.
- For a Kafka instance with ciphertext access disabled, run the following command in the /bin directory of the Kafka client:
./kafka-topics.sh --bootstrap-server {connection-address} --topic {topic-name} --alter --partitions {number-of-partitions}
Table 2 Topic partition quantity parameters Parameter
Description
connection-address
Connection address of a Kafka instance. To obtain the address, choose Overview > Connection.
topic-name
Topic name.
number-of-partitions
Number of partitions in the topic.
To ensure performance, 200 or fewer partitions are recommended for each topic.
Example:
[root@ecs-kafka bin]# ./kafka-topics.sh --bootstrap-server 192.168.xx.xx:9092,192.168.xx.xx:9092,192.168.xx.xx:9092 --topic topic-01 --alter --partitions 6
[root@ecs-kafka bin]#
- For a Kafka instance with ciphertext access enabled, do as follows:
- (Optional) If the username and password, and the SSL certificate has been configured, skip this step and go to 2. Otherwise, do as follows:
Create the ssl-user-config.properties file in the /config directory of the Kafka client. Add the username and password, and the SSL certificate configuration by referring to 3.
- Run the following command in the /bin directory of the Kafka client:
./kafka-topics.sh --bootstrap-server {connection-address} --topic {topic-name} --alter --partitions {number-of-partitions} --command-config ../config/{ssl-user-config.properties}
Table 3 Topic partition quantity parameters Parameter
Description
connection-address
Connection address of a Kafka instance. To obtain the address, choose Overview > Connection.
topic-name
Topic name.
number-of-partitions
Number of partitions in the topic.
To ensure performance, 200 or fewer partitions are recommended for each topic.
ssl-user-config.properties
Configuration file name. This file contains username, password, and SSL certificate information.
Example:
[root@ecs-kafka bin]# ./kafka-topics.sh --bootstrap-server 192.168.xx.xx:9093,192.168.xx.xx:9093,192.168.xx.xx:9093 --topic topic-01 --alter --partitions 6 --command-config ../config/ssl-user-config.properties
[root@ecs-kafka bin]#
- (Optional) If the username and password, and the SSL certificate has been configured, skip this step and go to 2. Otherwise, do as follows:
Related Documents
- To modify the partition quantity of a topic by calling an API, see Modifying Topics of a Kafka Instance.
- To increase the partition quantity of a topic, see How Do I Increase the Partition Quantity?
Feedback
Was this page helpful?
Provide feedbackThank you very much for your feedback. We will continue working to improve the documentation.See the reply and handling status in My Cloud VOC.
For any further questions, feel free to contact us through the chatbot.
Chatbot


