
Microservice Management
On the Microservice List tab, you can create, view, delete, dynamically configure, and dark launch microservices, and clean microservices without instances.

Creating a Microservice
Create a microservice for testing or restoring the microservice that is deleted by mistake. If a microservice that is automatically registered with ServiceComb is deleted by mistake, you can manually create a microservice to restore the deleted microservice. The microservice name, application, version, and environment must be the same as those of the original microservice.
- Log in to CSE.
- Choose Exclusive ServiceComb Engines.
- Click the target engine.
- Choose Microservice Catalog.
- For engines with security authentication disabled, go to 6.
- For engines with security authentication enabled, if the login user is the user imported in Importing an IAM Account, go to 6. For other users, go to 5.
- In the displayed Security Authentication dialog box, enter the account name and password, and click OK.

- If you connect to the ServiceComb engine for the first time, enter the account name root and the password entered when Creating a ServiceComb Engine.
- For details about how to create an account, see Adding an Account.
- Choose Microservice List > Create a Microservice and set microservice parameters by referring to the following table. Parameters marked with an asterisk (*) are mandatory.
Parameter
Description
*Microservice
Microservice name, for example, myServiceName. Enter 1 to 128 characters. Start and end with a digit or letter. Only use digits, letters, and special characters (_-.). The special characters cannot be used consecutively.
*Application
Name of the application to which the microservice belongs. Microservices are isolated by applications. Enter 1 to 160 characters. Start and end with a digit or letter. Only use digits, letters, and special characters (_-.). The special characters cannot be used consecutively.
*Version
Microservice version. The default value is 1.0.0.
The microservice version is in the format of X.Y.Z or X.Y.Z.B, where X, Y, Z, and B are digits and range from 0 to 32767. The value contains 3 to 46 characters.
*Environment
Environment where the microservice is located to isolate microservice data, including the version and instance.
Description
Microservice description.
- Click OK.
Once the microservice is created, it will be displayed in Microservice List.
Viewing the Microservice List
The microservice list displays all microservices of the current ServiceComb engine. You can search for the target microservice by microservice name, or filter microservices by environment and application.
- Log in to CSE.
- Choose Exclusive ServiceComb Engines.
- Click the target engine.
- Choose Microservice Catalog.
- For engines with security authentication disabled, go to 6.
- For engines with security authentication enabled, if the login user is the user imported in Importing an IAM Account, go to 6. For other users, go to 5.
- In the displayed Security Authentication dialog box, enter the account name and password, and click OK.
- If you connect to the ServiceComb engine for the first time, enter the account name root and the password entered when Creating a ServiceComb Engine.
- For details about how to create an account, see Adding an Account.
- Click Microservice List to view all microservices of the current account under the engine.
You can search for the target microservice by microservice name, or filter microservices by environment and application.
Viewing Microservice Details
On the microservice details page, you can view the instance list, called services, calling services, dynamic configuration, and service contract. You can also perform Dynamic Configuration and Dark Launch on microservice-level configurations.
- Log in to CSE.
- Choose Exclusive ServiceComb Engines.
- Click the target engine.
- Choose Microservice Catalog.
- For engines with security authentication disabled, go to 6.
- For engines with security authentication enabled, if the login user is the user imported in Importing an IAM Account, go to 6. For other users, go to 5.
- In the displayed Security Authentication dialog box, enter the account name and password, and click OK.
- If you connect to the ServiceComb engine for the first time, enter the account name root and the password entered when Creating a ServiceComb Engine.
- For details about how to create an account, see Adding an Account.
- Click the microservice to be viewed in Microservice List. On the displayed page, view the instance list, called services, calling services, dynamic configuration, dark launch, and service contract.
Cleaning Versions Without Instances
Delete microservice versions with no running instances to optimize resource utilization, improve governance efficiency, and ensure system stability.
- Log in to CSE.
- Choose Exclusive ServiceComb Engines.
- Click the target engine.
- Choose Microservice Catalog.
- For engines with security authentication disabled, go to 6.
- For engines with security authentication enabled, if the login user is the user imported in Importing an IAM Account, go to 6. For other users, go to 5.
- In the displayed Security Authentication dialog box, enter the account name and password, and click OK.
- If you connect to the ServiceComb engine for the first time, enter the account name root and the password entered when Creating a ServiceComb Engine.
- For details about how to create an account, see Adding an Account.
- Choose Microservice List > Clean No Instance Services. Select the microservice version without instances to be cleaned.
You can search for the target microservice by microservice name, or filter microservices by environment and application.
- Click OK.
Dynamic Configuration
Create, edit, disable, and delete microservice-level configurations, and view historical versions of microservice-level configurations.
Configuration items are stored in plaintext. Do not include sensitive data.
- Log in to CSE.
- Choose Exclusive ServiceComb Engines.
- Click the target engine.
- Choose Microservice Catalog.
- For engines with security authentication disabled, go to 6.
- For engines with security authentication enabled, if the login user is the user imported in Importing an IAM Account, go to 6. For other users, go to 5.
- In the displayed Security Authentication dialog box, enter the account name and password, and click OK.
- If you connect to the ServiceComb engine for the first time, enter the account name root and the password entered when Creating a ServiceComb Engine.
- For details about how to create an account, see Adding an Account.
- Click Microservice List and click a microservice.
- Choose Dynamic Configuration. On the Dynamic Configuration tab, perform the following operations.
Operation
Procedure
Create a configuration item
See Creating a Configuration for ServiceComb Engine 2.x. Microservice-level is selected for Configuration Range and Microservices is set to the current microservice.
View historical versions
Click View Historical Version in the Operation column of the target configuration item.
Disable a configuration item
- In the Operation column of the target configuration item, choose More > Disable.
- Click OK.
Modify a configuration item
- Click Edit in the Operation column corresponding to the target configuration item.
- On the configuration details page, click Edit.
- On the Configuration Details tab, enter the new configuration.
- Click Save.
Delete a configuration item
- In the Operation column of the target configuration item, choose More > Delete.
- Click OK.
Dark Launch
In dark launch, new features are tested in a selected group of users. When the features become mature and stable, they are released to all users. This ensures the smooth feature rollout.
- For microservices developed based on the ServiceComb Java Chassis framework, add dependency darklaunch or handler-router to POM and add servicecomb.router.type=router to the microservice.yaml configuration file.
- For microservices developed based on the Spring Cloud Huawei framework, add dependency spring-cloud-starter-huawei-router to POM.
- Log in to CSE.
- Choose Exclusive ServiceComb Engines.
- Click the target engine.
- Choose Microservice Catalog.
- For engines with security authentication disabled, go to 6.
- For engines with security authentication enabled, if the login user is the user imported in Importing an IAM Account, go to 6. For other users, go to 5.
- In the displayed Security Authentication dialog box, enter the account name and password, and click OK.
- If you connect to the ServiceComb engine for the first time, enter the account name root and the password entered when Creating a ServiceComb Engine.
- For details about how to create an account, see Adding an Account.
- In the microservice list, click a microservice. On the displayed page, choose Dark Launch.
- Click Add Launch Rule.
- To add a launch rule by Weight:
- Click Weight.
- Set the following parameters.
Parameter
Description
Rule Name
Name of the rule. Enter 3 to 24 characters. Start with a letter. Only use digits, letters, and special characters (.@_-).
Scope
- Microservice version to which the rule applies.
- Select Do you want to add a customized version? and add a new version as prompted.
Rule Configuration
Traffic allocation rate for the selected version. Traffic is evenly allocated to the selected service versions based on the configured value.
- Click OK to complete the weight rule configuration and dark launch.
- To add a launch rule by Customization:
- Click Custom.
- Set the following parameters.
- Click OK to complete the customization rule configuration and dark launch.
- To add a launch rule by Weight:
Examples of delivering dark launch rules:
- For microservices developed based on the ServiceComb Java Chassis framework, rules are delivered based on dependency darklaunch on the ServiceComb engine page. You can add dark launch rules in customized mode.
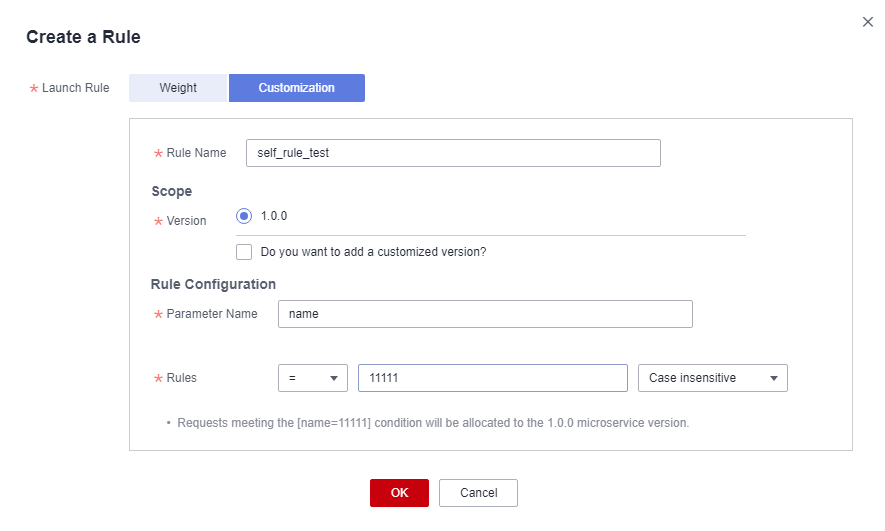
This key must exist in the contract. It is possible that the server API is String paramA, but paramB is actually generated after the annotation is added. Therefore, paramB should be set here.
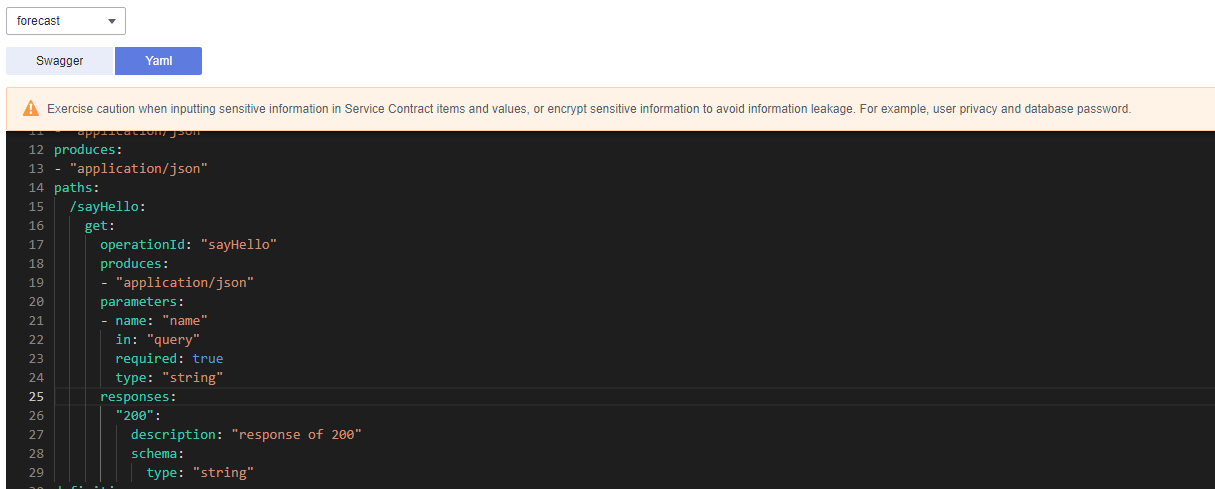
By selecting the matching character and the value corresponding to the key of contract, requests that meet the rules are allocated to the microservice version.

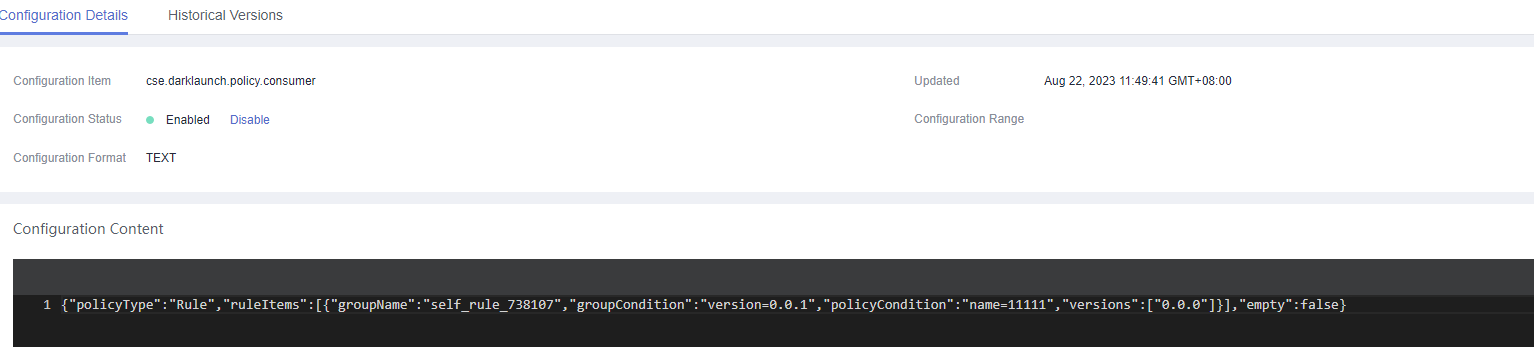
A delivered rule is as follows. The configuration item is cse.darklaunch.policy.${serviceName}.
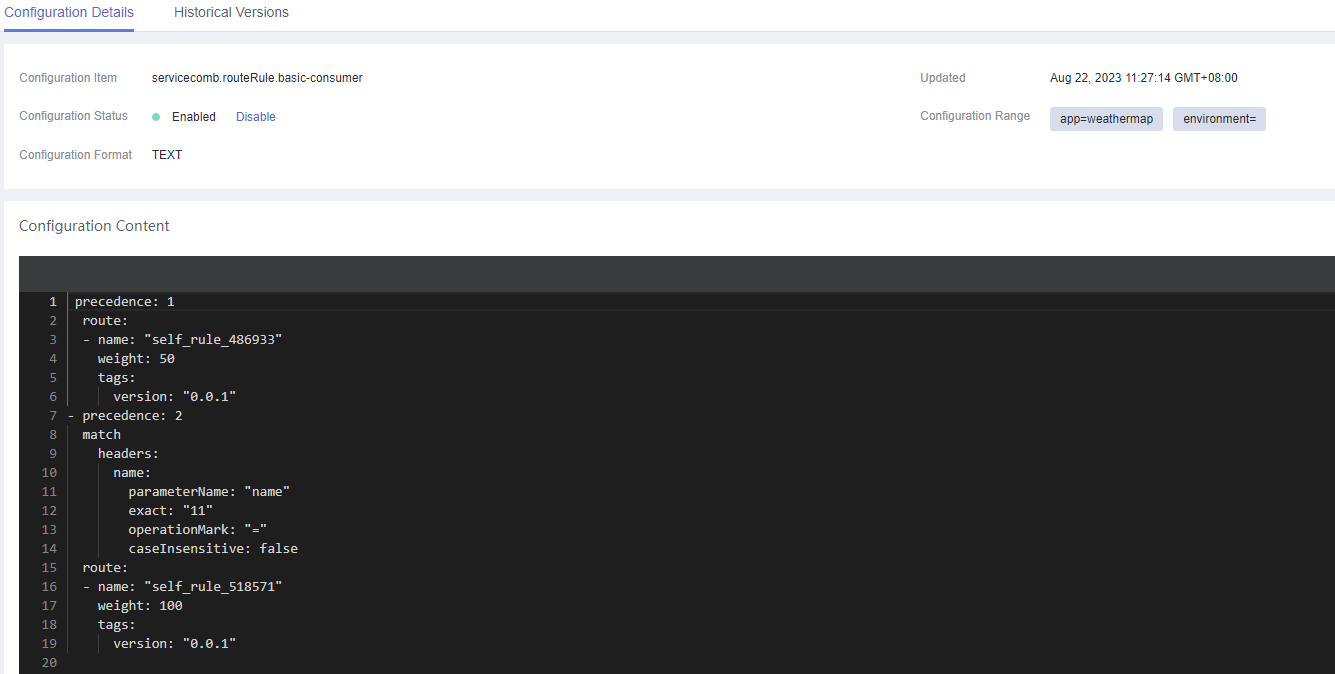
- For microservices developed based on the ServiceComb Java Chassis framework, dark launch rules that depend on handler-router need to be manually delivered in the configuration center. The configuration item is servicecomb.routeRule.${serviceName}. The content is as follows:
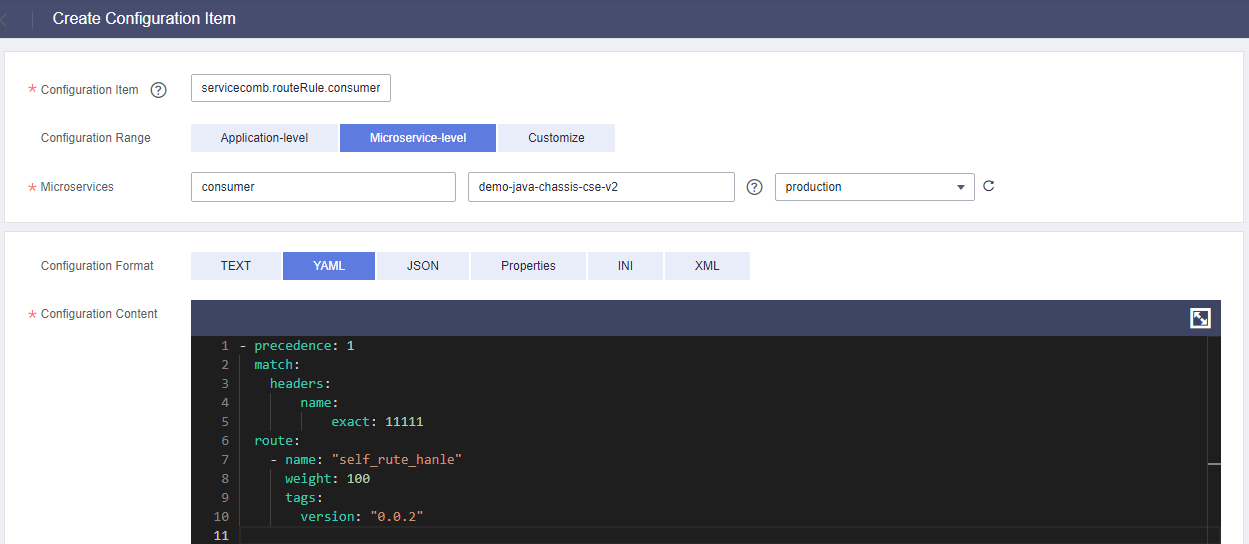
- For microservices developed based on the Spring Cloud Huawei framework, dark launch rules delivered on the ServiceComb engine page are as follows:
Deleting a Microservice
Delete a microservice that is no longer used.
- After a microservice is deleted, you can restore it by referring to Restoring Backup Data.
- If the service to be deleted has instances, delete the instances first. Otherwise, the service will be registered again.
- Log in to CSE.
- Choose Exclusive ServiceComb Engines.
- Click the target engine.
- Choose Microservice Catalog.
- For engines with security authentication disabled, go to 6.
- For engines with security authentication enabled, if the login user is the user imported in Importing an IAM Account, go to 6. For other users, go to 5.
- In the displayed Security Authentication dialog box, enter the account name and password, and click OK.
- If you connect to the ServiceComb engine for the first time, enter the account name root and the password entered when Creating a ServiceComb Engine.
- For details about how to create an account, see Adding an Account.
- Click Microservice List.
- To delete microservices in batches, select the microservices to be deleted and click Delete above the microservices.
- To delete one microservice, locate the row that contains the microservice to be deleted and click Delete in the Operation column.
- In the displayed dialog box, enter DELETE to confirm the deletion and click OK.
Feedback
Was this page helpful?
Provide feedbackThank you very much for your feedback. We will continue working to improve the documentation.See the reply and handling status in My Cloud VOC.
For any further questions, feel free to contact us through the chatbot.
Chatbot


