Buying a CCE Autopilot Cluster
CCE Autopilot allows you to create serverless clusters that offer optimized Kubernetes compatibilities and free you from having to deal with complex O&M. After a CCE Autopilot cluster is created, you can deploy applications without purchasing nodes or maintaining the deployment, management, and security of nodes. You only need to focus on the implementation of application service logic, which greatly reduces your O&M costs and improves the reliability and scalability of applications.
Constraints
- After a cluster is created, the following items cannot be changed:
- Cluster type
- Network settings, such as the VPC, pod subnet, and Service CIDR block
- When using a CCE Autopilot cluster, you must pay attention to the quotas of related resources and reserve sufficient quotas. The following table lists the resources required by each cluster.
Table 1 Required cluster resources Service
Resource
Minimum Usage
Minimum Usage Description
Quota in a Region
Quota Increase
CCE
Cluster
1
-
Maximum number of clusters that can be created by each account in a region: 50
Increase the quota on the My Quotas page.
VPC
VPC
1 per cluster
Select one VPC for each cluster to provide an isolated, private virtual network environment for the cluster.
Maximum number of VPCs that can be created by each account in a region: 5
Subnet
1 per cluster
At least one subnet must be selected for each cluster to allocate container IP addresses.
By default, the cluster control plane occupies eight IP addresses for control plane deployment and interconnection with external services.
Maximum number of subnets that can be created by each account in a region: 50
Security group
2 per cluster
Two security groups are automatically created for each cluster for network access control of the cluster control plane and elastic network interfaces.
Maximum number of security groups that can be created by each account in a region: 100
Security group rules
7 per cluster
Seven security group rules are automatically added for each cluster to allow traffic over specified ports and ensure normal network communication in the cluster.
Maximum number of security groups rules that can be added by each account in a region: 1,000
VPC Endpoint
Endpoint
3 per cluster
Reserve at least three endpoints for each cluster so that the cluster can access peripheral services such as SWR and OBS.
Maximum number of VPC endpoints that can be created by each account in a region: 50
Domain Name Service (DNS)
Private zone
2 per cluster
Each cluster requires at least two private zones for normal communication within the cluster or across clusters.
Maximum number of private zones that can be created by each account in a region: 50
Record set
6 per cluster
Each cluster requires at least six DNS record sets for mapping specified domain names to IP addresses or other domain names in the cluster.
Maximum number of record sets that can be added by each account in a region: 500
Step 1: Log In to the CCE Console
- Log in to the CCE console.
- On the Clusters page, click Buy Cluster in the upper right corner.
Step 2: Configure the Cluster
On the Buy Cluster page, configure the parameters.
Basic Settings

|
Parameter |
Example Value |
Description |
|---|---|---|
|
Type |
CCE Autopilot Cluster |
CCE allows you to create various types of clusters for diverse needs.
For more information about cluster types, see Cluster Comparison. |
|
Cluster Name |
autopilot-example |
Enter a cluster name. Cluster names in the same account must be unique. Enter 4 to 128 characters. Start with a lowercase letter and do not end with a hyphen (-). Only lowercase letters, digits, and hyphens (-) are allowed. |
|
Enterprise Project |
default |
This parameter is only available for enterprise users who have enabled Enterprise Project Management Service (EPS). After you select an enterprise project (for example, default), the cluster and resources in the cluster are created in the selected enterprise project. You can use enterprise projects to manage clusters and other resources (such as elastic load balancers and EVS disks). For more information, see Enterprise Management. If there is no special requirement, you can select default. |
|
Cluster Version |
v1.31 |
Select the Kubernetes version used by the cluster. You are advised to select the latest version. |
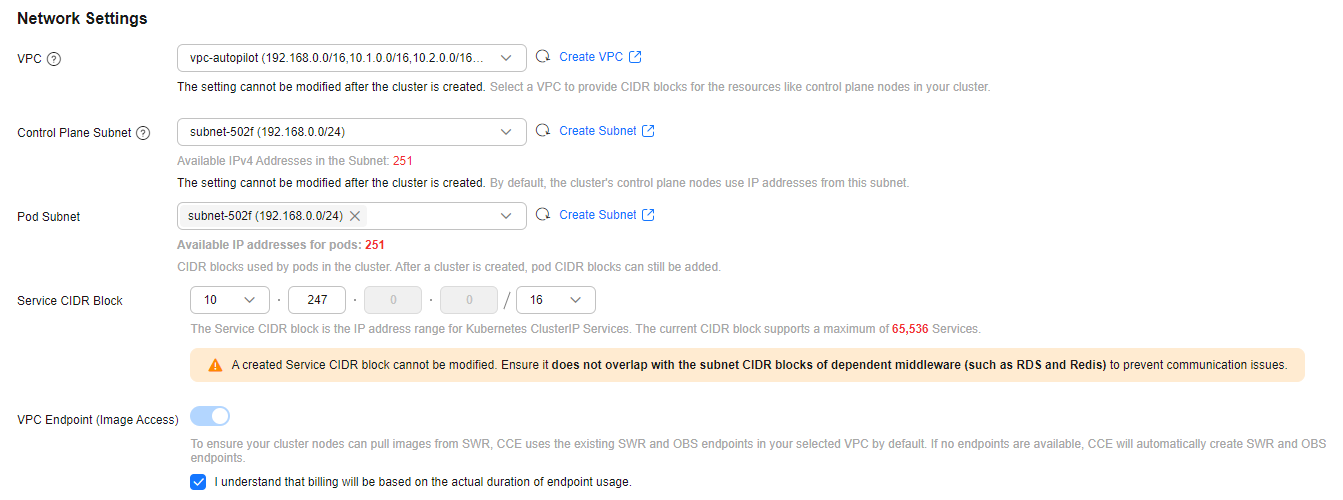
Network Settings

|
Parameter |
Example Value |
Description |
|---|---|---|
|
VPC |
vpc-autopilot |
Select a VPC where the cluster will be running. If no VPC is available, click Create VPC on the right to create one. For details, see Creating a VPC and Subnet. The VPC cannot be changed after the cluster is created. |
|
Control Plane Subnet |
subnet-502f |
Select the subnet where the control plane is located. The cluster control plane node uses the IP address in this subnet by default. Ensure that the subnet has sufficient available IPv4 addresses. The subnet cannot be modified after being created. If no subnet is available, click Create Subnet on the right to create one. For details, see Creating a VPC and Subnet. |
|
Pod Subnet |
subnet-502f |
Select the subnet where the pods will be running. Each pod requires a unique IP address. The number of IP addresses in a subnet determines the maximum number of pods in a cluster and the maximum number of containers. After the cluster is created, you can add subnets. If no subnet is available, click Create Subnet on the right to create one. For details, see Creating a VPC and Subnet. |
|
Service CIDR Block |
10.247.0.0/16 |
Select a Service CIDR block, which will be used by containers in the cluster to access each other. This CIDR block determines the maximum number of Services. After the cluster is created, the Service CIDR block cannot be changed. |
|
VPC Endpoint (Image Access) |
- |
To ensure that your cluster nodes can pull images from SWR, existing SWR and OBS endpoints in the selected VPC are used by default. If there are no such endpoints, new SWR and OBS endpoints will be automatically created. VPC endpoints are billed. For details, see VPC Endpoint Price Calculator. |
Alarm Center (Optional)
Alarm Center offers comprehensive cluster alarm functions. When there is a fault in a cluster , CCE will promptly trigger an alarm. This helps maintain service stability. For details, see Configuring Alarms in Alarm Center.

|
Parameter |
Description |
Modifiable After Cluster Creation |
|---|---|---|
|
Enable Alarm Center |
If this option is selected, Alarm Center is automatically enabled for the cluster, and default alarm rules are created. For details about alarm rules, see Table 1. Metric alarm rules rely on the Cloud Native Cluster Monitoring add-on to report data to AOM. If this add-on is not installed or connected to AOM, the alarm center will not create such alarm rules. |
√ |
|
Contact Group |
Select one or more contact groups to manage alarm notifications by group. After a contact group is selected, CCE automatically pushes alarms to the contact group based on alarm rules. Alarm notifications are billed. For details, see Simple Message Notification Billing. |
√ |
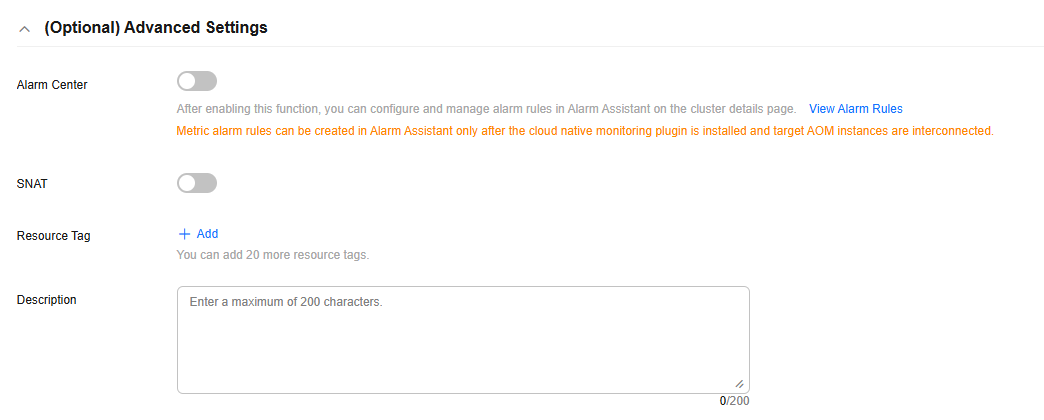
Advanced Settings (Optional)

|
Parameter |
Example Value |
Description |
|---|---|---|
|
SNAT |
Disabled |
This option is disabled by default, and the cluster can access the Internet through a NAT gateway. By default, an existing NAT gateway in the selected VPC is used. If there are no NAT gateways, CCE Autopilot automatically creates a NAT gateway with default specifications, binds an EIP to the NAT gateway, and configures SNAT rules. The NAT gateway will be billed. For details, see NAT Gateway Billing. |
|
Resource Tag |
- |
You can add resource tags to classify resources. You can create predefined tags on the Tag Management Service (TMS) console. The predefined tags are available to all resources that support tags. You can use predefined tags to improve the tag creation and resource migration efficiency. For details, see Creating Predefined Tags.
|
|
Description |
- |
Enter a maximum of 200 characters except the following: ^~#$%&*<>()[]{}"'\. |
Step 3: Select Add-ons
Click Next: Select Add-on. On the displayed page, select the add-ons to be installed. For details about the parameters, see Figure 5, Table 6, and Table 7.
|
Add-on |
Example Value |
Description |
|---|---|---|
|
- |
This add-on is installed by default. It provides DNS resolution for your cluster and can be used to access the cloud DNS servers. |
|
Add-on |
Example Value |
Description |
|---|---|---|
|
Kubernetes Metrics Server |
- |
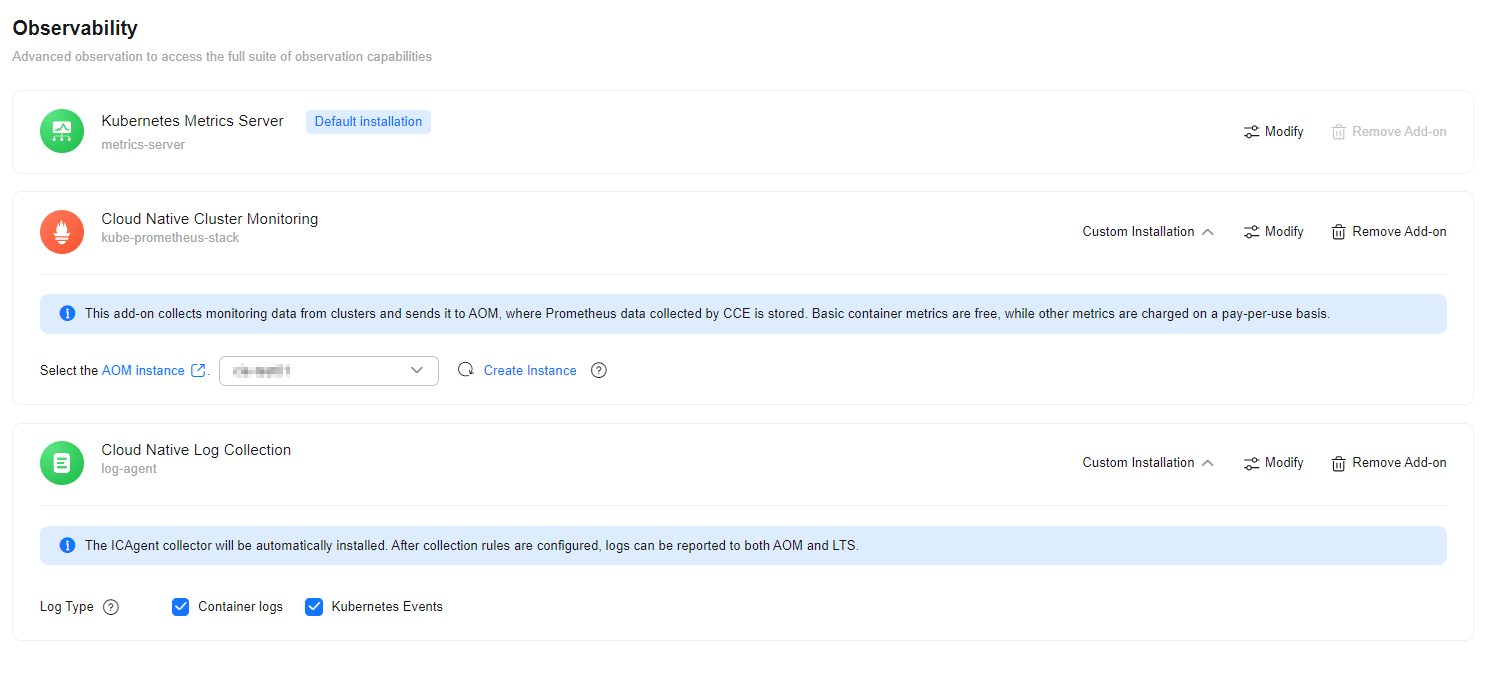
This add-on is installed by default. It collects resource usage metrics, such as the container CPU and memory usages, for the cluster. |
|
Select this add-on. |
This add-on is optional. If selected, it will be automatically installed. It collects monitoring metrics for your cluster and reports the metrics to Application Operations Management (AOM). The agent mode does not support HPA based on custom Prometheus statements. If related functions are required, install this add-on manually after the cluster is created. If this add-on is selected, pod billing is involved. You can view the prices on the console. |
|
|
Select this add-on. |
This add-on is optional. If selected, it will be automatically installed. Cloud Native Log Collection helps report logs to LTS. After the cluster is created, you are allowed to obtain and manage collection rules on the Logging page of the CCE cluster console. LTS does not charge you for creating log groups and offers a free quota for log collection every month. You pay only for log volume that exceeds the quota. For details, see Price Calculator. For details, see Collecting Logs. If this add-on is selected, pod billing is involved. You can view the prices on the console. |
Step 4: Configure Add-ons

Add-on installation consumes resources, and you will be billed for these resources. The actual resource consumption and expenditures may vary. View the details on the console.
Click Next: Configure Add-on and configure add-ons. For details about the parameters, see Figure 6 and Table 8. To modify add-on settings, click Modify in the right of the add-on.
|
Add-on |
Example Value |
Description |
|---|---|---|
|
Cloud Native Cluster Monitoring |
test |
Select an AOM instance for the add-on to report metrics. If no AOM instance is available, create one first. Basic metrics are free, but custom metrics are billed based on the standard pricing of AOM. For details, see AOM Pricing Details. |
|
Cloud Native Log Collection |
Select Container log and Kubernetes events. |
Select the logs to be collected. If enabled, a log group named k8s-log-{clusterId} will be automatically created, and a log stream will be created for each selected log type.
If log collection is disabled, choose Logging in the navigation pane of the cluster console after the cluster is created and enable this option. LTS does not charge you for creating log groups and offers a free quota for log collection every month. You pay only for log volume that exceeds the quota. For details, see Price Calculator. For details, see Collecting Logs. |
Step 5: Confirm the Configuration
Click Next: Confirm Settings. The cluster resource list is displayed. Confirm the information and click Submit.
It takes about 5 to 10 minutes to create a cluster. You can click Back to Cluster Management to perform other operations or click Go to Cluster Events to view the cluster details.
Related Operations
After a cluster is created, you can use kubectl, the Kubernetes command line (CLI) tool, to connect to the cluster. For details, see Connecting to a Cluster Using kubectl.
Feedback
Was this page helpful?
Provide feedbackThank you very much for your feedback. We will continue working to improve the documentation.See the reply and handling status in My Cloud VOC.
For any further questions, feel free to contact us through the chatbot.
Chatbot


