
Installation Guide for Private Deployment
Private deployment involves packaging and downloading a project using the enterprise edition, then installing and deploying it on your intranet.
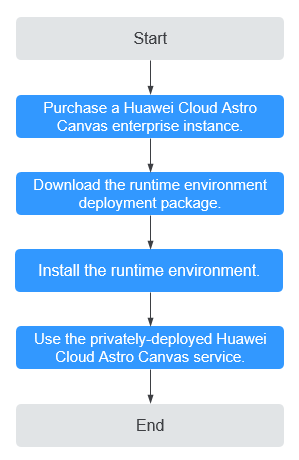
Procedure
Figure 1 shows the process of private deployment.
- Step 1: Purchase an Enterprise Edition Instance
Purchase an enterprise edition instance first.
- Step 2: Download the Runtime Environment Package
Download the runtime environment deployment package from the enterprise edition page to deploy the Huawei Cloud Astro Canvas runtime environment on your server.
- Step 3: Install the Runtime Environment
On the local server, install the runtime environment deployment package and obtain the server code. Register the server code to generate a key for the enterprise-edition Huawei Cloud Astro Canvas. The Huawei Cloud Astro Canvas can be accessed only after the key is bound to the server.
- Step 4: Use the Privately-Deployed Huawei Cloud Astro Canvas Service
Install a large screen deployment package and update its configuration in the privately-deployed Huawei Cloud Astro Canvas runtime environment.
Software and Hardware Requirements
The system and hardware requirements are as follows:
- CentOS 7.0 64-bit Linux
- 4-core CPU running at 4 GHz
- 8 GB memory
- 100 GB hard disk
Step 1: Purchase an Enterprise Edition Instance
- Go to the page of purchasing a Huawei Cloud Astro Canvas instance.
- Select the enterprise edition and specify the required duration. Click Buy Now.
- Choose a payment method and then click to confirm your payment.
- After you pay for the order, click the button to return to the Huawei Cloud Astro Canvas console.
On the console, you can view the installation status of the instance. If the instance status is Running, it has been installed and is ready for use.
Figure 2 Console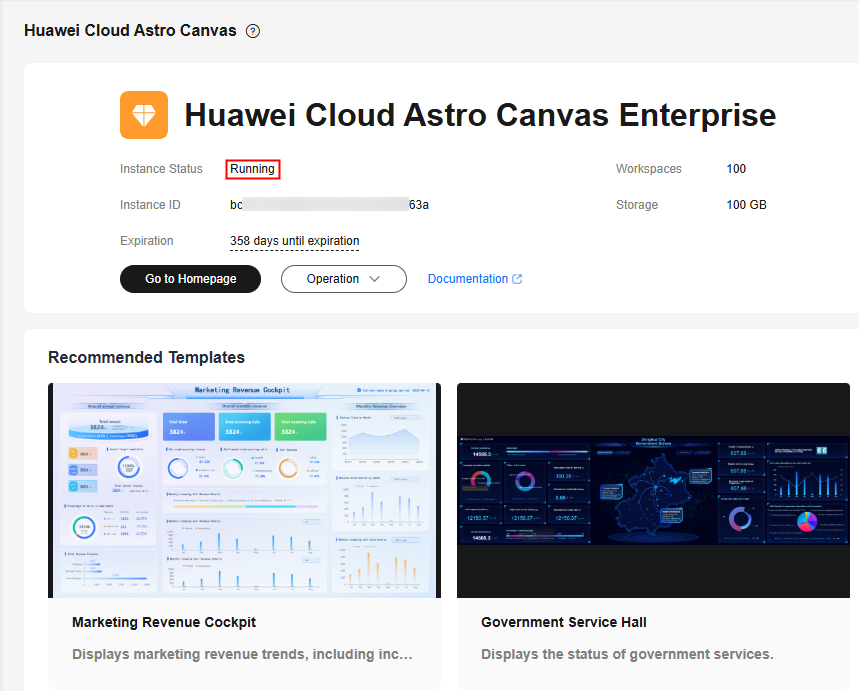
- Click Go to Homepage to go to the Huawei Cloud Astro Canvas page to develop and publish a page.
For details about how to use Huawei Cloud Astro Canvas to develop large screens, see Creating a Page.
Step 2: Download the Runtime Environment Package
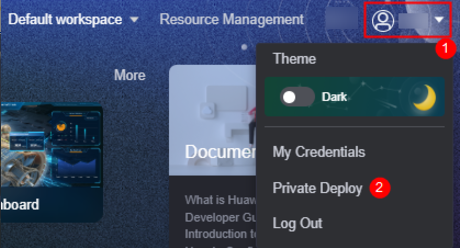
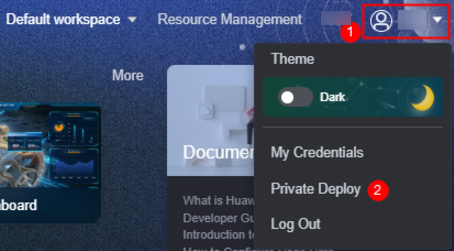
- On the Huawei Cloud Astro Canvas console, click Go to Homepage.
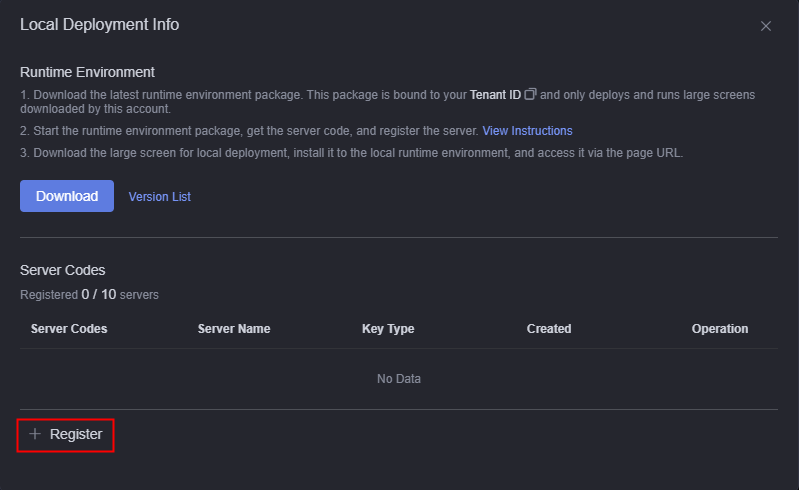
- In the upper right corner of the page, click the account name and choose Private Deploy.
Figure 3 Choosing Private Deploy
- In the displayed dialog box, click Download to download the runtime environment deployment package.
The runtime environment deployment package is used to deploy the Huawei Cloud Astro Canvas service on your server. The package name is AstroCanvas_Runtime.zip. To download the deployment package of a historical version, click Version List and click
 next to the corresponding version.Figure 4 Downloading the runtime environment deployment package
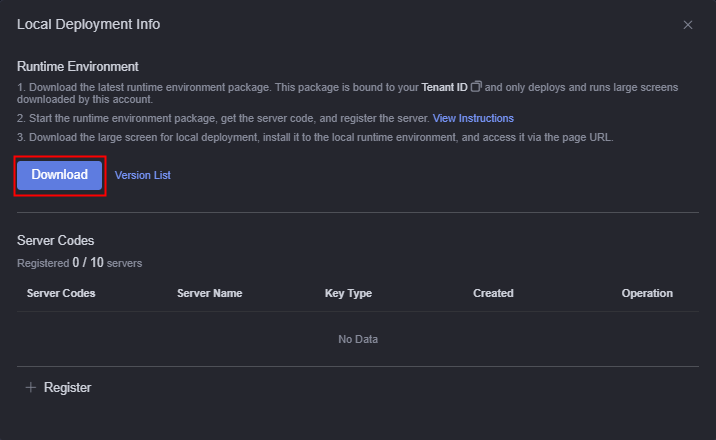
Step 3: Install the Runtime Environment
- Deploy the Huawei Cloud Astro Canvas service.
- Log in to your server and create an installation directory.
cd /home/
mkdir canvas_private
canvas_private indicates the installation directory, which can be customized. This section describes how to create an installation directory in the home directory.
- Upload the runtime environment deployment package (AstroCanvas_Runtime.zip) obtained in Step 2: Download the Runtime Environment Package to the installation directory.
- Decompress the uploaded deployment package and go to the directory generated after the decompression.
unzip AstroCanvas_Runtime.zip
cd AstroCanvas_Runtime
Figure 5 Content in the decompressed package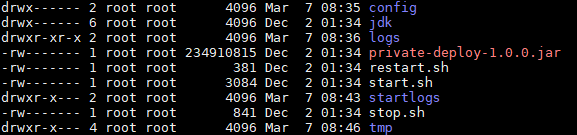
- Go to the config directory and add the application.yml configuration file.
cd config
vi application.yml
Add the following content to the configuration file:# Configure the IP address of the current host (127.0.0.1 by default). hostIp: 10.10.*.* # Configure the timeout interval of the HTTP connector (3000 by default). http: connectTimeout: 30000 socketTimeout: 30000 magno: deploy: # Configure the startup port of the private environment (8081 by default). serverPort: 19996 # Whether to enable anonymous access. The default value is false. If anonymous access is enabled, change the value to true. enableAnonymous: false # Tenant ID tenantId: tenant-2bb76b9b9f24****09737a83tenantId indicates the tenant ID. For details, see Step 2: Download the Runtime Environment Package. Go to the local deployment information page. Click
 next to the tenant ID to copy the tenant ID.Figure 6 Copying the tenant ID
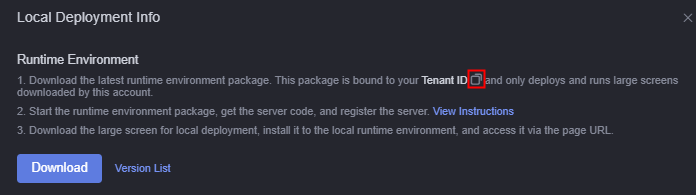
- Go to the directory created after decompression and execute the startup command.
cd /home/canvas_private/AstroCanvas_Runtime
sh start.sh
If the startup fails, view the startup log /home/canvas_private/AstroCanvas_Runtime/startlogs/start.log. If the system displays a message about insufficient permissions, go back to the installation directory and set the permissions for all files to the highest level.cd /home/canvas_private/AstroCanvas_Runtime chmod -R 777 AstroCanvas_Runtime

Other common operations and commands are as follows:
- Viewing logs: /home/canvas_private/AstroCanvas_Runtime/logs/***-PrivateDeployApp.log
- Restarting the service if the application.yml file is modified: sh restart.sh
- Stopping the service: sh stop.sh
- Log in to your server and create an installation directory.
- After starting the service, enter the IP address and port number of the Huawei Cloud Astro Canvas server into the browser's address box to obtain the server code.
http://10.10.*.*:19996/
10.10.*.* indicates the server IP address configured when application.yml is modified in 1.d, and 19996 indicates the port number.
Figure 7 Copying the machine code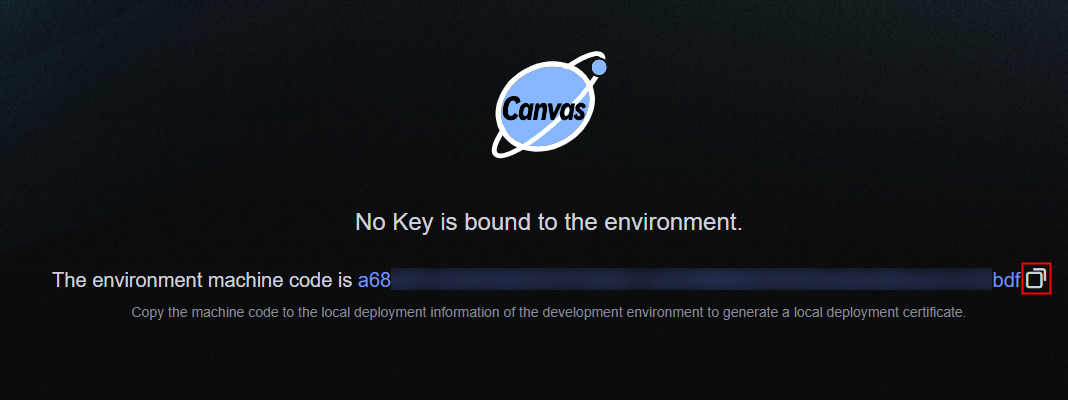
- Register the server.
- On the Huawei Cloud Astro page, click the account name in the upper right corner and choose Private Deploy.
Figure 8 Selecting Private Deploy
- On the local deployment information page, click Register.
Figure 9 Selecting the new server code
- Enter the server code and name of the server, and click Confirm to generate a test key.
Figure 10 Generating a test key
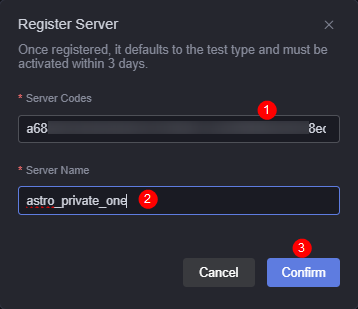
Set Server Codes to the value obtained from 2 and set the server name based on the site requirements.
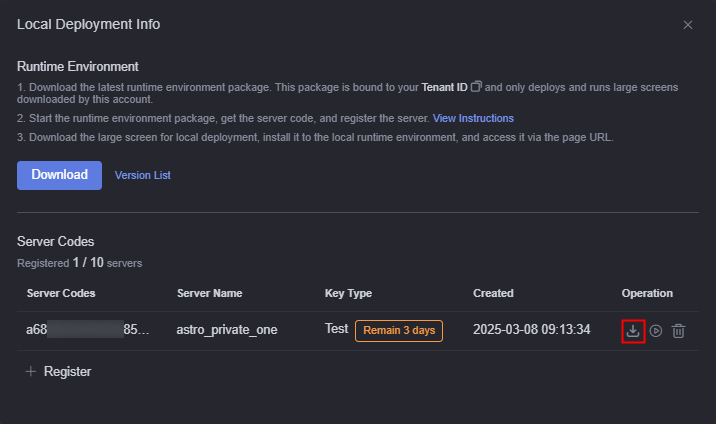
- Return to the local deployment information page, click next to the server code, and download the test key file runtime.key.
Figure 11 Downloading the test key file
- Upload the obtained test key to the /home/canvas_private/AstroCanvas_Runtime/config directory to verify the server deployment.
cd /home/canvas_private/AstroCanvas_Runtime/config
- The test key is valid for three days. After it expires, use the server code to register a new test key or convert the test key to a formal key. Once the new key is downloaded, delete the original key and replace it with the new one.
- When generating a new test key using the server code, delete the invalid key first and then register the new one. Note that one server code can register only one key.
Enter the Huawei Cloud Astro Canvas server's IP address and port number in the browser's address box. If the Huawei Cloud Astro Canvas page appears, the deployment is successful.http://10.10.*.*:19996/
10.10.*.* indicates the public IP address of the server configured when application.yml is modified in 1.d, and 19996 indicates the port number.
- After the verification is complete, click
 in the Operation column of the test key. On the page that is displayed, click OK to enable the test key.
Figure 12 Enables the test key.
in the Operation column of the test key. On the page that is displayed, click OK to enable the test key.
Figure 12 Enables the test key.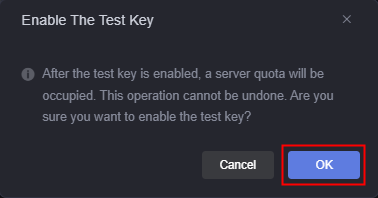
After the test key is enabled, return to the local deployment information page. You can view that the value of Key Type changes from Test to Formal.
Figure 13 Formal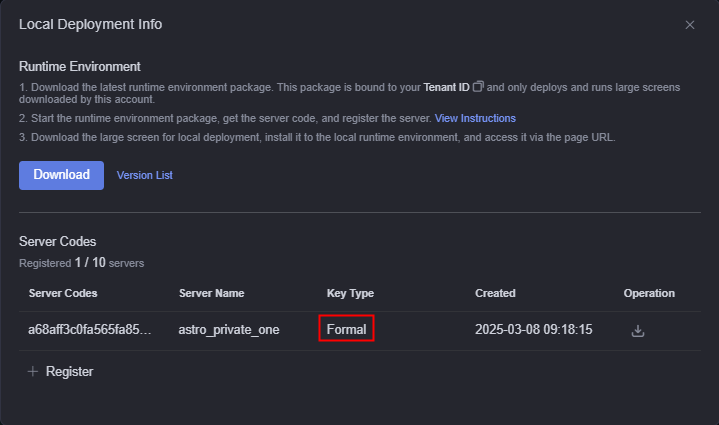
- On the Huawei Cloud Astro page, click the account name in the upper right corner and choose Private Deploy.
- Download the formal key file (runtime.key) and replace it with the runtime.key file of the test key. After the replacement, restart the service.
- Set up a username and password for accessing the privately-deployed Huawei Cloud Astro Canvas service.
- Go to the /home/canvas_private/AstroCanvas_Runtime directory.
cd /home/canvas_private/AstroCanvas_Runtime
- Edit the userConfig.json file and set the username and password for logging in to Huawei Cloud Astro Canvas.
vi userConfig.json
The following shows an example configuration:{ "accounts": [ { "name": "user1", "pwd": "Login password of user1" }, { "name": "user2", "pwd": "Login password of user2" } ] } - Save the modifications and close the file.
- Go to the /home/canvas_private/AstroCanvas_Runtime directory.
Step 4: Use the Privately-Deployed Huawei Cloud Astro Canvas Service
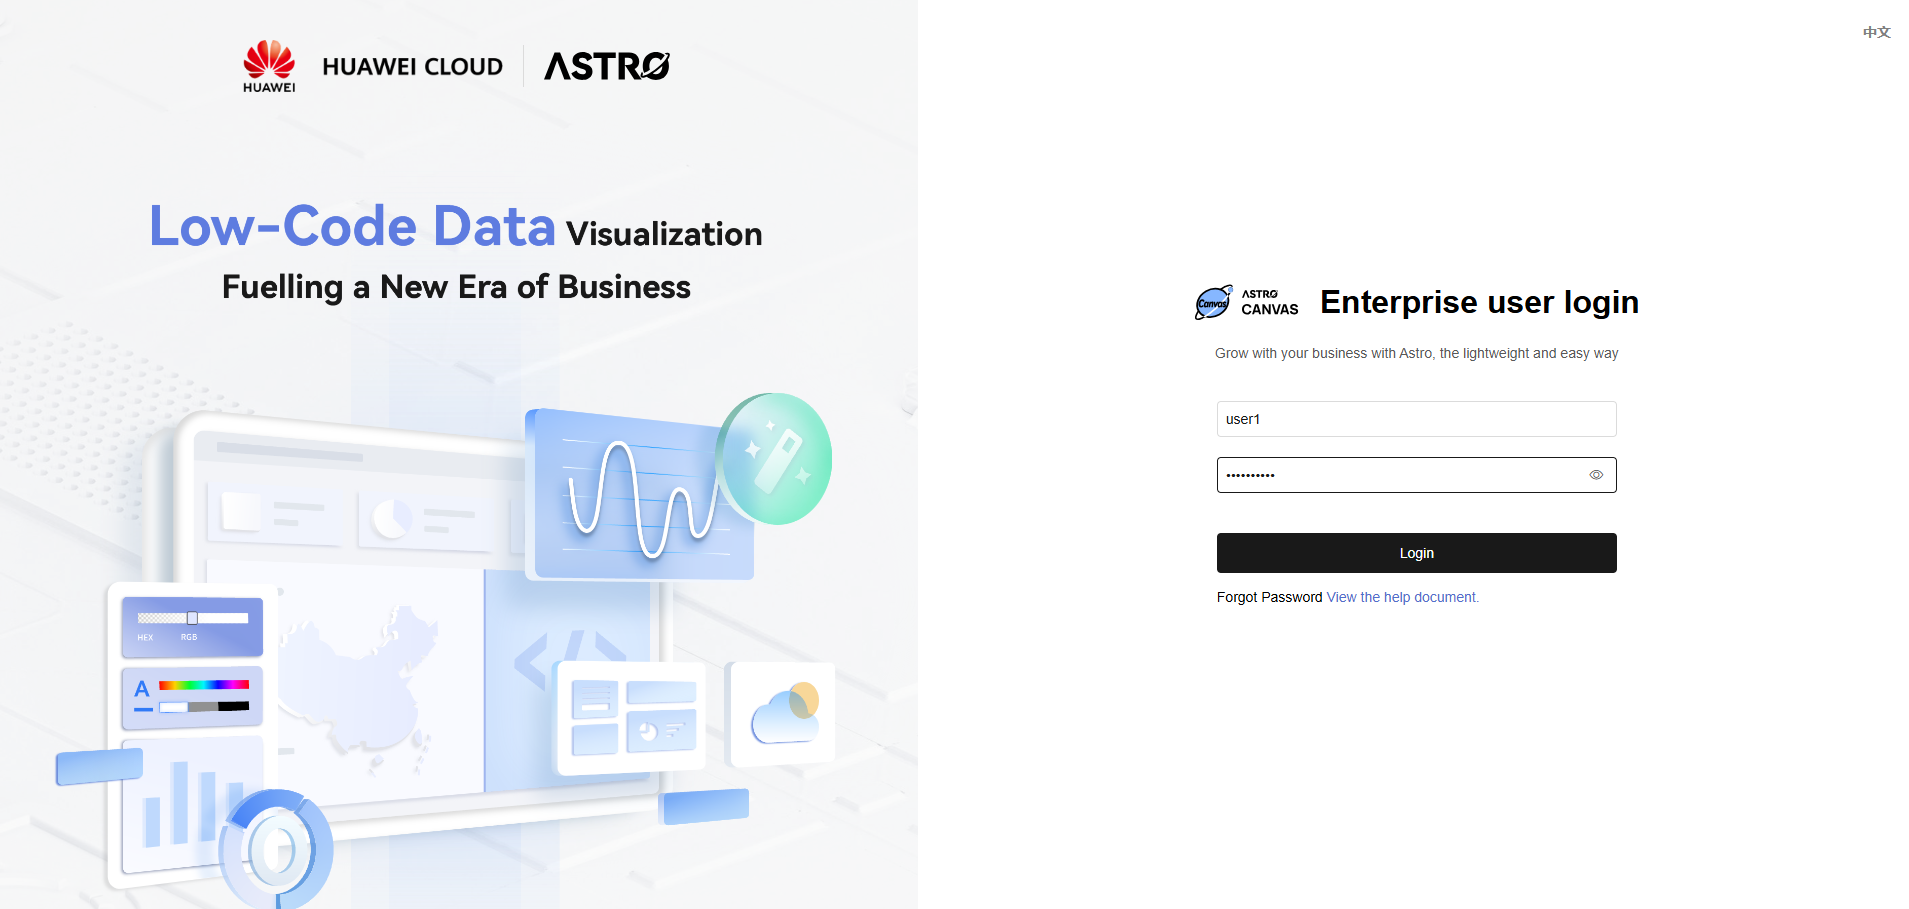
- Log in to the privately-deployed Huawei Cloud Astro Canvas service.
- In the address box of a browser, enter the IP address and port number of the Huawei Cloud Astro Canvas server. The login page is displayed.
http://10.10.*.*:19996/
10.10.*.* indicates the public IP address of the server configured when application.yml is modified in 1.d, and 19996 indicates the port number.
- Enter the username and password configured in 5 to log into the service.
Figure 14 Entering the username and password
- In the address box of a browser, enter the IP address and port number of the Huawei Cloud Astro Canvas server. The login page is displayed.
- Obtain the local deployment package of a large screen.
- In Step 1: Purchase an Enterprise Edition Instance, click Go to Homepage of the Huawei Cloud Astro Canvas instance.
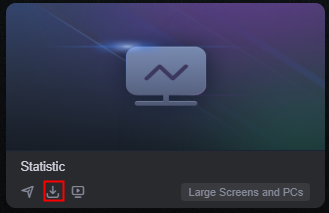
- On the Projects page, move the cursor to a project and click .
Figure 15 Clicking the icon for downloading the local deployment package
- On the displayed page, select the pages to be downloaded and click Download.
The local deployment package of a large screen is used to install the application in the runtime environment and facilitate project migration. The package name is AstroCanvas_Project name_Random code.zip.
Figure 16 Selecting required pages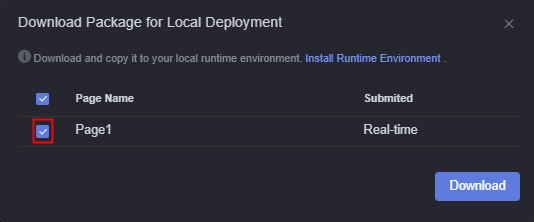
- Add the large screen.
- On the Projects page, click Import Project Package.
- Select the local deployment package (AstroCanvas_Project name_Random code.zip) downloaded in 2.
In the project list, you can see that the project has been imported.
Figure 17 Viewing the imported project
- Configure the data source password and encryption field.
After the local deployment package is imported, if the application package contains the relational database, Prometheus, and HTTP connector data sources, you need to reconfigure the password and encryption field.
Figure 18 Changing the password of a relational database data source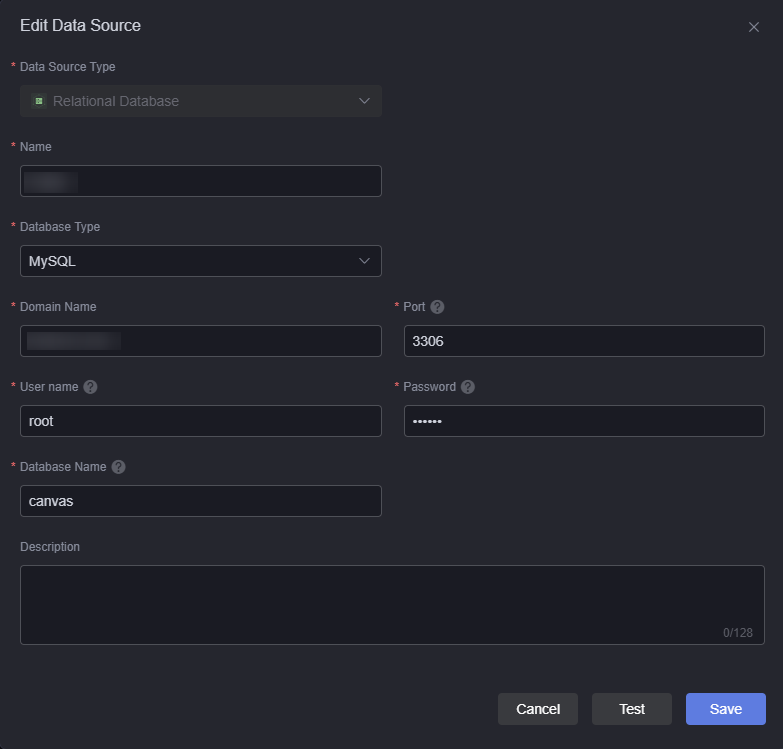 Figure 19 Changing the Prometheus data source password
 Figure 20 Changing the data source encryption field of the HTTP connector
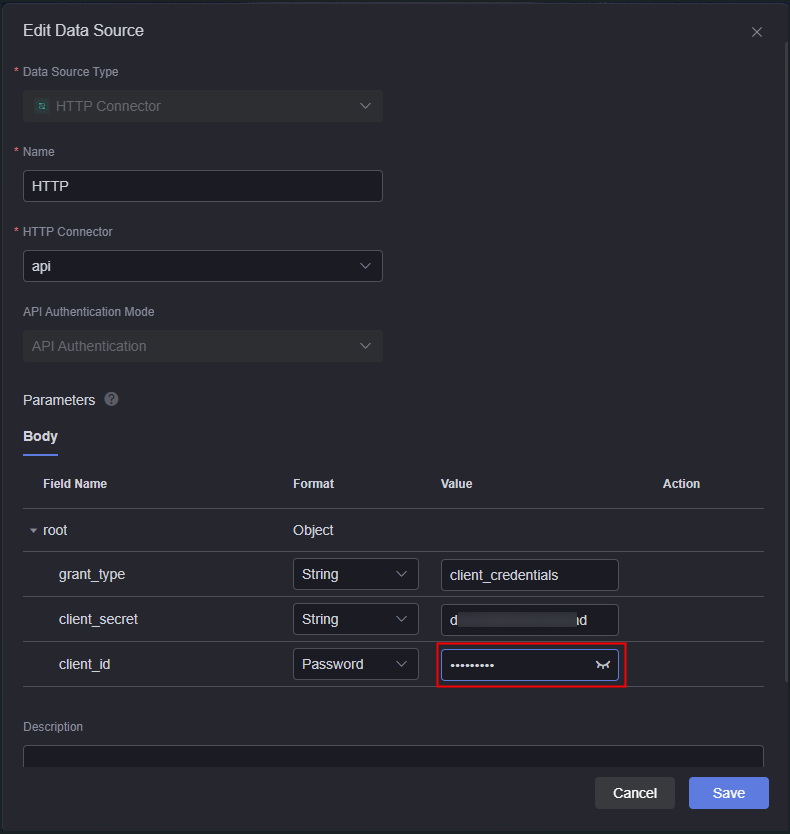
- Access pages in the project.
When you publish a page in the Huawei Cloud Astro Canvas enterprise edition, if token authentication is selected for access restrictions, you can directly click the page URL on the project details page to access it. For details about how to configure token authentication, see Configuring Token Authentication. If a share code is set for access restrictions, the original share code will be cleared when the project is imported into the privately-deployed Huawei Cloud Astro Canvas service. In this case, follow these steps to set the share code again:
- In the project list, click the imported project. The project details page is displayed.
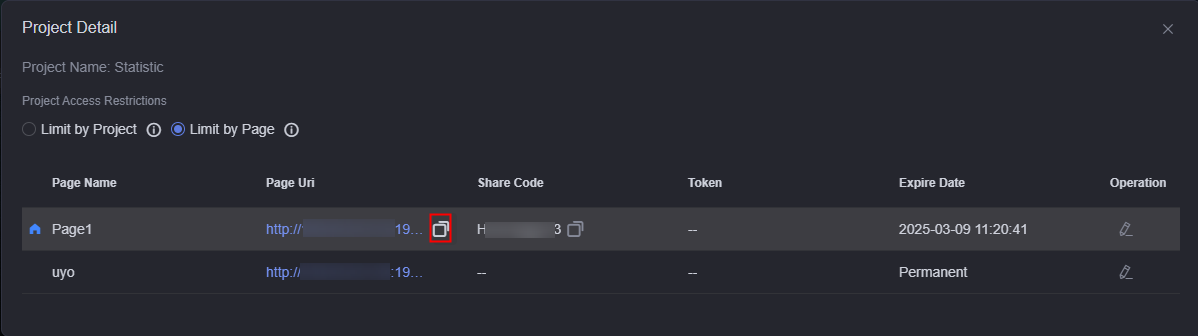
- Click
 next to the page to be accessed and set a share code.
Figure 21 Setting a share code
next to the page to be accessed and set a share code.
Figure 21 Setting a share code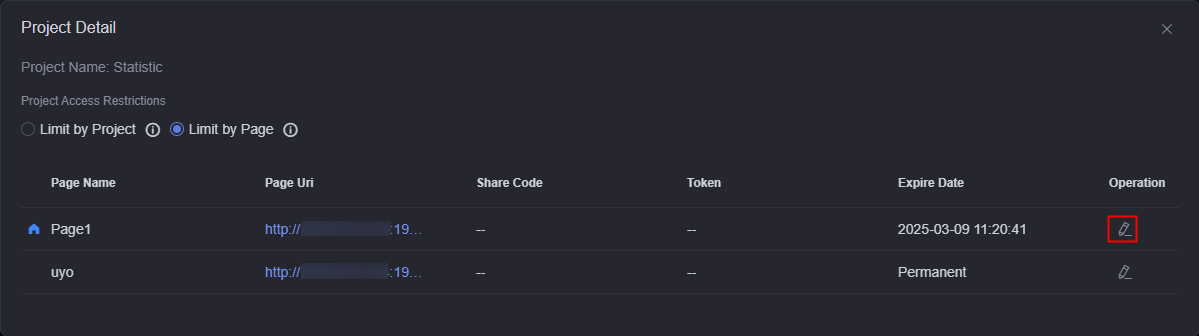
- Enter the share code and click
 to save the settings.
Figure 22 Setting the share code
to save the settings.
Figure 22 Setting the share code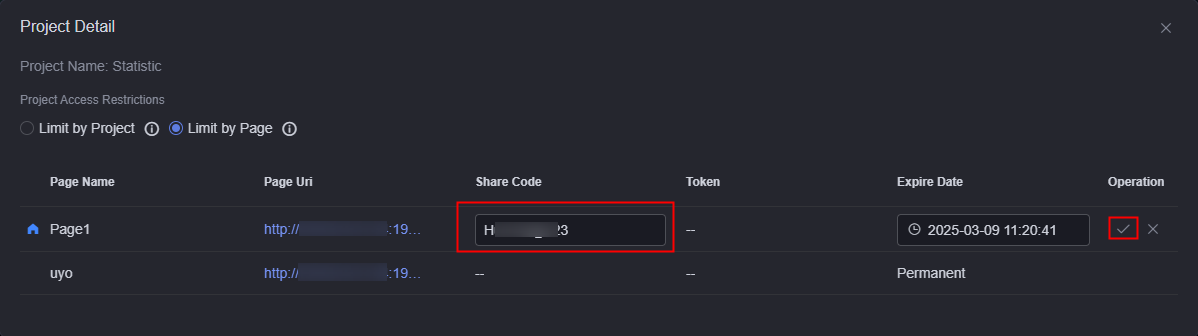
- Click to copy the page URL.
Figure 23 Obtaining the page URL
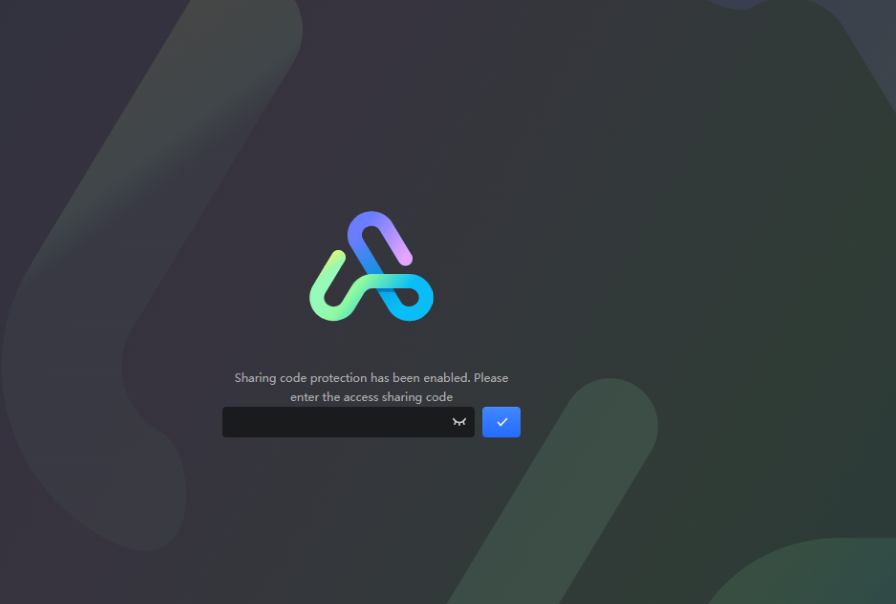
- Enter the obtained address into the browser's address box and input the share code to access the page.
Figure 24 Entering the share code to access the page
(Optional) Adding a Root Directory
The current private deployment does not have a unified root directory. In actual O&M scenarios, if you need to configure it under a specific root directory, follow these steps.
For example, using the root directory canvas, add the following code to the http section in the conf/nginx.conf file of Nginx: During the actual configuration, replace canvas, {IP address of the private deployment}, {Port number of the private deployment}, {IP address of Nginx}, and {Corresponding port number} with the corresponding fields.

After the root directory is configured, the original access address in 1 needs to be changed to http://{IP address of Nginx}:{Corresponding port number}/canvas.
sub_filter_once off;
server {
        listen       8080; #Ensure that the port is not occupied.
        server_name  localhost;

        location /canvas/magno {
            proxy_pass http://{IP address of the private deployment}:{Port number of the private deployment}/magno;
            # Replace the domain name.
            sub_filter 'http://{IP address of the private deployment}:{Port number of the private deployment}' 'http://{IP address of Nginx}:{Corresponding port number}/canvas';
            sub_filter '"http:\/\/{IP address of the private deployment}:{Port number of the private deployment}' '"http://{IP address of Nginx}:{Corresponding port number}/canvas';
            sub_filter '{IP address of the private deployment}:{Port number of the private deployment}' '{IP address of Nginx}:{Corresponding port number}/canvas';

            sub_filter '/magno/studio/dmax_share/auth/' '/canvas/magno/studio/dmax_share/auth/';
            sub_filter '="/resources/' '="/canvas/resources/';
            sub_filter '"\/magno\/gallery' '"\/canvas\/magno\/gallery';
            sub_filter 'magno\\\\/gallery' 'canvas\\\\/magno\\\\/gallery';
            sub_filter '{IP address of Nginx}/magno/render/share/' '{IP address of Nginx}:{Corresponding port number}/canvas/magno/render/share/';
            sub_filter_types *;
        }

        location /canvas/resources {
            proxy_pass http://{IP address of the private deployment}:{Port number of the private deployment}/resources;

            sub_filter '.appBaseUrl' '.appBaseUrls';
            sub_filter '"/magno/render' '"/canvas/magno/render';

            sub_filter_types *;
        }

        location /canvas/global {
            proxy_pass http://{IP address of the private deployment}:{Port number of the private deployment}/global;

            sub_filter '/magno/gallery/asset/globalImageUrl' '/canvas/magno/gallery/asset/globalImageUrl';
            sub_filter '/magno/render/share' '/canvas/magno/render/share';

            sub_filter_types *;
        }

        location /canvas/default {
            proxy_pass http://{IP address of the private deployment}:{Port number of the private deployment}/default;
        }

        location /canvas/obs {
            proxy_pass http://{IP address of the private deployment}:{Port number of the private deployment}/obs;
        }
    }
Feedback
Was this page helpful?
Provide feedbackThank you very much for your feedback. We will continue working to improve the documentation.See the reply and handling status in My Cloud VOC.
For any further questions, feel free to contact us through the chatbot.
Chatbot


