Implementing Association Recommendations Using GES
Scenario
This section describes how to use GES' Real-time Recommendation algorithm to swiftly recommend potential friends with similar preferences. It helps you quickly familiarize yourself with the service usage process. For further guidance on using GES, refer to GES Overview.
Procedure
Before proceeding with the following steps, ensure all necessary preparations have been completed according to Preparations.
- Create a graph: Create a custom graph.
- Import graph data: Once the graph is created, proceed to import graph data.
- Analyze the graph using the real-time recommendation algorithm: Use the real-time recommendation algorithm to analyze the graph based on the obtained query results.
- Release graph resources: Upon completion of graph data analysis, if there is no further need for the graph instance, you are advised to delete the graph to free up resources and prevent additional charges.
Preparations
- Before using GES, you need to sign up for a HUAWEI ID and enable Huawei Cloud services.
If you already have enabled Huawei Cloud services and completed real-name authentication, skip this step.
- Before using GES, check your account status to ensure it is not in arrears or frozen.
Step 1: Create a Graph
- Log in to the GES console. On the displayed Overview page, click Create Graph in the upper right corner.
- The Customize Graph tab page appears.
- Set graph parameters.
- Graph Name: Enter a new graph name or use the default one. Note: The graph name cannot be changed after the graph is created.
- GES Software Version: The latest version is used by default.
- VPC: If your account has VPCs, a VPC is automatically selected. You can change it as needed. You can click View VPC to check the names and IDs of existing VPCs. If no VPCs are available, you need to create a VPC. After the VPC is successfully created, it will be automatically selected.
- Subnet: A subnet is automatically selected by default. If needed, change it to the subnet where you want to create a cluster. To verify the subnet associated with the selected VPC, click View VPC next to VPC.
- Other parameters: Retain the default values.
Figure 1 Network parameters
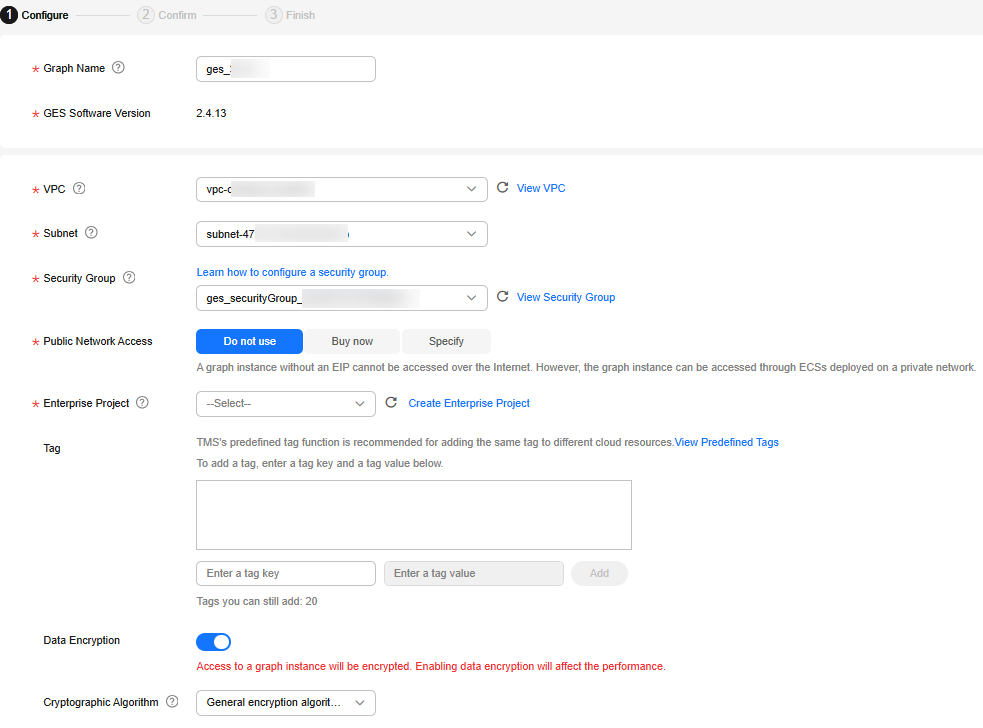 Figure 2 Graph parameters
- Click Next. On the displayed Confirm tab, confirm the configuration and click Submit.
- After the submission is successful, the system will automatically redirect to the Finish tab. You can click Back to Task Center to check the status and running result of the created graph.
- After the graph is created, the graph status changes to Running on the Graph Management page.
Step 2: Import Graph Data
After the graph is created, you need to import graph data. Follow these steps:
- On the Graph Management page, locate the graph you created, click More in its Operation column, and select Import.
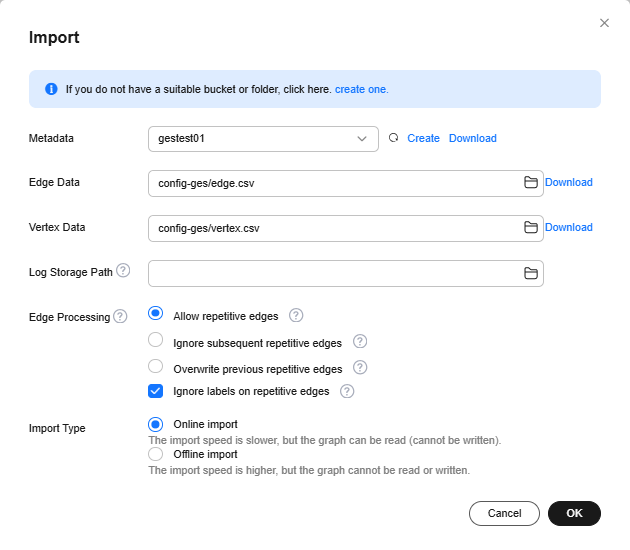
- In the Import dialog box that appears, set the import parameters. See Figure 3.
Click Download next to Metadata, Edge Data, and Vertex Data respectively and save the downloaded three templates to your OBS bucket.

The downloaded templates already include a set of movie data that can be used directly.
- Importing a metadata file:
- On the Metadata Management page, click Import in the upper left corner. In the displayed Import dialog box, select OBS for Type, click Upload next to Select File, upload the metadata file stored in the OBS path, and set Name. Then, click OK. See Figure 4. The imported metadata file will then be displayed on the Metadata Management page.
- Return to the Graph Management page. Locate the graph you created and click Import in the Operation column. In the displayed Import dialog box, select the metadata file you just uploaded in the Metadata drop-down list.
- Edge Data and Vertex Data: Select the templates uploaded in the OBS path.
- Log Storage Path: Leave this parameter blank.
- Edge Processing and Import Type: Retain their default values.
- Importing a metadata file:
- Click OK.
Step 3: Analyze the Graph Using the Real-Time Recommendation Algorithm
- After the import is complete, click Access in the Operation column of the graph.
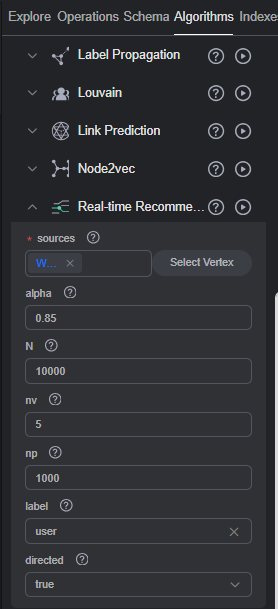
- On the left of the editor page, click the Algorithms tab and find the Real-time Recommendation algorithm.
- Set sources to Will and label to user. This means querying users with preferences similar to Will's. Retain the default values for other parameters.
Figure 5 Setting algorithm parameters
Click
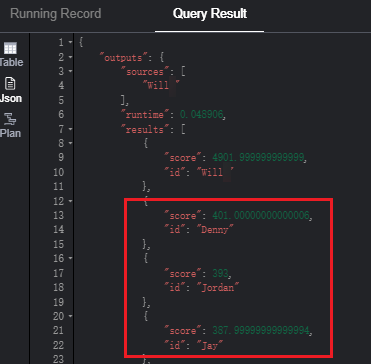
 next to the Real-time Recommendation algorithm. The subgraph consisting of top nodes in the computation result is displayed on the canvas, with node sizes varying according to the final scores. The JSON result is displayed in the query result area.Figure 6 Result display
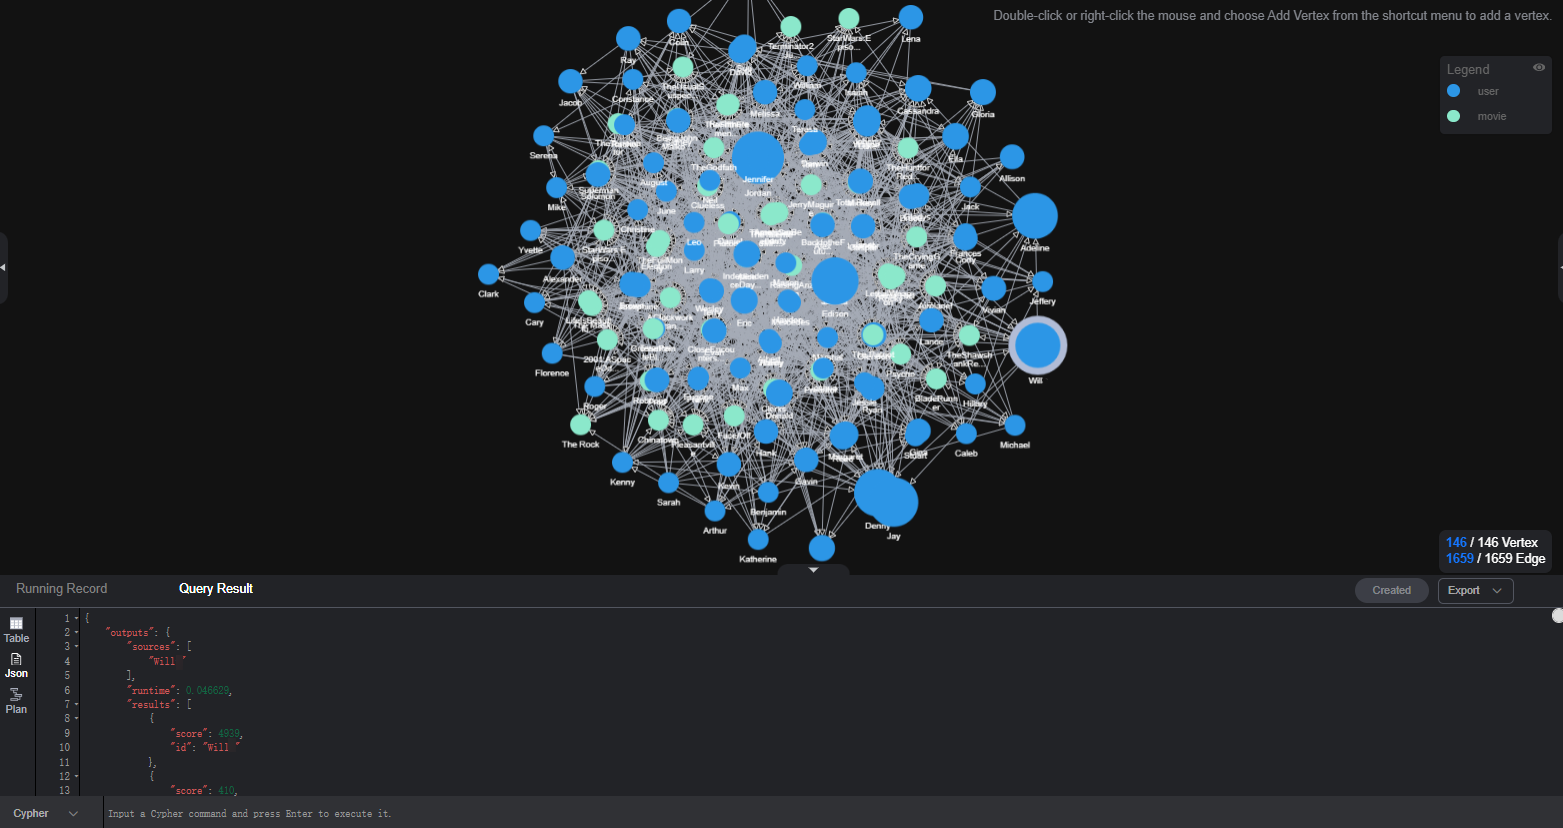
- From the query results, it can be seen that users Denny, Jordan, and Jay have the highest matching degree with Will. This algorithm assists user Will in recommending potential friends with similar preferences.
Step 4: Release Graph Resources
Upon completion of graph data analysis, if there is no further need for the graph instance, you are advised to delete the graph to free up resources and prevent additional charges.
- On the Graph Management page, locate the graph you want to delete, click More in its Operation column, and select Delete.
- In the dialog box that appears, enter DELETE or click Auto Enter, and click OK.
Feedback
Was this page helpful?
Provide feedbackThank you very much for your feedback. We will continue working to improve the documentation.See the reply and handling status in My Cloud VOC.
For any further questions, feel free to contact us through the chatbot.
Chatbot

