Before creating a camera on the NetEco, you need to add the camera to the video surveillance subsystem.
Prerequisites
- The video surveillance subsystem and camera are powered on and connected through a switch.
- The IP addresses of the video surveillance subsystem and camera are in the same network segment.
- The video surveillance subsystem client has been installed. For details, see How Do I Install the Video Surveillance Subsystem Client?
- You have obtained the user name and password of a camera.
Procedure
Expand All
-
Adding a camera on the VCN
- Log in to the VCN IVS client as the Admin user.

- The default User name is Admin, and Password is Change_Me. When a user logs in to the VCN IVS client for the first time, a password change dialog box is displayed, requiring the user to change the password.
- Set Server IP address to the IP address of the VCN.
- The default value of Port is 9900. The default value is recommended.
- In the Quick Setup area, double-click Add Camera.
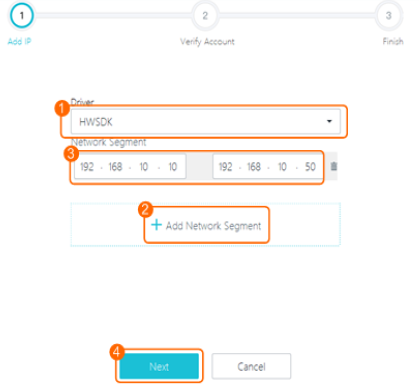
- Set search criteria.
- Set the value of the Drive.

- The default Drive is ONVIF. If an IPC6325 camera is added, select HWSKD for Drive.
- If there are multiple VCNs, set Access server to the VCN which the camera needs to be connected.
- Click
 at the lower left corner, and enter Start IP Addresses and End IP Addresses for the camera, then click Next.
Set Start IP Addresses and End IP Addresses to an appropriate IP address range. If the range is too large, the search process may take a long time.

In the scenario where smart ETH gateways are networked, the camera has an internal IP address and an external IP address, ECC800-Pro searches for the internal IP address of camera.
Figure 1 Setting the start and end IP addresses

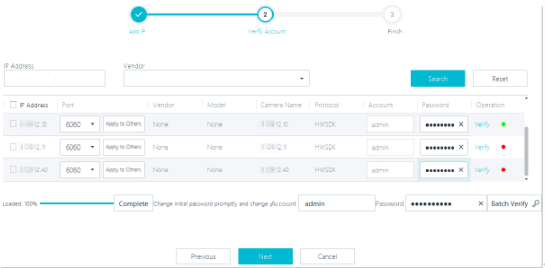
- Search for and verify the camera.
- Click Search.
The system displays the IP address of the camera that is found.
- In the Verify area, enter user name and password of a camera, click Verify.
If the verification succeeds, the camera icon color changes to green.
Figure 2 Verifying the camera user name and password


- Cameras already added to the VCN will not be displayed on the search result page.
- Please confirm that the user name and password are correct. If you enter the incorrect password, and click Verify for three times, the user account will be locked.
- Select the camera to be added, and click Next.
The camera preview page appears.
- Preview the monitored area, and modify parameters such as Camera name, Location, and Brightness as necessary, click Next.
The camera grouping page appears.
- Click Next.
If the Status bar displays  , the camera is successfully added.
- Click Finish.
-
Adding a camera on the IVS1800
- Log in to the iClient client as the administrator user.
Figure 3 Logging in to the iClient

- On the home page of the iClient, choose .
- Right-click an IVS1800 and choose Camera Access.
- Select Auto Batch Access and click Start.
- Set the IP address segment.
Figure 4 Setting an IP network segment


- The driver protocol of IPC6325 and C3220 cameras is HWSDK.
- The IP address segment indicates the start and end IP addresses of cameras.
- You can use IP Address and Vendor to filter the required cameras in thecamera search result and select the required cameras. Alternatively, you can directly select the required cameras in the camera list. Then verify accounts.The default password of the HWSDK protocol is HuaWei123.
Figure 5 Verifying accounts


If there are multiple IVS1800s for multiple smart modules, you are advised to evenly distribute the cameras to each IVS1800.
- Select the cameras to be added and click Next.
- Click Finish.
- Preview live video. On the iClient home page, click Live and drag a camera to the live video pane. If the live video can be properly played, the camera is successfully connected.


