Getting Started
(Optional) Modifying Security Group Rules

- This solution uses port 80 to access Dify. By default, all traffic is allowed. Refer to "Modifying Security Group Rules" to configure the IP address whitelist.
- This solution uses port 22 to remotely log in to the cloud server over SSH. If you need to remotely log in to the cloud server, configure an IP address whitelist by referring to "Modifying Security Group Rules" so you can access the service properly.
- After the solution is successfully deployed, it takes approximately 5 to 10 minutes to initialize the environment. The deployment duration varies depending on the network and bandwidth. You can access the environment only after the deployment is complete.
A security group is a collection of access control rules for traffic to and from cloud resources, such as cloud servers, containers, and databases. Cloud resources associated with the same security group have the same security requirements and are mutually trusted within a VPC.
You can modify security group rules, for example, by adding, modifying, or deleting a TCP port, as follows:
- Adding a security group rule: Add an inbound rule and enable a TCP port if needed.
- Modifying a security group rule: Inappropriate security group settings may introduce serious security risks. You can modify security group rules to ensure the network security of instances like ECSs.
- Deleting a security group rule: If the source or destination IP address of an inbound or outbound security group rule changes, or a port needs to be disabled, you can delete the security group rule.
Using Dify
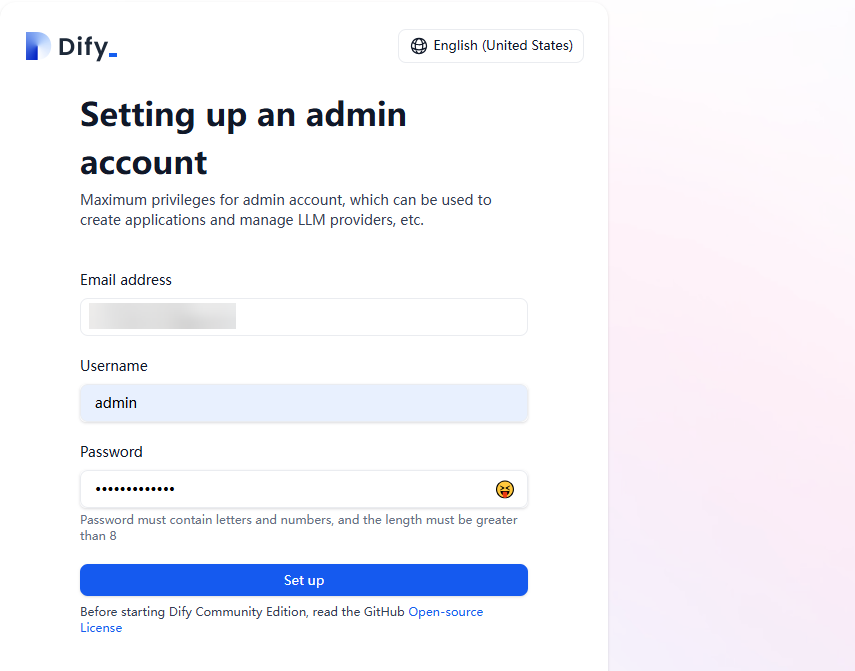
- Log in to the Dify platform: Enter the access address (single-cloud server deployment) provided in step 10 of the quick deployment process to access Dify. Create an administrator account when you first log in by entering the email address, username, and password.
Figure 1 Creating an administrator account
- Open your browser, access the Dify platform page, and enter the email address and password you configured in step 1 to log in to the Dify platform.
Figure 2 Logging in to the Dify platform
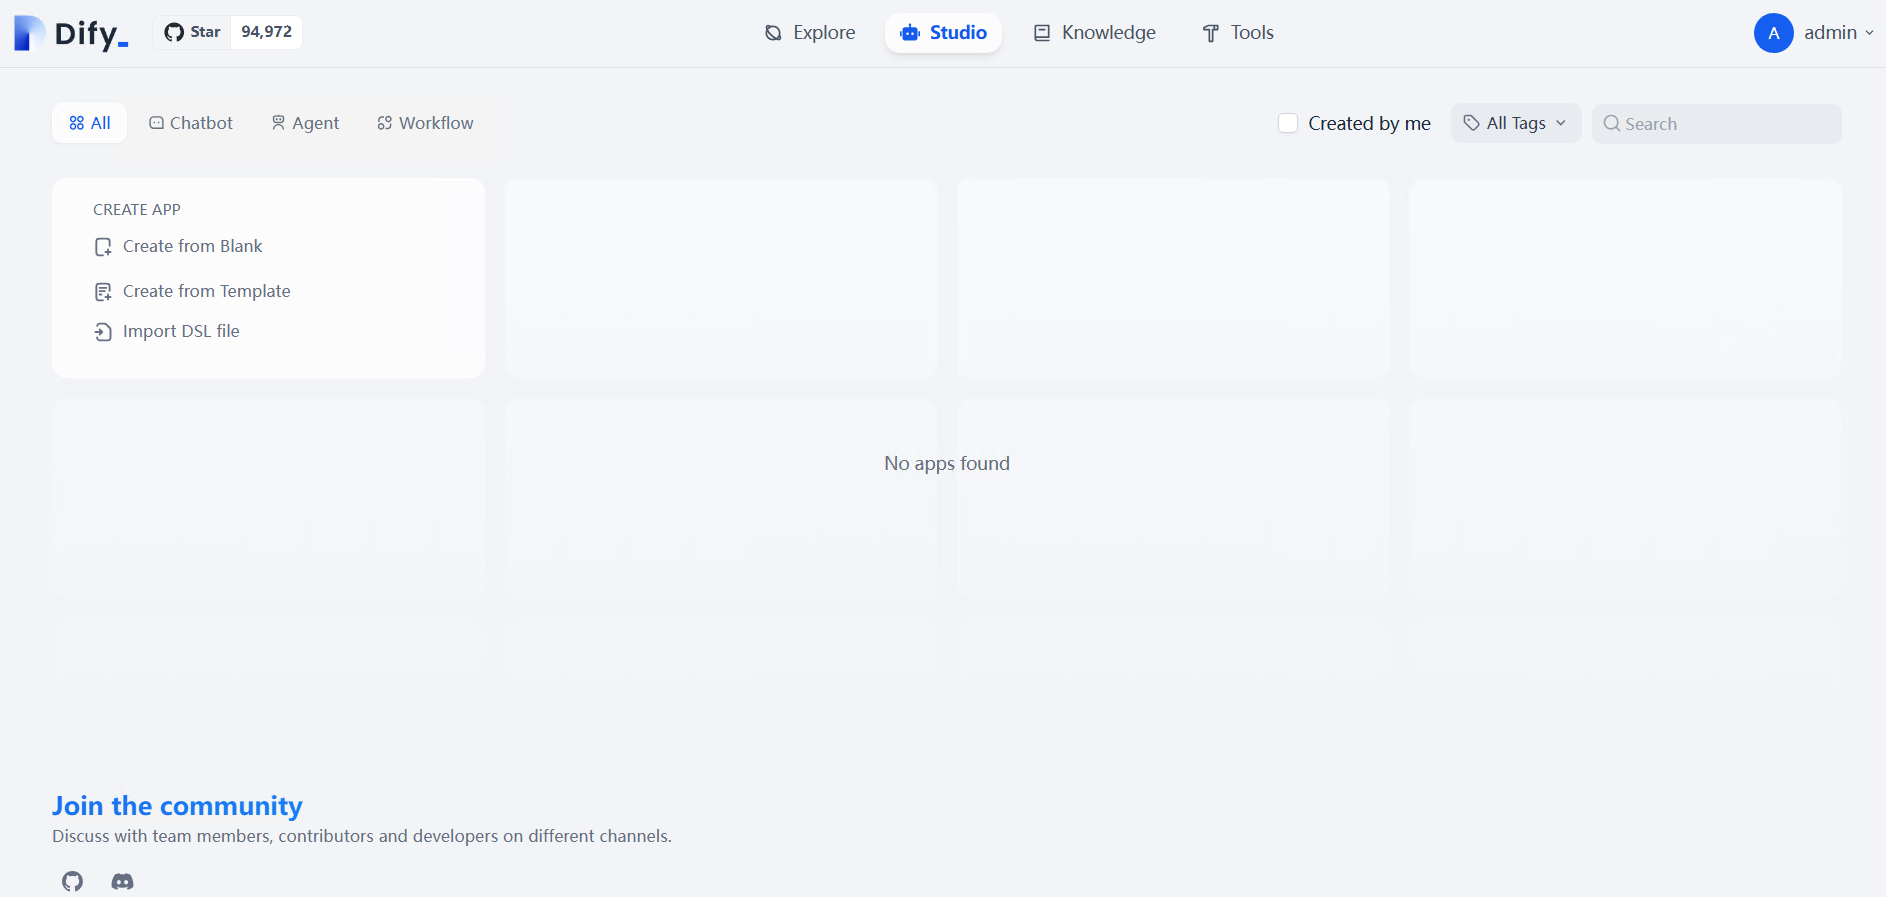
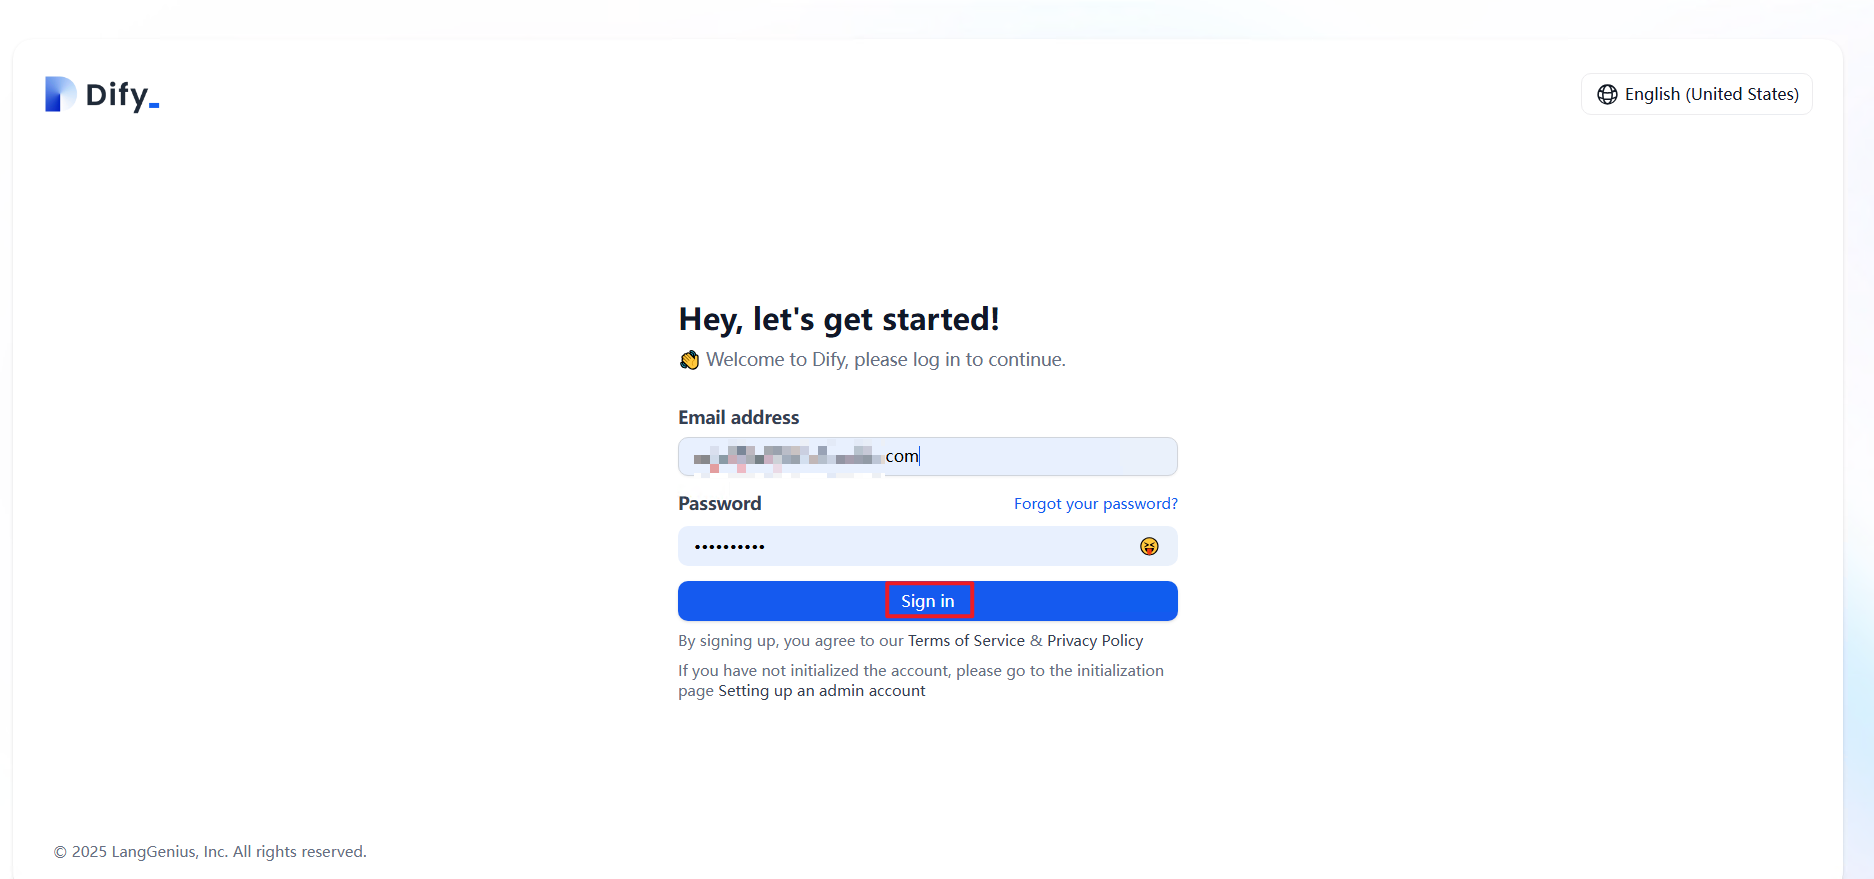 Figure 2 Dify platform
Interconnecting with DeepSeek Models
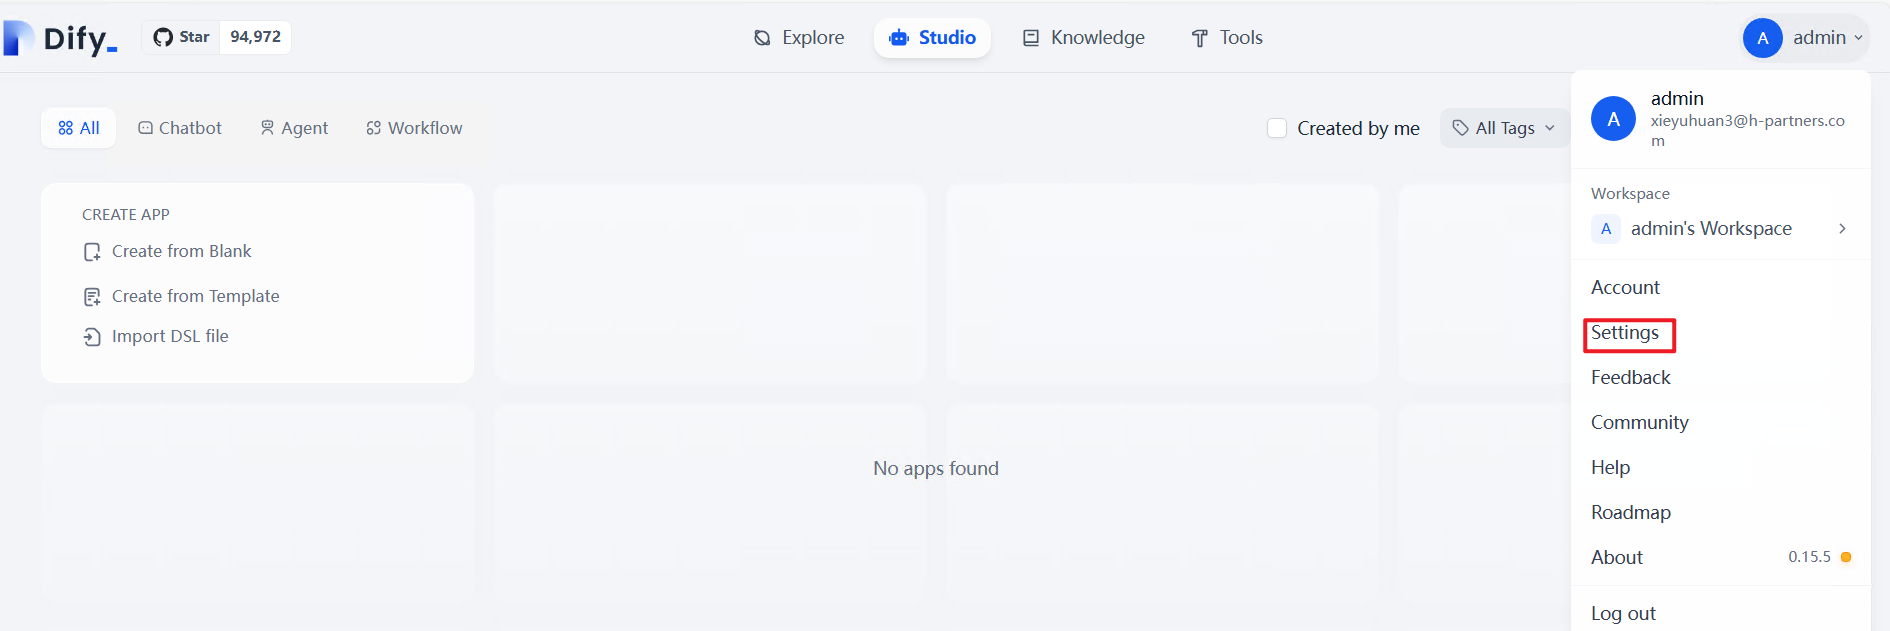
- Click the username in the upper right corner and choose Settings.
Figure 4 Settings
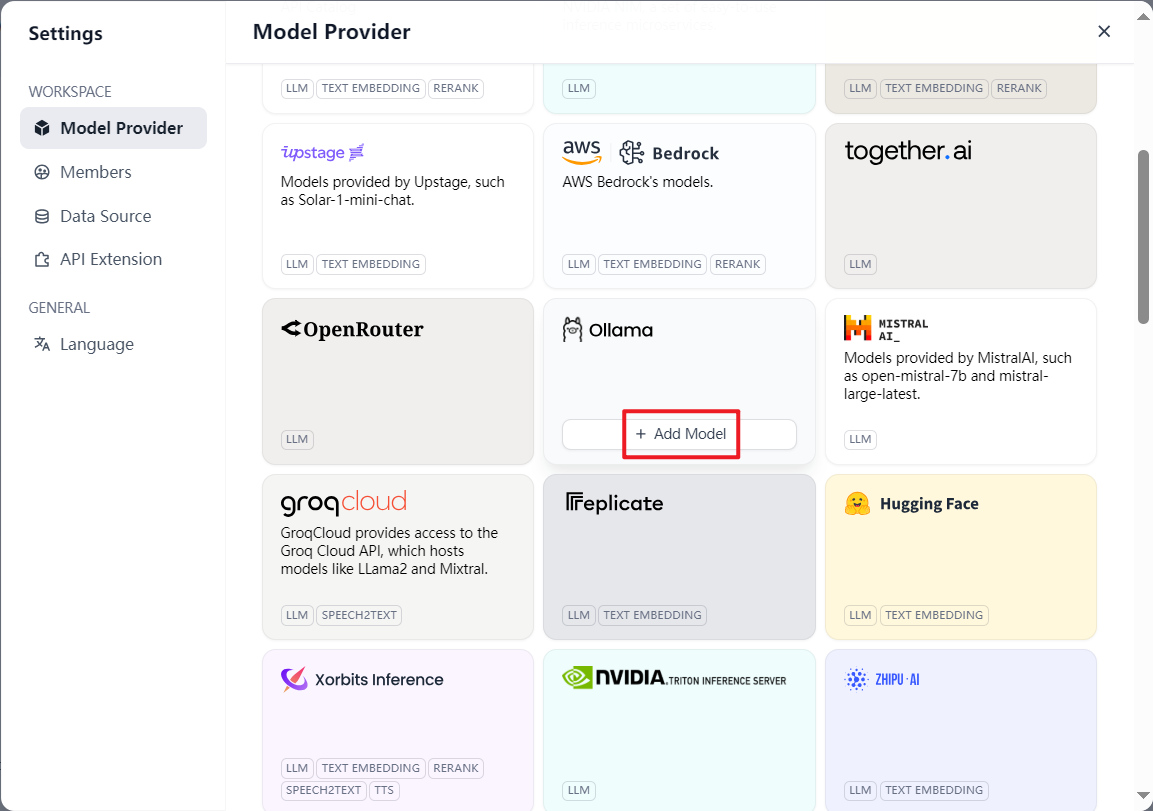
- In the navigation pane on the left, choose WORKSPACE > Model Provider. On the displayed page, click Add Model on the Ollama card.
Figure 5 Adding an Ollama model
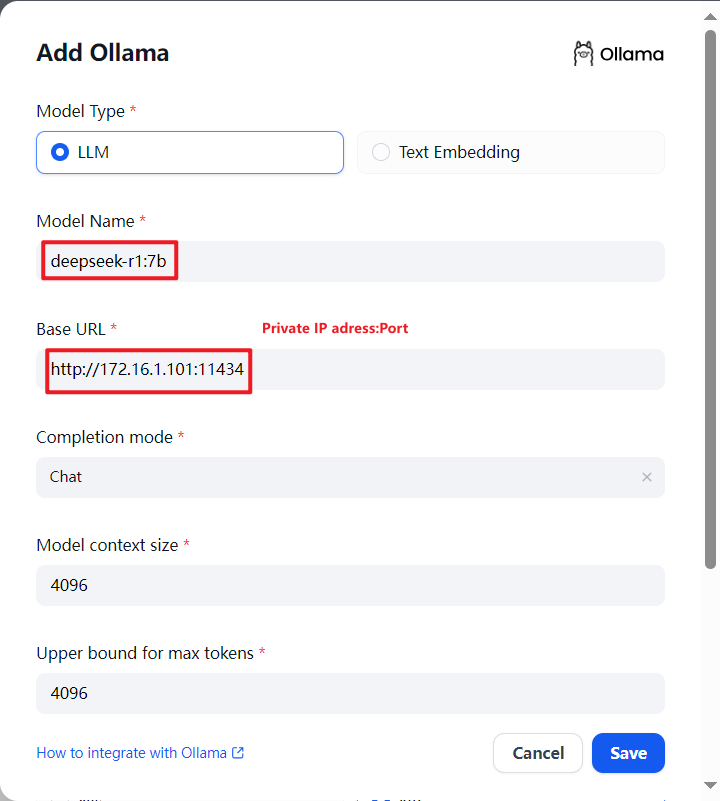
- Enter the name of the deployed model, for example, deepseek-r1:7b. Set the basic URL to the private IP address obtained earlier. (If the deployed Dify application and the DeepSeek-R1 distilled model are not on the same server and not within the same VPC, set this parameter to the public IP address of the server where the DeepSeek-R1 distilled model is located.) Set the port number to 11434. (When the public network is used for connection, port 11434 must be enabled for the security group where the model server is located. For details, see Adding a Security Group Rule.) Click Save in the lower right corner and close the settings page.
Figure 6 Model settings
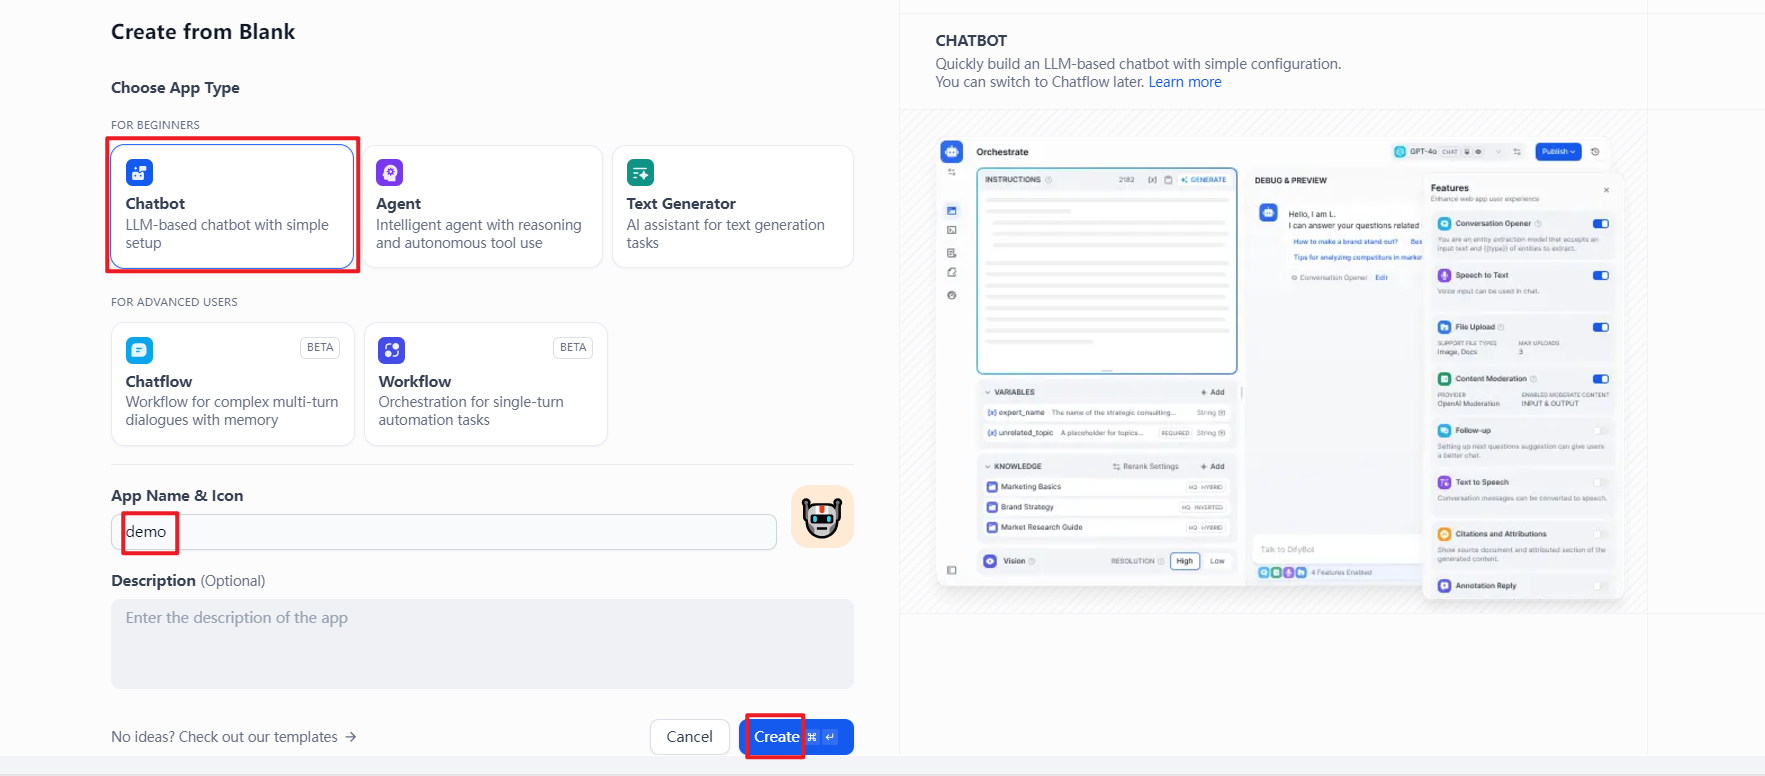
- Under CREATE APP, click Create from Blank. Click Chatbot, set App Name & Icon, and click Create in the lower part.
Figure 7 Clicking Create from Blank
 Figure 8 Clicking Chatbot
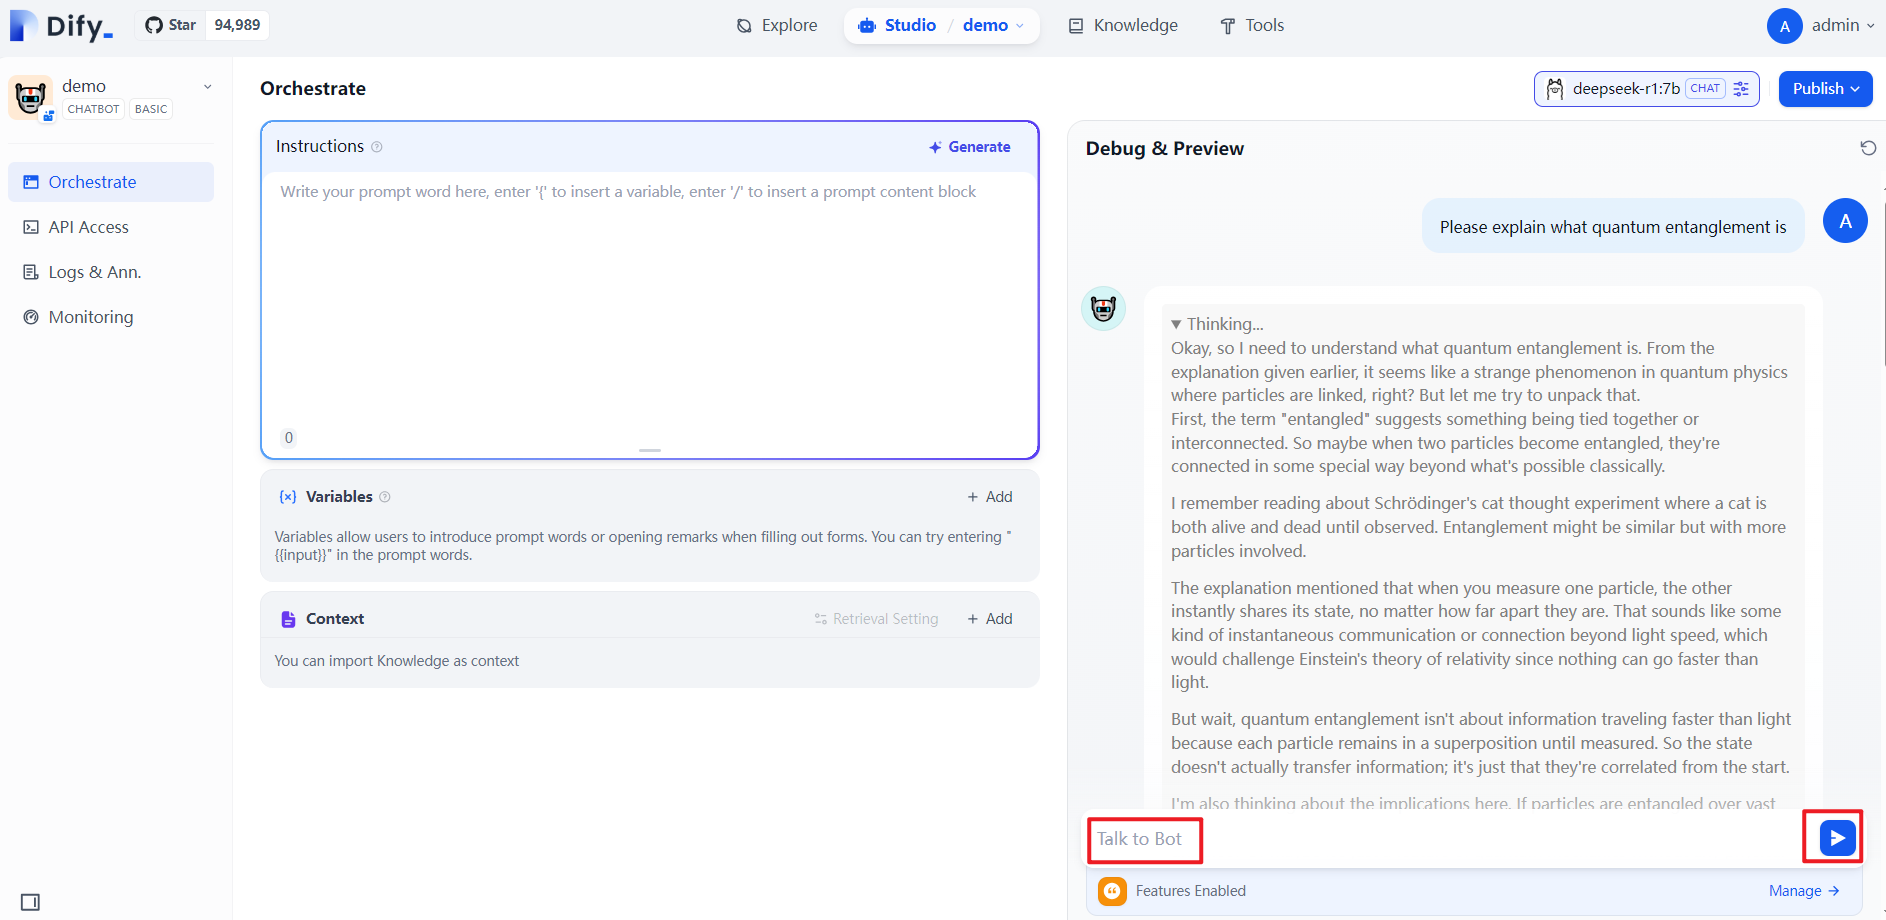
- In the navigation pane on the left, choose Orchestrate. In the Talk to Bot area in the lower right corner, enter content to debug and preview.
Figure 9 Debugging and preview
HA Deployment in CCE Container
- Log in to the Dify platform by referring to Using Dify.
- Add a model. For details about how to connect to a model, see Interconnecting with DeepSeek Models.
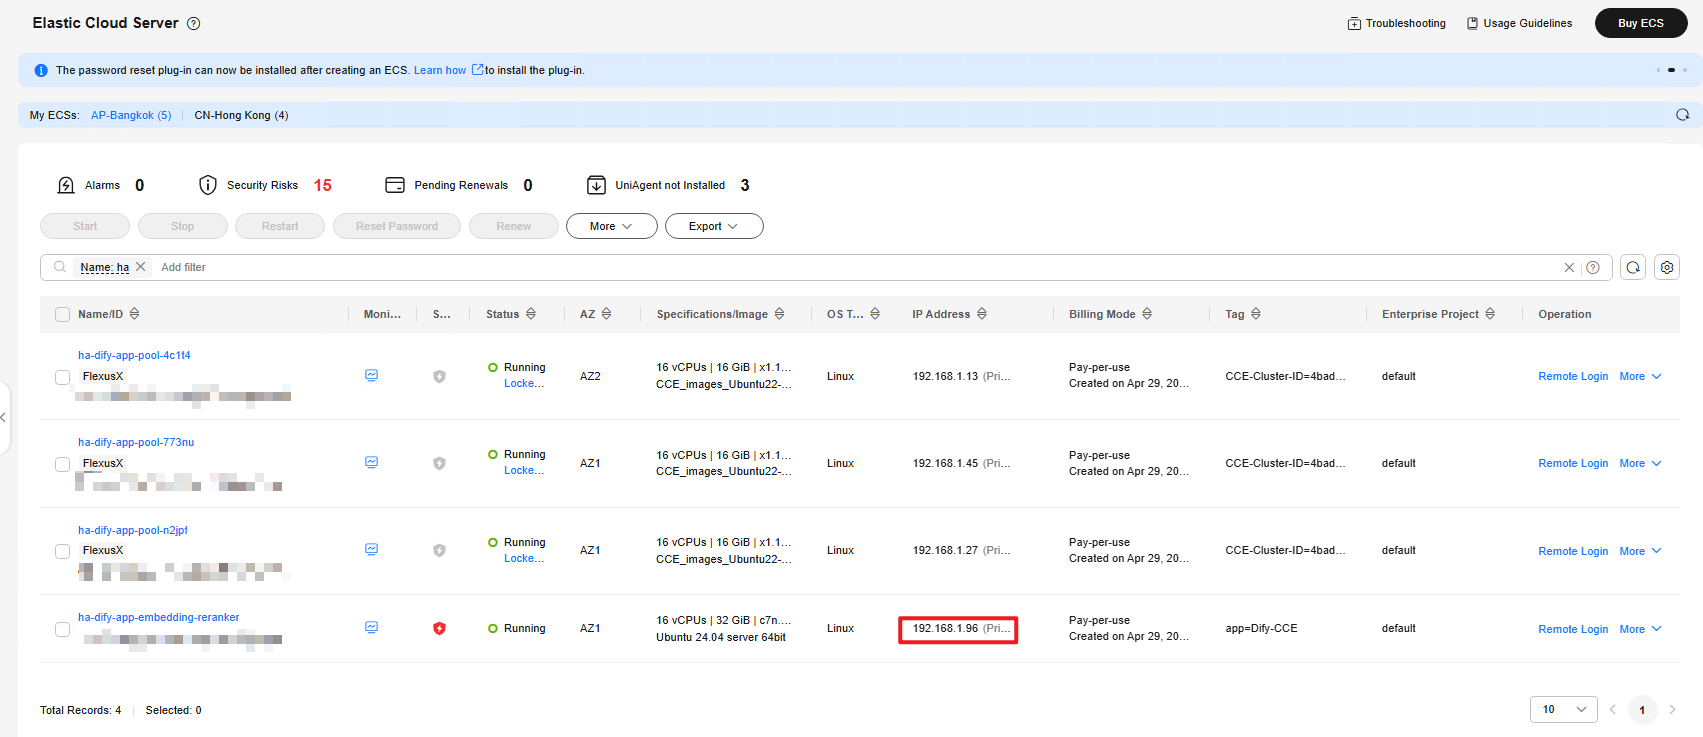
- Add the Embedding and Reranker models. Log in to the ECS console, find the Embedding & Reranker model server created in the solution, and copy the private IP address. For more details, refer to steps 3 to 7 in Getting Started of the deployment guide of Quick Deployment of Embedding and Reranker Models (enter a private IP address in the server URL).
Figure 10 Server private IP address
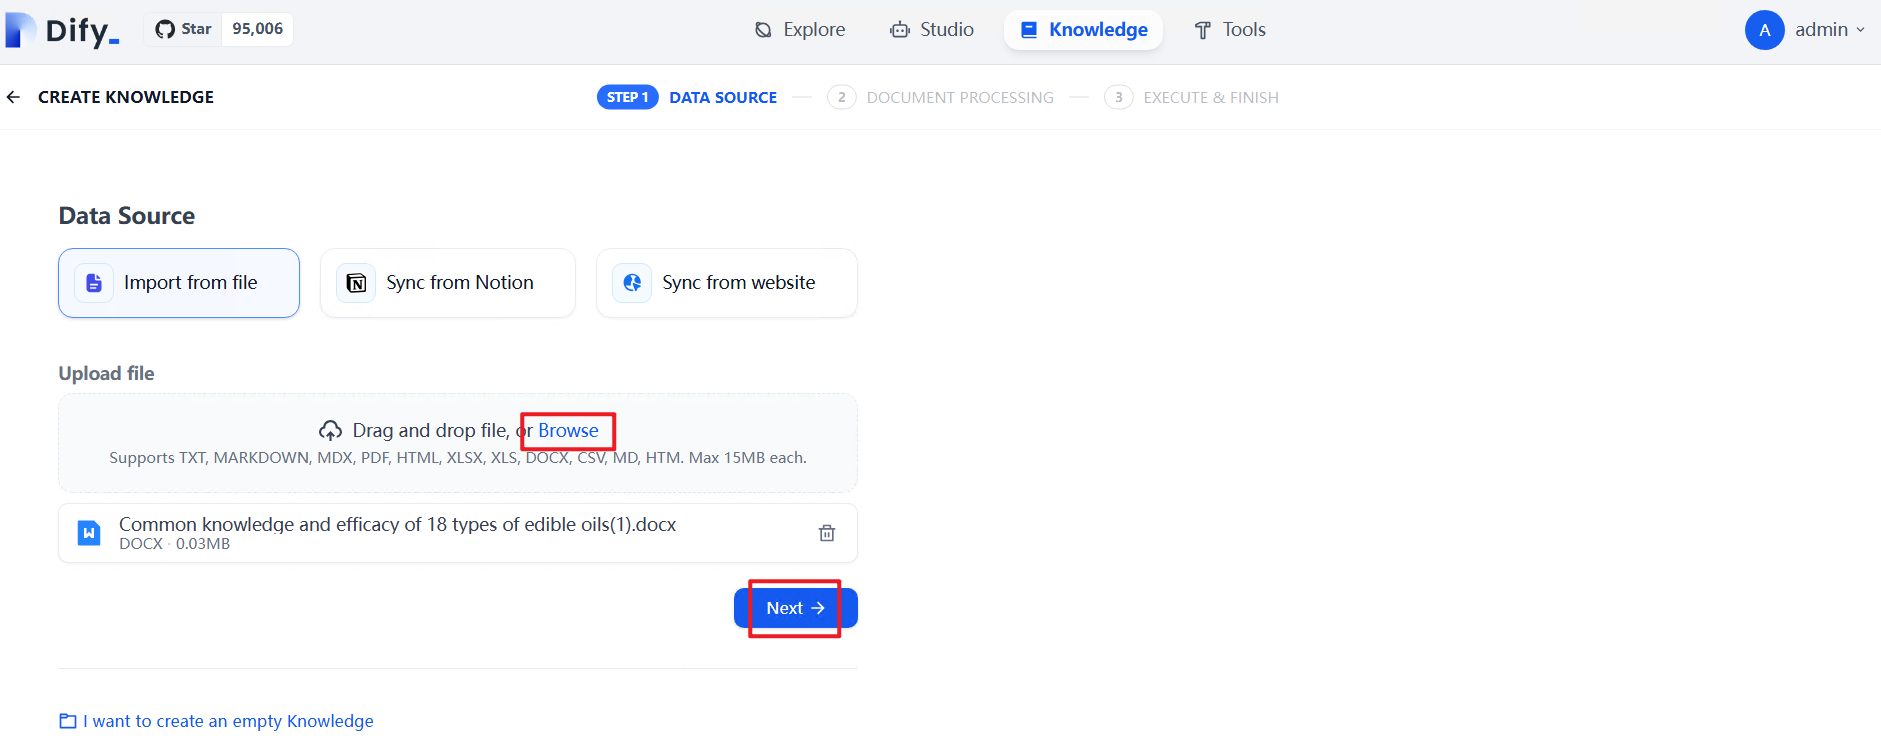
- Create a knowledge base. On the top menu of the Dify platform, choose Knowledge. In the navigation pane on the left, click Create Knowledge. On the displayed page, upload a text file and click Next.
Figure 11 Creating a knowledge base
 Figure 12 Importing a file
- (Economical) Configure the knowledge base as needed. If there are no special requirements, use the default settings. Click Save & Process. When the page indicates that the embedding is complete, the configuration is finished.
Figure 13 Configuring an economical index knowledge base
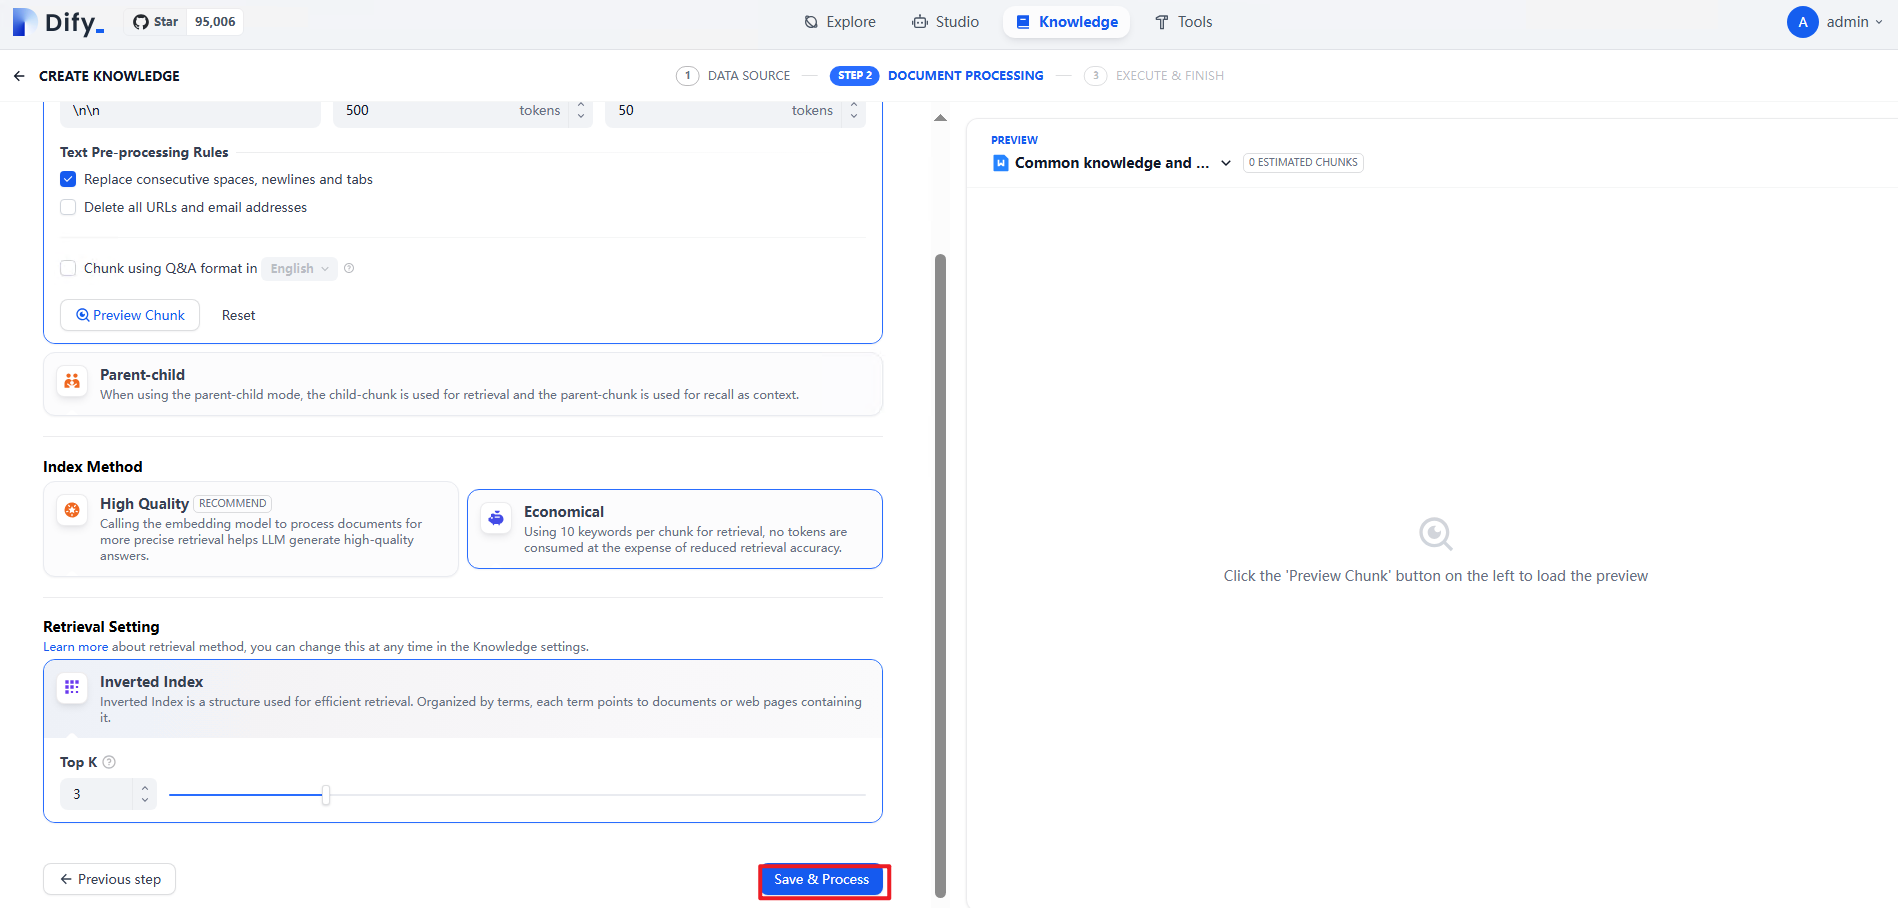 Figure 14 Knowledge base configured
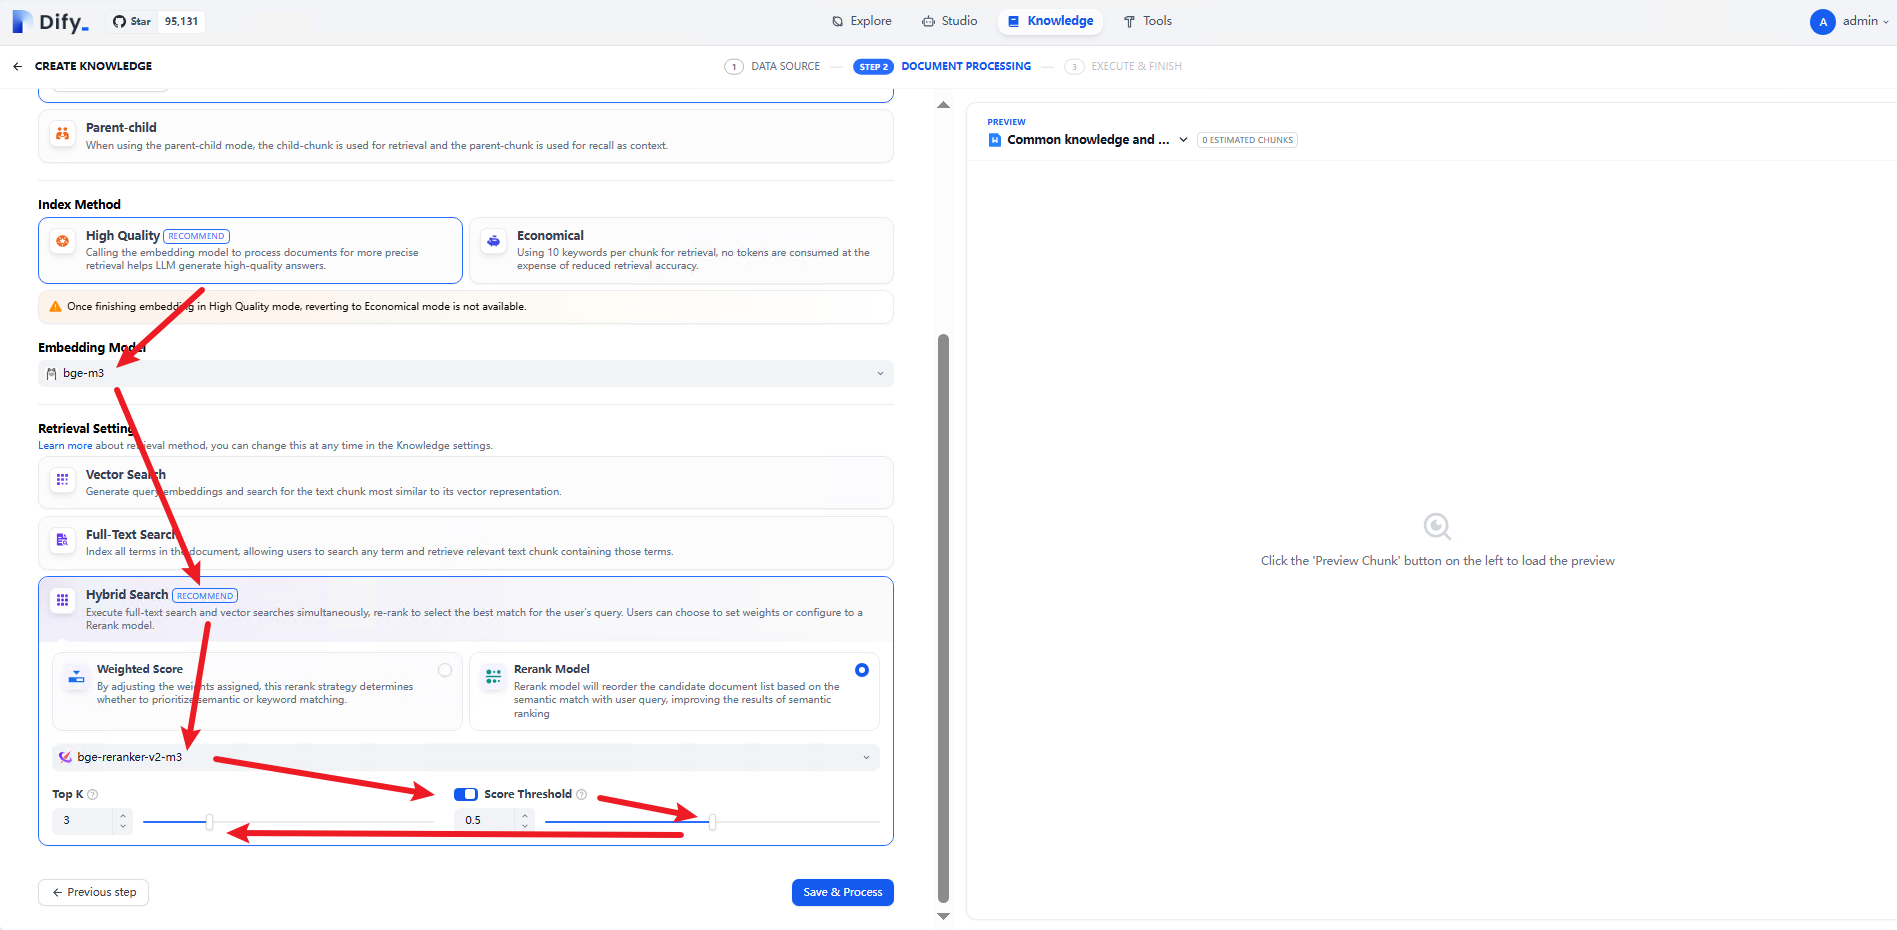
- (High Quality) Select the High Quality module. In the Embedding Model area, select the added bge-m3 model. In the Retrieval Setting area, choose Hybrid Search (allowing simultaneous use of vector search and keyword search, with adjustable weights for both). From the model dropdown menu, select the added bge-reranker-v2-m3 model, enable the Score Threshold toggle below, and adjust the slider to set the threshold—recommended value is 0.5. Additionally, there is a Top K option to limit the maximum number of document chunks utilized.
Figure 15 Configuring a high-quality index knowledge base
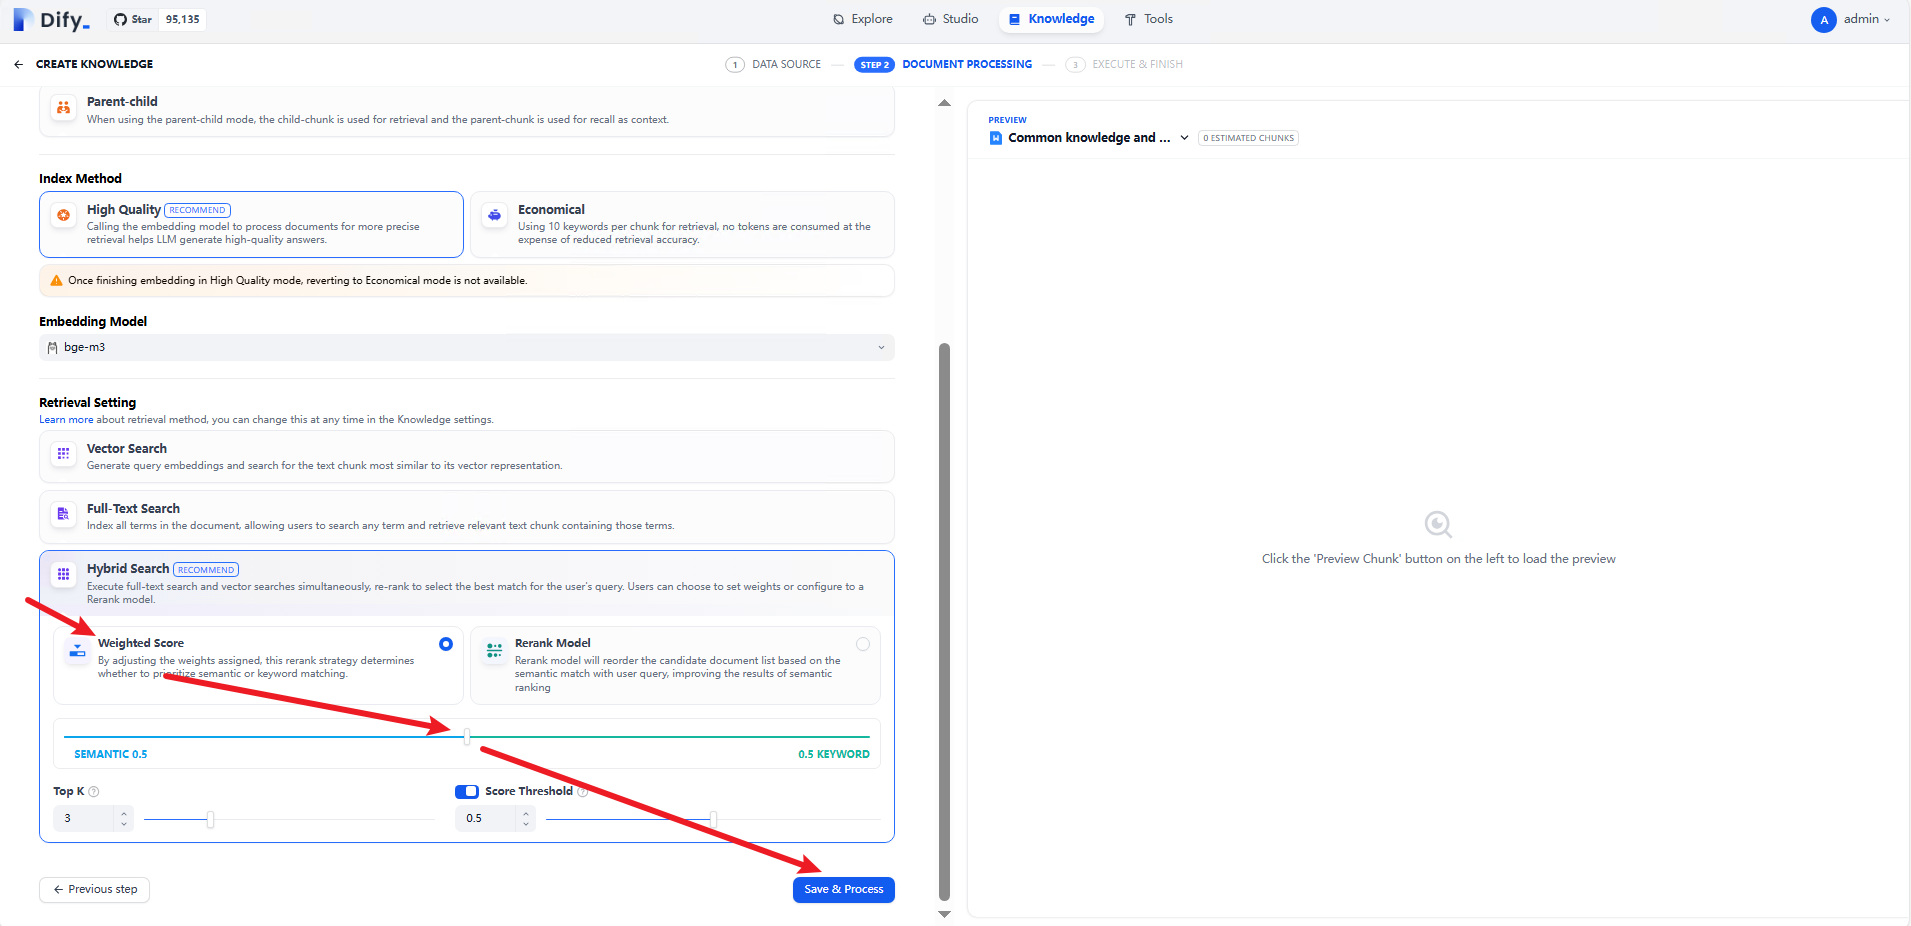
- (High Quality) Continue to select Weighted Score, adjust the slider, and set SEMANTIC (vector search) to 0.5 and KEYWORD (keyword search) to 0.5. Then click Save & Process. The high-quality knowledge base is created.
Figure 16 Configuring semantics
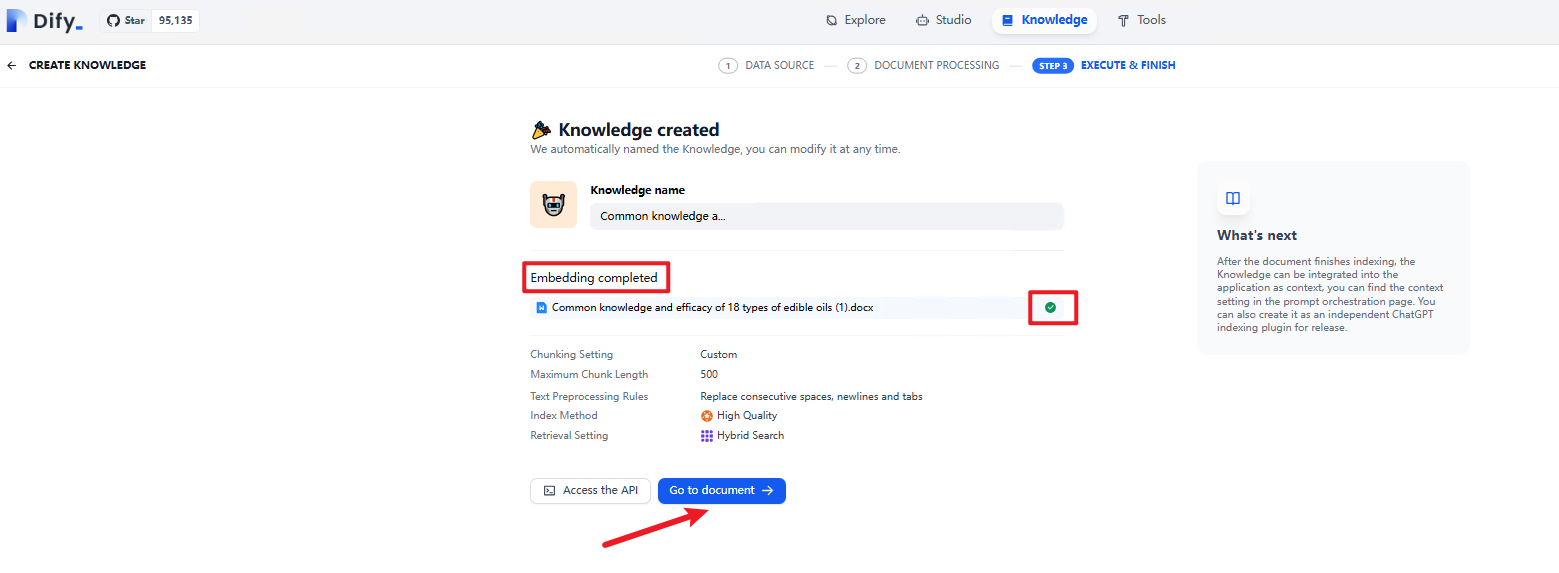
- After the embedding is complete, the status of the document changes to a green tick. Click Go to document. The imported knowledge base document is available.
Figure 17 Embedding completed
- Access the created OBS bucket. If the knowledge base file is saved in the upload_files folder, the configuration is successful. The user's raw data is uploaded to OBS only when the knowledge base is created, and the original file names are modified to the UUID format.
Figure 18 Knowledge base document

- Create a Dify workflow. On the Studio page, click Import DSL file. In the dialog box that appears, click the From URL tab, copy the following address, paste it into the DSL URL field, and click Create to import the workflow.
https://documentation-samples-6.obs.ap-southeast-2.myhuaweicloud.com/solution-as-code-moudle/building-a-dify-llm-application-development-platform/document/DeepSeek%20-%20Internet%20Search%20-%20Knowledge%20Base.yml
Figure 19 Importing a DSL file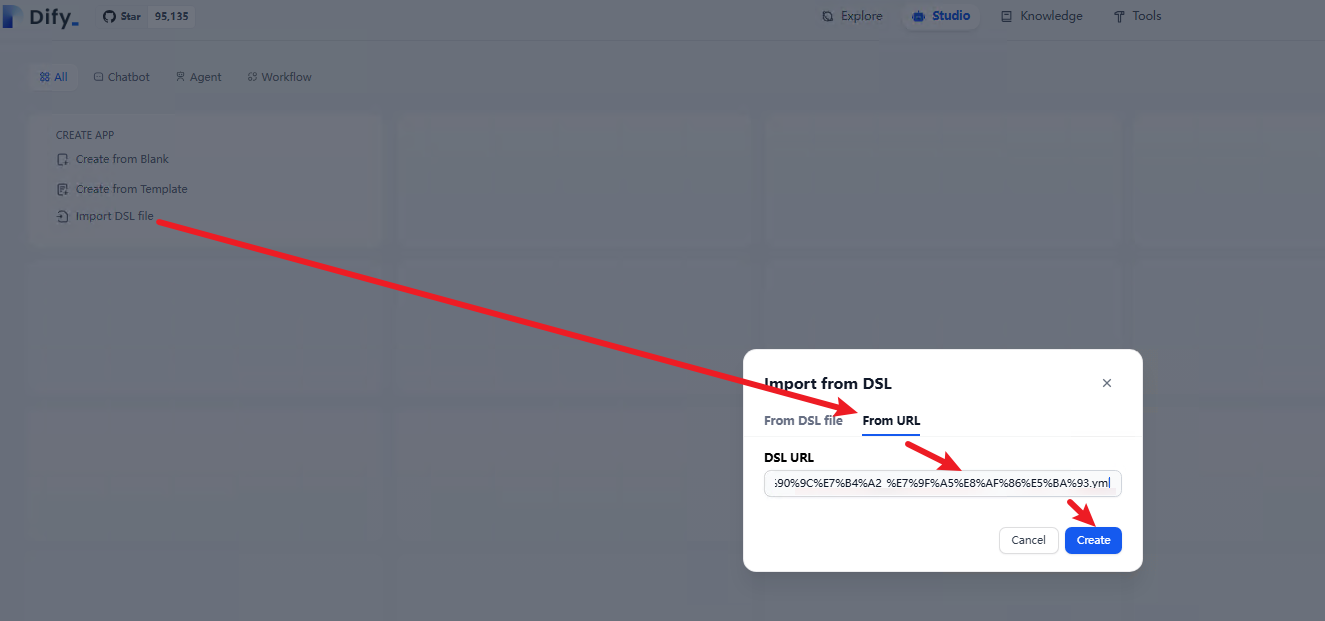 Figure 19 Workflow demo
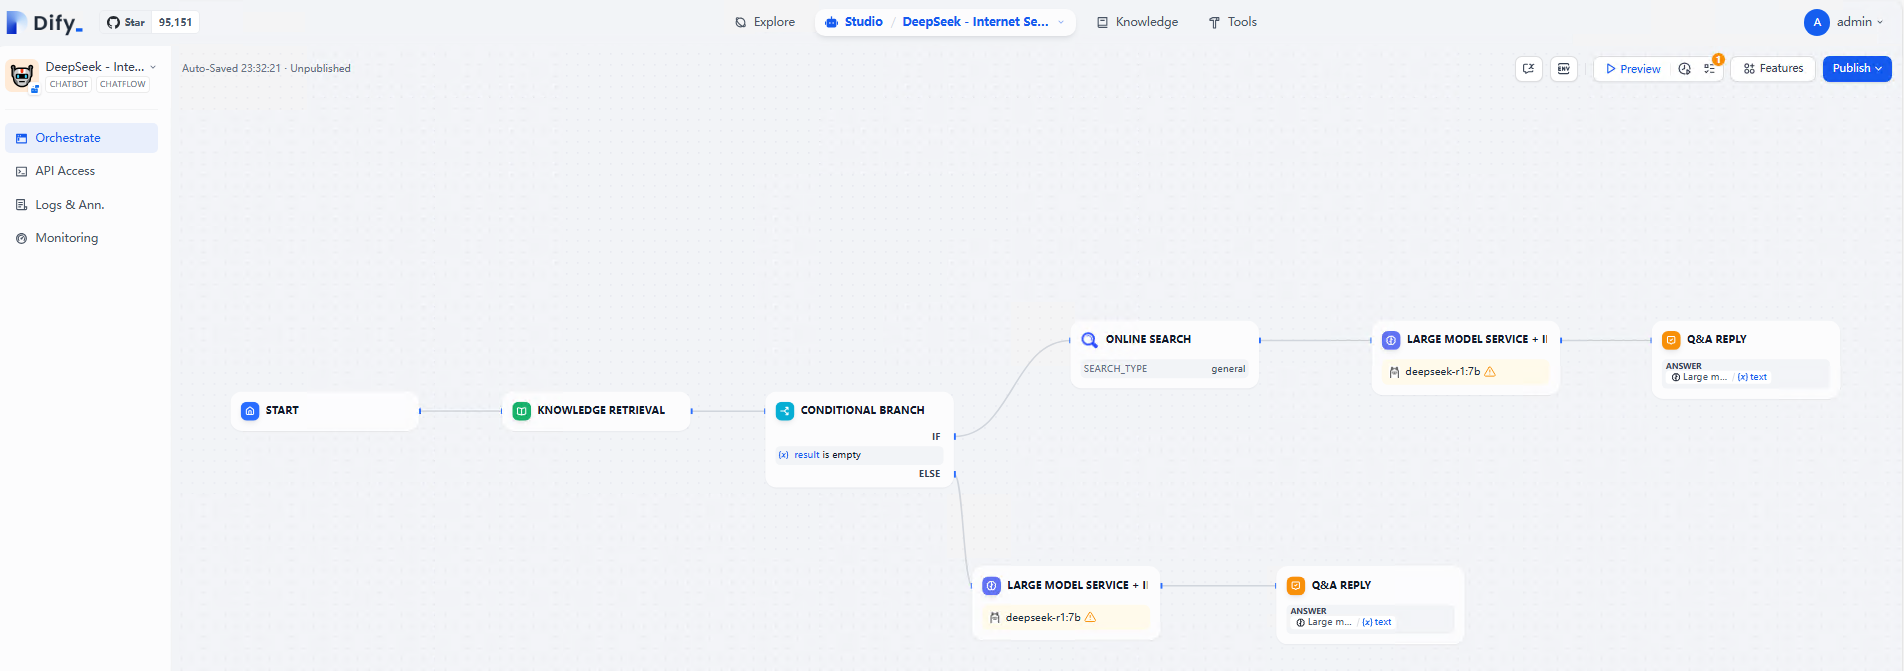
- If the following message is displayed for a large AI model, change the model to an existing one.
Figure 21 Model not found
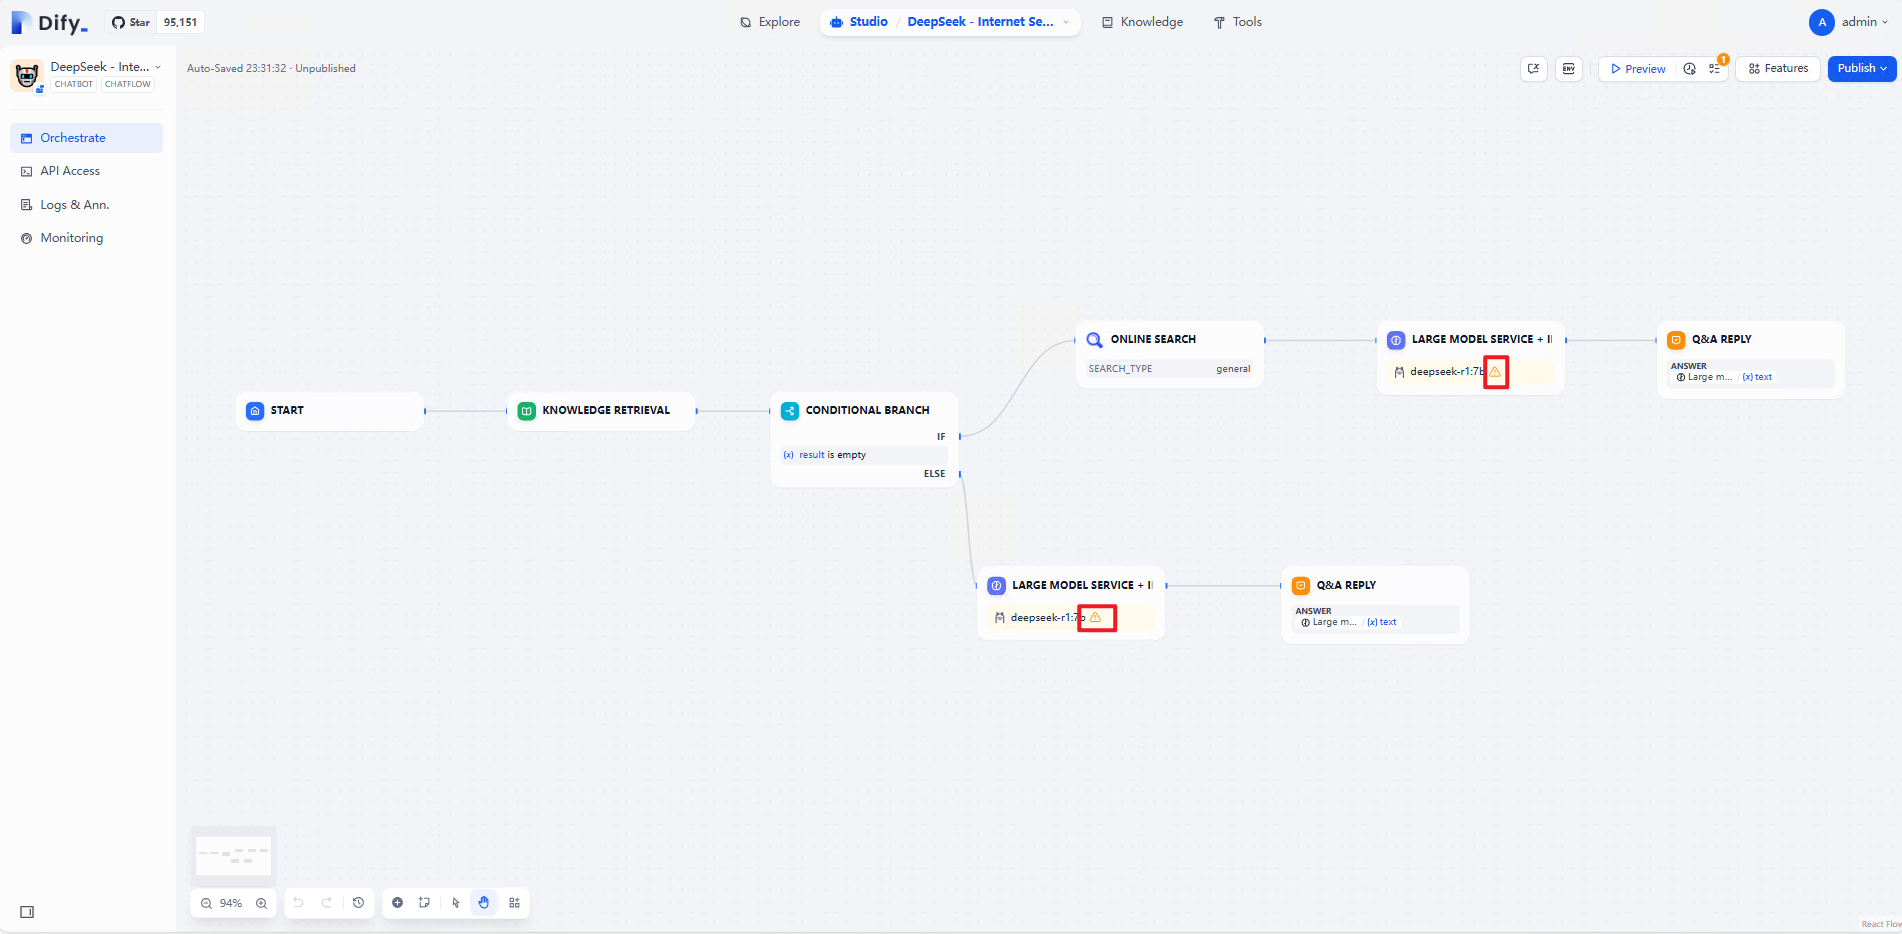 Figure 22 Changing a model
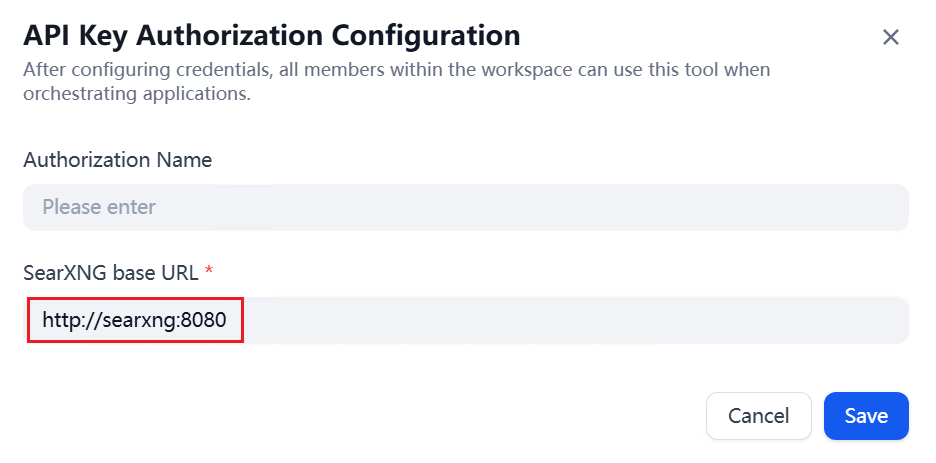
- Choose Tools Search Plug-in and click APIKey Authorization Configuration, and add the URL http://searxng:8080. As shown in the following figure, click Save to complete the setup.
Figure 23 SearXNG authorization
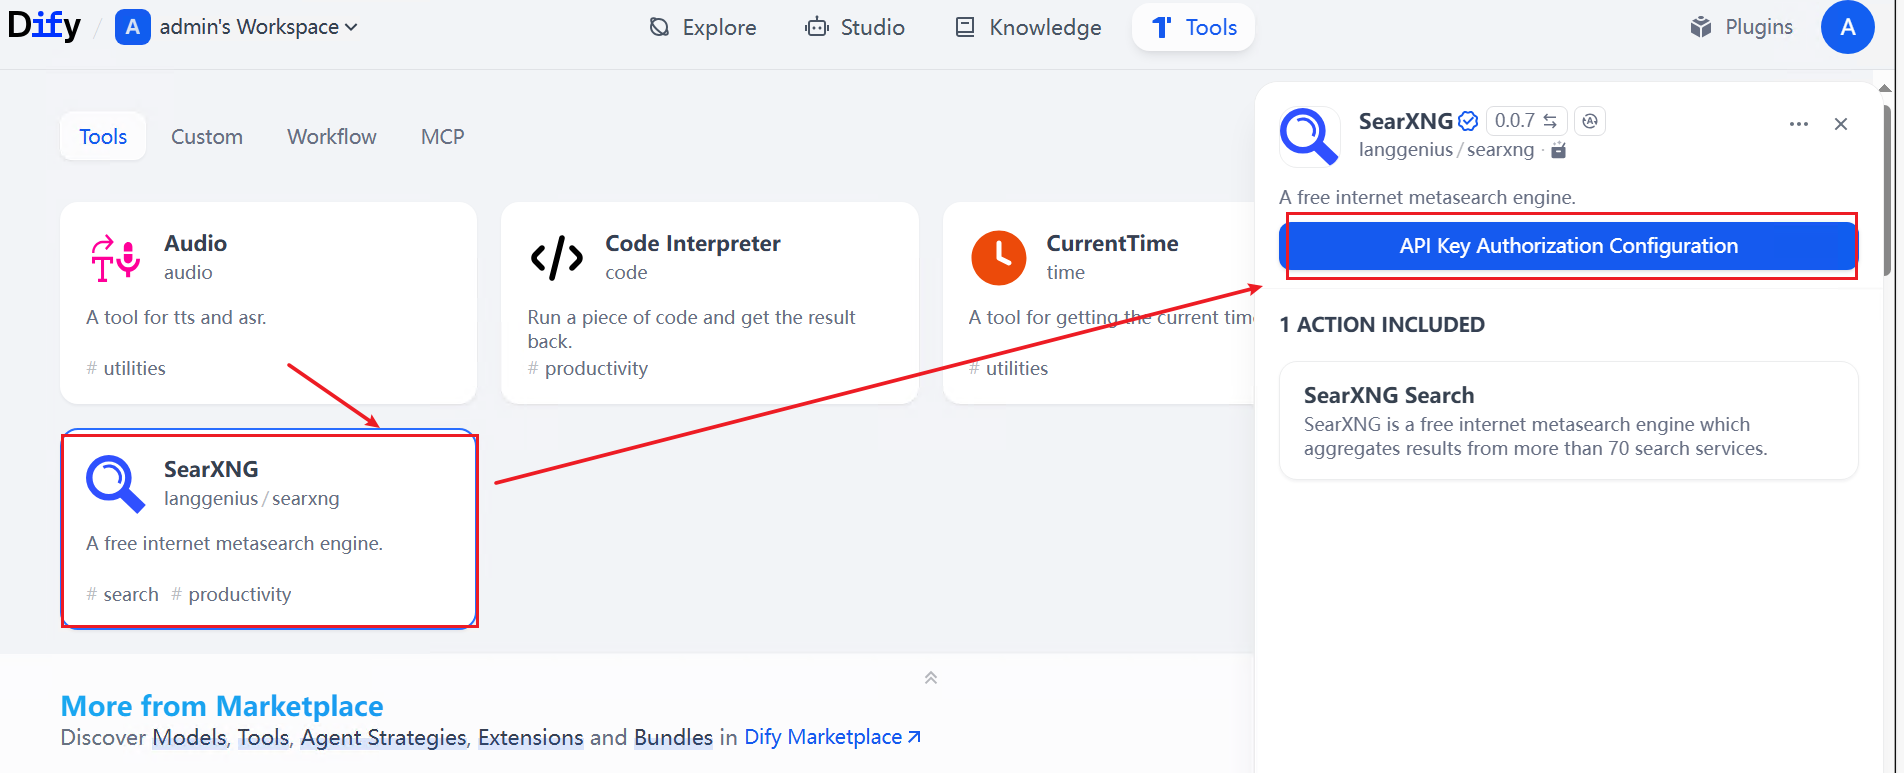 Figure 24 Entering the URL
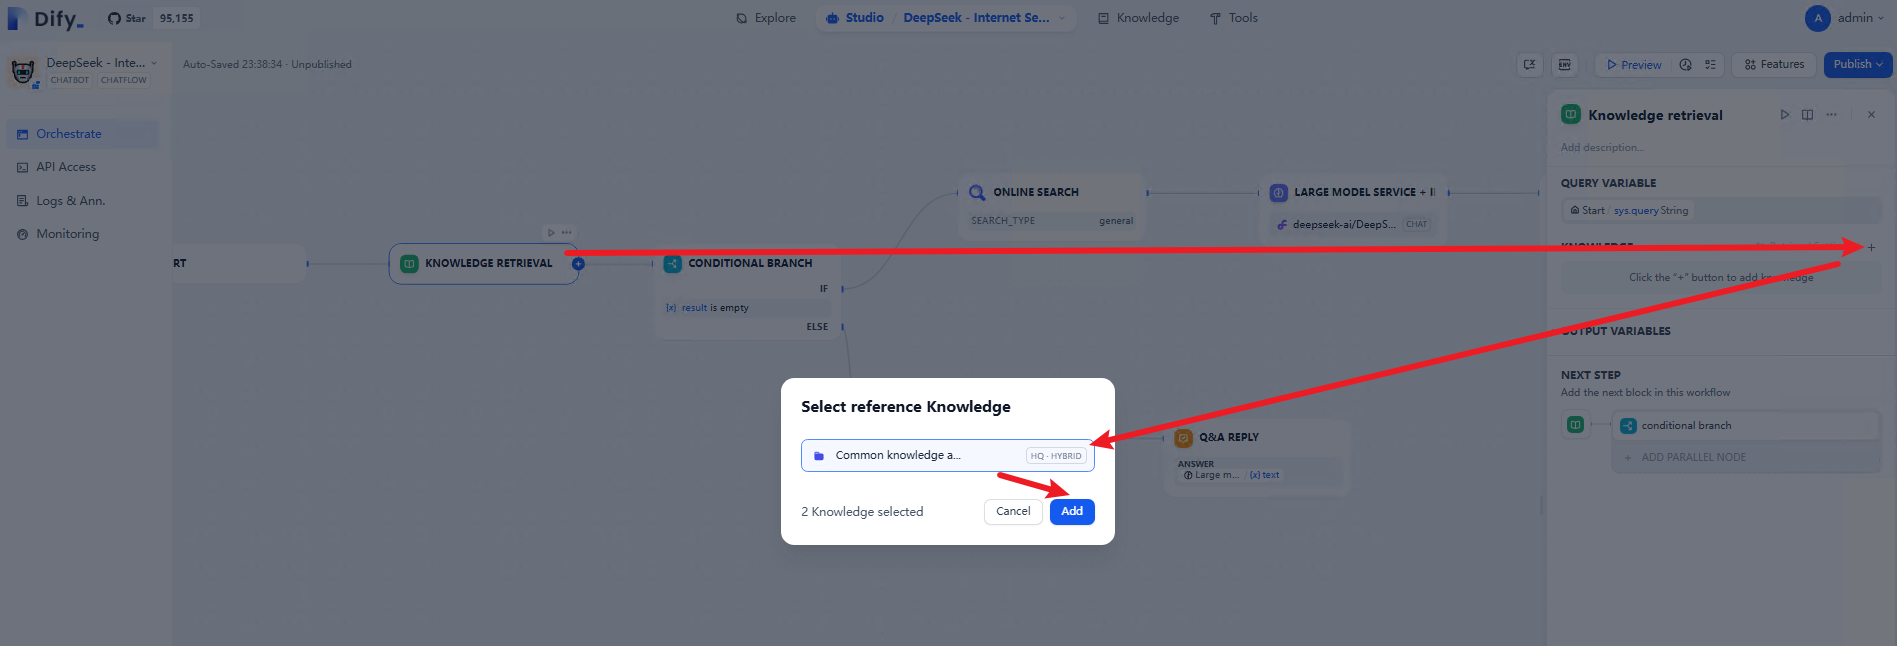
- Add a knowledge base. Click the knowledge search node and click + to add a knowledge base.
Figure 25 Adding a knowledge base
- The online search workflow configuration is complete and ready for testing and publication.
- On the workflow page, click Preview. In the pop-up chat box, enter a question for testing. Test the content search from the knowledge base: Input content related to the knowledge base and check if it is searched through the knowledge base.
Figure 26 Knowledge base search
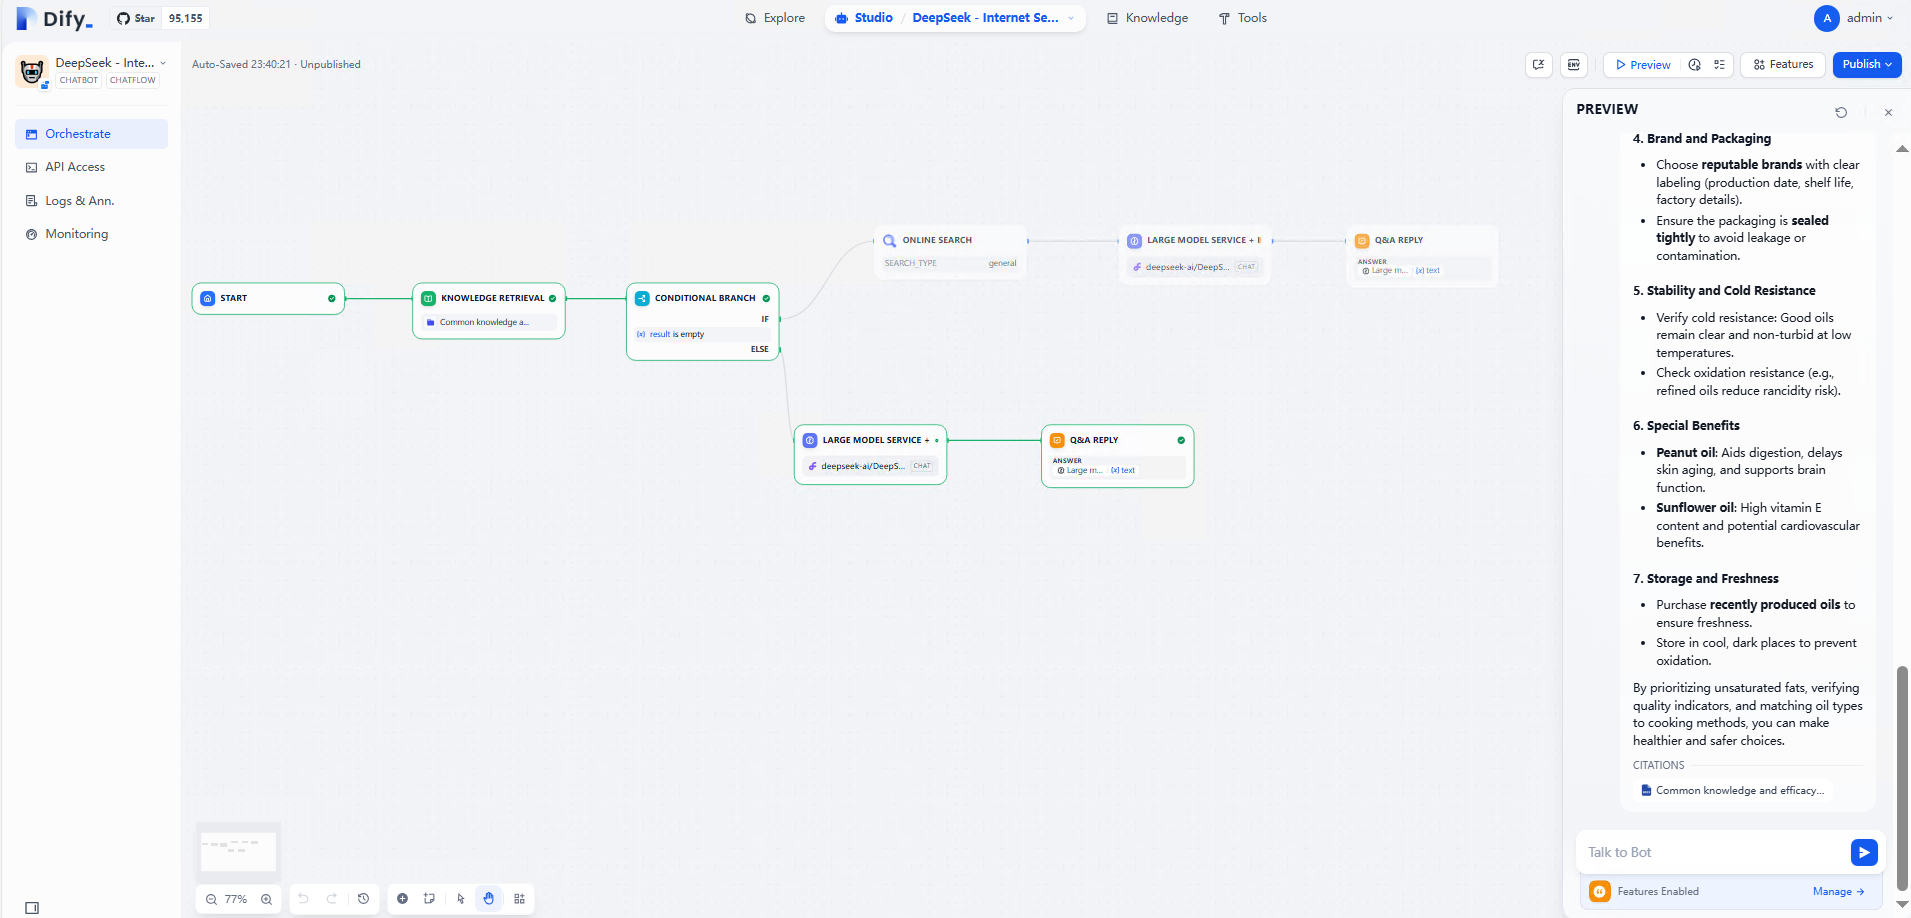
- Test the function of content search through online search: Enter relevant content outside the knowledge base and check if the search is performed through online search.
Figure 27 Online search

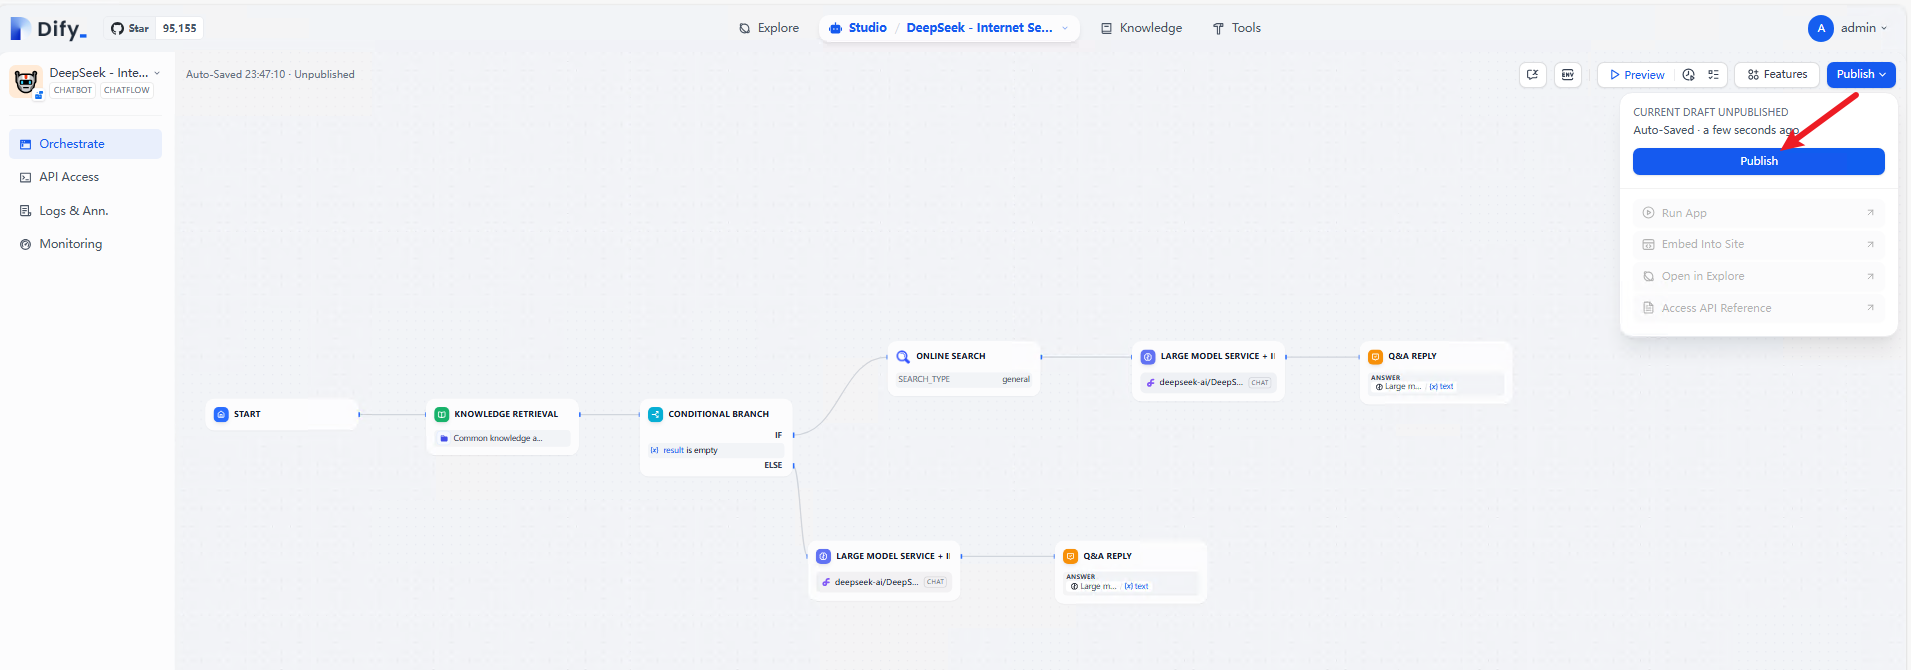
- Click Publish in the upper right corner of the workflow page, and then click Publish again to publish the workflow.
Figure 28 Workflows
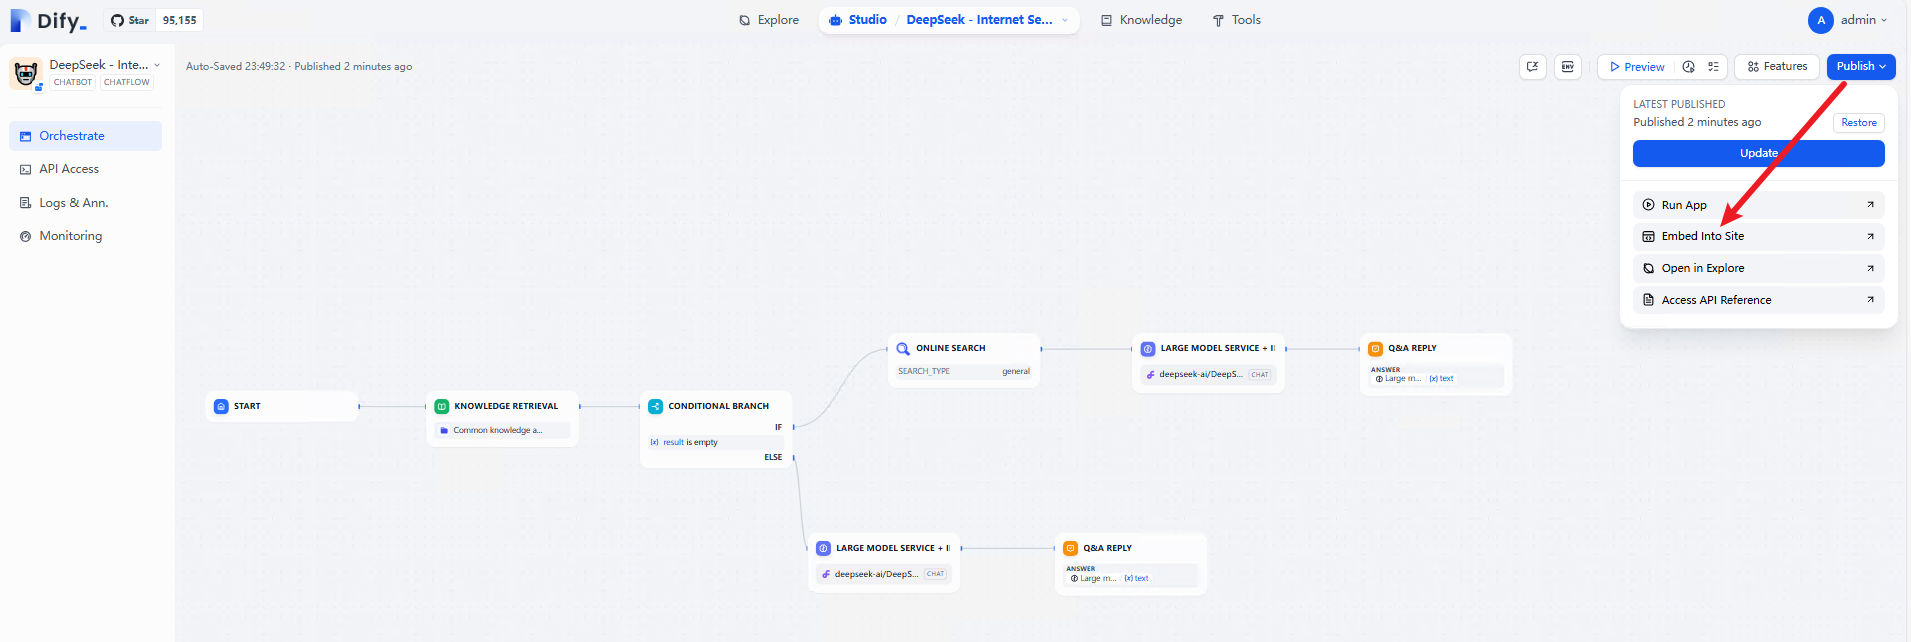
- After the workflow is published, you can use this agent application in the following three ways: API access, direct access, and website embedding.
Figure 29 API access
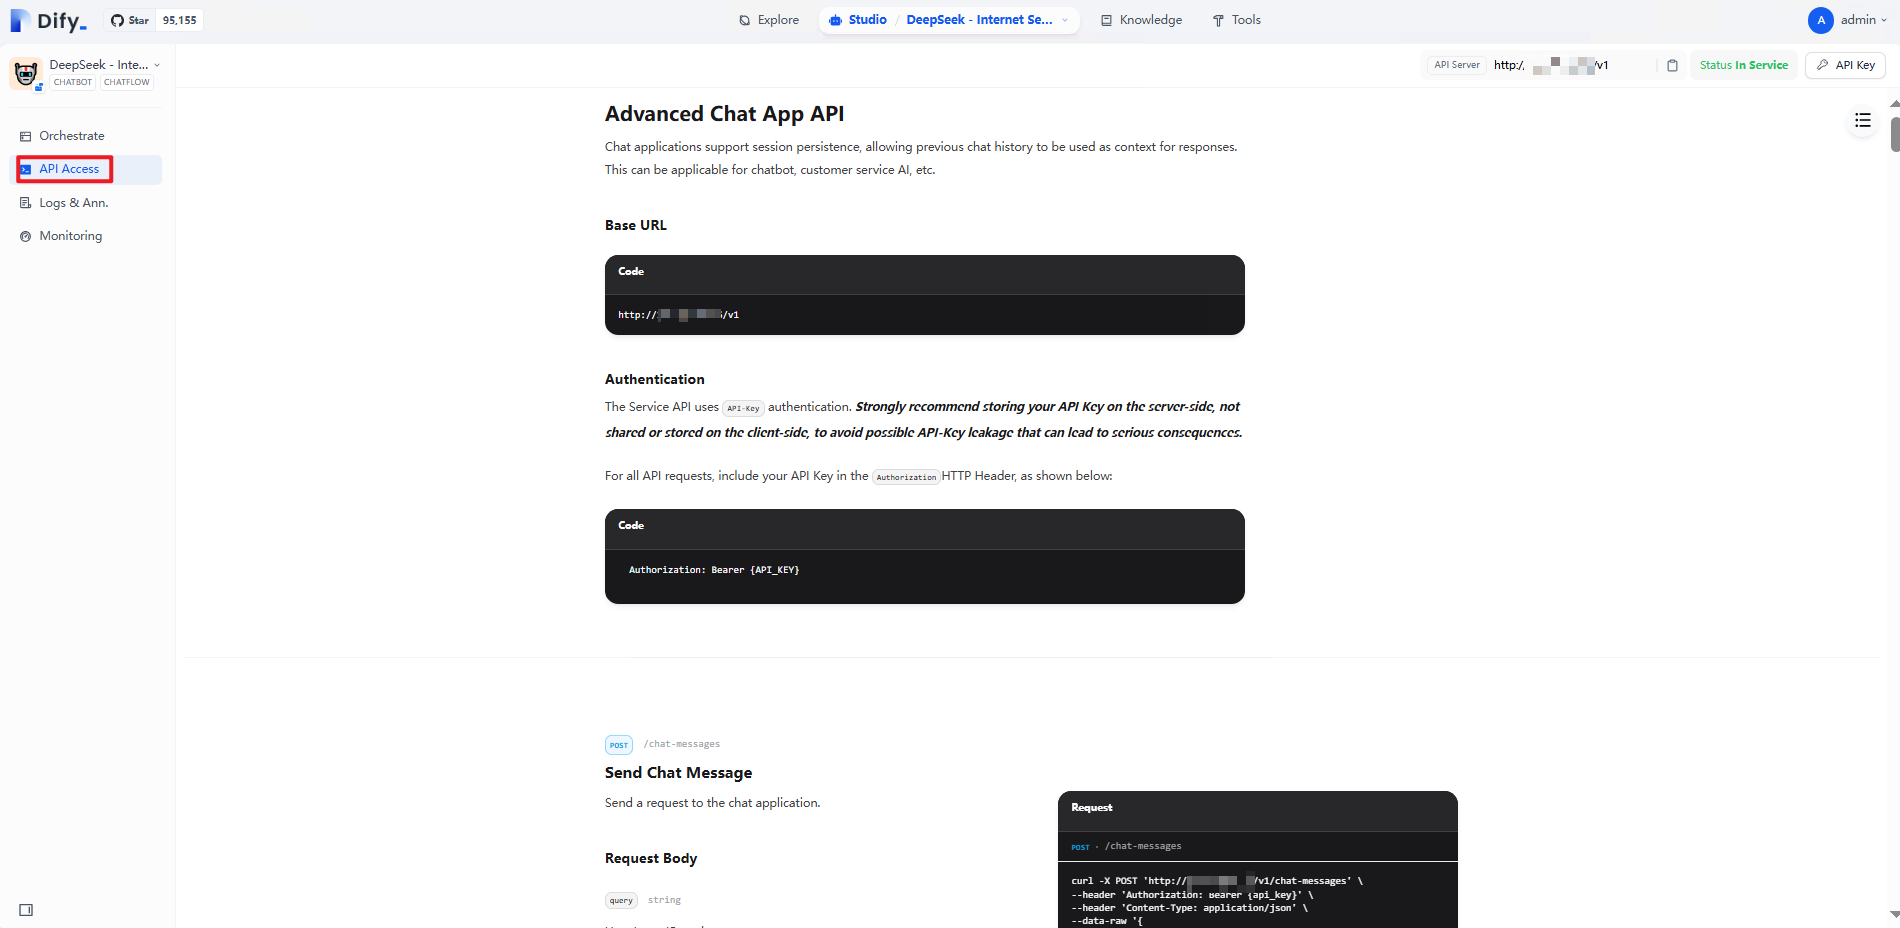 Figure 30 Direct access
 Figure 31 Website embedding
Feedback
Was this page helpful?
Provide feedbackThank you very much for your feedback. We will continue working to improve the documentation.See the reply and handling status in My Cloud VOC.
For any further questions, feel free to contact us through the chatbot.
Chatbot


