Python
Scenarios
To use Python to sign backend requests, obtain the Python SDK, import the project, and verify the backend signature by referring to the example provided in this section.

The Python SDK supports only HMAC backend service signatures.
Prerequisites
- A signature key has been created on the ROMA Connect console and bound to an API. For details, see Configuring Signature Verification for Backend Services.
- You have obtained the signature key and secret. For details, see Preparations.
- You have installed the development tool and Python development environment. For details, see Preparations.
- You have installed the Python plug-in on IntelliJ IDEA. Otherwise, install it according to Figure 1.
Obtaining the SDK
Old version: Log in to the ROMA Connect console, choose API Connect > API Management > Signature Keys, and download the SDK.
New version: Log in to the ROMA Connect console, choose API Connect > Credentials > SDKs, and download the SDK.
Importing a Project
- Start IntelliJ IDEA and choose File > New > Project.
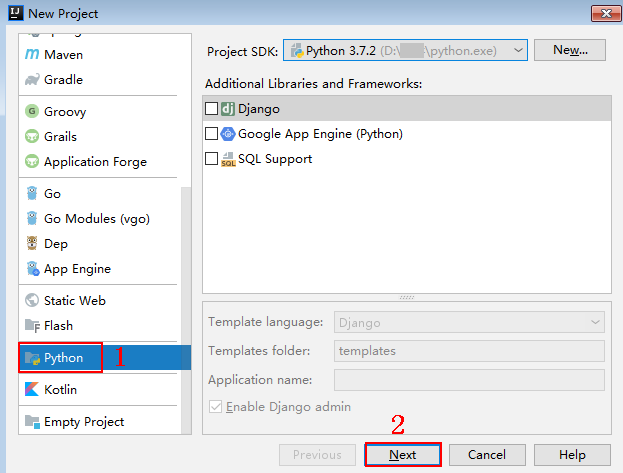
On the displayed New Project page, choose Python and click Next.
Figure 2 New Project
- Click Next. Click ..., select the directory where the SDK is decompressed, and click Finish.
Figure 3 Selecting the SDK directory after decompression

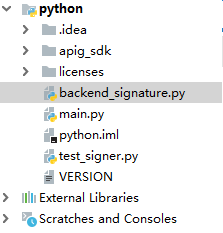
- View the directory structure of the project.
Figure 4 Directory structure

- Click Edit Configurations.
Figure 5 Edit Configurations

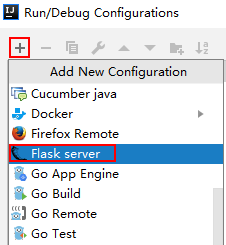
- Click + and choose Flask server.
Figure 6 Choosing Flask server

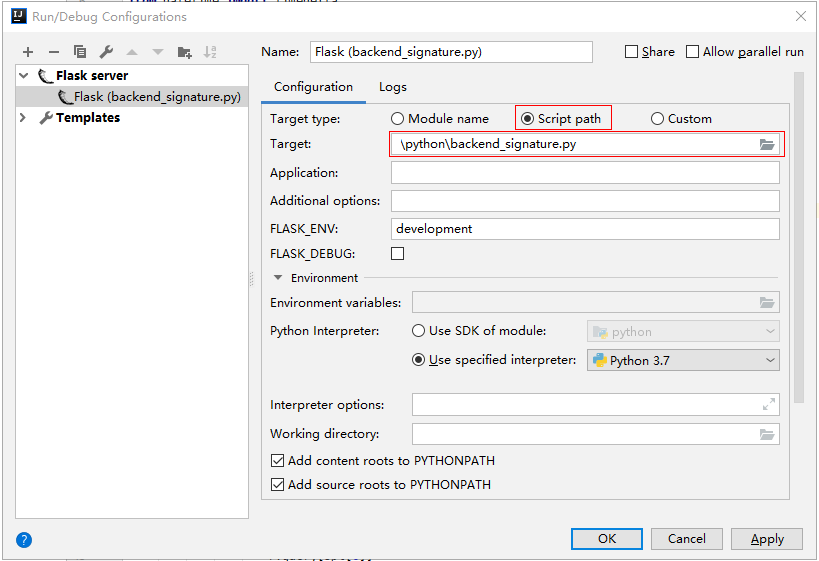
- Set Target Type to Script path, select backend_signature.py from the Target drop-down list box, and click OK.

Backend Signature Verification Example

- This example demonstrates how to write a Flask-based server as the backend of an API and implement a wrapper to verify the signature of requests sent from APIC.
- Signature information is added to requests sent to access the backend of an API only after a signature key is bound to the API.
- Compile an API that returns Hello World!, and uses the GET, POST, PUT, or DELETE method and the requires_apigateway_signature wrapper.
app = Flask(__name__) @app.route("/<id>", methods=['GET', 'POST', 'PUT', 'DELETE']) @requires_apigateway_signature() def hello(id): return "Hello World!" - Implement requires_apigateway_signature by putting the signature key and secret in a dict.
def requires_apigateway_signature(): def wrapper(f): # Directly writing AK/SK in code is risky. For security, encrypt your AK/SK and store them in the configuration file or environment variables. # In this example, the AK/SK are stored in environment variables for identity authentication. Before running this example, set environment variables HUAWEICLOUD_SDK_AK1, HUAWEICLOUD_SDK_SK1, and HUAWEICLOUD_SDK_AK2, HUAWEICLOUD_SDK_SK2. secrets = { os.getenv('HUAWEICLOUD_SDK_AK1'): os.getenv('HUAWEICLOUD_SDK_SK1'), os.getenv('HUAWEICLOUD_SDK_AK2'): os.getenv('HUAWEICLOUD_SDK_SK2'), } authorizationPattern = re.compile( r'SDK-HMAC-SHA256\s+Access=([^,]+),\s?SignedHeaders=([^,]+),\s?Signature=(\w+)') BasicDateFormat = "%Y%m%dT%H%M%SZ" @wraps(f) def wrapped(*args, **kwargs): //Signature verification code ... return f(*args, **kwargs) return wrapped return wrapper - The wrapped function is the signature verification code. The verification process is as follows: Use a regular expression to parse the Authorization header. Obtain the key and signedHeaders.
if "authorization" not in request.headers:
	return 'Authorization not found.', 401
authorization = request.headers['authorization']
m = authorizationPattern.match(authorization)
if m is None:
	return 'Authorization format incorrect.', 401
signingKey = m.group(1)
signedHeaders = m.group(2).split(";")
For example, for Authorization header:
SDK-HMAC-SHA256 Access=signature_key1, SignedHeaders=host;x-sdk-date, Signature=e11adf65a20d1b82c25419b5********8d0ba12fed1ceb13ed00
The parsing result is as follows:
signingKey=signature_key1
signedHeaders=host;x-sdk-date
- Find secret based on key. If key does not exist, the authentication failed.
if signingKey not in secrets:
	return 'Signing key not found.', 401
signingSecret = secrets[signingKey]
- Create an HttpRequest, and add the method, URL, query, and signedHeaders headers to the request. Determine whether the body needs to be set.
The body is read if there is no x-sdk-content-sha256 header with value UNSIGNED-PAYLOAD.
r = signer.HttpRequest() r.method = request.method r.uri = request.path r.query = {} for k in request.query_string.decode('utf-8').split('&'): spl = k.split("=", 1) if len(spl) < 2: r.query[spl[0]] = "" else: r.query[spl[0]] = spl[1] r.headers = {} needbody = True dateHeader = None for k in signedHeaders: if k not in request.headers: return 'Signed header ' + k + ' not found', 401 v = request.headers[k] if k.lower() == 'x-sdk-content-sha256' and v == 'UNSIGNED-PAYLOAD': needbody = False if k.lower() == 'x-sdk-date': dateHeader = v r.headers[k] = v if needbody: r.body = request.get_data() - Check whether the signature has expired. Obtain the time from the X-Sdk-Date header, and check whether the difference between this time and the server time is within 15 minutes. If signedHeaders does not contain X-Sdk-Date, the authentication failed.
if dateHeader is None:
	return 'Header x-sdk-date not found.', 401
t = datetime.strptime(dateHeader, BasicDateFormat)
if abs(t - datetime.utcnow()) > timedelta(minutes=15):
	return 'Signature expired.', 401
- Invoke the verify method to verify the signature of the request, and check whether the verification is successful.
sig = signer.Signer()
sig.Key = signingKey
sig.Secret = signingSecret
if not sig.Verify(r, m.group(3)):
	return 'Verify authorization failed.', 401
- Run the server to verify the code. The following example uses the HTML signature tool in the JavaScript SDK to generate a signature.
Set the parameters according to the following figure, and click Send request. Copy the generated curl command, execute it in the CLI, and check whether the server returns 200.
If an incorrect key or secret is used, the server returns 401, which means authentication failure.

Feedback
Was this page helpful?
Provide feedbackThank you very much for your feedback. We will continue working to improve the documentation.See the reply and handling status in My Cloud VOC.
For any further questions, feel free to contact us through the chatbot.
Chatbot


