
Designing a Test Based on Requirements
Overview
The test design feature in the CodeArts TestPlan provides multi-dimensional test strategies and design templates. Based on different design inputs, there are two processes to generate the test scheme and test cases: requirement > scenario > test point > test case, and feature > scenario > test point > test case. The feature utilizes mind maps and heuristic testing to encourage testers to visually represent their test models. It also improves test design efficiency, optimizes test completeness, and helps testers reduce product test omissions during execution.
This function enables you to combine factors using multiple modes and algorithms, and generate test cases in batches from the resulting combinations. In addition, you can reference action and data factors to efficiently generate test cases in batches, freeing yourself from repeated writing of test cases of a test point. The test cases generated in this way are clear and unified in structure.
This section describes how to generate a single test case based on the requirement, and how to generate test cases in batches by using test factors.
Prerequisite
- You have created a project. This section uses a Scrum project as an example.
- You have created a requirement work item.
Generating a Test Case Based on Requirements
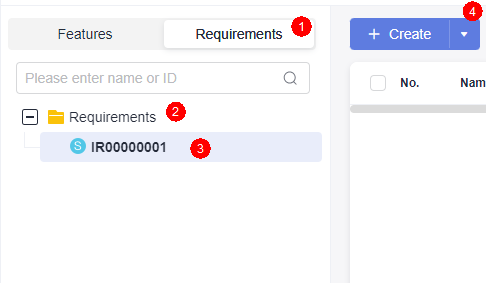
- Log in to the CodeArts homepage, search for your target project, and click the project name to access the project.
- In the navigation pane, choose .
- Click Requirements on the left, select a requirement, and click Create in the upper left corner.
- The mind map page is displayed. Right-click the root node, and choose Add Subnode(Ins) from the shortcut menu. Change the subnode name to Mobile Testing.
- On the toolbar above the mind map, click
 to tag the node as a scenario. If
  is displayed next to the selected node, the scenario is added successfully.
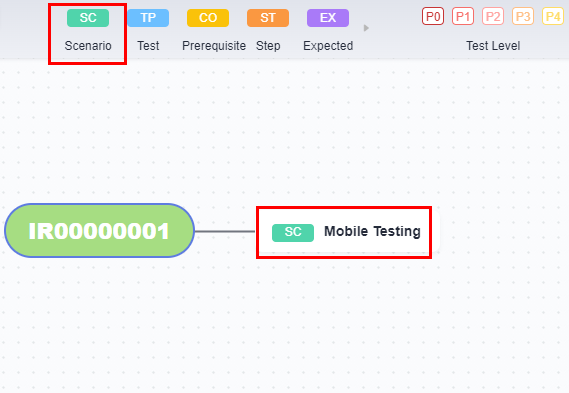
- Right-click the Mobile Testing scenario node, add a subnode, and change the subnode name to Test the camera function of the mobile phone. On the toolbar above the mind map, click
 to tag the node as a test point. If
  is displayed next to the selected node, the test point is added successfully.
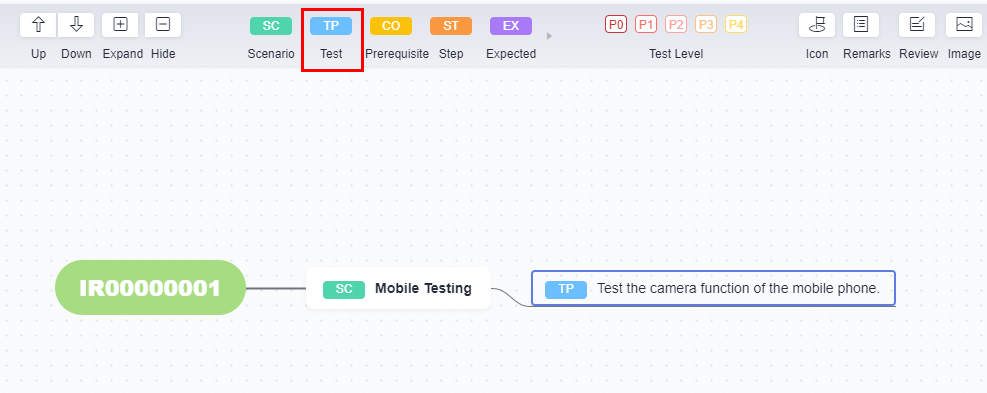
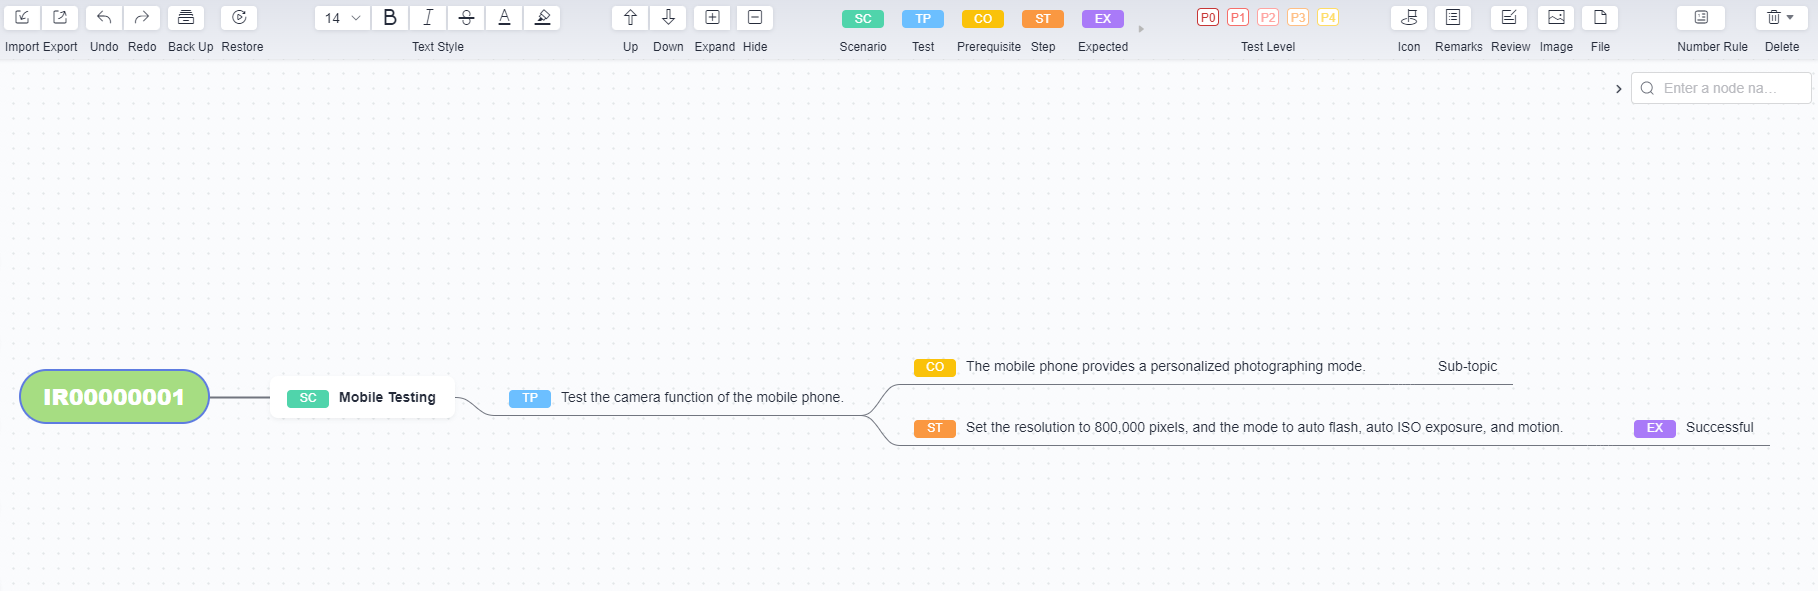
- Add a prerequisite subnode and a test step subnode to the Test the camera function of the mobile phone node, and then add an expected result subnode to the test step. Example:
- Prerequisite: The mobile phone provides a personalized photographing mode
- Step: Set the resolution to 800,000 pixels, and the mode to auto flash, auto ISO exposure, and motion
- Expected result: Successful
- Right-click the Test the camera function of the mobile phone. node and choose Generate Case from the shortcut menu to create a draft case. If
 is displayed on the node, the operation is successful. In this case, a draft case is generated. Click
  . The case details are displayed on the right of the page.
 - Right-click the node for which a case has been generated and choose Archive Case from the shortcut menu. The Archive Case window is displayed.
- On the left, select the test cases to be archived. On the right of the page, set Version, Case Library/Test Plan where the test case is to be stored, and Execution Mode, select a feature, and click Confirm. (The requirement selected during mind map creation is associated to this test case by default if you have subscribed to CodeArts Req.) If
 is displayed in the node, the operation is successful. You can find the test case on the Testing Case page. Click
  . The test case details page is displayed.
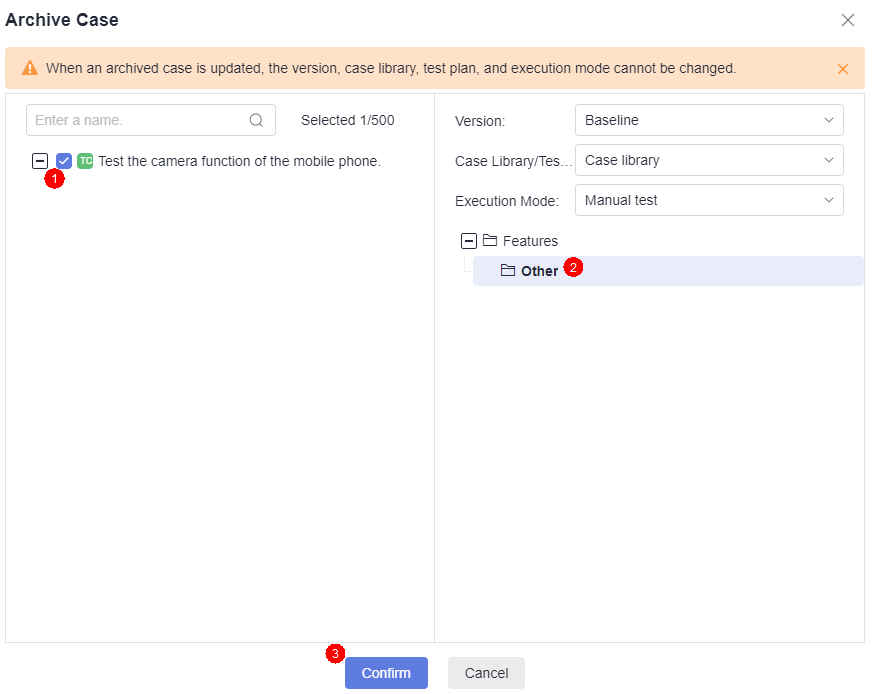
Generating Combinatorial Cases in Test Factor Center
To use the Test Factor Center function, create a factor library first. A project can have only one factor library. Go to the Testing Design page, and click Test Factor Center to access the factor library. You can create a test factor library either by creating new factors or importing existing ones.
Creating new factors
- Click the root directory in the factor library tree (create one if there is no library available), click
 , choose Create Directory, and enter a library name.
 - Click the directory and click Create Factor.
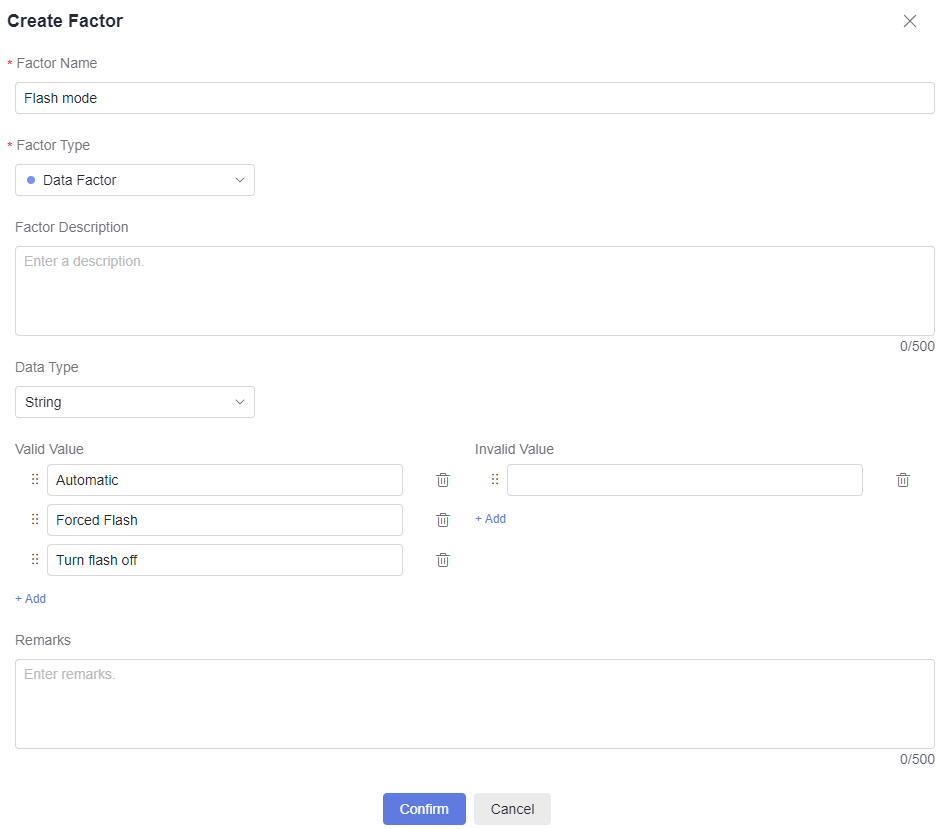
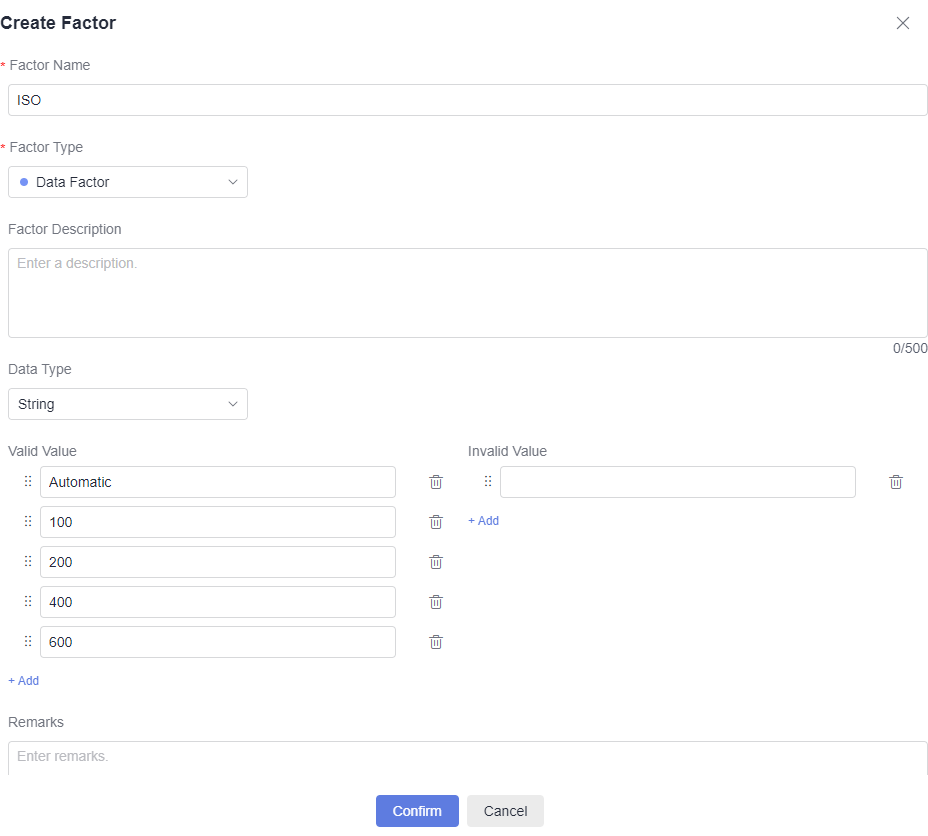
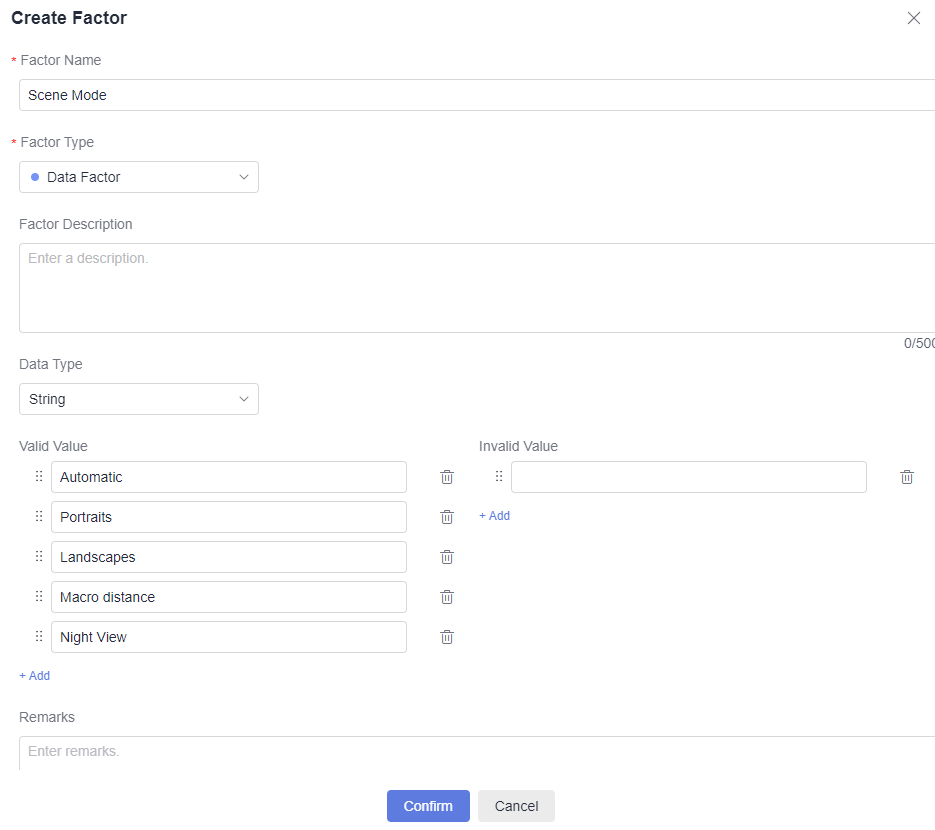
- Enter a factor name, set Factor Type to Data Factor, click Add, set valid values and invalid values for the factor, and click Confirm.
Configuration Item
Mandatory
Description
Factor Name
Yes
Name of a data factor (1–500 characters).
Factor Type
Yes
Default type: Data Factor.
Factor Description
No
Brief description of a data factor. Max. 500 characters.
Data Type
Yes
Default type: String.
Valid Value
No
Elements of a data factor. Click Add to add more valid values.
Invalid Value
No
Elements not supported by a data factor. Click Add to add more invalid values.
Remarks
No
Max. 500 characters.
For example, to test the camera function of a mobile phone, create data factors Pixels, Flash mode, ISO, and Scene mode, as shown in the following figures.

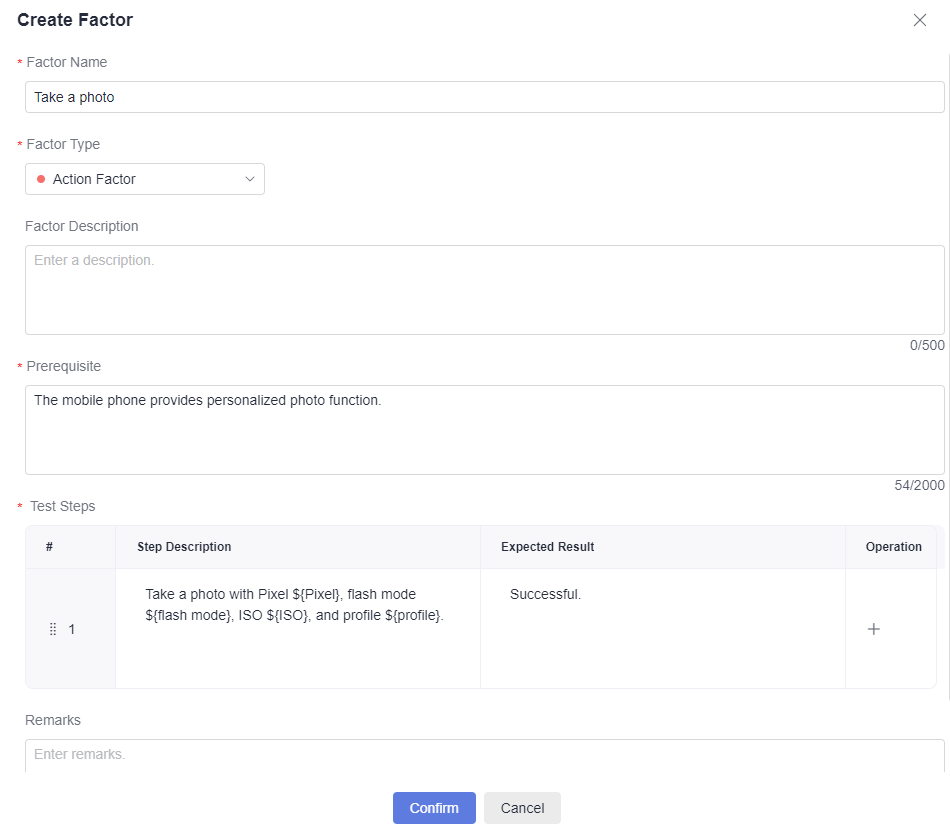
- To create an action factor, configure the following information and click Confirm.
Configuration Item
Mandatory
Description
Factor Name
Yes
Name of an action factor (1–500 characters).
Factor Type
Yes
Select Action Factor.
Factor Description
No
Brief description of a data factor. Max. 500 characters.
Prerequisite
Yes
Enter the prerequisites of an action factor. Max. 2,000 characters.
Test Steps
Yes
Enter the step description and expected result. In the Step Description column, use ${Data Factor} to invoke data factors. Click + in the Operation column to add a test step.
Remarks
No
Max. 500 characters.
For example, to test the camera function of a mobile phone, the action factor Take a photo may be set as shown in the figure below.
Importing existing factors
- Go to the test factor center, select a directory, and click Import.
- Click Download Template, edit the downloaded file on the local PC, and upload the file.
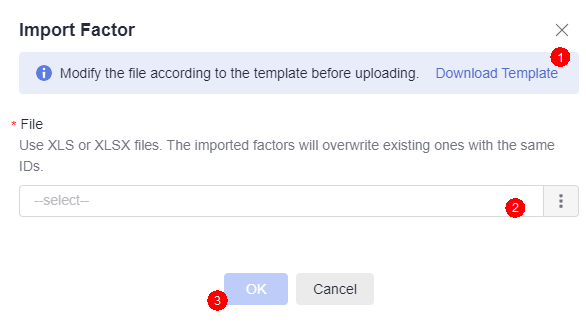
After the file is imported, directories and factor data configured in it are displayed in the factor library.
Generating cases in batches using test factors
- In the requirement tree, click a requirement, and click a mind map.
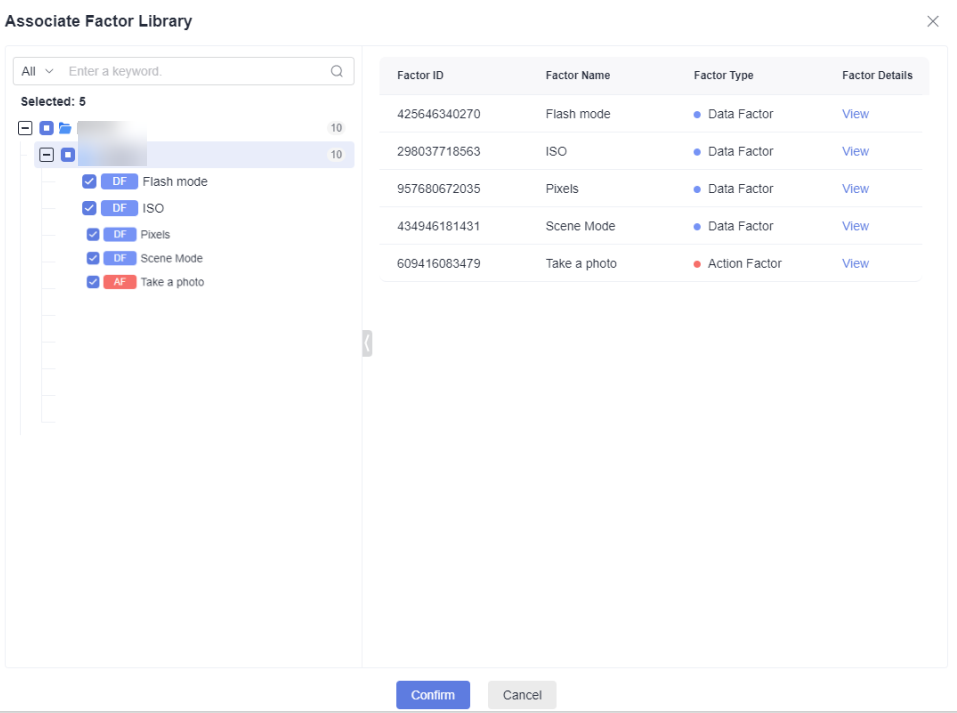
- Right-click a test point to be associated with the factor library, and choose Associate Factor Library from the shortcut menu.
- Select the target factor library directory, select useful factors, and click Confirm.
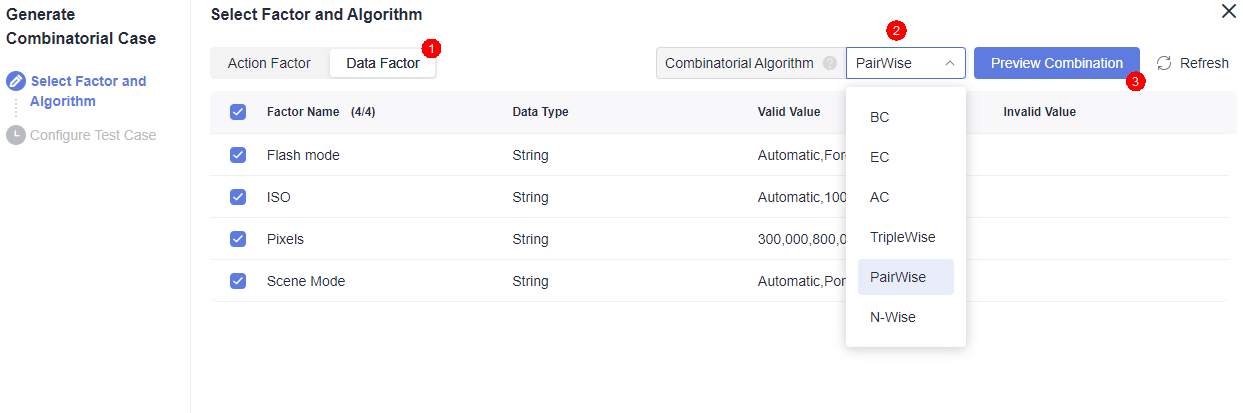
- Right-click the test point and choose Generate Combinatorial Case from the shortcut menu.
- Click Data Factor and select a combinatorial algorithm.
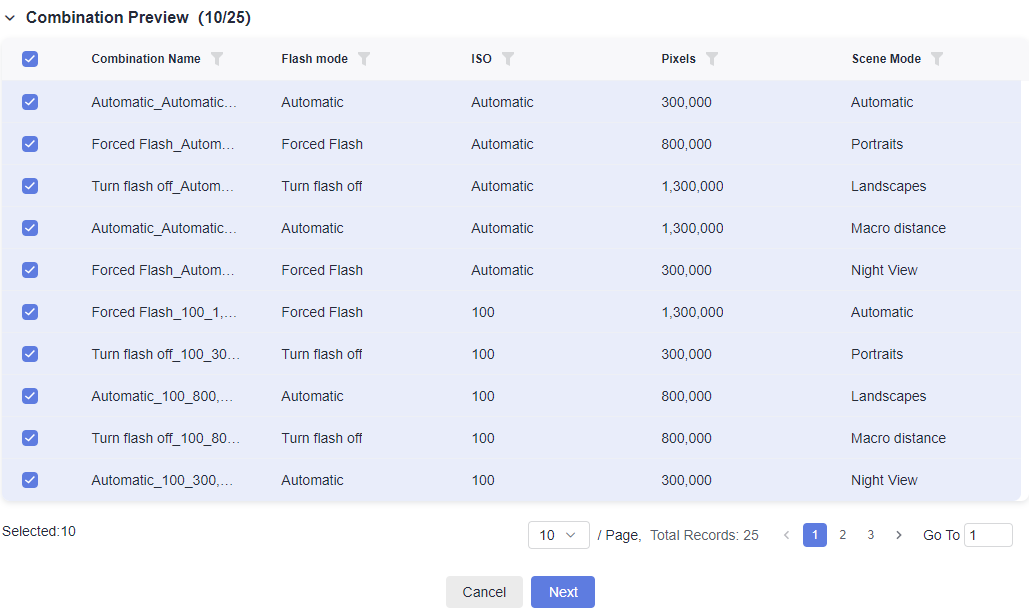
- Click Preview Combination to see the combinations. The following figure shows the combinations generated using the PairWise algorithm.
- Select combinations and click Next.
- The Configure Test Case page is displayed. Check the prerequisites, steps, and expected results of the action factor. Edit the information as required. Click Confirm to generate combinatorial cases.
- Click the case icon
 in the test point.
 - Select cases and click Archive Cases.
- On the left, select the test cases to be archived. On the right of the page, set Version, Case Library/Test Plan where the test case is to be stored, and Execution Mode, select a feature, and click Confirm. (The requirement selected during mind map creation is associated to this test case by default if you have subscribed to CodeArts Req.)
- Click
 in the upper left corner of the page. Choose to check the archived cases in the case list.
Feedback
Was this page helpful?
Provide feedbackThank you very much for your feedback. We will continue working to improve the documentation.See the reply and handling status in My Cloud VOC.
For any further questions, feel free to contact us through the chatbot.
Chatbot


